Tolman Creek Design
Joe Wizda
Karen Montgomery
David Futato
Robert Romano
Jessamyn Read
Copyright © 2007, 2005 O’Reilly Media
O’Reilly books may be purchased for educational, business, or sales
promotional use. Online editions are also available for most titles
(http://safari.oreilly.com). For
more information, contact our corporate/institutional sales department:
(800) 998-9938 or <corporate@oreilly.com>.
Nutshell Handbook, the Nutshell Handbook logo, and the O’Reilly logo are registered trademarks of O’Reilly Media, Inc. Asterisk™: The Future of Telephony, the image of starfish, and related trade dress are trademarks of O’Reilly Media, Inc. Asterisk™ is a trademark of Digium, Inc. Asterisk: The Future of Telephony is published under the Creative Commons “Commons Deed” license (http://creativecommons.org/licenses/by-nc-nd/2.5/ca/).
This book is dedicated to Rich Adamson (1947–2006).
Thanks for showing us the meaning of community.
Table of Contents
- Foreword
- Preface
- 1. A Telephony Revolution
- 2. Preparing a System for Asterisk
- 3. Installing Asterisk
- What Packages Do I Need?
- Obtaining the Source Code
- Menuselect
- Compiling Zaptel
- Compiling libpri
- Compiling Asterisk
- Installing Additional Prompts
- Common Compiling Issues
- Loading Asterisk and Zaptel Quickly
- Loading Zaptel Modules Without Scripts
- Loading libpri Without Script
- Starting Asterisk Without Scripts
- Directories Used by Asterisk
- AsteriskNOW™
- Conclusion
- 4. Initial Configuration of Asterisk
- What Do I Really Need?
- Working with Interface Configuration Files
- Setting Up the Dialplan for Some Test Calls
- FXO and FXS Channels
- Configuring an FXO Channel for a PSTN Connection
- Configuring an FXS Channel for an Analog Telephone
- Configuring SIP Telephones
- Connecting to a SIP Service Provider
- Connecting Two Asterisk Boxes Together via SIP
- Configuring an IAX Softphone
- Connecting to an IAX Service Provider
- Connecting Two Asterisk Boxes Together via IAX
- Using Templates in Your Configuration Files
- Debugging
- Conclusion
- 5. Dialplan Basics
- 6. More Dialplan Concepts
- 7. Understanding Telephony
- 8. Protocols for VoIP
- 9. The Asterisk Gateway Interface (AGI)
- 10. Asterisk Manager Interface (AMI) and Adhearsion
- The Manager Interface
- The Flash Operator Panel
- Asterisk Development with Adhearsion
- 11. The Asterisk GUI Framework
- 12. Relational Database Integration
- 13. Managing Your Asterisk System
- 14. Potpourri
- 15. Asterisk: The Future of Telephony
- A. VoIP Channels
- B. Application Reference
- AddQueueMember()
- ADSIProg()
- AgentCallbackLogin()
- AgentLogin()
- AgentMonitorOutgoing()
- AGI()
- AlarmReceiver()
- AMD()
- Answer()
- AppendCDRUserField()
- Authenticate()
- Background()
- BackgroundDetect()
- Busy()
- ChangeMonitor()
- ChanIsAvail()
- ChannelRedirect()
- ChanSpy()
- Congestion()
- ContinueWhile()
- ControlPlayback()
- DateTime()
- DBdel()
- DBdeltree()
- DeadAGI()
- Dial()
- Dictate()
- Directory()
- DISA()
- DumpChan()
- EAGI()
- Echo()
- EndWhile()
- Exec()
- ExecIf()
- ExitWhile()
- ExtenSpy()
- ExternalIVR()
- FastAGI()
- Festival()
- Flash()
- FollowMe()
- ForkCDR()
- GetCPEID()
- Gosub()
- GosubIf()
- Goto()
- GotoIf()
- GotoIfTime()
- Hangup()
- HasNewVoicemail()
- HasVoicemail()
- IAX2Provision()
- ICES()
- ImportVar()
- Log()
- LookupBlacklist()
- LookupCIDName()
- Macro()
- MacroExclusive()
- MacroExit()
- MacroIf()
- MailboxExists()
- MeetMe()
- MeetMeAdmin()
- MeetMeCount()
- Milliwatt()
- MixMonitor()
- Monitor()
- MorseCode()
- MP3Player()
- MusicOnHold()
- NBScat()
- NoCDR()
- NoOp()
- Page()
- Park()
- ParkAndAnnounce()
- ParkedCall()
- PauseMonitor()
- PauseQueueMember()
- Pickup()
- Playback()
- Playtones()
- PrivacyManager()
- Progress()
- Queue()
- QueueLog()
- Random()
- Read()
- ReadFile()
- RealTime
- RealTimeUpdate()
- Record()
- RemoveQueueMember()
- ResetCDR()
- RetryDial()
- Return()
- Ringing()
- SayAlpha()
- SayDigits()
- SayNumber()
- SayPhonetic()
- SayUnixTime()
- SendDTMF()
- SendImage()
- SendText()
- SendURL()
- Set()
- SetAMAFlags()
- SetCallerID()
- SetCallerPres()
- SetCDRUserField()
- SetGlobalVar()
- SetMusicOnHold()
- SetTransferCapability()
- SIPAddHeader()
- SIPDtmfMode()
- SLAStation()
- SLATrunk()
- SoftHangup()
- StackPop()
- StartMusicOnHold()
- StopMixMonitor()
- StopMonitor()
- StopPlaytones()
- StopMusicOnHold()
- System()
- Transfer()
- TryExec()
- TrySystem()
- UnpauseMonitor()
- UnpauseQueueMember()
- UserEvent()
- Verbose()
- VMAuthenticate()
- VoiceMail()
- VoiceMailMain()
- Wait()
- WaitExten()
- WaitForRing()
- WaitForSilence()
- WaitMusicOnHold()
- While()
- Zapateller()
- ZapBarge()
- ZapRAS()
- ZapScan()
- C. AGI Reference
- ANSWER
- CHANNEL STATUS
- DATABASE DEL
- DATABASE DELTREE
- DATABASE GET
- DATABASE PUT
- EXEC
- GET DATA
- GET FULL VARIABLE
- GET OPTION
- GET VARIABLE
- HANGUP
- NoOp
- RECEIVE CHAR
- RECORD FILE
- SAY ALPHA
- SAY DATE
- SAY DATETIME
- SAY DIGITS
- SAY NUMBER
- SAY PHONETIC
- SAY TIME
- SEND IMAGE
- SEND TEXT
- SET AUTOHANGUP
- SET CALLERID
- SET CONTEXT
- SET EXTENSION
- SET MUSIC ON
- SET PRIORITY
- SET VARIABLE
- STREAM FILE
- TDD MODE
- VERBOSE
- WAIT FOR DIGIT
- D. Configuration Files
- modules.conf
- adsi.conf
- adtranvofr.conf
- agents.conf
- alarmreceiver.conf
- alsa.conf
- amd.conf
- asterisk.conf
- cdr.conf
- cdr_manager.conf
- cdr_odbc.conf
- cdr_pgsql.conf
- cdr_tds.conf
- codecs.conf
- dnsmgr.conf
- dundi.conf
- enum.conf
- extconfig.conf
- extensions.conf
- extensions.ael
- features.conf
- festival.conf
- followme.conf
- func_odbc.conf
- gtalk.conf
- http.conf
- iax.conf
- iaxprov.conf
- indications.conf
- jabber.conf
- logger.conf
- manager.conf
- meetme.conf
- mgcp.conf
- modem.conf
- musiconhold.conf
- osp.conf
- oss.conf
- phone.conf
- privacy.conf
- queues.conf
- res_odbc.conf
- res_snmp.conf
- rpt.conf
- rtp.conf
- say.conf
- sip.conf
- sip_notify.conf
- skinny.conf
- sla.conf
- smdi.conf
- udptl.conf
- users.conf
- voicemail.conf
- vpb.conf
- zapata.conf
- zaptel.conf
- E. Asterisk Dialplan Functions
- AGENT
- ARRAY
- BASE64_DECODE
- BASE64_ENCODE
- BLACKLIST
- CALLERID
- CDR
- CHANNEL
- CHECK_MD5
- CHECKSIPDOMAIN
- CURL
- CUT
- DB
- DB_DELETE
- DB_EXISTS
- DUNDILOOKUP
- ENUMLOOKUP
- ENV
- EVAL
- EXISTS
- FIELDQTY
- FILTER
- GLOBAL
- GROUP
- GROUP_COUNT
- GROUP_LIST
- GROUP_MATCH_COUNT
- IAXPEER
- IF
- IFTIME
- ISNULL
- KEYPADHASH
- LANGUAGE
- LEN
- MATH
- MD5
- MUSICCLASS
- QUEUE_MEMBER_COUNT
- QUEUE_MEMBER_LIST
- QUEUE_WAITING_COUNT
- QUEUEAGENTCOUNT
- QUOTE
- RAND
- REALTIME
- REGEX
- SET
- SHA1
- SIP_HEADER
- SIPCHANINFO
- SIPPEER
- SORT
- SPEECH
- SPEECH_ENGINE
- SPEECH_GRAMMAR
- SPEECH_SCORE
- SPEECH_TEXT
- SPRINTF
- STAT
- STRFTIME
- STRPTIME
- TIMEOUT
- TXTCIDNAME
- URIDECODE
- URIENCODE
- VMCOUNT
- F. Asterisk Manager Interface Actions
- AbsoluteTimeout
- AgentCallbackLogin
- AgentLogoff
- Agents
- ChangeMonitor
- Command
- DBGet
- DBPut
- Events
- ExtensionState
- GetConfig
- GetVar
- Hangup
- IAXNetstats
- IAXPeers
- ListCommands
- Logoff
- MailboxCount
- MailboxStatus
- MeetmeMute
- MeetMeUnmute
- Monitor
- Originate
- Park
- ParkedCalls
- PauseMonitor
- Ping
- PlayDTMF
- QueueAdd
- QueuePause
- QueueRemove
- QueueStatus
- Queues
- Redirect
- SIPpeers
- SIPShowPeer
- SetCDRUserField
- SetVar
- Status
- StopMonitor
- UnpauseMonitor
- UpdateConfig
- UserEvent
- WaitEvent
- ZapDNDoff
- ZapDNDon
- ZapDialOffhook
- ZapHangup
- ZapRestart
- ZapShowChannels
- ZapTransfer
- G. An Example of func_odbc
- Hot-Desking (extensions.conf)
- Hot-Desking (func_odbc.conf)
- Hot-Desking (sip.conf)
- Index
List of Figures
- 2.1. Visual identification of PCI slots
- 2.2. One way you might connect a channel bank
- 3.1. Sample menuselect screen
- 3.2. List of modules to be built
- 3.3. Layers of device interaction with Asterisk
- 3.4. /var/spool/asterisk/ directory structure
- 4.1. A TDM400P with an FXS module (1 across) and an FXO module (2 across)
- 4.2. X-Lite configuration
- 4.3. X-Lite user configuration
- 4.4. SPA-942 keypad
- 4.5. SIP trunking topology
- 4.6. idefisk
- 4.7. idefisk Account Options screen
- 7.1. Tip and Ring
- 7.2. A simple sinusoidal (sine) wave
- 7.3. Sampling our sine wave using four bits
- 7.4. PCM encoded waveform
- 7.5. Plotted PCM signal
- 7.6. Delineated signal
- 7.7. The same waveform, on a higher-resolution overlay
- 7.8. The same waveform at double the resolution
- 7.9. Five-bit plotted PCM signal
- 7.10. Waveform delineated from five-bit PCM
- 7.11. Five-bit companding
- 7.12. Quantized and companded at 5-bit resolution
- 8.1. The SIP trapezoid
- 8.2. Call origination relationships of users, peers, and friends to Asterisk
- 10.1. The Flash Operator Panel management interface
- 11.1. A screenshot of the Asterisk GUI
- 12.1. Relationships between func_odbc.conf, res_odbc.conf, /etc/odbc.ini (unixODBC), and the database connection
- 15.1. Asterisk as a PBX gateway
- 15.2. Find-me-follow-me
- 15.3. VoIP-enabling a legacy PBX
- A.1. Trunking disabled
- A.2. Trunking enabled
List of Tables
- 2.1. System requirement guidelines
- 2.2. Sample test results for SIPp default scenario using simple Wait() and Playback() application; SIPp echoed media back to Asterisk
- 3.1. List of packages required to compile libpri, zaptel, and asterisk
- 3.2. Asterisk initialization script options
- 3.3. Zaptel initialization script options
- 7.1. DTMF digits
- 7.2. T-carrier circuits
- 7.3. OC circuits
- 8.1. Codec quick reference
Once upon a time, there was a boy
...with a computer
...and a phone.
This simple beginning begat much trouble!
It wasn’t that long ago that telecommunications, both voice and data, as well as software, were all proprietary products and services, controlled by one select club of companies that created the technologies, and another select club of companies who used the products to provide services. By the late 1990s, data telecommunications had been opened by the expansion of the Internet. Prices plummeted. New and innovative technologies, services, and companies emerged. Meanwhile, the work of free software pioneers like Richard Stallman, Linus Torvalds, and countless others was culminating in the creation of a truly open software platform called Linux (or GNU/Linux). However, voice communications, ubiquitous as they were, remained proprietary. Why? Perhaps it was because voice on the old public telephone network lacked the glamor and promise of the shiny new World Wide Web. Or, perhaps it was because a telephone just wasn’t as effective at supplying adult entertainment. Whatever the reason, one thing was clear. Open source voice communications was about as widespread as open source copy protection software.
Necessity (and in some cases simply being cheap) is truly the mother of invention. In 1999, having started Linux Support Services to offer free and commercial technical support for Linux, I found myself in need (or at least in perceived need) of a phone system to assist me in providing 24-hour technical support. The idea was that people would be able to call in, enter their customer identity, and leave a message. The system would in turn page a technician to respond to the customer’s request in short order. Since I had started the company with about $4,000 of capital, I was in no position to be able to afford a phone system of the sort that I needed to implement this scenario. Having already been a Linux user since 1994, and having already gotten my feet wet in open source software development by starting l2tpd, Gaim, and cheops, and in the complete absence of anyone having explained the complexity of such a task, I decided that I would simply make my own phone system using hardware borrowed from Adtran, where I had worked as a co-op student. Once I got a call into a PC, I fantasized, I could do anything with it. In fact, it is from this conjecture that the official Asterisk motto (which any sizable, effective project must have) is derived:
It’s only software!
For better or worse, I rarely think small. Right from the start, it
was my intent that Asterisk would do everything related
to telephony. The name “Asterisk” was chosen because it was both a key on a
standard telephone and also the wildcard symbol in Linux (e.g., rm -rf *).
So, in 1999, I had a free telephony platform I’d put out on the Web and I went about my business trying to eke out a living at providing Linux technical support. However, by 2001, as the economy was tanking, it became apparent that Linux Support Services might do better by pursuing Asterisk than general-purpose Linux technical support. That year, we would make contact with Jim “Dude” Dixon of the Zapata Telephony project. Dude’s exciting work was a fantastic companion to Asterisk and provided a business model for us to start pursuing Asterisk with more focus. After creating our first PCI telephony interface card in conjunction with Dude, it became clear that “Linux Support Services” was not the best name for a telephony company, and so we changed the name to “Digium,” which is a whole other story that cannot be effectively conveyed in writing. Enter the expansion of Voice over IP (VoIP) with its disruptive transition of voice from the old, circuit-switched networks to new IP-based networks, and things really started to take hold.
Now, as we’ve already covered, clearly most people don’t get very excited about telephones. Certainly, few people could share my excitement the moment I heard a dial tone coming from a phone connected to my PC. However, those who do get excited about telephones get really excited about telephones. And facilitated by the Internet, this small group of people were now able to unite and apply our bizarre passions to a common, practical project for the betterment of many.
To say that telecom was ripe for an open source solution would be an immeasurable understatement. Telecom is an enormous market due to the ubiquity of telephones in work and personal life. The direct market for telecom products has a highly technical audience that is willing and able to contribute. People demand their telecom solutions be infinitely customizable. Proprietary telecom is very expensive. Creating Asterisk was simply the spark in this fuel-rich backdrop.
Asterisk sits at the apex of a variety of transitions (proprietary → open source; circuit switched → VoIP; voice only → voice, video, and data; digital signal processing → host media processing; centralized directory → peer to peer) while easing those transitions by providing bridges back to the older ways of doing things. Asterisk can talk to anything from a 1960s-era pulse-dial phone to the latest wireless VoIP devices, and provide features from simple tandem switching all the way to Bluetooth presence and DUNDi.
Most important of all, though, Asterisk demonstrates how a community of motivated people and companies can work together to create a project with a scope so significant that no one person or company could have possibly created it on its own. In making Asterisk possible, I particularly would like to thank Linus Torvalds, Richard Stallman, the entire Asterisk community, and whoever invented Red Bull.
So where is Asterisk going from here? Think about the history of the PC. When it was first introduced in 1980, it had fairly limited capabilities. Maybe you could do a spreadsheet, maybe do some word processing, but in the end, not much. Over time, however, its open architecture led to price reductions and new products allowing it to slowly expand its applications, eventually displacing the mini computer, then the mainframe. Now, even Cray supercomputers are built using Linux-based x86 architectures. I anticipate that Asterisk’s future will look very similar. Today, there is a large subset of telephony that is served by Asterisk. Tomorrow, who knows what the limit might be?
So, what are you waiting for? Read, learn, and participate in the future of open telecommunications by joining the Asterisk revolution!
—Mark Spencer
Table of Contents
This is a book for anyone who is new to Asterisk™.
Asterisk is an open source, converged telephony platform, which is designed primarily to run on Linux. Asterisk combines more than 100 years of telephony knowledge into a robust suite of tightly integrated telecommunications applications. The power of Asterisk lies in its customizable nature, complemented by unmatched standards compliance. No other PBX can be deployed in so many creative ways.
Applications such as voicemail, hosted conferencing, call queuing and agents, music on hold, and call parking are all standard features built right into the software. Moreover, Asterisk can integrate with other business technologies in ways that closed, proprietary PBXes can scarcely dream of.
Asterisk can appear quite daunting and complex to a new user, which is why documentation is so important to its growth. Documentation lowers the barrier to entry and helps people contemplate the possibilities.
Produced with the generous support of O’Reilly Media, Asterisk: The Future of Telephony was inspired by the work started by the Asterisk Documentation Project. We have come a long way, and this book is the realization of a desire to deliver documentation that introduces the most fundamental elements of Asterisk—the things someone new to Asterisk needs to know. It is the first volume in what we are certain will become a huge library of knowledge relating to Asterisk.
This book was written for, and by, the Asterisk community.
This book is for those new to Asterisk, but we assume that you’re familiar with basic Linux administration, networking, and other IT disciplines. If not, we encourage you to explore the vast and wonderful library of books that O’Reilly publishes on these subjects. We also assume you’re fairly new to telecommunications, both traditional switched telephony and the new world of Voice over IP.
The book is organized into these chapters:
- Chapter 1, A Telephony Revolution
This is where we chop up the kindling and light the fire. Asterisk is going to change the world of telecom, and this is where we discuss our reasons for that belief.
- Chapter 2, Preparing a System for Asterisk
Covers some of the engineering considerations you should have in mind when designing a telecommunications system. Much of this material can be skipped if you want to get right to installing, but these are important concepts to understand, should you ever plan on putting an Asterisk system into production.
- Chapter 3, Installing Asterisk
Covers the obtaining, compiling, and installation of Asterisk.
- Chapter 4, Initial Configuration of Asterisk
Describes the initial configuration of Asterisk. Here we will cover the important configuration files that must exist to define the channels and features available to your system.
- Chapter 5, Dialplan Basics
Introduces the heart of Asterisk, the dialplan.
- Chapter 6, More Dialplan Concepts
Goes over some more advanced dialplan concepts.
- Chapter 7, Understanding Telephony
Taking a break from Asterisk, this chapter discusses some of the more important technologies in use in the Public Telephone Network.
- Chapter 8, Protocols for VoIP
Following the discussion of legacy telephony, this chapter discusses Voice over Internet Protocol.
- Chapter 9, The Asterisk Gateway Interface (AGI)
Introduces one of the more amazing components, the Asterisk Gateway Interface. Using Perl, PHP, and Python, we demonstrate how external programs can be used to add nearly limitless functionality to your PBX.
- Chapter 10, Asterisk Manager Interface (AMI) and Adhearsion
Describes how external applications can connect to Asterisk to manipulate or monitor various aspects of the system. Also included in this chapter is a gentle introduction to the Adhearsion framework.
- Chapter 11, The Asterisk GUI Framework
The Asterisk GUI Framework, new in Asterisk 1.4, is a framework system that allows web developers to create graphical interfaces with minimal interference to the standard configuration files.
- Chapter 12, Relational Database Integration
Walks you through setting up Asterisk to work with ODBC databases.
- Chapter 13, Managing Your Asterisk System
Discusses issues regarding how to best manage your Asterisk phone system, including CDR, logs, and prompts.
- Chapter 14, Potpourri
Briefly covers what is, in fact, a rich and varied cornucopia of incredible features and functions—all part of the Asterisk phenomenon.
- Chapter 15, Asterisk: The Future of Telephony
Predicts a future where open source telephony completely transforms an industry desperately in need of a revolution.
- Appendix A, VoIP Channels, VoIP Channels
- Appendix B, Application Reference, Application Reference
- Appendix C, AGI Reference, AGI Reference
- Appendix D, Configuration Files, Configuration Files
- Appendix E, Asterisk Dialplan Functions, Asterisk Dialplan Functions
- Appendix F, Asterisk Manager Interface Actions, Asterisk Manager Interface Actions
- Appendix G, An Example of func_odbc, An Example of func_odbc
This book is focused on documenting Asterisk Version 1.4; however, many of the conventions and information in this book are version-agnostic. Linux is the operating system we have run and tested Asterisk on, with a leaning toward Red Hat syntax. We decided that while Red Hat–based distributions may not be the preferred choice of everyone, their layout and utilities are nevertheless familiar to many experienced Linux administrators.
The following typographical conventions are used in this book:
- Italic
Indicates new terms, URLs, email addresses, filenames, file extensions, pathnames, directories, and Unix utilities.
-
Constant
        width
Indicates commands, options, parameters, and arguments that must be substituted into commands.
-
Constant width
        bold
Shows commands or other text that should be typed literally by the user. Also used for emphasis in code.
-
Constant width italic Shows text that should be replaced with user-supplied values.
-
[ Keywords and other stuff
        ]
Indicates optional keywords and arguments.
-
{ choice-1 | choice-2
        }
Signifies either choice-1 or choice-2.
This book is here to help you get your job done. In general, you may use the code in this book in your programs and documentation. You do not need to contact us for permission unless you’re reproducing a significant portion of the code. For example, writing a program that uses several chunks of code from this book does not require permission. Selling or distributing a CD-ROM of examples from O’Reilly books does require permission. Answering a question by citing this book and quoting example code does not require permission. Incorporating a significant amount of example code from this book into your product’s documentation does require permission.
We appreciate, but do not require, attribution. An attribution usually includes the title, author, publisher, and ISBN. For example: “Asterisk: The Future of Telephony, Second Edition, by Jim Van Meggelen, Leif Madsen, and Jared Smith. Copyright 2007 O’Reilly Media, Inc., 978-0-596-51048-0.”
If you feel your use of code examples falls outside fair use or the
permission given above, feel free to contact us at
<permissions@oreilly.com>.
Note
When you see a Safari® Books Online icon on the cover of your favorite technology book, that means the book is available online through the O’Reilly Network Safari Bookshelf.
Safari offers a solution that’s better than e-books. It’s a virtual library that lets you easily search thousands of top tech books, cut and paste code samples, download chapters, and find quick answers when you need the most accurate, current information. Try it for free at http://safari.oreilly.com.
Please address comments and questions concerning this book to the publisher:
| O’Reilly Media, Inc. |
| 1005 Gravenstein Highway North |
| Sebastopol, CA 95472 |
| (800) 998-9938 (in the United States or Canada) |
| (707) 829-0515 (international or local) |
| (707) 829-0104 (fax) |
We have a web page for this book, where we list errata, examples, and any additional information. You can access this page at:
| http://www.oreilly.com/catalog/9780596510480 |
To comment or ask technical questions about this book, send email to:
<bookquestions@oreilly.com>
|
For more information about our books, conferences, Resource Centers, and the O’Reilly Network, see our web site at:
| http://www.oreilly.com |
Firstly, we have to thank our fantastic editor Michael Loukides, who offered invaluable feedback and found incredibly tactful ways to tell us to rewrite a section (or chapter) when it was needed, and have us think it was our idea. Mike built us up when we were down, and brought us back to earth when we got uppity. You are a master, Mike, and seeing how many books have received your editorial oversight contributes to an understanding of why O’Reilly Media is the success that it is.
Thanks also to Sanders Kleinfeld, our copy editor, Laurel Ruma, our production editor, and the rest of the unsung heroes in O’Reilly’s production department. These are the folks that take our book and make it an O’Reilly book.
Everyone in the Asterisk community needs to thank Jim Dixon for creating the first open source telephony hardware interfaces, starting the revolution, and giving his creations to the community at large.
Thanks to Tim O’Reilly, for giving us a chance to write this book.
To our most generous and merciless review team:
Rich Adamson, President of Network Partners Inc., for your encyclopedic knowledge of the PSTN, and your tireless willingness to share your experience. Your generosity, even in the face of daunting challenge, is inspiring to us all.[1]
Tilghman Lesher, for an incredibly thorough review of our book, contributing some much needed time toward Appendixes B and F, in addition to some amazing new Asterisk applications and functions.
Andrew Kohlsmith, for helping to write the IMAP voicemail storage section in Chapter 14, Potpourri.
David Troy, for providing a technical review, for AstManProxy, and for porting Asterisk to the Roomba (first PBX to run on a vacuum cleaner!).
Matthew Gast, fellow O’Reilly author, for reading our book from cover to cover, and then giving us a comprehensive review, and also for T1, The Definitive Guide.
Dr. Edward Guy III, for your comprehensive and razor-sharp evaluation of each and every chapter of the first edition, and for your championing of Asterisk.
Kristian Kielhofner, President, KrisCompanies, and creator of AstLinux, for the most excellent AstLinux distribution.
Russell Bryant, for your rapid and helpful responses to our questions.
Joshua Colp, for helping us with performance tweaking, and still more questions.
Kevin Fleming, for raising the bar, and for being a class act, respected (dare we say loved) by all.
Brian Capouch, for talking about what is possible, and then going out there and doing it.
Stephen Uhler, for championing the port of Zaptel to Solaris, and for giving us some golden examples.
Jason Parker, for not being a newb.
Ekke Loo, for beating up the database chapter.
Ian Darwin, for tweaking some of the verbiage for us, and for the cherry-red rotary dial phone (that works with Asterisk!).
Joel Sisko, CEO, iConverged, for your comprehensive telecom and wiring knowledge.
Finally, and most importantly, thanks go to Mark Spencer for Gaim (recently renamed Pidgin, www.pidgin.im), Asterisk, and DUNDi, and for contributing his creations to the open source community.
For me, it all started in the spring of 2004, sitting at my desk in the technical support department of the telecom company I’d worked at for nearly 15 years. With no challenges to properly exercise the skills I had developed, I spent my time trying to figure out what the rest of my career was going to look like. The telecommunications industry had fallen from the pedestal of being a darling of investors to being a joke known to even the most uninformed. I was supposed to feel fortunate to be one of the few who still had work, but what thankless, purposeless work it was. We knew why our industry had collapsed: the products we sold could not hope to deliver the solutions our customers required—even though the industry promised that they could. They lacked flexibility, and were priced totally out of step with the functionality they were delivering (or, more to the point, were failing to deliver). Nowhere in the industry were there any signs this was going to change any time soon.
I had been dreaming of an open source PBX for many long years, but I really didn’t know how such a thing could ever come to be—I’d given up on the idea several years before. I knew that to be successful, an open source PBX would need to effectively bridge the worlds of legacy and network-based telecom. I always failed to find anything that seemed ready.
Then, one fine day in spring, I half-heartedly seeded a Google search with the phrase “open source telephony,” and discovered a bright new future for telecom: Asterisk, the open source Linux PBX.[2]
There it was: the very thing I’d been dreaming of for so many years. I had no idea how I was going to contribute, but I knew this: open source telephony was going to cause a necessary and beneficial revolution in the telecom industry, and one way or another, I was going to be a part of it.
For me, more of a systems integrator than developer, I needed a way to contribute to the community. There didn’t seem to be a shortage of developers, but there sure was a shortage of documentation. This sounded like something I could do. I knew how to write, I knew PBXes, and I desperately needed to talk about this phenomenon that suddenly made telecom fun again.
If I contribute only one thing to this book, I hope you will catch some of my enthusiasm for the subject of open source telephony. This is an incredible gift we have been given, but also an incredible responsibility. What a wonderful challenge. What a cosmic opportunity. What delicious fun!
First of all, I need to thank Leif and Jared for inviting me to join the Asterisk Documentation Project. I have immensely enjoyed working with both of you, and I am constantly amazed at how well our personalities and skills complement each other. A truly balanced team, are we. Also, thanks goes to Figment for all the typing.
To my wife Killi, and my children Kaara, Joonas, and Joosep (who always remember to visit me when I disappear into my underground lair for too long): you are a source of inspiration to me. Your love is the fuel that feeds my fire, and I thank you.
Obviously, I need to thank my parents, Jack and Martiny, for always believing in me, no matter how many rules I broke. In a few years, I’ll have my own teenagers, and it’ll be your turn to laugh!
To Mark Spencer: thanks for all of the things that everybody else thanks you for, but also, personally, thanks for giving generously of your time to the Asterisk community. The Toronto Asterisk Users’ Group (http://www.taug.ca) made a quantum leap forward as a result of your taking the time to speak to us, and that event will forever form a part of our history. Oh yeah, and thanks for the beers, too. :-)
Finally, thanks to the Asterisk Community. This book is our gift to you. We hope you enjoy reading it as much as we’ve enjoyed writing it.
The road to this book is a long one—nearly three years in the making. Back when I started using Asterisk, possibly much like you, I didn’t know anything about Asterisk, very little about traditional telephony, and even less about Voice over IP. I delved right into this new and very exciting world and took in all I could. For two months during a co-op term, for which I couldn’t immediately find work, I absorbed as much as I could, asking questions, trying things and seeing what the system could do. Unfortunately very little to no documentation existed for Asterisk, aside from some dialplan examples I was able to find by John Todd, and having questions answered by Brian K. West on IRC. Of course, this method wasn’t going to scale.
Not being much of a coder, I wanted to contribute something back to the community, and what do coders hate doing more than anything? Documentation! So I started The Asterisk Documentation Assignment (TADA), a basic outline with some information for the beginnings of a book.
Shortly after releasing it on my web site, an intelligent fellow by the name of Jared Smith introduced himself. He had similar aspirations for creating a “dead-tree” format book for the community, and we humbly started the Asterisk Documentation Project. Jared set up a simple web site at http://www.asteriskdocs.org, a CVS server, and the very first DocBook-formatted version of a book for Asterisk. From there we started filling in information, and soon had information submitted by a number of members of the community.
In June of 2004, an animated chap by the name of Jim Van Meggelen started showing up on the mailing lists, and contributing lots of information and documentation—this was definitely a guy we wanted on our team! Jim had the vision and the drive to really get Jared’s and my butts in gear and to work on something grander. Jim brought us years of experience and a writing flair that we could have hardly imagined.
With the core documentation team established, we embarked on a plan for the creation of volumes of Asterisk knowledge, eventually to lead to a complete library and a wealth of information. This book is essentially the beginning of that dream.
Firstly and mostly, I have to thank my parents, Rick and Carol, for always supporting my efforts, allowing me to realize my dreams, and always putting my needs ahead of theirs. Without their vision, understanding, and insight into the future, it would have been impossible to have accomplished what I have. I love you both very much!
I’d like to thank Felix Carapaica and Bill Farkas of the Sheridan Institute of Technology for their dedication to the advancement of knowledge. Their teaching has complemented my prior learning, and has allowed me to expand my understanding of routing and telecommunications exponentially.
There are far too many people to thank individually, but of particular importance, the following people were, and are, the most influential to my understanding of Asterisk: Joshua Colp, Tilghman Lesher, Russell Bryant, Steve Murphy, Olle Johansson, Steven Sokol, Brian K. West, John Todd, and William Suffill, for my very first VoIP phone (which I use to this day!). And for those who I said I’d mention in the book…thanks!
And of course, I must thank Jared Smith and Jim Van Meggelen for having the vision and understanding of how important documentation really is—all of this would have been impossible without you.
I first started working with Asterisk in the spring of 2002. I had recently started a new job with a market research company, and ended up taking a long road trip to a remote call center with the CIO. On the long drive home we talked about innovation in telephony, and he mentioned a little open source telephony project he had heard of called Asterisk. Over the next few months, I was able to talk the company into buying a developer’s kit from Digium and started playing with Asterisk on company time.
During the next few months, I became more and more involved with the Asterisk community. I read the mailing lists. I scoured the archives. I hung out in the IRC channel, just hoping to find nuggets of Asterisk knowledge. As time went on, I was finally able to figure out enough to get Asterisk up and running.
That’s when the real fun began.
With the help of the CIO and the approval of the CEO, we moved forward with plans to move our entire telecom infrastructure to Asterisk, including our corporate office and all of our remote call centers. Along the way, we ran into a lot of uncharted territory, and I began thinking about creating a good repository of Asterisk knowledge. Over the course of the project, we were able to do some really innovative things, such as invent IAX trunking!
When all was said and done, we ended up with around forty Asterisk servers spread across many different geographical locations, all communicating with each other to provide a cohesive enterprise-class VoIP phone system. This system currently handles approximately 1 million minutes of calls per month, serves several hundred employees, connects to 27 voice T1s, and saves the company around $20,000 (USD) per month on their telecom costs. In short, our Asterisk project was a resounding success!
While in the middle of implementing this project, I met Leif in one of the Asterisk IRC channels. We talked about ways we could help out new Asterisk users and lower the barrier to entry, and we decided to push ahead with plans to more fully document Asterisk. I really wanted some good documentation in “dead-tree” format —basically a book that a new user could pick up and learn the basics of Asterisk. About that same time, the number of new users on the Asterisk mailing lists and in the IRC channels grew tremendously, and we felt that writing an Asterisk book would greatly improve the signal-to-noise ratio. The Asterisk Documentation Project was born! The rest, they say, is history.
Since then, we’ve been writing Asterisk documentation. I never thought it would be this arduous, yet rewarding. (I joked with Leif and Jim that it might be easier and less controversial to write an in-depth tome called Religion, Gun Control, and Sushi than cover everything that Asterisk has to offer in sufficient detail!) What you see here is a direct result of a lot of late nights and long weekends spent helping the Asterisk community—after all, it’s the least we could do, considering what Asterisk has given to us. We hope it will inspire other members of the Asterisk community to help document changes and new features for the benefit of all involved.
Now to thank some people:
First of all, I’d like to thank my beautiful wife. She’s put up with a lot of lonely nights while I’ve been slaving away at the keyboard, and I’d like her to know how much I appreciate her and her endless support. I’d also like to thank my kids for doing their best to remind me of the important things in life. I love you!
To my parents: thanks for everything you’ve done to help me stretch and grow and learn over the years. You’re the best parents a person could ask for.
To Dave Carr and Michael Lundberg: thanks for letting me learn Asterisk on company time. Working with both of you was truly a pleasure. May God smile upon you and grant you success and joy in all you do.
To Leif and Jim: thanks for putting up with my stupid jokes, my insistence that we do things “the right way,” and my crazy schedule. Thanks for pushing me along, and making me a better writer. I’ve really enjoyed working with you two, and hope to collaborate with you on future projects!
To Mark Spencer: thank you for your continued support and dedication and friendship. You’ve been an invaluable resource to our effort, and I truly believe that you’ve started a revolution in the world of telephony. You’re always welcome in my home and at my dinner table!
To the other great people at Digium: thank you for your help and support. We’re especially thankful for your willingness to give us more insight into the Asterisk code, and for donating hardware so that we can better document the Asterisk Developer’s Kit.
To Steven Sokol, Steven Critchfield, Olle E. Johansson, and all the others who have contributed to the Asterisk Documentation Project and to this book: thank you! We couldn’t have done it without your help and suggestions.
[1] In December of 2006, Rich passed away, as his two-year battle with cancer came to an unfortunate end. Rich was posting on the Asterisk Users mailing list as late as November of that year. He was giving to the community right up until the end, which is why we dedicated this book to him.
[2] To get a sense of how big the Asterisk phenomenon is, type “PBX” into Google. As you look at the results, bear in mind that the traditional PBX industry represents billions of dollars. The big players are companies such as Avaya, Nortel, Siemens, Mitel, Cisco, NEC, and many, many more. It is somewhat telling that they don’t seem to be concerned about how they rank in a Google search. As a cultural barometer, we’re pretty sure this matters.
Table of Contents
It does not require a majority to prevail, but rather an irate, tireless minority keen to set brush fires in people’s minds.
An incredible revolution is under way. It has been a long time in coming, but now that it has started, there will be no stopping it. It is taking place in an area of technology that has lapsed embarrassingly far behind every other industry that calls itself high-tech. The industry is telecommunications, and the revolution is being fueled by an open source Private Branch eXchange (PBX) called Asterisk™.
Telecommunications is arguably the last major electronics industry that has remained untouched by the open source revolution.[3] Major telecommunications manufacturers still build ridiculously expensive, incompatible systems, running complicated, ancient code on impressively engineered yet obsolete hardware.
As an example, Nortel’s Business Communications Manager kludges together a 15 year-old Key Telephone Switch and a 1.2 GHz Celeron PC.[4] All this can be yours for between $5,000 and $15,000, not including telephones. If you want it to actually do anything interesting, you’ll have to pay extra licensing fees for closed, limited-functionality, shrink-wrapped applications. Customization? Forget it—it’s not in the plan. Future technology and standards compliance? Give them a year or two—they’re working on it.
All of the major telecommunications manufacturers offer similar-minded products. They don’t want you to have flexibility or choice; they want you to be locked in to their product cycles.
Asterisk changes all of that. With Asterisk, no one is telling you how your phone system should work, or what technology you are limited to. If you want it, you can have it. Asterisk lovingly embraces the concept of standards compliance, while also enjoying the freedom to develop its own innovations. What you choose to implement is up to you—Asterisk imposes no limits.
Naturally, this incredible flexibility comes with a price: Asterisk is not a simple system to configure. This is not because it’s illogical, confusing, or cryptic; to the contrary, it is very sensible and practical. People’s eyes light up when they first see an Asterisk dialplan and begin to contemplate the possibilities. But when there are literally thousands of ways to achieve a result, the process naturally requires extra effort. Perhaps it can be compared to building a house: the components are relatively easy to understand, but a person contemplating such a task must either a) enlist competent help or b) develop the required skills through instruction, practice, and a good book on the subject.
While Voice over IP (VoIP) is often thought of as little more than a method of obtaining free long-distance calling, the real value (and—let’s be honest—challenge as well) of VoIP is that it allows voice to become nothing more than another application in the data network.
It sometimes seems that we’ve forgotten that the purpose of the telephone is to allow people to communicate. It is a simple goal, really, and it should be possible for us to make it happen in far more flexible and creative ways than are currently available to us. Since the industry has demonstrated an unwillingness to pursue this goal, a large community of passionate people have taken on the task.
The challenge comes from the fact that an industry that has changed very little in the last century shows little interest in starting now.
The Zapata Telephony Project was conceived of by Jim Dixon, a telecommunications consulting engineer who was inspired by the incredible advances in CPU speeds that the computer industry has now come to take for granted. Dixon’s belief was that far more economical telephony systems could be created if a card existed that had nothing more on it than the basic electronic components required to interface with a telephone circuit. Rather than having expensive components on the card, Digital Signal Processing (DSP)[5] would be handled in the CPU by software. While this would impose a tremendous load on the CPU, Dixon was certain that the low cost of CPUs relative to their performance made them far more attractive than expensive DSPs, and, more importantly, that this price/performance ratio would continue to improve as CPUs continued to increase in power.
Like so many visionaries, Dixon believed that many others would see this opportunity, and that he merely had to wait for someone else to create what to him was an obvious improvement. After a few years, he noticed that not only had no one created these cards, but it seemed unlikely that anyone was ever going to. At that point it was clear that if he wanted a revolution, he was going to have to start it himself. And so the Zapata Telephony Project was born:
Since this concept was so revolutionary, and was certain to make a lot of waves in the industry, I decided on the Mexican revolutionary motif, and named the technology and organization after the famous Mexican revolutionary Emiliano Zapata. I decided to call the card the “tormenta” which, in Spanish, means “storm,” but contextually is usually used to imply a big storm, like a hurricane or such.[6]
Perhaps we should be calling ourselves Asteristas. Regardless, we owe Jim Dixon a debt of thanks, partly for thinking this up and partly for seeing it through, but mostly for giving the results of his efforts to the open source community. As a result of Jim’s contribution, Asterisk’s Public Switched Telephone Network (PSTN) engine came to be.
The most successful key telephone system in the world has a design limitation that has survived 15 years of users begging for what appears to be a simple change: when you determine the number of times your phone will ring before it forwards to voicemail, you can choose from 2, 3, 4, 6, or 10 ring cycles. Have you any idea how many times people ask for five rings? Plead as the customers might, the manufacturers of this system cannot get their head around the idea that this is a problem. That’s the way it works, they say, and users need to get over it.
Another example from the same system is that the name you program on your set can only be seven characters in length.[7] Back in the late 1980s, when this particular system was designed, RAM was very expensive, and storing those seven characters for dozens of sets represented a huge hardware expense. So what’s the excuse today? None. Are there any plans to change it? Hardly—the issue is not even officially acknowledged as a problem.
Those are just two examples; the industry is rife with them.
Now, it’s all very well and good to pick on one system, but the reality is that every PBX in existence suffers shortcomings. No matter how fully featured it is, something will always be left out, because even the most feature-rich PBX will always fail to anticipate the creativity of the customer. A small group of users will desire an odd little feature that the design team either did not think of or could not justify the cost of building, and, since the system is closed, the users will not be able to build it themselves.
If the Internet had been thusly hampered by regulation and commercial interests, it is doubtful that it would have developed the wide acceptance it currently enjoys. The openness of the Internet meant that anyone could afford to get involved. So, everyone did. The tens of thousands of minds that collaborated on the creation of the Internet delivered something that no corporation ever could have.
As with many other open source projects, such as Linux and the Internet, the development of Asterisk was fueled by the dreams of folks who knew that there had to be something more than what the industry was producing. The strength of the community is that it is composed not of employees assigned to specific tasks, but rather of folks from all sorts of industries, with all sorts of experiences, and all sorts of ideas about what flexibility means, and what openness means. These people knew that if one could take the best parts of various PBXes and separate them into interconnecting components—akin to a boxful of LEGO bricks—one could begin to conceive of things that would not survive a traditional corporate risk-analysis process. While no one can seriously claim to have a complete picture of what this thing should look like, there is no shortage of opinions and ideas.[8]
Many people new to Asterisk see it as unfinished. Perhaps these people can be likened to visitors to an art studio, looking to obtain a signed, numbered print. They often leave disappointed, because they discover that Asterisk is the blank canvas, the tubes of paint, the unused brushes waiting.[9]
Even at this early stage in its success, Asterisk is nurtured by a greater number of artists than any other PBX. Most manufacturers dedicate no more than a few developers to any one product; Asterisk has scores. Most proprietary PBXes have a worldwide support team comprised of a few dozen real experts; Asterisk has hundreds.
The depth and breadth of the expertise that surrounds this product is unmatched in the telecom industry. Asterisk enjoys the loving attention of old Telco guys who remember when rotary dial mattered, enterprise telecom people who recall when voicemail was the hottest new technology, and data communications geeks and coders who helped build the Internet. These people all share a common belief—that the telecommunications industry needs a proper revolution.[10]
Telecommunications companies who choose to ignore Asterisk do so at their peril. The flexibility it delivers creates possibilities that the best proprietary systems can scarcely dream of. This is because Asterisk is the ultimate hacker’s PBX.
If someone asks you not to use the term hacker, refuse. This term does not belong to the mass media. They stole it and corrupted it to mean “malicious cracker.” It’s time we took it back. Hackers built the networking engine that is the Internet. Hackers built the Apple Macintosh and the Unix operating system. Hackers are also building your next telecom system. Do not fear; these are the good guys, and they’ll be able to build a system that’s far more secure than anything that exists today. Rather than being constricted by the dubious and easily cracked security of closed systems, the hackers will be able to quickly respond to changing trends in security and fine-tune the telephone system in response to both corporate policy and industry best practices.
Like other open source systems, Asterisk will be able to evolve into a far more secure platform than any proprietary system, not in spite of its hacker roots, but rather because of them.
Never in the history of telecommunications has a system so suited to the needs of business been available, at any price. Asterisk is an enabling technology and, as with Linux, it will become increasingly rare to find an enterprise that is not running some version of Asterisk, in some capacity, somewhere in the network, solving a problem as only Asterisk can.
This acceptance is likely to happen much faster than it did with Linux, though, for several reasons:
Linux has already blazed the trail that led to open source acceptance. Asterisk is following that lead.
The telecom industry is crippled, with no leadership being provided by the giant industry players. Asterisk has a compelling, realistic, and exciting vision.
End users are fed up with incompatible, limited functionality, and horrible support. Asterisk solves the first two problems; entepreneurs and the community are addressing the latter.
One of the compelling strengths of Asterisk is the passionate community that developed and supports it. This community, led by Mark Spencer of Digium, is keenly aware of the cultural significance of Asterisk, and is giddy about the future.
One of the more powerful side effects caused by the energy of the Asterisk community is the cooperation it has spawned among the telecommunications professionals, networking professionals, and information technology professionals who share a love for this phenomenon. While these professions have traditionally been at odds with each other, in the Asterisk community they delight in each others’ skills. The significance of this cooperation cannot be underestimated.
Still, if the dream of Asterisk is to be realized, the community must grow—yet one of the key challenges that the community currently faces is a rapid influx of new users. The members of the existing community, having birthed this thing called Asterisk, are generally welcoming of new users, but they’ve grown impatient with being asked the kinds of questions whose answers can often be obtained independently, if one is willing to put forth the time needed to research and experiment.
Obviously, new users do not fit any particular kind of mold. While some will happily spend hours experimenting and reading various blogs describing the trials and tribulations of others, many people who have become enthusiastic about this technology are completely uninterested in such pursuits. They want a simple, straightforward, step-by-step guide that’ll get them up and running, followed by some sensible examples describing the best methods of implementing common functionality (such as voicemail, auto attendants, and the like).
To the members of the expert community, who (correctly) perceive that Asterisk is like a web development language, this approach doesn’t make any sense. To them, it’s clear that you have to immerse yourself in Asterisk to appreciate its subtleties. Would one ask for a step-by-step guide to programming and expect to learn from it all that a language has to offer?
Clearly, there’s no one approach that’s right for everyone. Asterisk is a different animal altogether, and it requires a totally different mind-set. As you explore the community, though, be aware that there are people with many different skill sets and attitudes here. Some of these folks do not display much patience with new users, but that’s often due to their passion for the subject, not because they don’t welcome your participation.
As with any community, there are places where members of the Asterisk community meet to discuss matters of mutual interest. Of the mailing lists you will find at http://lists.digium.com, these four are currently the most important:
- Asterisk-Biz
Anything commercial with respect to Asterisk belongs in this list. If you’re selling something Asterisk-related, sell it here. If you want to buy an Asterisk service or product, post here.
- Asterisk-Dev
The Asterisk developers hang out here. The purpose of this list is the discussion of the development of the software that is Asterisk, and its participants vigorously defend that purpose. Expect a lot of heat if you post anything to this list not relating to programming or development of the Asterisk code base specifically. General coding questions (such as interfacing with AGI or AMI), should be directed to the Asterisk-Users list.
Warning
The Asterisk-Dev list is not second-level support! If you scroll through the mailing list archives, you’ll see this is a strict rule. The Asterisk-Dev mailing list is about discussion of core Asterisk development, and questions about interfacing your external programs via AGI or AMI should be posted on the Asterisk-Users list.
- Asterisk-Users
This is where most Asterisk users hang out. This list generates several hundred messages per day and has over ten thousand subscribers. While you can go here for help, you are expected to have done some reading on your own before you post a query.
- Asterisk-BSD
This is where users who are implementing Asterisk on FreeBSD (and other BSD dialects) hang out.
The Asterisk Wiki (which exists in large part due to the tireless efforts of James Thompson—thanks James!) is a source of much enlightenment and confusion. A community-maintained repository of VoIP knowledge (http://www.voip-info.org) contains a truly inspiring cornucopia of fascinating, informative, and frequently contradictory information about many subjects, just one of which is Asterisk.
Since Asterisk documentation forms by far the bulk of the information on this web site,[11] and it probably contains more Asterisk knowledge than all other sources put together (with the exception of the mailing-list archives), it is commonly referred to as the place to go for Asterisk knowledge.
The Asterisk community maintains Internet Relay Chat (IRC) channels on irc.freenode.net. The two most active channels are #asterisk and #asterisk-dev.[12] To cut down on spam-bot intrusions, both of these channels now require registration to join.[13]
In many cites around the world, lonely Asterisk users began to realize that there were other like-minded people in their towns. Asterisk User Groups (AUGs) began to spring up all over the place. While these groups don’t have any official affiliation with each other, they generally link to each others’ web sites and welcome members from anywhere. Type “Asterisk User Group” into Google to track down one in your area.
The Asterisk Documentation Project was started by Leif Madsen and Jared Smith, but several people in the community have contributed.
The goal of the documentation project is to provide a structured repository of written work on Asterisk. In contrast with the flexible and ad hoc nature of the Wiki, the Docs project is passionate about building a more focused approach to various Asterisk-related subjects.
As part of the efforts of the Asterisk Docs project to make documentation available online, this book is available at the http://www.asteriskdocs.org web site, under a Creative Commons license.
It is very rare to find businesses these days that do not have to reinvent themselves every few years. It is equally rare to find a business that can afford to replace its communications infrastructure each time it goes in a new direction. Today’s businesses need extreme flexibility in all of their technology, including telecom.
In his book Crossing the Chasm (HarperBusiness), Geoffrey Moore opines, “The idea that the value of the system will be discovered rather than known at the time of installation implies, in turn, that product flexibility and adaptability, as well as ongoing account service, should be critical components of any buyer’s evaluation checklist.” What this means, in part, is that the true value of a technology is often not known until it has been deployed.
How compelling, then, to have a system that holds at its very heart the concept of openness and the value of continuous innovation.
So where to begin? Well, when it comes to Asterisk, there is far more to talk about than we can fit into one book. For now, we’re not going to take you down all the roads that the über-geeks follow—we’re just going to give you the basics.
In Chapter 2, Preparing a System for Asterisk, we cover some of the engineering considerations you should keep in mind when designing a telecommunications system. You can skip much of this material if you want to get right to installing, but these are important concepts to understand, should you ever plan on putting an Asterisk system into production.
Chapter 3, Installing Asterisk covers obtaining, compiling, and installing Asterisk, and Chapter 4, Initial Configuration of Asterisk deals with the initial configuration of Asterisk. Here we cover the important configuration files that must exist to define the channels and features available to your system. This will prepare you for Chapter 5, Dialplan Basics, where we introduce the heart of Asterisk—the dialplan. Chapter 6, More Dialplan Concepts will introduce some more advanced dialplan concepts.
We will take a break from Asterisk in Chapter 7, Understanding Telephony and discuss some of the more important technologies in use in the PSTN. Naturally, following the discussion of legacy telephony, Chapter 8, Protocols for VoIP discusses Voice over IP.
Chapter 9, The Asterisk Gateway Interface (AGI) introduces one of the more amazing components, the Asterisk Gateway Interface (AGI). Using Perl, PHP, and Python, we demonstrate how external programs can be used to add nearly limitless functionality to your PBX. In Chapter 14, Potpourri, we briefly cover what is, in fact, a rich and varied cornucopia of incredible features and functions, all of which are part of the Asterisk phenomenon. To conclude, Chapter 15, Asterisk: The Future of Telephony looks forward, predicting a future where open source telephony completely transforms an industry desperately in need of a revolution. You’ll also find a wealth of reference information in the book’s five appendixes.
This book can only lay down the basics, but from this foundation you will be able to come to an understanding of the concept of Asterisk—and from that, who knows what you will build?
[3] Until now.
[4] To its credit, Nortel finally got rid of Windows NT 4.0 and installed Linux. Technically a good idea, but rather odd, given that Nortel and Microsoft recently announced a partnership to develop enterprise telecom applications together.
[5] The term DSP also means Digital Signal Processor, which is a device (usually a chip) that is capable of interpreting and modifying signals of various sorts. In a voice network, DSPs are primarily responsible for encoding, decoding, and transcoding audio information. This can require a lot of computational effort.
[6] Jim Dixon, “The History of Zapata Telephony and How It Relates to the Asterisk PBX” (http://www.asteriskdocs.org/modules/tinycontent/index.php?id=10).
[7] If your name is Elizabeth, for example, you will have to figure something else out like elizbth, or elizabe, or perhaps lizabth. OK, so liz might serve as well, but you get the point.
[8] From the release of Asterisk 1.2 to Asterisk 1.4, there have been over 4,000 updates to the code in the SVN repository.
[9] It should be noted that these folks need not leave disappointed. Several projects have arisen to lower the barriers to entry for Asterisk. By far the most popular and well known is trixbox (http://www.trixbox.org). If you have an old PC lying around (or a copy of VMware), trixbox will build a GUI-based PBX for you simply by answering a few questions during the automated install process. This does not make it easier to learn Asterisk, because you are no longer involved in the platform or dialplan configuration, but it will deliver a working PBX to you much faster than the more hands-on approach we employ in this book.
[10] The telecom industry has been predicting a revolution since before the crash; time will tell how well they respond to the open source revolution.
[11] More than 30 percent, at last count.
[12] The #asterisk-dev channel is for the discussion of changes to the underlying code base of Asterisk and is also not second-tier support. Discussions related to programming external applications that interface with Asterisk via AGI or AMI are meant to be in #asterisk.
[13] /msg nickserv help when you connect to the
service via your favorite IRC client.
Table of Contents
Very early on, I knew that someday in some “perfect” future out there over the horizon, it would be commonplace for computers to handle all of the necessary processing functionality internally, making the necessary external hardware to connect up to telecom interfaces very inexpensive and, in some cases, trivial.
By this point, you must be anxious to get your Asterisk system up and running. If you are building a hobby system, you can probably jump right to the next chapter and begin the installation. For a mission-critical deployment, however, some thought must be given to the environment in which the Asterisk system will run. Make no mistake: Asterisk, being a very flexible piece of software, will happily and successfully install on nearly any Linux platform you can conceive of, and several non-Linux platforms as well.[14] However, to arm you with an understanding of the type of operating environment Asterisk will really thrive in, this chapter will discuss issues you need to be aware of in order to deliver a reliable, well-designed system.
In terms of its resource requirements, Asterisk’s needs are similar to those of an embedded, real-time application. This is due in large part to its need to have priority access to the processor and system buses. It is, therefore, imperative that any functions on the system not directly related to the call-processing tasks of Asterisk be run at a low priority, if at all. On smaller systems and hobby systems, this might not be as much of an issue. However, on high-capacity systems, performance shortcomings will manifest as audio quality problems for users, often experienced as echo, static, and the like. The symptoms will resemble those experienced on a cell phone when going out of range, although the underlying causes will be different. As loads increase, the system will have increasing difficulty maintaining connections. For a PBX, such a situation is nothing short of disastrous, so careful attention to performance requirements is a critical consideration during the platform selection process.
Table 2.1, “System requirement guidelines” lists some very basic guidelines that you’ll want to keep in mind when planning your system. The next section takes a close look at the various design and implementation issues that will affect its performance.
Note
The size of an Asterisk system is actually not dictated by the number of users or sets, but rather by the number of simultaneous calls it will be expected to support. These numbers are very conservative, so feel free to experiment and see what works for you.
Table 2.1. System requirement guidelines
With large Asterisk installations, it is common to deploy functionality across several servers. One or more central units will be dedicated to call processing; these will be complemented by one or more ancillary servers handling peripherals (such as a database system, a voicemail system, a conferencing system, a management system, a web interface, a firewall, and so on). As is true in most Linux environments, Asterisk is well suited to growing with your needs: a small system that used to be able to handle all your call-processing and peripheral tasks can be distributed among several servers when increased demands exceed its abilities. Flexibility is a key reason why Asterisk is extremely cost-effective for rapidly growing businesses; there is no effective maximum or minimum size to consider when budgeting the initial purchase. While some scalability is possible with most telephone systems, we have yet to hear of one that can scale as flexibly as Asterisk. Having said that, distributed Asterisk systems are not simple to design—this is not a task for someone new to Asterisk.
Note
If you are sure that you need to set up a distributed Asterisk system, you will want to study the DUNDi protocol, Asterisk Realtime Architecture (ARA), func_odbc, and the various other database tools at your disposal. This will help you to abstract the data your system requires from the dialplan logic your Asterisk systems will utilize, allowing a generic set of dialplan logic that can be used across multiple boxes, thereby allowing you to scale more simply by adding additional boxes to the system. However, this is far beyond the scope of this book and will be left as an exercise for the reader. If you want a teaser of some tools you can use for scaling, see Chapter 12, Relational Database Integration.
The selection of a server is both simple and complicated: simple because, really, any x86-based platform will suffice, but complicated because the reliable performance of your system will depend on the care that is put into the platform design. When selecting your hardware, you must carefully consider the overall design of your system and what functionality you need to support. This will help you determine your requirements for the CPU, motherboard, and power supply. If you are simply setting up your first Asterisk system for the purpose of learning, you can safely ignore the information in this section. If, however, you are building a mission-critical system suitable for deployment, these are issues that require some thought.
Among other considerations, when selecting the hardware for an Asterisk installation you must bear in mind this critical question: how powerful must the system be? This is not an easy question to answer, because the manner in which the system is to be used will play a big role in the resources it will consume. There is no such thing as an Asterisk performance-engineering matrix, so you will need to understand how Asterisk uses the system in order to make intelligent decisions about what kinds of resources will be required. You will need to consider several factors, including:
- The maximum number of concurrent connections the system will be expected to support
- The percentage of traffic that will require processor-intensive DSP of compressed codecs (such as G.729 and GSM)
The Digital Signal Processing (DSP) work that Asterisk performs in software can have a staggering impact on the number of concurrent calls it will support. A system that might happily handle 50 concurrent G.711 calls could be brought to its knees by a request to conference together 10 G.729 compressed channels. We’ll talk more about G.729, GSM, G.711, and many other codecs in Chapter 8, Protocols for VoIP.
- Whether conferencing will be provided, and what level of conferencing activity is expected
Will the system be used heavily? Conferencing requires the system to transcode and mix each individual incoming audio stream into multiple outgoing streams. Mixing multiple audio streams in near-real-time can place a significant load on the CPU.
- Echo cancellation
Echo cancellation may be required on any call where a Public Switched Telephone Network (PSTN) interface is involved. Since echo cancellation is a mathematical function, the more of it the system has to perform, the higher the load on the CPU will be. [15] Do not fear. Echo cancellation is another topic for Chapter 8, Protocols for VoIP.
- Dialplan scripting logic
Whenever Asterisk has to pass call control to an external program, there is a performance penalty. As much logic as possible should be built into the dialplan. If external scripts are used, they should be designed with performance and efficiency as critical considerations.
As for the exact performance impact of these factors, it’s difficult to know for sure. The effect of each is known in general terms, but an accurate performance calculator has not yet been successfully defined. This is partly because the effect of each component of the system is dependent on numerous variables, such as CPU power, motherboard chipset and overall quality, total traffic load on the system, Linux kernel optimizations, network traffic, number and type of PSTN interfaces, and PSTN traffic—not to mention any non-Asterisk services the system is performing concurrently. Let’s take a look at the effects of several key factors:
- Codecs and transcoding
Simply put, a codec (short for coder/decoder, or compression/decompression) is a set of mathematical rules that define how an analog waveform will be digitized. The differences between the various codecs are due in large part to the levels of compression and quality that they offer. Generally speaking, the more compression that’s required, the more work the DSP must do to code or decode the signal. Uncompressed codecs, therefore, put far less strain on the CPU (but require more network bandwidth). Codec selection must strike a balance between bandwidth and processor usage.
- Central processing unit (and Floating Point Unit)
A CPU is comprised of several components, one of which is the floating point unit (FPU). The speed of the CPU, coupled with the efficiency of its FPU, will play a significant role in the number of concurrent connections a system can effectively support. The next section (the section called “Choosing a Processor”) offers some general guidelines for choosing a CPU that will meet the needs of your system.
- Other processes running concurrently on the system
Being Unix-like, Linux is designed to be able to multitask several different processes. A problem arises when one of those processes (such as Asterisk) demands a very high level of responsiveness from the system. By default, Linux will distribute resources fairly among every application that requests them. If you install a system with many different server applications, those applications will each be allowed their fair use of the CPU. Since Asterisk requires frequent high-priority access to the CPU, it does not get along well with other applications, and if Asterisk must coexist with other apps, the system may require special optimizations. This primarily involves the assignment of priorities to various applications in the system and, during installation, careful attention to which applications are installed as services.
- Kernel optimizations
A kernel optimized for the performance of one specific application is something that very few Linux distributions offer by default and, thus, it requires some thought. At the very minimum—whichever distribution you choose—a fresh copy of the Linux kernel (available from http://www.kernel.org) should be downloaded and compiled on your platform. You may also be able to acquire patches that will yield performance improvements, but these are considered hacks to the officially supported kernel.
- IRQ latency
Interrupt request (IRQ) latency is basically the delay between the moment a peripheral card (such as a telephone interface card) requests the CPU to stop what it’s doing and the moment when the CPU actually responds and is ready to handle the task. Asterisk’s peripherals (especially the Zaptel cards) are extremely intolerant of IRQ latency. This is not due to any problem with the cards so much as part of the nature of how a software-based TDM engine has to work. If we buffer the TDM data and send it on the bus as a larger packet, that may be more efficient from a system perspective, but it will create a delay between the time the audio is received on the card, and when it is delivered to the CPU. This makes real-time processing of TDM data next to impossible. In the design of Zaptel, it was decided that sending the data every 1 ms would create the best trade-off, but a side effect of this is that any card in the system that uses the Zaptel interface is going to ask the system to process an interrupt every millisecond. This used to be a factor on older motherboards, but it has largely ceased to be a cause for concern.
Tip
Linux has historically had problems with its ability to service IRQs quickly; this problem has caused enough trouble for audio developers that several patches have been created to address this shortcoming. So far, there has been some mild controversy over how to incorporate these patches into the Linux kernel.
- Kernel version
Asterisk is officially supported on Linux Version 2.6.
- Linux distribution
Linux distributions are many and varied. In the next chapter, we will discuss the challenge of selecting a Linux distribution, and how to obtain and install both Linux and Asterisk.
Since the performance demands of Asterisk will generally involve a large number of math calculations, it is essential that you select a processor with a powerful FPU. The signal processing that Asterisk performs can quickly demand a staggering quantity of complex mathematical computations from the CPU. The efficiency with which these tasks are carried out will be determined by the power of the FPU within the processor.
To actually name a best processor for Asterisk in this book would fly in the face of Moore’s law. Even in the time between the authoring and publishing of this book, processor speeds will undergo rapid improvements, as will Asterisk’s support for various architectures. Obviously, this is a good thing, but it also makes the giving of advice on the topic a thankless task. Naturally, the more powerful the FPU is, the more concurrent DSP tasks Asterisk will be able to handle, so that is the ultimate consideration. When you are selecting a processor, the raw clock speed is only part of the equation. How well it handles floating-point operations will be a key differentiator, as DSP operations in Asterisk will place a large demand on that process.
Both Intel and AMD CPUs have powerful FPUs. Current-generation chips from either of those manufacturers can be expected to perform well.[16]
The obvious conclusion is that you should get the most powerful CPU your budget will allow. However, don’t be too quick to buy the most expensive CPU out there. You’ll need to keep the requirements of your system in mind; after all, a Formula 1 Ferrari is ill-suited to the rigors of rush-hour traffic. Slower CPUs will often run cooler and, thus, you might be able to build a lower-powered, fanless Asterisk system for a small office, which could work well in a dusty environment, perhaps.
In order to attempt to provide a frame of reference from which we can contemplate our platform decision, we have chosen to define three sizes of Asterisk systems: small, medium, and large.
Small systems (up to 10 phones) are not immune to the performance requirements of Asterisk, but the typical load that will be placed on a smaller system will generally fall within the capabilities of a modern processor.
If you are building a small system from older components you have lying around, be aware that the resulting system cannot be expected to perform at the same level as a more powerful machine, and will run into performance degradation under a much lighter load. Hobby systems can be run successfully on very low-powered hardware, although this is by no means recommended for anyone who is not a whiz at Linux performance tuning.[17]
If you are setting up an Asterisk system for the purposes of learning, you will be able to build a fully featured platform using a relatively low-powered CPU. The authors of this book run several Asterisk lab systems with 433 MHz to 700 MHz Celeron processors, but the workload of these systems is minimal (never more than two concurrent calls).
Medium-sized systems (from 10 to 50 phones) are where performance considerations will be the most challenging to resolve. Generally, these systems will be deployed on one or two servers only and, thus, each machine will be required to handle more than one specific task. As loads increase, the limits of the platform will become increasingly stressed. Users may begin to perceive quality problems without realizing that the system is not faulty in any way, but simply exceeding its capacity. These problems will get progressively worse as more and more load is placed on the system, with the user experience degrading accordingly. It is critical that performance problems be identified and addressed before they are noticed by users.
Monitoring performance on these systems and quickly acting on any developing trends is key to ensuring that a quality telephony platform is provided.
Large systems (more than 120 channels) can be distributed across multiple systems and sites and, thus, performance concerns can be managed through the addition of machines. Very large Asterisk systems have been created in this way.
Building a large system requires an advanced level of knowledge in many different disciplines. We will not discuss it in detail in this book, other than to say that the issues you’ll encounter will be similar to those encountered during any deployment of multiple servers handling a single, distributed task.
Just to get any anticipation out of the way, we also cannot recommend specific motherboards in this book. With new motherboards coming out on a weekly basis, any recommendations we could make would be rendered moot by obsolescence before the published copy hit the shelves. Not only that, but motherboards are like automobiles: while they are all very similar in principle, the difference is in the details. And as Asterisk is a performance application, the details matter.
What we will do, therefore, is give you some idea of the kinds of motherboards that can be expected to work well with Asterisk, and the features that will make for a good motherboard. The key is to have both stability and high performance. Here are some guidelines to follow:
The various system buses must provide the minimum possible latency. If you are planning a PSTN connection using analog or PRI interfaces (discussed later in this chapter), having Zaptel cards in the system will generate 1,000 interrupt requests per second. Having devices on the bus that interfere with this process will result in degradation of call quality. Chipsets from Intel (for Intel CPUs) and nVidia nForce (for AMD CPUs) seem to score the best marks in this area. Review the specific chipset of any motherboard you are evaluating to ensure that it does not have known problems with IRQ latency.
If you are running Zaptel cards in your system, you will want to ensure that your BIOS allows you maximum control over IRQ assignment. As a rule, high-end motherboards will offer far greater flexibility with respect to BIOS tweaking; value-priced boards will generally offer very little control. This may be a moot point, however, as APIC-enabled motherboards turn IRQ control over to the operating system.
Server-class motherboards generally implement a different PCI standard than workstation-class motherboards. While there are many differences, the most obvious and well known is that the two versions have different voltages. Depending on which cards you purchase, you will need to know if you require 3.3V or 5V PCI slots.[18] Figure 2.1, “Visual identification of PCI slots” shows the visual differences between 3.3V and 5V slots. Most server motherboards will have both types, but workstations will typically have only the 5V version.
Tip
There is some evidence that suggests connecting together two completely separate, single-CPU systems may provide far more benefits than simply using two processors in the same machine. You not only double your CPU power, but you also achieve a much better level of redundancy at a similar cost to a single-chassis, dual-CPU machine. Keep in mind, though, that a dual-server Asterisk solution will be more complex to design than a single-machine solution.

Consider using multiple processors, or processors with multiple cores. This will provide an improvement in the system’s ability to handle multiple tasks. For Asterisk, this will be of special benefit in the area of floating-point operations.
If you need a modem, install an external unit that connects to a serial port. If you must have an internal modem, you will need to ensure that it is not a so-called “Win-modem”—it must be a completely self-sufficient unit (note that these are very difficult, if not impossible, to find).
Consider that with built-in networking, if you have a network component failure, the entire motherboard will need to be replaced. On the other hand, if you install a peripheral Network Interface Card (NIC), there may be an increased chance of failure due to the extra mechanical connections involved. It can also be useful to have separate network cards serving sets and users (the internal network) and VoIP providers and external sites (the external network). NICs are cheap; we suggest always having at least two.
The stability and quality of your Asterisk system will be dependent on the components you select for its architecture. Asterisk is a beast, and it expects to be fed the best. As with just about anything, high cost is not always synonymous with quality, but you will want to become a connoisseur of computer components.
Having said all that, we need to get back to the original point: Asterisk can and will happily install on pretty much any system that will run Linux. The lab systems used to write this book, for example, included everything from a Linksys WRT to a dual-Xeon locomotive.[19] We have not experienced any performance or stability problems running less than five concurrent telephone connections. For the purposes of learning, do not be afraid to install Asterisk on whatever system you can scrounge up. When you are ready to put your system into production, however, you will need to understand the ramifications of the choices you make with respect to your hardware.
One often-overlooked component in a PC is the power supply (and the supply of power). For a telecommunications system,[20] these components can play a significant role in the quality of the user experience.
The power supply you select for your system will play a vital role in the stability of the entire platform. Asterisk is not a particularly power-hungry application, but anything relating to multimedia (whether it be telephony, professional audio, video, or the like) is generally sensitive to power quality.
This oft-neglected component can turn an otherwise top-quality system into a poor performer. By the same token, a top-notch power supply might enable an otherwise cheap PC to perform like a champ.
The power supplied to a system must provide not only the energy the system needs to perform its tasks but also stable, clean signal lines for all of the voltages your system expects from it.
Spend the money and get a top-notch power supply (gamers are pretty passionate about this sort of thing, so there are lots of choices out there).
In a carrier-grade or high-availability environment, it is common to deploy servers that use a redundant power supply. Essentially, this involves two completely independent power supplies, either one of which is capable of meeting the power requirements of the system.
If this is important to you, keep in mind that best practices suggest that to be properly redundant, these power supplies should be connected to completely independent uninterruptible power supplies (UPSes) that are in turn fed by totally separate electrical circuits. In truly mission-critical environments (such as hospitals), even the main electrical feeds into the building are redundant, and diesel-powered generators are on-site to generate electricity during extended power failures (such as the one that hit Northeastern North America on August 15, 2003).
Your system’s environment consists of all of those factors that are not actually part of the server itself but nevertheless play a crucial role in the reliability and quality that can be expected from the system. Electrical supplies, room temperature and humidity, sources of interference, and security are all factors that should be contemplated.
When selecting the power sources for your system, consideration should be given not only to the amount of power the system will use, but also to the manner in which this power is delivered.
Power is not as simple as voltage coming from the outlet in the wall, and you should never just plug a production system into whatever electrical source is near at hand.[21]Giving some consideration to the supply of power to your system can provide a far more stable power environment, leading to a far more stable system.
One of the benefits of clean power is a reduction in heat, which means less stress on components, leading to a longer life expectancy.
Properly grounded, conditioned power feeding a premium-quality power supply will ensure a clean logic ground (a.k.a. 0 volt) reference[22] for the system and keep electrical noise on the motherboard to a minimum. These are industry-standard best practices for this type of equipment, which should not be neglected. A relatively simple way to achieve this is through the use of a power-conditioned UPS.[23]
The UPS is well known for its role as a battery backup, but the power-conditioning benefits that high-end UPS units also provide are less well understood.
Power conditioning can provide a valuable level of protection from the electrical environment by regenerating clean power through an isolation transformer. A quality power conditioner in your UPS will eliminate most electrical noise from the power feed and help to ensure a rock-steady supply of power to your system.
Unfortunately, not all UPS units are created equal; many of the less expensive units do not provide clean power. What’s worse, manufacturers of these devices will often promise all kinds of protection from surges, spikes, overvoltages, and transients. While such devices may protect your system from getting fried in an electrical storm, they will not clean up the power being fed to your system and, thus, will do nothing to contribute to stability.
Make sure your UPS is power conditioned. If it doesn’t say exactly that, it isn’t.
Voltage is defined as the difference in electrical potential between two points. When considering a ground (which is basically nothing more than an electrical path to earth), the common assumption is that it represents 0 volts. But if we do not define that 0V in relation to something, we are in danger of assuming things that may not be so. If you measure the voltage between two grounding references, you’ll often find that there is a voltage potential between them. This voltage potential between grounding points can be significant enough to cause logic errors—or even damage—in a system where more than one path to ground is present.
Tip
One of the authors recalls once frying a sound card he was trying to connect to a friend’s stereo system. Even though both the computer and the stereo were in the same room, more than 6 volts of difference was measured between the ground conductors of the two electrical outlets they were plugged into! The wire between the stereo and the PC (by way of the sound card) provided a path that the voltage eagerly followed, thus frying a sound card that was not designed to handle that much current on its signal leads. Connecting both the PC and the stereo to the same outlet fixed the problem.
When considering electrical regulations, the purpose of a ground is primarily human safety. In a computer, the ground is used as a 0V logic reference. An electrical system that provides proper safety will not always provide a proper logic reference—in fact, the goals of safety and power quality are sometimes in disagreement. Naturally, when a choice must be made, safety has to take precedence.
Tip
Since the difference between a binary zero and a binary one is represented in computers by voltage differences of sometimes less than 3V, it is entirely possible for unstable power conditions caused by poor grounding or electrical noise to cause all kinds of intermittent system problems. Some power and grounding advocates estimate that more than 80 percent of unexplained computer glitches can be traced to power quality. Most of us blame Microsoft.
Modern switching power supplies are somewhat isolated from power quality issues, but any high-performance system will always benefit from a well-designed power environment. In mainframes, proprietary PBXes, and other expensive computing platforms, the grounding of the system is never left to chance. The electronics and frames of these systems are always provided with a dedicated ground that does not depend on the safety grounds supplied with the electrical feed.
Regardless of how much you are willing to invest in grounding, when you specify the electrical supply to any PBX, ensure that the electrical circuit is completely dedicated to your system (as discussed in the next section) and that an insulated, isolated grounding conductor is provided. This can be expensive to provision, but it will contribute greatly to a quality power environment for your system.[24]
It is also vital that each and every peripheral you connect to your system be connected to the same electrical receptacle (or, more specifically, the same ground reference). This will cut down on the occurrence of ground loops, which can cause anything from buzzing and humming noises to damaged or destroyed equipment.
If you’ve ever seen the lights dim when an electrical appliance kicks in, you’ve seen the effect that a high-energy device can have on an electrical circuit. If you were to look at the effects of a multitude of such devices, each drawing power in its own way, you would see that the harmonically perfect 50 or 60 Hz sine wave you may think you’re getting with your power is anything but. Harmonic noise is extremely common on electrical circuits , and it can wreak havoc on sensitive electronic equipment. For a PBX, these problems can manifest as audio problems, logic errors, and system instability.
Ideally, you should never install a server on an electrical circuit that is shared with other devices. There should be only one outlet on the circuit, and you should connect only your telephone system (and associated peripherals) to it. The wire (including the ground) should be run unbroken directly back to the electrical panel. The grounding conductor should be insulated and isolated. There are far too many stories of photocopiers, air conditioners, and vacuum cleaners wreaking havoc with sensitive electronics to ignore this rule of thumb.
Warning
The electrical regulations in your area must always take precedence over any ideas presented here. If in doubt, consult a power quality expert in your area on how to ensure that you adhere to electrical regulations. Remember, electrical regulations take into account the fact that human safety is far more important than the safety of the equipment.
Environmental conditions can wreak havoc on systems, and yet it is quite common to see critical systems deployed with little or no attention given to these matters. When the system is installed, everything works well, but after as little as six months, components begin to fail. Talk to anyone with experience in maintaining servers and systems, and it becomes obvious that attention to environmental factors can play a significant role in the stability and reliability of systems.
Simply put, humidity is water in the air. Water is a disaster for electronics for two main reasons: 1) water is a catalyst for corrosion, and 2) water is conductive enough that it can cause short circuits. Do not install any electronic equipment in areas of high humidity without providing a means to remove the moisture.
Heat is the enemy of electronics. The cooler you keep your system, the more reliably it will perform, and the longer it will last. If you cannot provide a properly cooled room for your system, at a minimum ensure that it is placed in a location that ensures a steady supply of clean, cool air. Also, keep the temperature steady. Changes in temperature can lead to condensation and other damaging changes.
An old adage in the computer industry holds that dust bunnies inside of a computer are lucky. Let’s consider some of the realities of dust bunnies:
Significant buildup of dust can restrict airflow inside the system, leading to increased levels of heat.
Dust can contain metal particles, which, in sufficient quantities, can contribute to signal degradation or shorts on circuit boards.
Put critical servers in a filtered environment, and clean out dust bunnies on a regular schedule.
If you are going to connect Asterisk to any traditional telecommunications equipment, you will need the correct hardware. The hardware you require will be determined by what it is you want to achieve.
Asterisk allows you to seamlessly bridge circuit-switched telecommunications networks[25] with packet-switched data networks.[26] Because of Asterisk’s open architecture (and open source code), it is ultimately possible to connect any standards-compliant interface hardware. The selection of open source telephony interface boards is currently limited, but as interest in Asterisk grows, that will rapidly change.[27] At the moment, one of the most popular and cost-effective ways to connect to the PSTN is to use the interface cards that evolved from the work of the Zapata Telephony Project (http://www.zapatatelephony.org).
Unless you need a lot of channels (or a have lot of money to spend each month on telecommunications facilities), chances are that your PSTN interface will consist of one or more analog circuits, each of which will require a Foreign eXchange Office (FXO) port.
Digium, the company that sponsors Asterisk development, produces analog interface cards for Asterisk. Check out its web site for its extensive line of analog cards, including the venerable TDM400P, the latest TDM800P, and the high-density TDM2400P. As an example, the TDM800P is an eight-port base card that allows for the insertion of up to two daughter cards, which each deliver either four FXO or four FXS ports.[28] The TDM800P can be purchased with these modules preinstalled, and a hardware echo-canceller can be added as well. Check out Digium’s web site (http://www.digium.com) for more information about these cards.
Other companies that produce Asterisk-compatible analog cards include:
Rhino (http://www.channelbanks.com)
Sangoma (http://www.sangoma.com)
Voicetronix (http://www.voicetronix.com)
Pika Technologies (http://www.pikatechnologies.com)
These are all well-established companies that produce excellent products.
If you require more than 10 circuits, or require digital connectivity, chances are you’re going to be in the market for a T1 or E1 card.[29] Bear in mind, though, that the monthly charges for a digital PSTN circuit vary widely. In some places, as few as five circuits can justify a digital circuit; in others, the technology may never be cost-justifiable. The more competition there is in your area, the better chance you have of finding a good deal. Be sure to shop around.
The Zapata Telephony Project originally produced a T1 card, the Tormenta, that is the ancestor of most Asterisk-compatible T1 cards. The original Tormenta cards are now considered obsolete, but they do still work with Asterisk.
Digium makes several different digital circuit interface cards. The features on the cards are the same; the primary differences are whether they provide T1 or E1 interfaces, and how many spans each card provides. Digium has been producing Zaptel cards for Linux longer than anyone else, as they were deeply involved with the development of Zaptel on Linux, and have been the driving force behind Zaptel development over the years.
Sangoma, which has been producing open source WAN cards for many years, added Asterisk support for its T1/E1 cards a few years ago.[30] Rhino has had T1 hardware for Asterisk for a while now, and there are many other companies that offer digital interface cards for Asterisk as well.
A channel bank is loosely defined as a device that allows a digital circuit to be de-multiplexed into several analog circuits (and vice versa). More specifically, a channel bank lets you connect analog telephones and lines into a system across a T1 line. Figure 2.2, “One way you might connect a channel bank” shows how a channel bank fits into a typical office phone system.

Although they can be expensive to purchase, many people feel very strongly that the only proper way to integrate analog circuits and devices into Asterisk is through a channel bank. Whether that is true or not depends on a lot of factors, but if you have the budget, they can be very useful.[31] You can often pick up used channel banks on eBay. Look for units from Adtran and Carrier Access Corp. (Rhino makes great channel banks, and they are very competitively priced, but they may be hard to find used on eBay.) Don’t forget that you will need a T1 card in order to connect a channel bank to Asterisk.
Many VoIP gateways exist that can be configured to provide access to PSTN circuits. Generally speaking, these will be of most use in a smaller system (one or two lines). They can also be very complicated to configure, as grasping the interaction between the various networks and devices requires a solid understanding of both telephony and VoIP fundamentals. For that reason, we will not discuss these devices in detail in this book. They are worth looking into, however; popular units are made by Sipura, Grandstream, Digium, and many other companies.
Another way to connect to the PSTN is through the use of Basic Rate Interface (BRI) ISDN circuits. BRI is a digital telecom standard that specifies a two-channel circuit that can carry up to 144 Kbps of traffic. It is very rarely used in North America, but in Europe it is very widely deployed. Due to the variety of different ways this technology has been implemented, and a lack of testing equipment, we will not be discussing BRI in very much detail in this book. Please note, however, that BRI is very popular in Europe, and Digium has produced the B410P card to address this need.
If you do not need to connect to the PSTN, Asterisk requires no hardware other than a server with a Network Interface Card (NIC).
However, if you are going to be providing music on hold[32] or conferencing and you have no physical timing source, you will need the ztdummy Linux kernel module. ztdummy is a clocking mechanism designed to provide a timing source to a system where no hardware timing source exists. Think of it as a kind of metronome to allow the system to mix multiple audio streams in a properly synchronized manner.
One of the issues that can arise if you use analog interfaces on a VoIP system is echo. Echo is simply what you say being reflected back to you a short time later. The echo is caused by the far end, but you are the one that hears it. It is a little known fact that echo would be a massive problem in the PSTN were it not for the fact that the carriers employ complex (and expensive) strategies to eliminate it. We will talk about echo a bit more later on, but with respect to hardware we would suggest that you consider adding echo-cancellation hardware to any card you purchase for use as a PSTN interface. While Asterisk can do some work with echo in software, it does not provide nearly enough power to deal with the problem. Also, echo cancellation in software imposes a load on the processor; hardware echo cancellers built into the PSTN card take this burden away from the CPU.
Hardware echo cancellation can add several hundred dollars to your equipment cost, but if you are serious about having a quality system, invest the extra money now instead of suffering later. Echo problems are not pleasant at all, and your users will hate the system if they experience it.
As of this writing, several software echo cancellers have become available. We have not had a chance to evaluate any of them, but we know that they employ the same algorythems the hardware echo cancellers do. If you have a recently purchased Digium analog card, you can call Digium sales for a keycode to allow its latest software echo canceller to work with your system.[33] There are other software options available for other types of cards, but you will have to look into whether you have to purchase a license to use them.[34] Keep in mind that there is a performance cost to using software echo cancellers. They will place a measureable load on the CPU that needs to be taken into account when you design a system using these technologies.
Since the title of this book is Asterisk: The Future of Telephony, we would be remiss if we didn’t discuss the devices that all of this technology ultimately has to interconnect: telephones!
We all know what a telephone is—but will it be the same five years from now? Part of the revolution that Asterisk is contributing to is the evolution of the telephone, from a simple audio communications device into a multimedia communications terminal providing all kinds of yet-to-be-imagined functions.
As an introduction to this exciting concept, we will briefly discuss the various kinds of devices we currently call “telephones” (any of which can easily be integrated with Asterisk). We will also discuss some ideas about what these devices may evolve into in the future (devices that will also easily integrate with Asterisk).
Any physical device whose primary purpose is terminating an on-demand audio communications circuit between two points can be classified as a physical telephone. At a minimum, such a device has a handset and a dial pad; it may also have feature keys, a display screen, and various audio interfaces.
This section takes a brief look at the various user (or endpoint) devices you might want to connect to your Asterisk system. We’ll delve more deeply into the mechanics of analog and digital telephony in Chapter 7, Understanding Telephony.
Analog phones have been around since the invention of the telephone. Up until about 20 years ago, all telephones were analog. Although analog phones have some technical differences in different countries, they all operate on similar principles.
Tip
This contiguous connection is referred to as a circuit, which the telephone network used to use electromechanical switches to create—hence the term circuit-switched network.
When a human being speaks, the vocal cords, tongue, teeth, and lips create a complex variety of sounds. The purpose of the telephone is to capture these sounds and convert them into a format suitable for transmission over wires. In an analog telephone, the transmitted signal is analogous to the sound waves produced by the person speaking. If you could see the sound waves passing from the mouth to the microphone, they would be proportional to the electrical signal you could measure on the wire.
Analog telephones are the only kind of phone that are commonly available in any retail electronics store. In the next few years, that can be expected to change dramatically.
As digital switching systems developed in the 1980s and 1990s, telecommunications companies developed digital Private Branch eXchanges (PBXes) and Key Telephone Systems (KTSes). The proprietary telephones developed for these systems were completely dependent on the systems to which they were connected and could not be used on any other systems. Even phones produced by the same manufacturer were not cross-compatible (for example, a Nortel Norstar set will not work on a Nortel Meridian 1 PBX). The proprietary nature of digital telephones limits their future. In this emerging era of standards-based communications, they will quickly be relegated to the dustbin of history.
The handset in a digital telephone is generally identical in function to the handset in an analog telephone, and they are often compatible with each other. Where the digital phone is different is that inside the telephone, the analog signal is sampled and converted into a digital signal—that is, a numerical representation of the analog waveform. We’ll leave a detailed discussion of digital signals until Chapter 7, Understanding Telephony; for now, suffice it to say that the primary advantage of a digital signal is that it can be transmitted over limitless distances with no loss of signal quality.
The chances of anyone ever making a proprietary digital phone directly compatible with Asterisk are slim, but companies such as Citel (http://www.citel.com)[35] have created gateways that convert the proprietary signals to Session Initiation Protocol (SIP).[36]
Prior to VoIP, the closest thing to a standards-based digital telephone was an ISDN-BRI terminal. Developed in the early 1980s, ISDN was expected to revolutionize the telecommunications industry in exactly the same way that VoIP promises to finally achieve today.
Tip
There are two types of ISDN: Primary Rate Interface (PRI) and Basic Rate Interface (BRI). PRI is commonly used to provide trunking facilities between PBXes and the PSTN, and is widely deployed all over the world. BRI is not at all popular in North America, but is common in Europe.
While ISDN was widely deployed by the telephone companies, many consider the standard to have been a flop, as it generally failed to live up to its promises. The high costs of implementation, recurring charges, and lack of cooperation among the major industry players contributed to an environment that caused more problems than it solved.
BRI was intended to service terminal devices and smaller sites (a BRI loop provides two digital circuits). A wealth of BRI devices have been developed, but BRI has largely been deprecated in favor of faster, less expensive technologies such as ADSL, cable modems, and VoIP.
BRI is still very popular for use in video-conferencing equipment, as it provides a fixed bandwidth link. Also, BRI does not have the type of quality of service issues a VoIP connection might, as it is circuit-switched.
BRI is still sometimes used in place of analog circuits to provide trunking to a PBX. Whether or not this is a good idea depends mostly on how your local phone company prices the service, and what features it is willing to provide.[37]
IP telephones are heralds of the most exciting change in the telecommunications industry. Already now, standards-based IP telephones are available in retail stores. The wealth of possibilities inherent in these devices will cause an explosion of interesting applications, from video phones to high-fidelity broadcasting devices, to wireless mobility solutions, to purpose-built sets for particular industries, to flexible all-in-one multimedia systems.
The revolution that IP telephones will spawn has nothing to do with a new type of wire to connect your phone to, and everything to do with giving you the power to communicate the way you want.
The early-model IP phones that have been available for several years now do not represent the future of these exciting appliances. They are merely a stepping-stone, a familiar package in which to wrap a fantastic new way of thinking.
The future is far more promising.
A softphone is a software program that provides telephone functionality on a non-telephone device, such as a PC or PDA. So how do we recognize such a beast? What might at first glance seem a simple question actually raises many. A softphone should probably have some sort of dial pad, and it should provide an interface that reminds users of a telephone. But will this always be the case?
The term softphone can be expected to evolve rapidly, as our concept of what exactly a telephone is undergoes a revolutionary metamorphosis.[38] As an example of this evolution, consider the following: would we correctly define popular communication programs such as Instant Messenger as softphones? IM provides the ability to initiate and receive standards-based VoIP connections. Does this not qualify it as a softphone? Answering that question requires knowledge of the future that we do not yet possess. Suffice it to say that while at this point in time, softphones are expected to look and sound like traditional phones, that conception is likely to change in the very near future.
As standards evolve and we move away from the traditional telephone and toward a multimedia communications culture, the line between softphones and physical telephones will become blurred indeed. For example, we might purchase a communications terminal to serve as a telephone and install a softphone program onto it to provide the functions we desire.
Having thus muddied the waters, the best we can do at this point is to define what the term softphone will refer to in relation to this book, with the understanding that the meaning of the term can be expected to undergo a massive change over the next few years. For our purposes, we will define a softphone as any device that runs on a personal computer, presents the look and feel of a telephone, and provides as its primary function the ability to make and receive full-duplex audio communications (formerly known as “phone calls”)[39] through E.164 addressing.[40]
A telephony adaptor (usually referred to as an ATA, or Analog Terminal Adaptor) can loosely be described as an end-user device that converts communications circuits from one protocol to another. Most commonly, these devices are used to convert from some digital (IP or proprietary) signal to an analog connection that you can plug a standard telephone or fax machine into.
These adaptors could be described as gateways, for that is their function. However, popular usage of the term telephony gateway would probably best describe a multiport telephony adaptor, generally with more complicated routing functions.
Telephony adaptors will be with us for as long as there is a need to connect incompatible standards and old devices to new networks. Eventually, our reliance on these devices will disappear, as did our reliance on the modem—obsolescence through irrelevance.
Communications terminal is an old term that disappeared for a decade or two and is being reintroduced here, very possibly for no other reason than that it needs to be discussed so that it can eventually disappear again—once it becomes ubiquitous.
First, a little history. When digital PBX systems were first released, manufacturers of these machines realized that they could not refer to their endpoints as telephones—their proprietary nature prevented them from connecting to the PSTN. They were therefore called terminals, or stations. Users, of course, weren’t having any of it. It looked like a telephone and acted like a telephone, and therefore it was a telephone. You will still occasionally find PBX sets referred to as terminals, but for the most part they are called telephones.
The renewed relevance of the term communications terminal has nothing to do with anything proprietary—rather, it’s the opposite. As we develop more creative ways of communicating with each other, we gain access to many different devices that will allow us to connect. Consider the following scenarios:
If I use my PDA to connect to my voicemail and retrieve my voice messages (converted to text), does my PDA become a phone?
If I attach a video camera to my PC, connect to a company’s web site, and request a live chat with a customer service rep, is my PC now a telephone?
If I use the IP phone in my kitchen to surf for recipes, is that a phone call?
The point is simply this: we’ll probably always be “phoning” each other, but will we always be using “telephones” to do so?
If you ask anyone at the Free Software Foundation, they will tell you that what we know as Linux is in fact GNU/Linux. All etymological arguments aside, there is some valuable truth to this statement. While the kernel of the operating system is indeed Linux, the vast majority of the utilities installed on a Linux system and used regularly are in fact GNU utilities. “Linux” is probably only 5 percent Linux, possibly 75 percent GNU, and perhaps 20 percent everything else.
Why does this matter? Well, the flexibility of Linux is both a blessing and a curse. It is a blessing because with Linux you can truly craft your very own operating system from scratch. Since very few people ever do this, the curse is in large part due to the responsibility you must bear in determining which of the GNU utilities to install, and how to configure the system.
If this seems overwhelming, do not fear. In the next chapter, we will discuss the selection, installation, and configuration of the software environment for your Asterisk system.
In this chapter, we’ve discussed all manner of issues that can contribute to the stability and quality of an Asterisk installation. Before we scare you off, we should tell you that many people have installed Asterisk on top of a graphical Linux workstation—running a web server, a database, and who knows what else—with no problems whatsoever.[41]How much time and effort you should devote to following the best practices and engineering tips in this chapter all depends on how much work you expect the Asterisk server to perform, and how much quality and reliability your system must provide. If you are experimenting with Asterisk, don’t worry too much; just be aware that any problems you have may not be the fault of the Asterisk system.
What we have attempted to do in this chapter is give you a feel for the kinds of best practices that will help to ensure that your Asterisk system will be built on a reliable, stable platform. Asterisk is quite willing to operate under far worse conditions, but the amount of effort and consideration you decide to give these matters will play a part in the stability of your PBX. Your decision should depend on how critical your Asterisk system will be.
[14] People have successfully compiled and run Asterisk on WRAP boards, Linksys WRT54G routers, Soekris systems, Pentium 100s, PDAs, Apple Macs, Sun SPARCs, laptops, and more. Of course, whether you would want to put such a system into production is another matter entirely. (Actually, the AstLinux distribution, by Kristian Kielhofner, runs very well indeed on the Soekris 4801 board. Once you’ve grasped the basics of Asterisk, this is something worth looking into further. Check out http://www.astlinux.org.)
[15] Roughly 30 MHz of CPU power per channel.
[16] If you want to be completely up to the minute on which CPUs are leading the performance race, surf on over to Tom’s Hardware (http://www.tomshardware.com) or AnandTech (http://www.anandtech.com), where you will find a wealth of information about both current and out-of-date CPUs, motherboards, and chipsets.
[17] Greg Boehnlein once compiled and ran Asterisk on a 133 MHz Pentium system, but that was mostly as an experiment. Performance problems are far more likely, and properly configuring such a system requires an expert knowledge of Linux. We do not recommend running Asterisk on anything less than a 500 MHz system (for a production system, 2 GHz might be a sensible minimum). Still, we think the fact that Asterisk is so flexible is remarkable.
[18] With the advent of PCI-X and PCI-Express, it is becoming harder and harder to select a motherboard with the correct type of slots. Be very certain that the motherboard you select has the correct type and quantity of card slots for your hardware. Keep in mind that most companies that produce hardware cards for Asterisk offer PCI and PCI-Express versions, but it’s still up to you to make sure they make sense in whatever motherboard and chassis combination you choose.
[19] OK, it wasn’t actually a locomotive, but it sure sounded like one. Does anyone know where to get quiet CPU fans for Xeon processors? It’s getting too loud in the lab here.
[20] Or any system that is expected to process audio.
[21] Okay, look, you can plug it in wherever you’d like, and it’ll probably work, but if your system has strange stability problems, please give this section another read. Deal?
[22] In electronic devices, a binary zero (0) is generally related to a 0 volt signal, while a binary one (1) can be represented by many different voltages (commonly between 2.5 and 5 volts). The grounding reference that the system will consider 0 volts is often referred to as the logic ground. A poorly grounded system might have electrical potential on the logic ground to such a degree that the electronics mistake a binary zero for a binary one. This can wreak havoc with the system’s ability to process instructions.
[23] It is a common misconception belief that all UPSes provide clean power. This is not at all true.
[24] On a hobby system, this is probably too much to ask, but if you are planning on using Asterisk for anything important, at least be sure to give it a fighting chance; don’t put anything like air conditioners, photocopiers, laser printers, or motors on the same circuit. The strain such items place on your power supply will shorten its life expectancy.
[25] Often referred to as TDM networks, due to the Time Division Multiplexing used to carry traffic through the PSTN.
[26] Popularly called VoIP networks, although Voice over IP is not the only method of transmitting voice over packet networks (Voice over Frame Relay was very popular in the late 1990s).
[27] The evolution of inexpensive, commodity-based telephony hardware is only slightly behind the telephony software revolution. New companies spring up on a weekly basis, each one bringing new and inexpensive standards-based devices into the market.
[28] FXS and FXO refer to the opposing ends of an analog circuit. Which one you need will be determined by what you want to connect to. Chapter 7, Understanding Telephony discusses these in more detail.
[29] T1 and E1 are digital telephony circuits. We’ll discuss them further in Chapter 7, Understanding Telephony.
[30] It should be noted that a Sangoma Frame Relay card played a role in the original development of Asterisk (see http://linuxdevices.com/articles/AT8678310302.html); Sangoma has a long history of supporting open source WAN interfaces with Linux.
[31] We use channel banks to simulate a central office. One 24-port channel bank off an Asterisk system can provide up to 24 analog lines—perfect for a classroom or lab.
[32] Technically, no timing source is needed for music on hold, but it generally works better with one.
[33] This software is not part of a normal Asterisk download because Digium has to pay to license it separately. Nevertheless, it has grandfathered it into all of its cards, so it is available for free to anyone who has a Digium analog card that is still under warranty. If you are running a non-Digium analog card, you can purchase a keycode for this software echo canceller from Digium’s web site.
[34] Sangoma also offers free software echo cancellation on their analog cards (up to six channels).
[35] Citel has produced a fantastic product that is limited by the fact that it is too expensive. If you have old proprietary PBX telephones, and you want to use them with your Asterisk system, Citel’s technology can do the job, but make sure you understand how the per-port cost of these units stacks up against replacing the old sets with pure VoIP telephones.
[36] The SIP is currently the most well-known and popular protocol for VoIP. We will discuss it further in Chapter 8, Protocols for VoIP.
[37] If you are in North America, give up on this idea, unless you have a lot of patience and money, and are a bit of a masochist.
[38] Ever heard of Skype?
[39] OK, so you think you know what a phone call is? So did we. Let’s just wait a few years, shall we?
[40] E.164 is the ITU standard that defines how phone numbers are assigned. If you’ve used a telephone, you’ve used E.164 addressing.
[41] Just don’t ever install the X-windowing environment (which is anything that delivers a desktop, such as GNOME, KDE, and such). You are almost guaranteed to have audio quality problems, as Asterisk and the GUI will fight for control of the CPU.
Table of Contents
- What Packages Do I Need?
- Obtaining the Source Code
- Menuselect
- Compiling Zaptel
- Compiling libpri
- Compiling Asterisk
- Installing Additional Prompts
- Common Compiling Issues
- Loading Asterisk and Zaptel Quickly
- Loading Zaptel Modules Without Scripts
- Loading libpri Without Script
- Starting Asterisk Without Scripts
- Directories Used by Asterisk
- AsteriskNOW™
- Conclusion
I long to accomplish great and noble tasks, but it is my chief duty to accomplish humble tasks as though they were great and noble. The world is moved along, not only by the mighty shoves of its heroes, but also by the aggregate of the tiny pushes of each honest worker.
In the previous chapter, we discussed preparing a system to install Asterisk. Now it’s time to get our hands dirty!
Although a large number of Linux[42] distributions and PC architectures are excellent candidates for Asterisk, we have chosen to focus on a single distribution in order to maintain brevity and clarity throughout the book. The instructions that follow have been made as generic as possible, but you will notice a leaning toward CentOS directory structure and system utilities. We have chosen to focus on CentOS (arguably, the most popular distro for Asterisk) because its command set, directory structure, and so forth are likely to be familiar to a larger percentage of readers (we have found that many Linux administrators are familiar with CentOS, even if they don’t prefer it). This doesn’t mean that CentOS is the only choice, or even the best one for you. A question that often appears on the mailing lists is: “Which distribution of Linux is the best to use with Asterisk?” The multitude of answers generally boils down to “the one you like the best.”[43]
Most Asterisk configurations are composed of three main packages : the main Asterisk program (asterisk), the Zapata telephony drivers (zaptel), and the PRI libraries (libpri). If you plan on a pure VoIP network, the only real requirement is the asterisk package, but we recommend installing all three packages; you can choose what modules to activate later. The zaptel drivers are required if you are using analog or digital hardware, or if you’re using the ztdummy driver (discussed later in this chapter) as a timing source. The libpri library is optional unless you’re using ISDN PRI interfaces, and you may save a small amount of RAM if you don’t load it, but we recommend that it be installed in conjunction with the zaptel package for completeness.
In the first edition of this book, we recommended that you install the additional asterisk-sounds package. This was a separate compressed archive that you would download, extract, and then install. As of Asterisk version 1.4.0, there are now two sets of sounds packages: the Core Sound package and the Extra Sound package. Since Asterisk supports several different audio formats, these packages can be obtained in a number of different sound formats, such as G.729 and GSM. The reason for all of the different formats is that Asterisk can use the sound format that requires the least amount of CPU transcode. For example, if you have a lot of connections coming in on VoIP channels that are running GSM, you would want to have the GSM version of the sound files. You can select one or more sound prompt types in the menuselect screen (discussed later in this chapter). We recommend that you install at least one type of sounds file from both the Core Sound package and Extra Sound package menu items. Since we may make use of some of the Extra Sound files throughout this book, we will assume you have at least one of the formats installed.
To compile Asterisk, you must have the GCC compiler (version 3.x or later) and its dependencies on your system. Asterisk also requires bison, a parser generator program that replaces yacc, and ncurses for CLI functionality. The cryptographic library in Asterisk requires OpenSSL and its development packages.
Zaptel requires libnewt and its development packages for the zttool program (see the section called “Using ztcfg and zttool” later in this chapter). If you’re using PRI interfaces, Zaptel also requires the libpri package (again, even if you aren’t using PRI circuits, we recommend that you install libpri along with zaptel).
If you install the Software Development packages in CentOS, you will have all of these tools. If you are looking to keep things trim, and wish to install the bare minimum to compile Asterisk and its related packages, Table 3.1, “List of packages required to compile libpri, zaptel, and asterisk” will prove useful.
Note
In the following table, the -y switch to the yum
application means to answer yes to all prompts, and using it will
install the application and all dependencies without prompting you. If
this is not what you want, omit the -y switch.
If you just want to install all of the above packages in one go, you can specify more than one package on the command line, e.g.:
# yum install -y gcc ncurses-devel libtermcap-devel [...]
Table 3.1. List of packages required to compile libpri, zaptel, and asterisk
| Package name | Installation command | Note | Used by |
|---|---|---|---|
| GCC 3.x |
yum install -y gcc
| Required to compile zaptel, libpri, and asterisk | libpri, zaptel, asterisk |
| ncurses-devel |
yum install -y ncurses-devel
| Required by menuselect | menuselect |
| libtermcap-devel |
yum install -y libtermcap-devel
| Required by asterisk | asterisk |
| Kernel Development Headers |
yum install -y kernel-devel
| Required to compile zaptel | zaptel |
| Kernel Development Headers (SMP) |
yum install -y kernel-smp-devel
| Required to compile zaptel | zaptel |
| GCC C++ 3.x |
yum install -y gcc-c++
| Required by asterisk | asterisk |
| OpenSSL (optional) |
yum install -y openssl-devel
| Dependency of OSP, IAX2 encryption, res_crypto (RSA key support) | asterisk |
| newt-devel (optional) |
yum install -y newt-devel
| Dependency of zttool | zaptel |
| zlib-devel (optional) |
yum install -y zlib-devel
| Dependency of DUNDi | asterisk |
| unixODBC; unixODBC-devel (optional) |
yum install -y unixODBC-devel
| Dependency of func_odbc, cdr_odbc, res_config_odbc, res_odbc, ODBC_STORAGE | asterisk |
| libtool (optional; recommended) |
yum install -y libtool
| Dependency of ODBC-related modules | asterisk |
| GNU make (version 3.80 or higher) [a] |
yum install -y make
| Required to compile zaptel and asterisk | asterisk |
[a] It is a common problem among new installs on some Linux distriebutons to see GNU make versions of 3.79 or lower. Note that Asterisk will no longer build correctly unless you have at least version 3.80 of GNU make. | |||
The best place to get source code for Asterisk and it’s packages is directly from the http://www.asterisk.org web site or FTP server.
Release Versus Trunk
The Asterisk code base is under a constant state of change. Developers use a sofware revision tool called Subversion (SVN)[44] to manage the code base. Subversion allows a communty of developers to collaborate with each other on complex programming projects.
There are two main areas where Asterisk is developed, and these are referred to as the Branch and the Trunk. In the Trunk, new features, architectural changes, and any of the brand-new stuff that is going on is performed. This place in the code base contains all the new toys, but at any time can be in a nonworking state, and is absolutely forbidden from production use (see figure).

Just like a tree, a Trunk will have Branches. These Branches have the major revision numbers such as 1.0, 1.2, and 1.4 (in the future we will likely see 1.6, 1.8, 1.8.2, 1.8.4. 1.8.6, 1.8.8. 1.8.8.2…um…etc…).[45] Within the Branch there are no major architectural changes or new features—simply bug and security fixes. In a production environment, stability is far more important than feature evolution.
Roughly every 14 months (although Asterisk does not follow a formal release timeline like many commercial software packages), a version of Asterisk is released intended for use in production environments. The first version of Asterisk was 1.0, which was released at the very first AstriCon in Atlanta in September of 2004. Asterisk 1.2 was released at IP4IT in November 2005, and Asterisk 1.4 was released in December of 2006.
The easiest way to obtain the most recent release is through the use of the program wget.
Note that we will be making use of the /usr/src/ directory to extract and compile the Asterisk source, although some system administrators may prefer to use /usr/local/src. Also be aware that you will need root access to write files to the /usr/src/ directory and to install Asterisk and its associated packages.
Note
See Chapter 13, Managing Your Asterisk System for information on running Asterisk as non-root. All security professionals will recommend that you run your daemons as a non-root user in case there are security vulnerabilities in the software. This helps to lower (but obviously does not eliminate) the risk of someone compromising the root user.
To obtain the latest release source code via wget, enter the following commands on the command line:
#cd /usr/src/# wget http://downloads.digium.com/pub/asterisk/asterisk-1.4-current.tar.gz # wget http://downloads.digium.com/pub/libpri/libpri-1.4-current.tar.gz # wget http://downloads.digium.com/pub/zaptel/zaptel-1.4-current.tar.gz
Note
The latest versions of the asterisk, libpri, and zaptel packages may not necessarily be the same version number.
Alternatively, during development and testing you will probably want to work with the latest branch. To check it out from SVN, run:
# svn co http://svn.digium.com/svn/asterisk/branches/1.4 asterisk-1.4
If you retrieved the described source code via the release files on the Digium FTP server, then extract the files as described in the next section before continuing on with compiling.
The packages you downloaded from the FTP server are compressed archives containing the source code; thus, you will need to extract them before compiling. If you didn’t download the packages to /usr/src/, either move them there now or specify the full path to their location. We will be using the GNU tar application to extract the source code from the compressed archive. This is a simple process that can be achieved through the use of the following commands:
#cd /usr/src/#tar zxvf zaptel-1.4-current.tar.gz#tar zxvf libpri-1.4-current.tar.gz#tar zxvf asterisk-1.4-current.tar.gz
Tip
In bash (and other shell systems which support it), you can use
an extremely handy feature called Tab completion. This will allow you to type part of a
filename and have the rest of it completed automatically. For example,
if you type tar zxvf
zap that will
complete the full zaptel filename for you. If
more than one filename matches the pattern and you hit Tab twice, it
will list the files matching that pattern.<tab>
These commands will extract the packages and source code to their
respective directories. When you extract the asterisk-1.4-current.tar.gz file, you will
find that the file will extract to the current version of Asterisk, i.e.
asterisk-1.4.4.
Tip
It’s always a good idea to keep the source code of the most recently working version of a package in case you have to “roll back” out of a new bug introduced, or some other strange behavior you can’t solve immediately.
In the 1.4.0 version of Asterisk and its related packages, a new build system, autoconf, was implemented. This has changed the build process slightly, but has given more flexibilty to control what modules are being built at build time. This has an advantage in that we only have to build the modules we want and need instead of building everything.
Along with the new build system, a new menu-based selection system
was introduced, courtesy of Russell Bryant. This new system permits a
finer-grained selection to which modules are built before compiling the
software and no longer requires the user to edit
Makefiles. So instead of discussing how to use menuselect in every
“Compiling ...” section, we will discuss it here, so when you see make menuselect you will understand what to do
once inside the menuselect configuration screen.
In Figure 3.1, “Sample menuselect screen”, we see the opening menuselect screen for the Asterisk software. Other packages will look extremely similar, but with less options. We can navigate up and down the list using the arrow keys. We can select one of the menu options by pressing Enter or by using the right arrow key. The left arrow key can be used to go back.
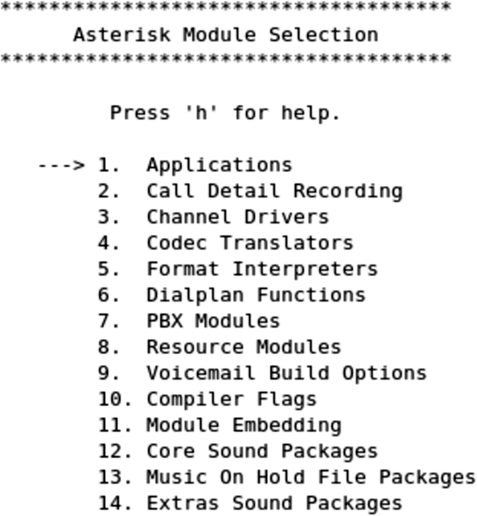
Figure 3.2, “List of modules to be built” shows a list of possible
dialplan applications that can be built for use in Asterisk. Modules to be
built are marked as [*]. A module is
marked as not being built by [ ].
Modules that have XXX in front of them
are missing a package dependency which must be satisfied before it will be
available to be built. In Figure 3.2, “List of modules to be built”, we can
see that the app_flash module cannot be built due to
a missing dependency of Zaptel (i.e., the Zaptel module has not been built
and installed on the system since the last time ./configure was run). If you have satisfied
a dependency since the last time you ran ./configure, then run it again, and rerun
menuselect. Your module should now be available for building.
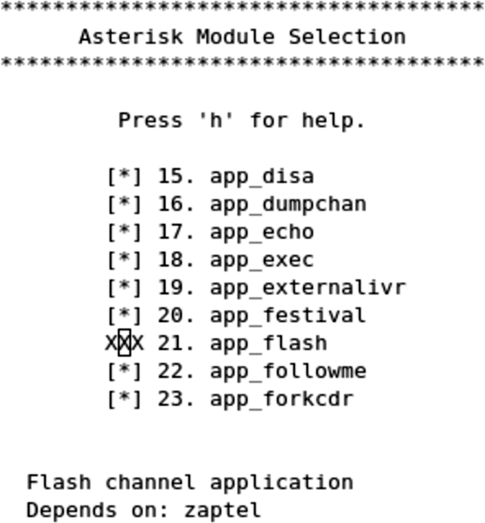
After you have finished making changes to menuselect, type
x to save and quit. qq
Figure 3.3, “Layers of device interaction with Asterisk” shows the layers of interaction between Asterisk and the Linux kernel with respect to hardware control. On the Asterisk side is the Zapata channel module, chan_zap. Asterisk uses this interface to communicate with the Linux kernel, where the drivers for the hardware are loaded.

The Zaptel interface is a kernel loadable module that presents an abstraction layer between the hardware drivers and the Zapata module in Asterisk. It is this concept that allows the device drivers to be modified without any changes being made to the Asterisk source itself. The device drivers are used to communicate with the hardware directly and to pass the information between Zaptel and the hardware.
Tip
While Asterisk itself compiles on a variety of platforms, the Zaptel drivers are Linux-specific—they are written to interface directly with the Linux kernel. There is a project at http://www.solarisvoip.com that provides Zaptel support for Solaris. There is also a project that is working to provide Zapata drivers for BSD, located at http://www.voip-info.org/tiki-index.php?page=FreeBSD+zaptel.
First we will discuss the ztdummy driver, used on systems that require a timing interface but that do not have hardware. Then we will look at compiling and installing the drivers. (The configuration of Zaptel drivers will be discussed in the next chapter.)
Tip
Before compiling the Zaptel drivers on a system running a Linux 2.4 kernel, you should verify that /usr/src/ contains a symbolic link named linux-2.4 pointing to your kernel source. If the symbolic link doesn’t exist, you can create it with the following command (assuming you’ve installed the source in /usr/src/):
# ln -s /usr/src/'uname -r' /usr/src/linux-2.4 Computers running Linux 2.6 kernel-based distributions do not usually require the use of the symbolic link, as these distributions will search for the kernel build directory automatically. However, if you’ve placed the build directory in a nonstandard place (i.e., somewhere other than /lib/modules/ <kernel version> /build/), you will require the use of the symbolic link.
While Asterisk and the other related packages run on Linux 2.4.x kernels, development is done first and foremost on 2.6.x kernels and support for 2.4.x kernels is not guarenteed in the future.
In Asterisk, certain applications and features require a timing device in order to operate (Asterisk won’t even compile them if no timing device is found). All Digium PCI hardware provides a 1 kHz timing interface that satisfies this requirement. If you lack the PCI hardware required to provide timing, the ztdummy driver can be used as a timing device. On Linux 2.4 kernel-based distributions, ztdummy must use the clocking provided by the UHCI USB controller.
Note
Many older systems (and some newer ones) use an OHCI USB controller chip, which is incompatible with ztdummy. However, if you’re using a 2.6 kernel there is no need to worry about which USB controller chip your system has.
The driver looks to see that the usb-uhci module is loaded and that the kernel version is at least 2.4.5. Older kernel versions are incompatible with ztdummy.
On a 2.6 kernel-based distribution, ztdummy does not require the use of the USB controller. (As of v2.6.0, the kernel now provides 1 kHz timing[46] with which the driver can interface; thus, the USB controller hardware requirement is no longer necessary.)
Compiling the Zapata telephony drivers for use with your Digium hardware is
straightforward; however, the method employed between the 1.2 and 1.4
versions is slightly different due to the new build environment. First
we need to run ./configure in order
to determine what applications and libraries are installed on the
system. This will ensure that everything Zaptel needs is installed. The
following commands will build Zaptel and its modules:
#cd /usr/src/zaptel-version# make clean # ./configure ##makemenuselectmake # make install
Tip
While running make clean is
not always necessary, it’s a good idea to run it before
recompiling any of the modules, as it will remove the compiled binary
files from within the source code directory. You can also use it to
clean up after installing if you don’t like to leave the compiled
binaries floating around. Note that this removes the binaries only
from the source directory, not from the system.
In addition to the executables, make
clean also removes the intermediary files (i.e., the object
files) after compilation. You don’t need them occupying space on your
hard drive.
If you’re using a system that makes use of the
/etc/rc.d/init.d/ or
/etc/init.d/ directories (such as CentOS and other
Red Hat-based distros), you may wish to run the make config command as well. This will install the startup scripts and
configure the system, using the chkconfig command to load the
zaptel module automatically at startup:
# make config
Two programs installed along with Zaptel are ztcfg and zttool. The ztcfg program is used to read the configuration in /etc/zaptel.conf to configure the hardware. The zttool program can be used to check the status of your installed hardware. For instance, if you are using a T1 card and there is no communication between the endpoints, you will see a red alarm. If everything is configured correctly and communication is possible, you should see an “OK.” The zttool application is also useful for analog cards, because it tells you their current state (configured, off-hook, etc.). The use of these programs will be explored further in the next chapter.
The libpri libraries do not make use of the autoconf build environment or the
menuselect feature as they are unnecessary; thus, the installation is
simplified. libpri is used by various makers of Time
Division Multiplexing (TDM) hardware, but even if you don’t have the hardware installed,
it is safe to compile and install this library. You must compile and
install libpri before Asterisk, as it will be
detected and used when Asterisk is compiled. Here are the commands
(replace version with your version of
libpri):
#cd /usr/src/libpri-#versionmake clean#make#make install
Once you’ve compiled and installed the zaptel and
libpri packages (if you need them), you can move on
to Asterisk. This section walks you through a standard installation and
introduces some of the alternative make
arguments that you may find useful.
Asterisk is compiled with gcc through the use of the
GNU make program. To get started
compiling Asterisk, simply run the following commands (replace
version with your version of
Asterisk):
#cd /usr/src/asterisk-#versionmake clean# ./configure # make menuselect#make install#make samples
Be aware that compile times will vary between systems. On a current-generation processor, you shouldn’t need to wait more than five minutes. At AstriCon (http://www.astricon.net), someone reported successfully compiling Asterisk on a 133 MHz Pentium, but it took approximately five hours. You do the math.
Run the make samples
command to install the default configuration files. Installing
these files (instead of configuring each file manually) will allow you
to get your Asterisk system up and running much faster. Many of the
default values are fine for Asterisk. Files that require editing will be
explained in future chapters.
Tip
If you already have configuration files installed in
/etc/asterisk/ when you run the make samples command,
.old will be appended to the end of each of your
current configuration files, for example,
extensions.conf will be renamed
extensions.conf.old. Be careful, though, because
if you run make samples more than
once you will overwrite your original configuration files!
The sample configuration files can also be found in the configs/ subdirectory within your Asterisk sources directory.
If you’re using a system that makes use of the
/etc/rc.d/init.d/ or
/etc/init.d/ directories, you may wish to run the
make config command as well. This
will install the startup scripts and configure the system (through the
use of the chkconfig command) to
execute Asterisk automatically at startup:
# make config
There are several other make
arguments that you can pass at compile time. While some of these will be
discussed here, the remainder are used internally within the file and
really have no bearing or use for the end user. (Of course, new
functions may have been added, so be sure to check the Makefile for other options.)
Let’s take a look at some useful make arguments.
The make clean command
is used to remove the compiled binaries from within the
source directory. This command should be run before you attempt to
recompile or, if space is an issue, if you would like to clean up the
files.
The make distclean command
is used to remove the compiled binaries and to clean the
source directory back to its original state after being extracted from
the compressed archive.
The make update command is used to update the existing code from the Digium SVN server.
If you downloaded the source code from the FTP server, you will
receive a notice stating so.
The Asterisk Web Voicemail script is used to give a graphical interface to your voicemail account, allowing you to manage and interact with your voicemail remotely from a web browser.
When you run the make
webvmail command, the Asterisk Web Voicemail script will be
placed into the cgi-bin/ directory of your HTTP
daemon. If you have specific policies with respect to security, be
aware that it uses a setuid root
Perl script. This command will install only on a CentOS or Fedora box,
as other distributions may have different paths to their
cgi-bin/ directories. (This, of course, can be
changed by editing the HTTP_CFGDIR variable in the
Makefile at line 133 at the time of this
writing.)
The make progdocs command will create documentation using the
doxygen software from comments placed within the
source code by the developers. You must have the appropriate
doxygen software installed on your system in
order for this to work. Note that doxygen assumes
that the source code is well documented, which, sadly, is not always
the case, although much work was published since the first edition of
this book! The information contained within the doxygen system will be useful only
to developers.
The make config command
will install Red Hat-style initialization scripts, if
the /etc/rc.d/init.d or
/etc/init.d directories are found to exist. If
they do exist, the scripts are installed with file permissions equal
to 755. If the script detects that
/etc/rc.d/init.d/ exists, the chkconfig --add asterisk command will also
be run to cause Asterisk to be started automatically at boot time.
This is not the case, however, with distributions that only use the
/etc/init.d/ directory. Running make config will not do anything to an
already running Asterisk process, or start one if it’s not
running.
This script currently is really only useful on a Red Hat-based system, although initialization scripts are available for other distributions (such as Gentoo, Mandrake, and Slackware) in the ./contrib./init.d/ directory of your Asterisk source directory.
While the documented process of installing Asterisk expects you to compile the source code yourself, there are Linux distributions (such as Debian) that include precompiled Asterisk binaries. Failing that, you may be able to install Asterisk with the package managers that those distributions of Linux provide (such as apt-get for Debian and portage for Gentoo).[47] However, you may also find that many of these prebuilt binaries are quite out of date and do not follow the same furious development cycle as Asterisk.
Finally, there do exist basic, precompiled Asterisk binaries that can be downloaded and installed in whatever Linux distribution you have chosen. However, the use of precompiled binaries doesn’t really save much time, and we have found that compiling Asterisk with each install is not a very cumbersome task. We believe that the best way to install Asterisk is to compile from the source code, so we won’t discuss prebuilt binaries very much in this book―and besides, don’t you want to be l33t?[48] In the next chapter, we’ll look at how to initially configure Asterisk and several kinds of channels.
Additional prompts are installed via the menuselect application in your Asterisk source directory. There are three sets of audio packages: Core Sound, Extra Sound, and Music On Hold File. Each set of packages is broken down into different formats (and the Core Sound packages are available in multiple languages). Using the menuselect application, you can select combinations of audio packages for use in your environment. Some of the formats available include:
WAV
μlaw
alaw
GSM
G.729
G.722 (wideband, 16-bit)
As of this writing, the Core Sound packages are available in the following languages:
English
Spanish
French
Warning
Selecting any sounds in menuselect will cause the system to download the files from the Digium FTP server upon install. The size of these files ranges anywhere from 2 MB to 27 MB, so be aware of this when installing offline, or on slow and expensive links.
There are many common compiling issues that users often run into. Here are some of the more common problems, and how to resolve them.
First, let’s take a look at some of the errors you may encounter when running the configure script.
If you receive the following error while attempting to run the configure script, you must install the gcc compiler and its dependencies:
configure: error: no acceptable C compiler found in $PATH
The following packages are required for gcc:
gcc
cpp
glibc-headers
glibc-devel
glibc-kernheaders
These can be installed manually, by copying the files off of
your distribution disks, or through the yum
package manager, with the command yum install
gcc.
The following error will be displayed if no C++ preprocessor is found installed on the system. You must install the gcc-c++ package and its dependencies:
configure: error: C++ preprocessor "/lib/cpp" fails sanity check
The
following packages are required for the gcc-c++
preprocessor; installed by running yum
install gcc-c++:
gcc-c++
libstdc++-devel
The following error may be encountered during initialization of the configure script if the libtermcap-devel package is not installed:
configure: error: *** termcap support not found
The following file is required in order to compile Asterisk; it
can be installed with the yum install
libtermcap-devel command:
libtermcap-devel
You may also run into errors when compiling Zaptel. Here are some of the most commonly occurring problems, and what to do about them. If your error is not listed below, see the previous section as your error may be covered there.
You will receive the following error if you attempt to build Zaptel without the gcc compiler installed:
make: cc: Command not found
make: *** [gendigits.o] Error 127
Be sure to install gcc and its dependencies. For more information, see the section called “configure: error: no acceptable C compiler found in $PATH” in the previous section.
The TDM400P cards require the PCI bus to be version 2.2. If you attempt to load the Zapata telephony drivers with an older version, you may get the following errors:
The only way to resolve these errors is to use a newer motherboard that supports PCI version 2.2:
The ztdummy driver requires that a UHCI USB controller be available on Linux 2.4 kernels (the USB controller is not a requirement on Linux 2.6 kernels, because they are capable of generating the 1 kHz timing reference). There exists a secondary kind of controller, known as OHCI, which is not compatible with the ztdummy driver. If the UHCI USB controller is not accessible on Linux 2.4 kernels, the following error will occur:
/lib/modules/2.4.22/misc/ztdummy.o: /lib/modules/2.4.22/misc/ztdummy.o: unresolved
symbol unlink_td
/lib/modules/2.4.22/misc/ztdummy.o: /lib/modules/2.4.22/misc/ztdummy.o: unresolved
symbol alloc_td
/lib/modules/2.4.22/misc/ztdummy.o: /lib/modules/2.4.22/misc/ztdummy.o: unresolved
symbol delete_desc
/lib/modules/2.4.22/misc/ztdummy.o: /lib/modules/2.4.22/misc/ztdummy.o: unresolved
symbol uhci_devices
/lib/modules/2.4.22/misc/ztdummy.o: /lib/modules/2.4.22/misc/ztdummy.o: unresolved
symbol uhci_interrupt
/lib/modules/2.4.22/misc/ztdummy.o: /lib/modules/2.4.22/misc/ztdummy.o: unresolved
symbol fill_td
/lib/modules/2.4.22/misc/ztdummy.o: /lib/modules/2.4.22/misc/ztdummy.o: unresolved
symbol insert_td_horizontal
/lib/modules/2.4.22/misc/ztdummy.o: insmod /lib/modules/2.4.22/misc/ztdummy.o failed
/lib/modules/2.4.22/misc/ztdummy.o: insmod ztdummy failed
You can verify that you have the correct style of USB controller
and its associated drivers with the lsmod command:
# lsmod
Module                  Size  Used by
usb_uhci               26412  0
usbcore                79040  1 [hid usb-uhci]
As you can see in the example above, you are looking to make sure that the usbcore and usb_uhci modules are loaded. If these modules are not loaded, be sure that USB has been activated within your BIOS and that the modules exist.
If the USB drivers are not loaded, you can still check which
type of USB controller you have with the dmesg command:
# dmesg | grep -i usb To verify that you indeed have a UHCI USB controller, look for the following lines:
uhci_hcd 0000:00:04.2: new USB bus registered, assigned bus number 1
hub 1-0:1.0: USB hub found
uhci_hcd 0000:00:04.3: new USB bus registered, assigned bus number 2
hub 2-0:1.0: USB hub found
If you experience depmod errors during
compilation, you more than likely don’t have a symbolic link to your
Linux kernel sources. If you don’t have your Linux kernel sources
installed, retrieve the sources for your installed kernel, install
them, and create a symbolic link against
/usr/src/linux-2.4. The following is an
example of a depmod error:
depmod: *** Unresolved symbols in /lib/modules/2.4.22/kernel/drivers/block/
loop.o
If you run make config in the Asterisk or
Zaptel source directories, then the initialization scripts used to control Asterisk or Zaptel will be copied to
/etc/rc.d/init.d/. The scripts can be used to easily
load and unload Asterisk and Zaptel. They will also run the
chkconfig command for you so Asterisk and Zaptel will
be started automatically upon system boot. The following shows their
usage:
# service zaptel start
# service asterisk start
Each initialization script has several options that can be utilized to control the PBX or the drivers. Tables 3.2 and 3.3 show the commands run by the script as if you had typed them into the command-line interface (CLI) yourself:
In this section, we’ll take a quick look at how to load the zaptel and ztdummy modules without the CentOS initialization script. The zaptel module does not require any configuration if it’s being used only for the ztdummy module. If you plan on loading the ztdummy module as your timing source (and thus, you will not be running any PCI hardware in your system), now is a good time to load both drivers.
In the early days of Linux, the system’s /dev/ directory was populated with a list of devices with which the system could potentially interact. At the time, nearly 18,000 devices were listed. That all changed when devfs was released, allowing dynamic creation of devices that are active within the system. Some of the recently released distributions have incorporated the udev daemon into their systems to dynamically populate /dev/ with device nodes.
To allow Zaptel and other device drivers to access the PCI hardware installed in your system, you must add some rules. Using your favorite text editor, open up your udevd rules file. On CentOS, for example, this file is located at /etc/udev/rules.d/50-udev.rules. Add the following lines to the end of your rules file:
# Section for zaptel

device
   KERNEL="zapctl",     NAME="zap/ctl"
   KERNEL="zaptimer",   NAME="zap/timer"
   KERNEL="zapchannel", NAME="zap/channel"
   KERNEL="zappseudo",  NAME="zap/pseudo"
   KERNEL="zap[0-9]*",  NAME="zap/%n"
Save the file and reboot your system for the settings to take effect.
Note
You may not have to actually edit anything in your system, as the Zaptel installation script will try to install the rules for you; however, we have left this here as a reference for those systems that are not automatically configured.
The zaptel module must be loaded before any of the other modules are loaded
and used. Note that if you will be using the zaptel
module with PCI hardware, you must configure
/etc/zaptel.conf before you load it. (We will
discuss how to configure zaptel.conf for use with
hardware in Chapter 4, Initial Configuration of Asterisk.) If you are using
zaptel only to access ztdummy,
you can load it with the modprobe
command, as follows:
# modprobe zaptel If all goes well, you shouldn’t see any output. To verify that the
zaptel module loaded successfully, use the lsmod command. You
should be returned a line showing the zaptel module
and the amount of memory it is using, as in the following:
# lsmod | grep zaptel
zaptel 201988 0The ztdummy module is an interface to a device that provides timing, which
in turn allows Asterisk to provide timing to various applications and
functions that require it. Use the modprobe command to load the
ztdummy module after zaptel
has been loaded:
# modprobe ztdummy If ztdummy loads successfully, no output will
be displayed. To verify that ztdummy is loaded and
is being used by zaptel, use the lsmod command. The following output is from a
computer running the 2.6 kernel:
# lsmod | grep ztdummy
    Module                  Size  Used by
    ztdummy                 3796  0
    zaptel                201988  1 ztdummy
If you happen to be running a 2.4 kernel-based computer, your
output from lsmod will show that
ztdummy is using the usb-uhci
module:
 # lsmod | grep ztdummy
    Module                  Size  Used by
    ztdummy                 3796  0
    zaptel                201988  0 ztdummy
usb-uhci 24524 0 ztdummyThe libpri libraries do not need to be loaded like modules. Asterisk looks for libpri at compile time and configures itself to use the libraries if they are found.
Asterisk can be loaded in a variety of ways. The easiest way is to start Asterisk by running the binary file directly from the Linux command-line interface. If you are running a system that uses the init.d scripts, you can easily start and restart Asterisk that way as well. However, the preferred way of starting Asterisk is via the safe_asterisk script.
The Asterisk binary is, by default, located at
/usr/sbin/asterisk. If you run
/usr/sbin/asterisk, it will be loaded as a daemon.
There are also a few switches you should be aware of that allow you to
(re)connect to the Asterisk CLI, set the verbosity of CLI output, and
allow core dumps if Asterisk crashes (for debugging with
gdb). To explore the full range of options, run
Asterisk with the -h switch:
# /usr/sbin/asterisk -h Here is a list of the most commonly used options:
-
-c Console. This will start Asterisk as a user process (not as a server), and will connect you to the Asterisk CLI. This option is good when you are debugging your startup parameters, but should not be used for a normal system (if Asterisk is already running, this option will not work and will issue a complaint).
-
-v Verbosity. This is used to set the amount of output for CLI debugging. The more “v”s, the more verbose.
-
-g Core dump. If Asterisk were to crash unexpectedly, this would cause a core file to be created for later tracing with gdb. You generally do not use this in production, unless you are writing code for Asterisk and want to debug any resulting crashes.
-
-r Remote. This is used to reconnect remotely to an already running Asterisk process. (The process is remote from the standpoint of the console connecting to it but is actually a local process on the machine. This has nothing to do with connecting to a remote process over a network using a protocol such as IP, as this is not supported.) This is the most common option and it is what you would use to connect to Asterisk on a system where it is running as a daemon/service that was started by init at boot time.
-
-x "<CLI
          command>"
Execute. Using this command in combination with -
rallows you to execute a CLI command without having to connect to the CLI and type it manually. An example would be to send a restart, which you would do by typingasterisk -rx "reload"from the command line.
Let’s look at some examples. If you want to start Asterisk as a user program (because you are tweaking your config and will be starting and stopping it several times), and you want a verbosity level of 3, use the following command:
# /usr/sbin/asterisk -cvvv If the Asterisk process is already running (for example, if you have installed Asterisk as part of the init process of the system), use the reconnect switch, like so:
# /usr/sbin/asterisk -vvvr If you want Asterisk to dump a core file after a crash, you can
use the -g switch when starting
Asterisk:
# /usr/sbin/asterisk -g To execute a command without connecting to the CLI and typing it
(perhaps for use within a script), you can use the -x switch in combination with the -r switch:
#/usr/sbin/asterisk -rx "restart now"#/usr/sbin/asterisk -rx "database show" #/usr/sbin/asterisk -rx "sip show peers"
If you are experiencing crashes and would like to output to a debug file, use the following command:
# /usr/sbin/asterisk -vvvvc | tee /tmp/debug.log Note that you do not have to use the v switch
if you do not want the system to provide detailed output of what is
going on. On a busy system, you may not want to get any output, as it
can interfere with whatever you are doing on the console.
Asterisk uses several directories on a Linux system to manage the various aspects of the system, such as voicemail recordings, voice prompts, and configuration files. This section discusses the necessary directories, all of which are created during installation and configured in the asterisk.conf file.
The /etc/asterisk/ directory contains the Asterisk configuration files. One file, however—zaptel.conf—is located in the /etc/ directory. The Zaptel hardware was originally designed by Jim Dixon of the Zapata Telephony Group as a way of bringing reasonable and affordable computer telephony equipment to the world. Asterisk makes use of this hardware, but any other software can also make use of the Zaptel hardware and drivers. Consequently, the zaptel.conf configuration file is not directly located in the /etc/asterisk/directory.
The /usr/lib/asterisk/modules/ directory contains all of the Asterisk loadable modules. Within this directory are the various applications, codecs, formats, and channels used by Asterisk. By default, Asterisk loads all of these modules at startup. You can disable any modules you are not using in the modules.conf file, but be aware that certain modules are required by Asterisk or are dependencies of other modules. Attempting to load Asterisk without these modules will cause an error at startup.
The /var/lib/asterisk/ directory contains the astdb file and a number of subdirectories. The astdb file contains the local Asterisk database information, which is somewhat like the Microsoft Windows Registry. The Asterisk database is a simple implementation based on v1 of the Berkeley database. The db.c file in the Asterisk source states that this version was chosen for the following reason: “DB3 implementation is released under an alternative license incompatible with the GPL. Thus, in order to keep Asterisk licensing simplistic, it was decided to use version 1 as it is released under the BSD license.”
The subdirectories within /var/lib/asterisk/ include:
- agi-bin/
The agi-bin/ directory contains your custom scripts, which can interface with Asterisk via the various built-in AGI applications. For more information about AGI, see Chapter 8, Protocols for VoIP.
- firmware/
The firmware/ directory contains firmware for various Asterisk-compatible devices. It currently contains only the iax/ subdirectory, which holds the binary firmware image for Digium’s IAXy.
- images/
Applications that communicate with channels supporting graphical images look in the images/ directory. Most channels do not support the transmission of images, so this directory is rarely used. However, if more devices that support and make use of graphical images are released, this directory will become more relevant.
- keys/
Asterisk can use a public/private key system to authenticate peers connecting to your box via an RSA digital signature. If you place a peer’s public key in your keys/ directory, that peer can be authenticated by channels supporting this method (such as the IAX2 channels). The private key is never distributed to the public. The reverse is also true: you can distribute your public key to your peers, allowing you to be authenticated with the use of your private key. Both the public and private keys—ending in the .pub and .key file extensions, respectively—are stored in the keys/ directory.
- mohmp3/
When you configure Asterisk for Music on Hold, applications utilizing this feature look for their MP3 files in the mohmp3/ directory. Asterisk is a bit picky about how the MP3 files are formatted, so you should use constant bitrate (CBR) encoding and strip the ID3 tags from your files.
- sounds/
All of the available voice prompts for Asterisk reside in the sounds/ directory. The contents of the basic prompts included with Asterisk are in the sounds.txt file located in your Asterisk source code directory. Contents of the additional prompts are located in the sounds-extra.txt file in the directory to which you extracted the asterisk-sounds package earlier in this chapter.
The Asterisk spool directory contains several subdirectories, including dictate/, meetme/, monitor/, outgoing/, system/, tmp/, and voicemail/ (see Figure 3.4, “/var/spool/asterisk/ directory structure”). Asterisk monitors the outgoing directory for text files containing call request information. These files allow you to generate a call simply by moving the correctly structured file into the outgoing/ directory.
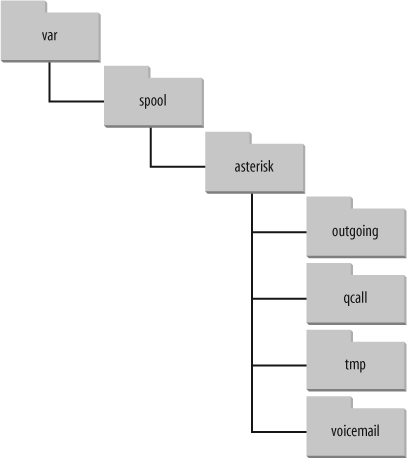
Call files being placed into the outgoing/ directory can contain useful information, such as the Context, Extension, and Priority where the answered call should start, or simply the application and its arguments. You can also set variables and specify an account code for Call Detail Records. More information about the use of call files is presented in Chapter 9, The Asterisk Gateway Interface (AGI).
The dictate/ directory is the default
location where the Dictate()
application looks for files.
The meetme/ directory is the location where
MeetMe() conference recordings are
saved.
Recordings from either one-touch recording (the w and W
flags to the Dial() application), the
MixMonitor(), or Monitor() applications are stored in the
monitor/ directory.
system/ is used by the System() application for temporary storage of
data.
The tmp/ directory is used, funny enough, to hold temporary information. Certain applications may require a place to write files to before copying the complete files to their final destinations. This prevents two processes from trying to write to and read from a file at the same time.
All voicemail and user greetings are contained within the voicemail/ directory. Extensions configured in voicemail.conf that have been logged in to at least once are created as subdirectories of voicemail/.
The /var/run/ directory contains the process ID (PID) information for all active processes on the system, including Asterisk (as specified in the asterisk.conf file). Note that /var/run/ is OS-dependent and may differ.
The /var/log/asterisk/ directory is where Asterisk logs information. You can control the type of information being logged to the various files by editing the logger.conf file located in the /etc/asterisk/ directory. Basic configuration of the logger.conf file is covered in Appendix D, Configuration Files.
The /var/log/asterisk/cdr-csv
directory is used to store the CDRs in comma-separated value (CSV)
format. By default information is stored in the Master.csv file, but individual
accounts can store their own CDRs in separate files with the use of the
accountcode option (see Appendix A, VoIP Channels for more information).
In the following sections we will provide a gentle introduction to the AsteriskNOW software, which gives you a complete PBX system with graphical configuration screen all built into one!
AsteriskNOW is an open source software appliance, a customized Linux distribution that includes Asterisk, the Asterisk GUI, and all other software needed for an Asterisk system. The Asterisk GUI gives you the ability to easily configure your Asterisk system without being a technical expert.
Note: The complete software appliance distribution is provided under the GPL and may legally be used for any purpose, commercial or otherwise.
AsteriskNOW installation is easy, because the appliance includes only those components necessary to run, debug, and build Asterisk. You no longer have to worry about kernel versions and package dependencies. AsteriskNOW is a custom Linux distribution for Asterisk based on rPath Linux.
A system on which you can install AsteriskNOW
A CD writer and associated software
Connection to the Internet
Firefox browser
Note
The Asterisk GUI currently requires the Firefox browser (available at http://www.mozilla.com/en-US/ for optimum performance. Wider browser support will be available with future versions.
You should observe all normal precautions when preparing and installing a new distribution. Any existing operating systems on your hard drive will be removed by the Express Installation. If you are not sure that you are ready to alter your system, try one of the alternate installations (discussed in the section called “Alternate Installations””) to give AsteriskNOW a try. For more help on Asterisk and rPath see the the section called “For More Information”” section at the end of the chapter.
The essential installation of AsteriskNOW is really quite simple and gives you the ability to get up and running in a short amount of time. Use this quick installation procedure if you are comfortable with accepting the defaults. Any help you may need is provided with the installation screens. If you would like more information on the installation procedure, refer to the the section called “Extended procedure”” section below:
Download the AsteriskNOW ISO file (http://www.asterisknow.org/downloads) and create a CD image from the file. This step is required before installation can begin. The process for creating a CD image will vary depending upon the CD authoring software you are using.
Insert your newly created AsteriskNOW CD into the CD-ROM drive of the PC.
Boot from the CD by restarting the PC. A basic AsteriskNOW boot menu with several options will be provided:
To install or upgrade in graphical mode, press Enter.
To install or upgrade in Linux text mode, type
linux textand then press Enter.
The recommended, and default, installation mode is graphical. If you do not make an entry, the installation will continue in graphical mode.
From here, follow the self-explanatory, onscreen prompts to guide you through the installation process.
When installation is complete, the system will prompt you to reboot. After rebooting, a URL to access the Asterisk GUI will be displayed.
You are now ready to configure and run AsteriskNOW.
Download the AsteriskNOW ISO file (http://www.asterisknow.org/downloads) and create a CD image from the file. This step is required before installation can begin. The process for creating a CD image will vary depending upon the CD authoring software you are using.
Insert your newly created AsteriskNOW CD into the CD-ROM drive.
Boot from the CD by restarting the PC. A basic AsteriskNOW boot menu with several options will be provided:
To install or upgrade in graphical mode, press Enter.
To install or upgrade in Linux text mode, type
linux textand then press Enter.
The recommended, and default, installation mode is graphical. If you do not make an entry, the installation will continue in graphical mode.
After a bit of processing, the initial installation screen is displayed. The initial screen is similar to the following illustration:
From the initial installation screen you can read the release notes or the Help information. When you are ready, click Next to continue the installation.
The next installation screen lets you choose the type of installation. The two modes of installation available are:
- Express Installation
The Express Installation installs all of the software needed to install Asterisk. Debugging and development tools are installed with this installation type.
- Expert
Select this installation type if you want to have complete control over all installation options. Among the options you can control are software package selection, partitioning, and language selection.
The default installation type is Express Installation. This installation type assumes an English language reader and that you aren’t concerned with the finer points. Choose Expert if you don’t read English, and/or want more control over the installation details. For the purposes of this procedure, Express Installation is discussed.
Choose your installation type and then click Next.
The Automatic Partitioning screen is displayed. The Automatic Partitioning screen gives you several options to choose from before the software partitions your drive. This gives you the opportunity to choose which data (if any) is removed from your system, and how the drive is partitioned. The following options are available:
- Remove All Linux Partitions
This option will only remove any Linux partitions created from a previous Linux installation.
- Remove All Partitions
Select this option if you want to remove all partitions on your system, including those created by other operating systems (such as Windows).
- Keep All Partitions
You should choose this option if you want to retain all of your current data and partitions. You will need enough hard drive space for your Asterisk implementation. Twenty GB is a realistic minimum, but the minimum space is dependent on the needs of the system you want to create.
In most cases, you will want to choose Remove All Partitions. A hard drive dedicated to your Asterisk implementation is the best way to ensure maximum performance. Select the Review checkbox on the Automatic Partitioning screen if you want to review or modify your partition selections.
A list of the hard drives available for use is listed on the Automatic Partitioning screen. Select the checkbox next to the hard drive(s) you want to use for your system. Click Next to continue with the installation.
If you selected Remove All Partitions or Remove All Linux Partitions, a warning dialog will be displayed that asks if you want to proceed. Click Yes to proceed, or No to change your partition selection.
If you selected Review on the Automatic Partitioning screen, a screen will be displayed with the partitions created. You can modify your partitions on this screen. To proceed, click Next.
The Network Configuration screen is displayed.
You can configure the network devices associated with your system on the Network Configuration screen. Any network devices attached to your system are automatically detected by the installation program and displayed in the Network Devices list. You can either accept the device(s) automatically selected by the installation program, or you can edit them by selecting Edit.
The Time Zone Selection screen is displayed.
The Time Zone Selection screen offers several ways for you to select the time zone appropriate for your installation. You can either use the world map, which displays major cities, select from a list of locations and time zones, or select the System Clock Uses UTC to use the system time. Once you have selected a time zone, click Next.
The Administrator Password screen is displayed.
You must set a password for the AsteriskNOW administrator account, “admin”. This password will be used to log on to the system, as well as the Asterisk GUI. Set and confirm an administrator password, and then click Next to proceed.
The About to Install screen is displayed, giving you an opportunity to delay or abort the installation process. If you are ready to continue with the installation, click Next.
The Installing Packages screen is displayed.
While AsteriskNOW is being installed, the Installing Packages screen will be displayed. The installation will continue for a few minutes.
Once the installation is complete, the system will prompt you to reboot. Remove the installation disk you created, and click Reboot. After rebooting, a URL to access the Asterisk GUI will be displayed.
Once you have completed your installation and rebooted your machine, you will be able to access the Asterisk GUI. The URL used to access the Asterisk GUI is the IP address or hostname displayed after rebooting your machine. Enter this IP address in your browser URL. You will be able to refine your AsteriskNOW installation by accessing the Asterisk GUI.
You can also try out AsteriskNOW using the available VMware Player image (http://www.vmware.com/download/player/), Xen universal guest domain image (http://wiki.rpath.com/wiki/Xen_Solutions_Using_rPath_Technologies) or the LiveCD (just burn and boot). All alternate installations can be downloaded from the AsteriskNOW download page.
Note: When using the LiveCD, the default username is “admin” with “password” as the password.
An AsteriskNOW Users’ Guide is currently under development by the Asterisk community on the Asterisk Forums. For additional information on AsteriskNOW, including step-by-step installation screenshots and configuration screenshots showing the setup wizard, please refer to http://www.asterisknow.org, and visit the Asterisk Forums at http://forums.digium.com. For more information and help with rPath Linux, please see rPath’s wiki, http://wiki.rpath.com.
In this chapter, we have reviewed the procedures for obtaining, compiling, and installing Asterisk and the associated packages. In the following chapter, we will touch on the initial configuration of your system with regard to various communications channels, such as analog devices attached to FXS and FXO ports, SIP channels, and IAX2 endpoints.
[42] And some non-Linux operating systems as well, such as Solaris, *BSD, and OS X. You should note that while people have managed to successfully run Asterisk on these alternative systems, Asterisk was, and continues to be, actively developed for Linux.
[43] We will be using CentOS Server 4.4 in this book, which we usually install with nothing except the Editors package selected. If you are not sure what distribution to choose, CentOS is an excellent choice. CentOS can be obtained from http://www.centos.org.
[44] Subversion is an excellent code management system, available at http://subversion.tigris.org/. It also has an equally excellent Creative Commons released book, Version Control with Subversion, by Ben Collins Sussman et al. (O’Reilly), available online at http://svnbook.red-bean.com/.
[45] As of the release date of this book, there has been no determination that the next Asterisk release will be 1.6. It could just as easily be 2.0. Therefore, when discussing new features, you’ll see us talk about what’s in Trunk or what will be in the next release—without mentioning the specific version.
[46] Note that this is configurable in the kernel, so it is possible certain distributions may not have this set to 1,000 Hz; CentOS, however, does have this set at the correct frequency.
[47] Gentoo doesn’t actually use a precompiled binary, but rather pulls the source from a repository, and builds and installs the software using its own package management system. But the version you get is still dependant upon the maintainers packaging it for you, when you could simply build it yourself!
[48] l33t is a funny way of saying “elite,” known as leetspeak (computer slang). Even more funny is a well-written, serious article by Microsoft about leetspeak at http://www.microsoft.com/athome/security/children/leetspeak.mspx.
Table of Contents
- What Do I Really Need?
- Working with Interface Configuration Files
- Setting Up the Dialplan for Some Test Calls
- FXO and FXS Channels
- Configuring an FXO Channel for a PSTN Connection
- Configuring an FXS Channel for an Analog Telephone
- Configuring SIP Telephones
- Connecting to a SIP Service Provider
- Connecting Two Asterisk Boxes Together via SIP
- Configuring an IAX Softphone
- Connecting to an IAX Service Provider
- Connecting Two Asterisk Boxes Together via IAX
- Using Templates in Your Configuration Files
- Debugging
- Conclusion
I don’t always know what I’m talking about, but I know I’m right.
Completing all the steps in Chapter 3, Installing Asterisk should have left you with a working Asterisk system. If it did not, please take the time to go back and review the steps, consult the wiki, engage the community, and get your system running.
Unfortunately, we cannot yet make any calls, because we have not yet created any channels. To get this plane to fly, we’re going to need some runways. While there are dozens of different channel types, and dozens of different ways to configure each type of channel, we just want to get some calls happening, so let’s try and keep things simple. We have decided to guide you through the configuration of four channels: a Foreign eXchange Office (FXO) channel, a Foreign eXchange Station (FXS) channel, a Session Initiation Protocol (SIP) channel, and an Inter-Asterisk eXchange (IAX) channel.[49] We selected these channel types because they are far and away the most popular channel types in use in small Asterisk systems, and one of the goals of this book is to keep things as simple as is reasonable. If we cover the basics of these channels, we will not have done an exhaustive survey of all channel types or topologies, but we will have created a base platform on which to develop your telecommunications system. Further scenarios and channel configuration details can be found in Appendix D, Configuration Files.
Our first effort will be to explore the basic configuration of analog interfaces such as FXS and FXO ports with the use of a Digium TDM11B (which is an analog card with one FXS port and one FXO port).[50]
Next, we’ll tackle a few Voice over Internet Protocol (VoIP) interfaces: a local SIP and IAX2 channel connected to a softphone or hardphone, along with connecting two Asterisk boxes via these two popular protocols.
For SIP, we are going to cover Linksys, Polycom, Aastra, Grandstream, and Cisco sets. If we do not cover your phone model, we apologize, but what is important to realize is that while most of these devices have many different parameters that you can define, generally only a few parameters need to be defined in order to get the device to work. That will be our goal, because we figure it’s a lot less frustrating to tweak a functioning device than to get it perfectly set up on the first try. We won’t discuss all the features you may want your channel to have (such as caller ID or advanced codec and security settings), but you will be able to make and receive calls with your phone, which should put a smile on your face—a good state to be in as we dig deeper into things.
Once you’ve worked through this chapter, you will have a basic system consisting of many useful interfaces, which will provide the foundation we need to explore the extensions.conf file (discussed in detail in Chapter 5, Dialplan Basics), where the dialplan is stored (technically, it contains the instructions Asterisk needs to build the dialplan). If you do not have access to the analog hardware, some of the examples will not be available to you, but you will still have configured a system suitable for a pure-VoIP environment.
The asterisk character (*) is
used as a wildcard in many different applications. It is a good name for this
PBX for many reasons, one of which is the enormous number of interface
types to which Asterisk can connect. These include:
Analog interfaces, such as your telephone line and analog telephones
VoIP protocols such as SIP and IAX[51]
Asterisk doesn’t need any specialized hardware—not even a sound card—even though it is common to expect a telephone system to physically connect to a voice network. There are many types of channel cards that allow you to connect your Asterisk to things like analog phones or PSTN circuits, but they are not essential to the functioning of Asterisk. On the user (or station) side of the system, you can choose from all kinds of softphones that are available for Windows, Linux, and other operating systems—or use almost any physical IP phone. That handles the telephone side of the system. On the carrier side, if you don’t connect directly to a circuit from your central office, you can still route your calls over the Internet using a VoIP service provider.
In this chapter, we’re going to build an Asterisk configuration on the platform we have just installed. For the first few sections on FXO and FXS channels, we’ll assume that you have a Digium TDM11B kit (which comes with one FXO and one FXS interface). This will allow you to connect to an analog circuit (FXO) and to an analog telephone (FXS). Note that this hardware interface isn’t necessary; if you want to build an IP-only configuration, you can skip to the section on configuring SIP.
The configuration we do in this chapter won’t be particularly useful on its own, but it will be a kernel to build on. We’re going to touch on the following files:
- zaptel.conf
Here, we’ll do low-level configuration for the hardware interface. We’ll set up one FXO channel and one FXS channel. This configures the driver for the Linux kernel.
- zapata.conf
In this file, we’ll configure Asterisk’s interface to the hardware. This file contains a slightly higher-level configuration of the hardware in the Asterisk user-level process.
- extensions.conf
The dialplans we create will be extremely primitive, but they will prove that the system is working.
- sip.conf
- iax.conf
This is where we’ll configure incoming and outgoing IAX channels.
In the following sections, you will be editing several configuration
files. You’ll have to reload these files for your changes to take effect.
After you edit the zaptel.conf file, you will need to
reload the configuration for the hardware with /sbin/ztcfg -vv (you may omit the -vv if you don’t need verbose output). Changes
made in zapata.conf will require a module
reload from the Asterisk console; however, changing signaling
methods requires a restart. You will need to perform an
iax2 reload and a sip reload after
editing the iax.conf and sip.conf files, respectively.
In order to test the new devices we have defined, we must have a
dialplan through which we can make connections. Even though we have not
discussed the Asterisk dialplan (that’s coming up in the next chapter), we
want you to create a basic extensions.conf file so that we can test our
work in this chapter.
Make a backup copy of the sample
extensions.conf (try the bash command mv extensions.conf extensions.conf.sample), and
then create a blank extensions.conf file (using the
bash command touch extensions.conf),
and insert the following lines:
[globals] [general] autofallthrough=yes [default] [incoming_calls] [internal] [phones] include => internal
Note
In the [general] section, we
have set autofallthrough=yes, which
tells Asterisk to continue when an extension runs out of things to do.
If you set this to no, then Asterisk
will sit and wait for input after all priorities have executed. This is
most prevalent if the Background()
application is the last application executed in an extension. If set to
yes (which is now the default in 1.4), Asterisk will
drop the call after Background()
finishes executing (at the end of the prompt(s) supplied to it). In
order to force Asterisk to wait for input after the Background() application finishes playing the
voice prompts supplied to it, we use the WaitExten() application.
Do not be afraid if what we’ve just written doesn’t make a whole
lot of sense, as we haven’t explored the dialplan, applications,
priorities, or extensions yet (that is coming up in the next chapter).
So for now, just set autofallthrough=yes. It is
safest to use the autofallthrough=yes
command as we don’t want Asterisk hanging around waiting for input
unless we explicitly tell it to do so.
There is nothing else for now, but we’ll be using this file as we go
through this chapter to build a test dialplan so we can ensure that all of
our devices are working. Also, be sure to run the dialplan reload command from the Asterisk CLI to update to the latest changes.
Verify your changes by running the CLI command dialplan show:
*CLI> dialplan show
[ Context 'phones' created by 'pbx_config' ]
Include => 'internal' [pbx_config]
[ Context 'internal' created by 'pbx_config' ]
[ Context 'incoming_calls' created by 'pbx_config' ]
[ Context 'default' created by 'pbx_config' ]
[ Context 'parkedcalls' created by 'res_features' ]
'700' => 1. Park((null)) [res_features]
-= 1 extension (1 priority) in 5 contexts. =-
Note
You will see the parkedcalls
context because it is an internal context to Asterisk, specified in
the features.conf file.
Now let’s expand upon the test dialplan we started in the previous section,
allowing us to dial back into the softphone after we have configured it and to use a dialplan
application called Echo() that will allow us to test bidirectional audio. We’ll learn
more about dialplans in Chapter 5, so for now, just add the italicized
bits to your existing extensions.conf
file. We’ll be making use of this dialplan throughout the chapter, and
expanding on it in certain sections. Once you’ve entered the text into
extensions.conf, reload the dialplan by running
dialplan reload from the Asterisk console:
[globals] [general] [default] exten => s,1,Verbose(1|Unrouted call handler) exten => s,n,Answer() exten => s,n,Wait(1) exten => s,n,Playback(tt-weasels) exten => s,n,Hangup() [incoming_calls] [internal] exten => 500,1,Verbose(1|Echo test application) exten => 500,n,Echo() exten => 500,n,Hangup() [phones] include => internal
The difference between an FXO channel and an FXS channel is simply which end of the connection provides the dial tone. An FXO port does not generate a dial tone; it accepts one. A common example is the dial tone provided by your phone company. An FXS port provides both the dial tone and ringing voltage to alert the station user of an inbound call. Both interfaces provide bidirectional communication (i.e., communication that is transmitted and received in both directions simultaneously).[52]
If your Asterisk server has a compatible FXO port, you can plug a telephone line from your telephone company (or “telco”) into this port. Asterisk can then use the telco line to place and receive telephone calls. By the same token, if your Asterisk server has a compatible FXS port, you may plug an analog telephone into your Asterisk server, so that Asterisk may call the phone and you may place calls.
Ports are defined in the configuration by the signaling they use, as opposed to the physical type of port they are. For instance, a physical FXO port will be defined in the configuration with FXS signaling, and an FXS port will be defined with FXO signaling. This can be confusing until you understand the reasons for it. FX_ cards are named not according to what they are, but rather according to what is connected to them. An FXS card, therefore, is a card that connects to a station. Since that is so, you can see that in order to do its job, an FXS card must behave like a central office and use FXO signaling. Similarly, an FXO card connects to a central office (CO), which means it will need to behave like a station and use FXS signaling. The modem in your computer is a classic example of an FXO device.
Warning
The older Digium X100P card used a Motorola chipset, and the X101P (which Digium sold before completely switching to the TDM400P) is based on the Ambient/Intel MD3200 chipset. These cards are modems with drivers adapted to utilize the card as a single FXO device (the telephone interface cannot be used as an FXS port). Support for the X101P card has been dropped in favor of the TDM series of cards.
These cards (or their clones) SHOULD NOT be used in production environments. They are $10 on eBay for a reason.
The X100P/X101P cards are poor cards for production use due to their tendency to introduce echo into your telephone calls, and their lack of remote disconnect supervision. Do yourself a favor and don’t waste your time with this hardware. You will find that if you ask the community for support of these cards, many responses will be hostile. You have been warned.
Figure 4.1, “A TDM400P with an FXS module (1 across) and an FXO module (2 across)” contains a picture of a TDM400P with an FXS module and an FXO module. You can’t see the colors, but module 1 is a green FXS module, and module 2 is an orange-red FXO module. In the bottom-right corner of the picture is the Molex connector, where power is supplied from the computer’s power supply.
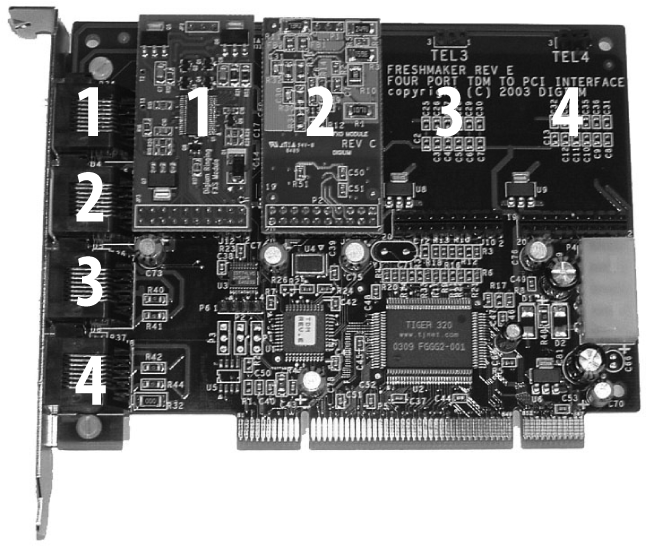
We’ll start by configuring an FXO channel. First we’ll configure the Zaptel hardware, and then the Zapata hardware. We’ll set up a very basic dialplan, and we’ll show you how to test the channel.
The zaptel.conf file located in /etc/ is used to configure your hardware. The following minimal configuration defines an FXO port with FXS signaling:
fxsks=2 loadzone=us defaultzone=us
In the first line, in addition to indicating whether we are using FXO or FXS signaling, we specify one of the following protocols for channel 2:
Loop start (
ls)Ground start (
gs)Kewlstart (
ks)
The difference between loop start and ground start has to do with how the equipment requests a dial tone: a ground-start circuit signals the far end that it wants a dial tone by momentarily grounding one of the leads; a loop-start circuit uses a short to request a dial tone. Though not common for new installations, analog ground start lines still exist in many areas of the country.[53] Ground start is really a rather strange thing, because it doesn’t exist in its analog form in Asterisk, so technically, there is no ground signal happening, but is rather a signaling bit that is intended for analog circuitry that historically would have been at the end of the T1. If this does not make much sense, don’t sweat it; chances are you won’t have to worry about ground-start signaling. All home lines (and analog telephones/modems/faxes) in North America use loop-start signaling. Kewlstart is in fact the same as loop start, except that it has greater intelligence and is thus better able to detect far-end disconnects.[54] Kewlstart is the preferred signaling protocol for analog circuits in Asterisk.
To configure a signaling method other than kewlstart, replace the
ks in fxsks with either
ls or gs (for loop start or ground start,
respectively).
loadzone configures the set of indications (as configured in
zonedata.c) to use for the channel. The
zonedata.c file contains information about all of the various sounds that
a phone system makes in a particular country: dial tone, ringing cycles,
busy tone, and so on. When you apply a loaded tone zone to a Zap
channel, that channel will mimic the indications for the specified
country. Different indication sets can be configured for different
channels. The defaultzone is used if
no zone is specified for a channel.
After configuring zaptel.conf, you can load
the drivers for the card. modprobe
is used to load modules for use by the Linux kernel. For
example, to load the wctdm driver, you would
run:
# modprobe wctdm If the drivers load without any output, they have loaded successfully.[55] You can verify that the hardware and ports were loaded and configured correctly with the use of the ztcfg program:
# /sbin/ztcfg -vv The channels that are configured and the signaling method being used will be displayed. For example, a TDM400P with one FXO module has the following output:
Zaptel Configuration ====================== Channel map: Channel 02: FXS Kewlstart (Default) (Slaves: 02) 1 channels configured.
If you receive the following error, you have configured the channel for the wrong signaling method (or there is no hardware present at that address):
ZT_CHANCONFIG failed on channel 2: Invalid argument (22) Did you forget that FXS interfaces are configured with FXO signaling and that FXO interfaces use FXS signaling?
To unload drivers from memory, use the rmmod (remove
module) command, like so:
# rmmod wctdm The zttool program is a diagnostic tool used to determine the state of your hardware. After running it, you will be presented with a menu of all installed hardware. You can then select the hardware and view the current state. A state of “OK” means the hardware is successfully loaded:
Alarms Span OK Wildcard TDM400P REV E/F Board 1
Asterisk uses the zapata.conf file to determine the settings and configuration for telephony hardware installed in the system. The zapata.conf file also controls the various features and functionality associated with the hardware channels, such as Caller ID, call waiting, echo cancellation, and a myriad of other options.
When you configure zaptel.conf and load the modules, Asterisk is not aware of anything you’ve configured. The hardware doesn’t have to be used by Asterisk; it could very well be used by another piece of software that interfaces with the Zaptel modules. You tell Asterisk about the hardware and control the associated features via zapata.conf:
[trunkgroups] ; define any trunk groups [channels] ; hardware channels ; default usecallerid=yes hidecallerid=no callwaiting=no threewaycalling=yes transfer=yes echocancel=yes echotraining=yes ; define channels context=incoming ; Incoming calls go to [incoming] in extensions.conf signaling=fxs_ks ; Use FXS signaling for an FXO channel channel => 2 ; PSTN attached to port 2
The [trunkgroups] section is used for connections where multiple physical lines are
used as a single logical connection to the telephone network, and won’t
be discussed further in this book. If you require this type of
functionality, see the zapata.conf.sample file and
your favorite search engine for more information.
The [channels] section
determines the signaling method for hardware channels and their options.
Once an option is defined, it is inherited down through the rest of the
file. A channel is defined using channel =>, and
each channel definition inherits all of the options defined above that
line. If you wish to configure different options for different channels,
remember that the options should be configured
before the channel
=> definition.
We’ve enabled Caller ID with usecallerid=yes and specified that it will not
be hidden for outgoing calls with hidecallerid=no. Call waiting is deactivated
on an FXO line with callwaiting=no.
Enabling three-way calling with threewaycalling=yes allows an active call to
be placed on hold with a hook switch flash (discussed in Chapter 7, Understanding Telephony) to suspend the current call. You may then
dial a third party and join them to the conversation with another hook
switch. The default is to not enable three-way calling.
Allowing call transfer with a hook switch is accomplished by
configuring transfer=yes; it requires
that three-way calling be enabled. The Asterisk echo canceller is used
to remove the echo that can be created on analog lines. You can enable
the echo canceller with echocancel=yes. The echo canceller in Asterisk
requires some time to learn the echo, but you can speed this up by
enabling echo training (echotraining=yes). This tells Asterisk to send
a tone down the line at the start of a call to measure the echo, and
therefore learn it more quickly.
When a call comes in on an FXO interface, you will want to perform
some action. The action to be performed is configured inside a block of
instructions called a context. Incoming calls on
the FXO interface are directed to the incoming context with context=incoming. The instructions to perform
inside the context are defined within
extensions.conf.
Finally, since an FXO channel uses FXS signaling, we define it as
such with signaling=fxs_ks.
The following minimal dialplan makes use of the Echo() application to
verify that bidirectional communications for the channel are
working:
[incoming] ; incoming calls from the FXO port are directed to this context ;from zapata.conf exten => s,1,Answer() exten => s,n,Echo()
Whatever you say, the Echo()
application will relay back to you.
Now that the FXO channel is configured, let’s test it. Run the zttool application and connect your PSTN line to the FXO port on your TDM400P. Once you have a phone line connected to your FXO port, you can watch the card come out of a RED alarm.
Now dial the PSTN number from another external phone (such as a
cell phone). Asterisk will answer the call and execute the Echo() application. If you can hear your voice
being reflected back, you have successfully installed and configured
your FXO channel.
The configuration of an FXS channel is similar to that of an FXO channel. Let’s take a look.
The following is a minimal configuration for an FXS channel on a
TDM400P. The configuration is identical to the FXO channel configuration
above, with the addition of fxoks=1.
Recall from our earlier discussion that the opposite type of signaling is used for FXO and FXS channels, so we will be configuring FXO signaling for our FXS channel. In the example below we are configuring channel 1 to use FXO signaling, with the kewlstart signaling protocol:
fxoks=1 fxsks=2 loadzone=us defaultzone=us
After loading the drivers for your hardware, you can verify their
state with the use of /sbin/ztcfg -vv:
Zaptel Configuration ====================== Channel map: Channel 01: FXO Kewlstart (Default) (Slaves: 01) Channel 02: FXS Kewlstart (Default) (Slaves: 02) 2 channels configured.
The following configuration is identical to that for the FXO channel, with the
addition of a section for our FXS port and, of the line immediate=no. The context for our FXS port is
phones, the signaling is fxoks (kewlstart), and the channel number is
set to 1.
FXS channels can be configured to perform one of two different
actions when a phone is taken off the hook. The most common (and often
expected) option is for Asterisk to produce a dial tone and wait for
input from the user. This action is configured with immediate=no. The alternative action is for
Asterisk to automatically perform a set of instructions configured in
the dialplan instead of producing a dial tone, which you indicate by
configuring immediate=yes.[56] The instructions to be performed are found in the context
configured for the channel and will match the s extension (both of these topics will be
discussed further in the following chapter).
Here’s our new zapata.conf:
[trunkgroups]
; define any trunk groups
[channels]
; hardware channels
; default
usecallerid=yes
hidecallerid=no
callwaiting=no
threewaycalling=yes
transfer=yes
echocancel=yes
echotraining=yes
immediate=no
; define channels
context=phones ; Uses the [internal] context in extensions.conf
signalling=fxo_ks ; Uses FXO signalling for an FXS channel
channel => 1 ; Telephone attached to port 1
context=incoming ; Incoming calls go to [incoming] in extensions.conf
signalling=fxs_ks ; Use FXS signalling for an FXO channel
channel => 2 ; PSTN attached to port 2We will make use of our minimal dialplan we configured
earlier in the chapter to test our FXS port with the use of the
Echo() application. The relevant section, which
should already exist in your dialplan, looks like this:
[internal] exten => 500,1,Verbose(1|Echo test application) exten => 500,n,Echo() exten => 500,n,Hangup() [phones] include => internal
Whatever you say, the Echo() application will
relay back to you.
The Session Initiation Protocol (SIP),[57] commonly used in VoIP phones (either hard phones, or softphones), takes care of the setup and teardown of calls, along with any changes during a call such as call transfers. The purpose of SIP is to help two endpoints talk to each other (if possible, directly to each other). The SIP protocol is simply a signaling protocol, which means that its purpose is only to get the two endpoints talking to each other, and not to deal with the media of the call (your voice). Rather, your voice is carried using another protocol called the Real-Time Transport Protocol (RTP; RFC 3550) to transfer media directly between the two endpoints.
Note
We use the term media to refer to the data transferred between endpoints and used to reconstruct your voice at the other end. It may also refer to music or prompts from the PBX.
In the world of SIP, we call our endpoints user agents, of which there are two types: client and server. The client is the endpoint that generates the request, and the server processes the request and generates a response. When an endpoint wishes to place a call to another endpoint (such as our softphone calling another softphone), we generate our request and send this to a SIP proxy.[58] A proxy server will take the request, determine where the request is destined for, and forward it on. Once the two user agents have negotiated a successful call setup, the media is transported via the RTP protocol and sent directly between the two user agents. SIP proxies do not handle media; they simply deal with the SIP packets.
Asterisk, on the other hand, is called a Back-To-Back User Agent (B2BUA). This means that Asterisk acts like a user agent in either the server (receiving) or client (sending) role. So when our softphone dials an extension number, the call is set up between the softphone and Asterisk directly. If the logic we’ve built into Asterisk determines that you mean to call another user agent, then Asterisk acts as a user agent client and sets up another connection (known as a channel) to the other phone. The media between the two phones then flows directly through Asterisk.[59] From the viewpoint of the phones, they are talking with Asterisk directly.
Configuring a SIP phone to work with Asterisk does not require much. However, because there are so many options possible in both Asterisk and the configuration of the particular telephone set or softphone, things can get confusing. Add to this the fact that similar things can have different names, and you have a recipe for frustration. What we are going to do, therefore, is give you the bare-bones basics. If you follow our advice, you should be able to get the sets we cover working (and be well on your way to getting a phone that we have not covered to work as well). We are not saying that this is the best way, or even the right way, but it is the simplest way, and from a working foundation, it is much easier to take a basic configuration and tweak things until you get the solution you need.
Note
Just as we did with the extensions.conf file; run the following commands in your bash shell:
# mv sip.conf sip.conf.sample
# touch sip.conf
If you put the following in a sip.conf file, you will be able to register a phone to the system.
[general] [1000] type=friend context=phones host=dynamic
Not pretty, not secure, not flexible, not fully-featured, but this will work.
Even though we have named this SIP device
1000, and we are probably going to assign it that
extension number, you should note that we could have named it whatever
we wanted. Names such as mysipset,
john, 0004f201ab0c are all
valid, popular, and may suit your needs better.[60] What we are doing is assigning a unique identifier to a
device, which will form part of the credentials when a call is placed
using the SIP channel.
Since we want to be able to both send calls to the softphone and
allow the client to place calls, we have defined the type as friend. The other two types are user and peer. From the viewpoint of Asterisk, a
user is configured to enter the
dialplan, and a peer is created for
calls leaving the dialplan (via the Dial() application). A friend is simply a shortcut that defines
both a user and a peer. If in doubt, define the type as
friend.
The host option is used to
define where the client exists on the network when Asterisk needs to
send a call to it. This can either be defined statically by defining
something like host=192.168.1.100,
or if the client has a dynamic IP address, then we set host=dynamic. When the host option is set as dynamic, and the client is configured to
register, Asterisk will receive a REGISTER packet from the endpoint
(i.e., telephone set or softphone), telling Asterisk which IP address
the SIP peer is using.
If you do not trust your network, you should probably also force the use of a password by adding the following to the device definition. This is one of those things that is not technically necessary, but is probably a good idea:
secret=guessthis
In the configuration menus of the phone itself (which could be via
a web GUI, through menus on the phone itself, or possibly using
configuration files that are stored on a server), the unique identifier
(which in this case is 1000) again forms part of the
credentials for the authentication process. Naturally, for a connection
to be successful, this has to match in both Asterisk and in the set
itself. The fun begins when you realize that there is no set rule as to
what this identifier is formally called. We have elected simply to call
it the Unique Identifier.
Note
In the SIP RFC (http://www.faqs.org/rfcs/rfc3261.html),
section 19.1 calls this user token, “the identifier of a particular
resource at the host being addressed,” verbiage consistent with our
usage of [1000] as the set
identifier in the sip.conf file
of Asterisk.
Instead, you will want to look for fields that are labeled
user name, auth name, authentication name, and so on.
The thing to remember is that since you know that the Asterisk end of
the equation is configured simply and correctly, you can experiment with
the phone setting until you find a combination that works. This is much
better than the usual suffering that new users go through, as they
change settings in both places and have no luck getting a phone to
register.
Note
We’re gonna say it again: configure sip.conf in the simplest manner possible, and then don’t change your Asterisk configuration. Trust us; what we have written here will work. Get your set working (i.e., where you can make and receive calls), and you will be in a far better position to begin experimenting with different settings. We have seen too much suffering (including our own), and we want it to end.
Note
If you are running Asterisk and a softphone on the same system (i.e., running an X-Lite softphone and Asterisk on a laptop or desktop), then you will need to modify the SIP port that client listens on. It will need to be changed from 5060 to 5061 (or some other unused port) so that Asterisk and the softphone do not interfere with each other.
Before we get into how to define these files, there are a few things that need to be configured on your server. Running the right services on your network will ensure your Polycom sets can autoconfigure from the moment you plug them in. There’s a little work involved here, but we promise that the payoff is worth it. Once you’ve done this a few times, it only really takes a few minutes on each new system, and going forward, it’ll save you a lot of mucking about with web interfaces. When you take your new Polycom phone out of the box, plug it into your network, watch it autoconfigure itself, and then successfully register with your Asterisk machine, you will know the sort of joy that only geeks can experience.[61]
It’s not really that complicated. Where we think people get confused is in making sense of the various ways this can be achieved, because there are a lot of choices.
Typically, a DHCP server is used to configure basic IP parameters for a device (IP address, default gateway, and DNS), but the DHCP protocol can actually pass many other parameters. In our case, we want it to pass some information to the sets that will tell them where to download their config files from. Here is a sample config from a Linux DHCP server that will do what is required:
ddns-update-style interim;
ignore client-updates;
subnet 192.168.1.0 netmask 255.255.255.0 {
option routers 192.168.1.1;
option subnet-mask 255.255.255.0;
option domain-name-servers 192.168.1.1;
option ntp-servers pool.ntp.org;
option time-offset -18000;
range dynamic-bootp 192.168.1.128 192.168.1.254;
default-lease-time 21600;
max-lease-time 43200;
}Keep in mind that this assumes that the only things on this network are devices that belong to the phone system (this setup will hand out an IP address to any device that requests it). If you have a more complex environment, you will need to configure the DHCP daemon to handle the various devices it is serving. For example, you might want to devise a scope that restricts IP addresses in your voice LAN to Polycom phones. Since all Polycom IP desk phones have 00:04:f2 as their OUI (Organizationally Unique Identifier), you might choose to restrict scope based on that.
Note
In a Microsoft DHCP environment, the tftp-server-name is referred to as Boot server host name. It is defined under option 66.
The DHCP protocol is far more flexible than is often realized, because in most environments it is not used for complex provisioning tasks. With a little care and attention, you can devise a DHCP environment that serves both your voice and data devices and greatly simplifies administrative workload when adding new devices.
FTP is currently our favorite[62]way to configure Polycom sets. We would recommend it over TFTP for any set that allows for both. To install it on your CentOS system, the following command will install VSFTPD, the Very Secure FTP Daemon:
# yum -y install vsftpdThen,
in order to lock things down, we need to prevent anonymous logins with
a simple change to the vsftpd config file,
/etc/vsftpd/vsftpd.conf:
# anonymous_enable=NO
Restart the server with service vsftpd
restart. To ensure that the daemon runs after every reboot,
run chkconfig vsftpd on.
Now, we have to create a user account and group for the sets to use. In this case, we will create an account for the Polycom sets:
# groupadd PlcmSpIp # useradd PlcmSpIp -g PlcmSpIp -p PlcmSpIp # passwd PlcmSpIp
Set the password to PlcmSpIp (the default FTP password for Polycom sets). This can be changed, but will then require manual configuration from each set in order to advise them of their nonstandard credentials.[63]
For added security, let’s make sure the FTP server keeps that account in a chroot jail:
# echo PlcmSpIp >> /etc/vsftpd/vsftpd.chroot_list
That pretty much does it as far as preparing the operating system to provide the required services to the phones.
In the next few sections we have provided instructions for
various popular SIP telephones. Choose the section that applies best
to the phone that you are planning to use (whether a hard- or
soft-phone). You will note that we have given all of these phones the
exact same unique identifier. If you plan on installing more than one
of them, you will need to ensure that they have unique names, and be
sure to update your sip.conf file
to include those device definitions.
CounterPath’s X-Lite softphone has become very popular with the Asterisk community. It is simple, functional, easy on the eyes, and—most importantly—free.
In this section we will be configuring the X-Lite softphone to connect to Asterisk. The IP address of the phone is 192.168.1.250, and Asterisk is located at 192.168.1.100. The X-Lite is available for Microsoft Windows, Mac, and Linux. You can obtain a copy of X-Lite from http://www.counterpath.com/index.php?menu=download.
Now let’s configure our softphone for connecting to our Asterisk box. To configure X-Lite, click on the Settings button, as circled in Figure 4.2, “X-Lite configuration”.
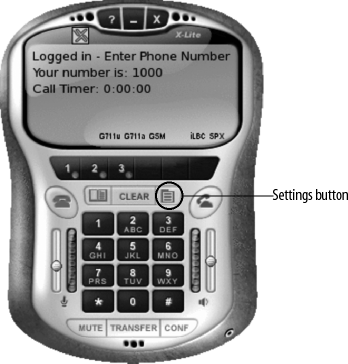
Select System Settings → SIP Proxy → [Default], which will display the default configuration for the softphone. Configure the screen as shown in Figure 4.3, “X-Lite user configuration”.
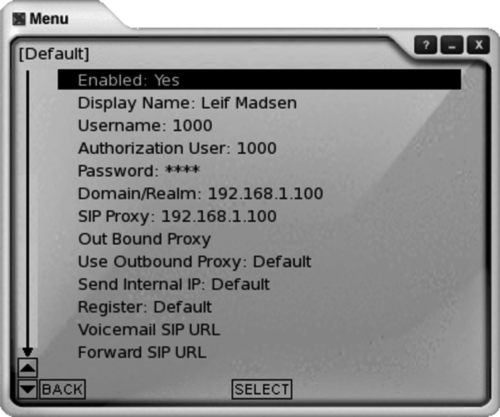
If you have not already started Asterisk, then start it now (see Chapter 3, Installing Asterisk for help installing and starting Asterisk). If Asterisk is running in the background, you can reconnect to the CLI by running the following command:
# asterisk -rvvv
You will then be given the Asterisk CLI like so:
*CLI>
If Asterisk was already
running before changing the sip.conf as instructed in this chapter, then
reload the dialplan and SIP channel with the following two
commands:
*CLI>dialplan reload*CLI>sip reload
In your X-Lite softphone client, close the Settings windows by clicking the BACK button until the windows are all closed. You should see X-Lite try to register to Asterisk, and if successful, you will see the following at the Asterisk CLI:
-- Registered SIP '1000' at 192.168.1.250 port 5061 expires 3600
You can verify the registration status at any time like so:
*CLI> sip show peers
Name/username Host Dyn Nat ACL Port Status
1000/1000 192.168.1.250 D N 5061 OK (63 ms)
1 sip peers [1 online , 0 offline]
More detailed stats of the peer can be shown as follows with
sip show peer 1000:
*CLI> sip show peer 1000
* Name : 1000
Secret : <Not set>
MD5Secret : <Not set>
Context : phones
Subscr.Cont. : <Not set>
Language :
AMA flags : Unknown
Transfer mode: open
CallingPres : Presentation Allowed, Not Screened
Callgroup :
Pickupgroup :
Mailbox :
VM Extension : asterisk
LastMsgsSent : 32767/65535
Call limit : 0
Dynamic : Yes
Callerid : "" <>
MaxCallBR : 384 kbps
Expire : 1032
Insecure : no
Nat : RFC3581
ACL : No
T38 pt UDPTL : No
CanReinvite : Yes
PromiscRedir : No
User=Phone : No
Video Support: No
Trust RPID : No
Send RPID : No
Subscriptions: Yes
Overlap dial : Yes
DTMFmode : rfc2833
LastMsg : 0
ToHost :
Addr->IP : 192.168.1.250 Port 5061
Defaddr->IP : 0.0.0.0 Port 5060
Def. Username: 1000
SIP Options : (none)
Codecs : 0x8000e (gsm|ulaw|alaw|h263)
Codec Order : (none)
Auto-Framing: No
Status : Unmonitored
Useragent : X-Lite release 1105d
Reg. Contact : sip:1000@192.168.1.250:5061
A lot of folks say configuring Polycom phones is difficult. From what we can tell, they base this on one of two reasons: 1) The Polycom web-based interface is horrible, or 2) the automatic provisioning process is painful and confusing.
With respect to item 1, we agree. The web interface on the Polycom phones has got to be one of the most annoying web interfaces ever developed for an IP telephone. We don’t use it, and we don’t recommend it.[64]
So that leaves us with some sort of server-based configuration. Fortunately, in this regard, the Polycom IP phones are superb—so much so that we can pretty much forgive the web interface. Set configurations are stored in files on a server, and each set navigates to the server, downloads the configuration files that are relevant to it, and applies them to itself.
If you cannot control your DHCP server, you may have to manually specify the FTP server information on the phone. This is done by rebooting the set, pressing the setup button before the set begins the load process, and specifying the address of the FTP server in the small boot menu that these phones offer.
The Polycom phones are able to download their configuration by one of three protocols: TFTP, HTTP, and FTP.
Right off the bat we are going to tell you to avoid TFTP. It is not secure, and the set cannot use date information to determine which versions of various files are the most current. It works, but there are better ways, and we are not going to discuss it further.
Polycom phones can pull their config data using HTTP as well, but it has not proven to be popular, and so we are going to move on.
FTP is currently the preferred method of allowing Polycom phones to obtain their configuration. It works well, is fairly easy to configure, and is well supported by the community.
FTP is currently our favorite way to configure Polycom sets. To install it on your CentOS system, the following command will install VSFTPD, the Very Secure FTP Daemon:
# yum -y install vsftpdThen,
in order to lock things down, we need to prevent anonymous logins,
with a simple change to thevsftpd config file, /etc/vsftpd/vsftpd.conf:
# anonymous_enable=NO
Restart the server with service vsftpd
restart. To ensure that the daemon runs after every reboot,
run chkconfig vsftpd on.
Now, we have to create a user account and group for the Polycom sets to use:
# groupadd PlcmSpIp # useradd PlcmSpIp -g PlcmSpIp -p PlcmSpIp # passwd PlcmSpIp
Set the password to PlcmSpIp (the default FTP password for Polycom sets). This can be changed, but will then require manual configuration from each set in order to advise them of their nonstandard credentials.[65]
For added security, let’s make sure the FTP server keeps that account in a chroot jail:
# echo PlcmSpIp >> /etc/vsftpd/vsftpd.chroot_list
That pretty much does it as far as preparing the operating system to provide the required services to the phones.
While there seem to be a lot of different files that are needed to make a Polycom set work, they are each fairly easy to understand.
This can best be described as the BIOS and operating system of the phone.
Perhaps there is a more technical explanation, but why make things
confusing? The bootROM should not need to be updated regularly, but
it is good to keep an eye on the current releases to see if a newer
bootROM has features that will be of benefit in your environment.
This file will be named bootrom.ld.
Since Polycom sets are capable of supporting other VoIP protocols (MGCP is supported, for example), the protocol that this set will employ forms part of the application image that the phone will download and run. If the image on the set is already correct, this file is not actually needed on the FTP server; however, it is common to have this file available to ensure that the most recent version of the protocol is available for the sets to download. You will sometimes receive phones that are not running the latest version, so having the most current image will ensure that all sets are up-to-date.
There is normally only one version of this file on a system, but it can be named
anything you want, and there can be as many different versions of
this file as are needed. For example, if you had an office where
there were two different languages in use, some users might prefer
French on their set, and others English. In that case, you’d create
a french.sip.conf file and an
english.sip.conf file to handle
each case. Name this file as you see fit, but pick a name that makes
sense so that future administrators have a chance to make sense of
your design choices.
This file is very simple and small. It is named to match the MAC address of each phone (so each set will need its own copy of this file) and tells the set what other files it needs to download in order to configure itself. This is the first config file each set will read. In this file will be a reference to the application image this set will use (currently named sip.ld), as well as the names of the XML files that have the parameters for this phone (the .cfg files). A master config file for a set might look something like this:
'<?xml version="1.0" standalone="yes"?>' '<!-- Default Master SIP Configuration File-->' '<!-- Edit and rename this file to <Ethernet-address>.cfg for each phone.-->' '<!-- $Revision: 1.14 $ $Date: 2005/07/27 18:43:30 $ -->' '<APPLICATION APP_FILE_PATH="sip.ld" CONFIG_FILES="phone1.cfg, sip.cfg" MISC_FILES="" LOG_FILE_DIRECTORY="" OVERRIDES_DIRECTORY="" CONTACTS_DIRECTORY="" />'
Note the name of the application file that we want this set to use, and the config files that it will be trying to find and apply.
We recommend giving the phone1.cfg files names that make sense. For example, SET<xxx>.cfg (such as SET201.cfg) to match the extension number
of the phone, or FLOOR4CUBE23.cfg, or maybe BOB_SMITHS_IP430_SET.cfg, or whatever
seems best to you. What’s the best way to name them? We’re going to
answer that question by asking a question. Let’s say you have 100 of
these phones. When you list the contents of the /home/PlcmSpIp folder, how do you want
the 100 config files for the sets to appear?
Settings that are configured directly on the telephone will be stored on the filesystem of the set, and may take precedence over parameters passed in config files. If you are having any problems applying changes to a set, try reformatting the phone. This will force the set to accept the parameters contained in the config files.
The venerable old C7960 is now a part of VoIP history. One of the first SIP telephones that could actually be taken seriously, the only real complaint one can have about this phone is the price: they are the Cadillac of SIP phones (meaning that they have all the bells and whistles but are tough to justify at the price, and are a little out of date sometimes).
If you can get one of these, you are getting an excellent SIP telephone. If you buy one new, be prepared to pay.
One of the ways this phone is out of date is the lack of remote provisioning from anything other than TFTP. TFTP has lost favor with networking professionals due to the lack of authentication and encryption, but since it is the only method of remotely provisioning the phone, we are going to have to use the tftp-server daemon. We can install tftp-server with the following command:
# yum install -y tftp-serverOnce
installed, we need to enable the server by modifying the
/etc/xinetd.d/tftp file. To enable the TFTP server,
change the disable=yes line to
disable=no.
service tftp
{
socket_type = dgram
protocol = udp
wait = yes
user = root
server = /usr/sbin/in.tftpd
server_args = -s /tftpboot
disable = no
per_source = 11
cps = 100 2
flags = IPv4
}
Then start the TFTP server by running:
# service xinetd restartWe can verify the server is running with the following command:
# chkconfig --list | grep tftp
tftp: onAs long as tftp:
on was returned, the server is up and running.
Note
Cisco phones by default are loaded with their own communication protocol known as SCCP (or Skinny). We will be showing you how to configure the phone, but due to the proprietary nature of Cisco and its phones, you will need to obtain the SIP firmware from your distributor. Also, there are both chan_sccp and chan_skinny modules for Asterisk, but they are beyond the scope of this book.
We will be registering our Cisco phone to the SIP friend we
configured in the section called “Zaptel Hardware Configuration”.” The following
configuration file should be saved into a file taking the format of
SIP<mac>.cnf, where <mac> represents the MAC address of the
telephone device you are configuring. Place this file into the /tftpboot/ directory on your server:
# Line 1 Configuration line1_name: "1000" line1_authname: "1000" line1_shortname: "Jimmy Carter" line1_password: "" line1_displayname: "" # The phone label, displayed in the upper-righthand corner of the phone phone_label: "aristotle" ; Has no effect on SIP messaging # Phone password used for console or telnet access, limited to 31 characters phone_password: "cisco"
Then configure the address to register
in the SIPDefault.cnffile, also placed in the /tftpboot/ directory of your server.
proxy1_address will contain the IP address of your
Asterisk server of where the phone should register for line 1. The
image_version contains the version of the
.loads and .sb2 files the
phone will load into memory.
image_version: P0S3-08-4-00 proxy1_address: 192.168.1.100
We need one additional file called OS79XX.TXT. This file contains only a single line―the .bin and .sbn file version to load into memory:
P003-08-4-00
In
order for our Cisco 7960 to use these files, we need to tell the phone
where to pull its configuration from. If using the DHCP server from your
Linux server, you can modify the /etc/dhcpd.conf file in order to tell the
phone where to pull its configuration from by adding the line:
option tftp-server-name "192.168.1.100";
which contains the IP address of the server hosting the TFTP server (assuming of course the TFTP server is configured at that address. This is the address we’ve been using for our Asterisk server, and we again assume you’ve installed the TFTP server on the same box as Asterisk). See the section called “DHCP server”” for more information about configuring the DHCP server:
ddns-update-style interim;
ignore client-updates;
subnet 192.168.1.0 netmask 255.255.255.0 {
option routers 192.168.1.1;
option subnet-mask 255.255.255.0;
option domain-name-servers 192.168.1.1;
option tftp-server-name "192.168.1.100";
option ntp-servers pool.ntp.org;
option time-offset -18000;
range dynamic-bootp 192.168.1.128 192.168.1.254;
default-lease-time 21600;
max-lease-time 43200;
}
Tip
Alternatively, you can configure from the phone itself to manually use an alternative TFTP server than that given by the DHCP server. To do so, press the settings button, (on the G version of the Cisco phones, this looks like a square with a check mark inside of it; G means Global). You will then need to unlock the settings by pressing the 9 key. The default password is cisco. Once the phone is unlocked, press the 3 key on the dialpad to enter the Network Configuration. Scroll down to option 32 and set the Alternate TFTP to YES. Then scroll up to option 7 and enter the IP address of the TFTP server you wish to boot from. Accept the settings and back out of the menu until the phone reboots itself. You can also use the *-6-settings three finger salute to reboot your phone at any time.
You can watch the phone pull its configuration from the TFTP
server by using tshark (yum install ethereal). Filter on port 69 using
the following command:
# tshark port 69You should then be able to watch the network traffic from the phone requesting data from your TFTP server.
If all goes well, then you should see your phone registered to Asterisk!
Ever since they purchased Sipura Technologies, Linksys has been producing a line of economical VoIP telephones and ATAs (Analog Terminal Adaptors). Linksys has been stealing a lot of business from Cisco. If you have read Clayton M. Christensen’s The Innovator’s Dilemma (HarperCollins), it becomes easier to understand Cisco’s strategy with respect to Linksys.
Linksys (and Sipura) products are well regarded for their excellent quality, especially relative to their price, but they are also famous for being painfully difficult to configure. This is mostly because their configuration GUI offers hundreds of configurable parameters.
We don’t care about that. Here’s what you need to know to get an SPA-942 working with your Asterisk system (and, we hope, most other Linksys VoIP devices as well).
The first thing you need to do is get the IP address of the phone so you can log in to the GUI interface. From the phone itself, select the icon that looks like a piece of paper with a dog-eared corner (right below the envelope icon). This is the Settings button, and is shown in Figure 4.4, “SPA-942 keypad”.

To get the IP address of the phone, press the Settings button, followed by 9 (or use directional pad and scroll down to Network). Then press the select button (there is a row of 4 buttons under the LCD screen—select is the leftmost button). The second field should show you the IP address of the phone.
Now open your browser, enter the IP address into the address bar, hit Enter, and you will be at the Info screen of the phone.
Select the Admin Login link in the upper-right corner of the screen. Once you’ve done this, you will be given several new tabs, such as Regional, Phone, Ext 1, Ext 2, and User.
Select the Ext 1 tab which will set up our first line. Then make the following menu selections:
General → Line Enable → yes
NAT Settings → NAT Mapping Enable → no
NAT Settings → NAT Keep Alive Enable → no
Proxy and Registration → Proxy → enter the IP address of Asterisk (e.g., 192.168.1.100)
Proxy and Registration → Register → yes
Proxy and Registration → Make Call Without Reg → no
Proxy and Registration → Ans Call Without Reg → no
Subscriber Information → Display Name → Caller ID information
Subscriber Information → User ID → 1000
Subscriber Information → Password → (leave blank if you’re using the simple configuration from earlier in this chapter)
Subscriber Information → Use Auth ID → yes
Subscriber Information → Auth ID → 1000
Audio Configuration → Preferred Codec → G711u
Audio Configuration → Use Pref Codec Only → no
Audio Configuration → Silence Supp Enable → no
Audio Configuration → DTMF Tx Method → Auto
Submit All Changes
And that’s it! Your phone should be registered to Asterisk now. You’ll know this because the first lighted line button beside the LCD screen will change from orange to green.
In order to allow our phone to call other phones (or, if a multiline phone, to call
itself), we need to modify the extensions.conf
file. Building on what we had in the section called “Setting Up the Dialplan for Some Test Calls”,” add the following parts to the
[internal] context:
exten => 1000,1,Verbose(1|Extension 1000) exten => 1000,n,Dial(SIP/1000,30) exten => 1000,n,Hangup()
If you have two phones, or multiple lines configured, you can duplicate the previous configuration and change the 1000 to the other extension name.
With the advent of Internet telephony, there has been an influx of Internet-based phone companies springing up all over the world! This gives you a large number of choices from which to choose. Many of these service providers allow you to connect your Asterisk-based system to their networks,[66] and some of them are even running Asterisk themselves!
The following configuration should get you connected with an Internet Telephony Service Provider (ITSP),[67] although it is impossible to know the unique configurations each service provider will require from you, and ideally the provider will give you the configuration required to connect your system with its own. However, not all are going to support Asterisk, so we’re going to provide you with a generic configuration which should help you get on your way and, ideally, going in a matter of minutes:
[my_service_provider] type=peer host=10.251.55.100 fromuser=my_unique_idsecret=my_special_secretcontext=incoming_calls dtmfmode=rfc2833 disallow=all allow=gsm allow=ulaw deny=0.0.0.0/0 permit=10.251.55.100/32 insecure=invite
Most of the previous configuration may be familiar to you by now, but in case it’s not, here is a brief rundown.
By defining the type as a peer, we are telling Asterisk not to match
on the [my_service_provider] name, but rather to match
on the IP address in the INVITE message (when the provider is sending us a
call). The host parameter is the IP address that we’ll place our calls to,
and the IP address we’ll be matching on when receiving a call from the
provider.
The fromuser parameter is going
to affect the way our INVITE message is structured when sending the call
to the provider. By setting our username in the fromuser parameter, we will modify the From: and Contact: fields of the INVITE
when sending a call to the provider. This may be required by the provider
if it’s using these fields as part of its authentication routine. You can
see the places Asterisk modifies the header in the next two code
blocks.
Without the fromuser:
Audio is at 66.135.99.122 port 18154 Adding codec 0x2 (gsm) to SDP Adding codec 0x4 (ulaw) to SDP Adding non-codec 0x1 (telephone-event) to SDP Reliably Transmitting (no NAT) to 10.251.55.100:5060: INVITE sip:15195915119@10.251.55.100 SIP/2.0 Via: SIP/2.0/UDP 66.135.99.122:5060;branch=z9hG4bK32469d35;rport From: "asterisk" <sip:asterisk@66.135.99.122>;tag=as4975f3ff To: <sip:15195915119@10.251.55.100> Contact: <sip:asterisk@66.135.99.122> Call-ID: 58e3dfb2584930cd77fe989c00986584@66.135.99.122 CSeq: 102 INVITE User-Agent: Asterisk PBX Max-Forwards: 70 Date: Fri, 20 Apr 2007 14:59:24 GMT Allow: INVITE, ACK, CANCEL, OPTIONS, BYE, REFER, SUBSCRIBE, NOTIFY Supported: replaces Content-Type: application/sdp Content-Length: 265
With the fromuser:
Audio is at 66.135.99.122 port 11700 Adding codec 0x2 (gsm) to SDP Adding codec 0x4 (ulaw) to SDP Adding non-codec 0x1 (telephone-event) to SDP Reliably Transmitting (no NAT) to 10.251.55.100:5060: INVITE sip:15195915119@10.251.55.100 SIP/2.0 Via: SIP/2.0/UDP 66.135.99.122:5060;branch=z9hG4bK635b0b1b;rport From: "asterisk" <sip:my_unique_id@66.135.99.122>;tag=as3186c1ba To: <sip:15195915119@10.251.55.100> Contact: <sip:my_unique_id@66.135.99.122> Call-ID: 0c7ad6156f92e70b1fecde903550a12f@66.135.99.122 CSeq: 102 INVITE User-Agent: Asterisk PBX Max-Forwards: 70 Date: Fri, 20 Apr 2007 15:00:30 GMT Allow: INVITE, ACK, CANCEL, OPTIONS, BYE, REFER, SUBSCRIBE, NOTIFY Supported: replaces Content-Type: application/sdp Content-Length: 265
The deny and permit
statements are used to deny all incoming calls to this peer except the
IP address defined by the permit parameter. This is
simply a security measure used to make sure nothing else matches on this
peer except traffic coming from the IP address we expect.
At the end is insecure=invite, which may be
required for your provider. This is because the source of the INVITE may
originate from its backend platform, but could be directed through its SIP
proxy server. Basically what this means is that the IP address that the
peer is coming from, and which you are matching on, may not be the IP
address that is in the Contact line: field of the INVITE message when you
are accepting a call from your provider. This tells Asterisk to ignore
this inconsistency and to accept the INVITE anyway.
Tip
You may need to set invite=invite,port if the port address is
also inconsistent with what Asterisk is expecting.
Now we need one additional parameter set in the [general] section of our sip.conf file: register. register is going to tell the service provider
where to send calls when it has a call to deliver to us. This is
Asterisk’s way of saying to the service provider, “Hey! If you’ve got a
call for me, send it to me at IP address 10.251.55.100.” The
register parameter takes the following form:
register => username:secret@my.service_provider.tld
Now we just need to configure a simple dialplan to handle our incoming calls and to send calls via the service provider. We’re going to modify the simple dialplan we started building in the the section called “Setting Up the Dialplan for Some Test Calls”” section of this chapter. The italicized sections are the new parts that we’re adding to the dialplan, with everything else existing previously.[68]
[globals] [general] [default] exten => s,1,Verbose(1|Unrouted call handler) exten => s,n,Answer() exten => s,n,Wait(1) exten => s,n,Playback(tt-weasels) exten => s,n,Hangup() [incoming_calls] exten => _X.,1.NoOp() exten => _X.,n,Dial(SIP/1000) [outgoing_calls] exten => _X.,1,NoOp() exten => _X.,n,Dial(SIP/my_service_provider/${EXTEN}) [internal] exten => 1000,1,Verbose(1|Extension 1000) exten => 1000,n,Dial(SIP/1000,30) exten => 1000,n,Hangup() exten => 500,1,Verbose(1|Echo test application) exten => 500,n,Echo() exten => 500,n,Hangup() [phones] include => internal include => outgoing_calls
There may come a time when you have a pair of Asterisk boxes, and you’d like to pass calls between them. Luckily this isn’t very difficult, although it does have some oddities that we need to deal with, but from the configuration viewpoint it isn’t really all that difficult.
Our topology will consist of a SIP phone (Alice) registered to Asterisk A (Toronto), and a separate SIP phone (Bob) registered to Asterisk B (Osaka). At the end of this section, you will be able to set up a call from Alice to Bob (and vice versa) through your pair of Asterisk boxes (see Figure 4.5, “SIP trunking topology”). This is a common scenario when you have two physical locations, such as a company with multiple offices that wants a single logical extension topology.
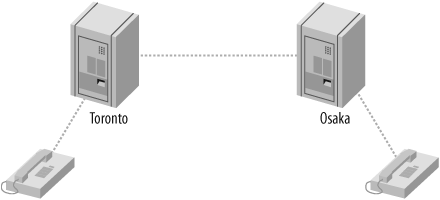
First, let’s configure our Asterisk boxes.
We have a pair of Asterisk boxes that we’re going to call Toronto and Osaka and that we’re going to have register to each other. We’re going to use the most basic sip.conf file that will work in this scenario. Just like the SIP phone configuration earlier in this chapter, it’s not necessarily the best way to do it, but it’ll work.
Here is the configuration for the Toronto box:
[general] register => toronto:welcome@192.168.1.101/osaka [osaka] type=friend secret=welcome context=osaka_incoming host=dynamic disallow=all allow=ulaw
And the configuration for the Osaka box:
[general] register => osaka:welcome@192.168.2.202/toronto [toronto] type=friend secret=welcome context=toronto_incoming host=dynamic disallow=all allow=ulaw
Many of the previous options may be familiar to you by now, but let’s take a look at them further just in case they are not.
The second line of the file tells our Asterisk box to register to the other box, with the purpose of telling the remote Asterisk box where to send calls when it wishes to send a call to our local Asterisk box. Remember how we mentioned a little oddity in the configuration? Notice that at the end of the registration line we tag on a forward slash and the username of the remote Asterisk box? What this does is tell the remote Asterisk box what digest name to use when it wants to set up a call. If you forget to add this, then when the far end tries to send you a call, you’ll see the following at your Asterisk CLI:
[Apr 22 18:52:32] WARNING[23631]: chan_sip.c:8117 check_auth: username mismatch,
have <toronto>, digest has <s>So by adding the forward slash and username, we tell the other end what to place in the Digest username of the Proxy Authorization field in the SIP INVITE message.
The rest of the file is the authorization block we use to control
the incoming and outgoing calls from the other Asterisk box. On the
Toronto box, we have the [osaka] authorization block,
and on the Osaka box, we have the [toronto] block. We
define the type as a friend, which allows us to both
receive and place calls from the other Asterisk box. The
secret is the password the other system should use
when authenticating. The context is where incoming
calls are processed in the dialplan
(extensions.conf). We set the
host parameter to dynamic, which
tells our Asterisk box that the other endpoint will register to us,
thereby telling us what IP address to set up calls when we want to send
a call to the other end. Finally, the disallow and
allow parameters control the codecs we wish to use
with the other end.
If you save the file and reload the SIP channel on both Asterisk
boxes (sip reload from the
Asterisk console), you should see something like the following, which
will tell you the remote box successfully registered:
*CLI> -- Saved useragent "Asterisk PBX" for peer toronto
You should see the status of the Host change from
(Unspecified) to the IP address of the remote box
when you run sip show peers:
*CLI> sip show peers
Name/username Host Dyn Nat ACL Port Status
toronto/osaka 192.168.2.202 D 5060 UnmonitoredYou
can verify that your own registration was successful by running
sip showregistry from the Asterisk
console:
*CLI> sip show registry
Host Username Refresh State Reg.Time
192.168.1.101:5060 osaka 105 Registered Sun, 22 Apr 2007 19:13:20Now that our Asterisk boxes are happy with each other, let’s configure a couple of SIP phones so we can call between the boxes.
See the the section called “Configuring an FXS Channel for an Analog Telephone”” section of this chapter for more information about configuring SIP phones with Asterisk. Below is the configuration for two SIP phones in the sip.conf file for each server, which we’ll be referencing from the dialplan in the next section, thereby giving us two endpoints to call between. Append this configuration to the end of the sip.conf file on each respective server.
Toronto sip.conf:
[1000] type=friend host=dynamic context=phones
Osaka sip.conf:
[1001] type=friend host=dynamic context=phones
You should now have extension 1000 registered
to Toronto, and extension 1001 registered to Osaka. You can verify this
with the sip show peers command from the Asterisk
console. Next, we’re going to configure the dialplan logic that will
allow us to call between the extensions.
Now we can configure a simple dialplan for each server allowing us to call between the two
phones we have registered: one to Toronto, the other to Osaka. In the
the section called “Working with Interface Configuration Files”” section of this chapter, we
asked you to create a simple extensions.conf file. We are going to build
up a dialplan based on this simple configuration. The dialplan for each
server will be very similar to the other one, but for clarity we will
show both. The new lines we’re adding to the file will be
italicized.
Toronto extensions.conf:
[globals] [general] autofallthrough=yes [default] [incoming_calls] [phones] include => internal include => remote [internal] exten => _2XXX,1,NoOp() exten => _2XXX,n,Dial(SIP/${EXTEN},30) exten => _2XXX,n,Playback(the-party-you-are-calling&is-curntly-unavail) exten => _2XXX,n,Hangup() [remote] exten => _1XXX,1,NoOp() exten => _1XXX,n,Dial(SIP/osaka/${EXTEN}) exten => _1XXX,n,Hangup() [osaka_incoming] include => internal
Osaka extensions.conf:
[globals] [general] autofallthrough=yes [default] [incoming_calls] [phones] include => internal include => remote [internal] exten => _1XXX,1,NoOp() exten => _1XXX,n,Dial(SIP/${EXTEN},30) exten => _1XXX,n,Playback(the-party-you-are-calling&is-curntly-unavail) exten => _1XXX,n,Hangup() [remote] exten => _2XXX,1,NoOp() exten => _2XXX,n,Dial(SIP/toronto/${EXTEN}) exten => _2XXX,n,Hangup() [toronto_incoming] include => internal
Once you’ve configured your extensions.conf file, you can reload it from
the Asterisk console with the dialplan reload
command. Verify your dialplan loaded with the dialplan
show command.
And that’s it! You should be able to place calls between your two Asterisk servers now.
A major advantage of using the IAX2 protocol is that it is designed to be more friendly to working within odd network configurations, especially working behind NAT. This makes it a fantastic protocol for softphone clients since they are often utilized on laptops that roam into many different networks, often with no control of the network itself (such as when traveling between hotel networks).
The Inter-Asterisk eXchange (IAX) protocol is usually used for server-to-server communication; more hard phones are available that talk SIP. However, there are several softphones that support the IAX protocol, and work is progressing on several fronts for hard phone support in firmware. The primary difference between the IAX and SIP protocols is the way media (your voice) is passed between endpoints.
With SIP, the RTP (media) traffic is passed using different ports than those used by the signaling methods. For example, Asterisk receives the signaling of SIP on port 5060 and the RTP (media) traffic on ports 10,000 through 20,000 by default. The IAX protocol differs in that both the signaling and media traffic are passed via a single port: 4569. An advantage to this approach is that the IAX protocol tends to be better suited to topologies involving NAT.
There exist many IAX-based softphones, but not so many hardware based phones. The most pronounced reason is because IAX2 is not yet an IETF standard, yet many people have become early adopters and have reaped the benefits.
An excellent IAX2 softphone is idefisk, available at http://www.asteriskguru.com[69] for free download. The authors have had excellent results with this softphone, and since it runs on Microsoft Windows, Mac OS X, and Linux, it is an excellent cross-platform softphone to write about. We will be demonstrating version 1.31 in this book, although version 2.0 was recently released (April 2007) but is not yet available for Linux.
Like the rest of this chapter, we’re attempting to get you up and running quickly with the smallest configuration file set possible in order to minimize the problems you may have in configuring your devices. Just like the sip.conf file, iax.conf requires only a few simple lines to get our IAX phone registered to Asterisk. Let’s take a look:
[general] autokill=yes [idefisk] type=friend host=dynamic context=phones
Yes, really, that’s all you need to get your softphone up and running. It’s not the most secure or feature-rich configuration (we’re not even using a password), but this will work.
In the [general] section of our
iax.conf file, we have a single
option: autokill=
yes. We use this option to avoid things from stalling
when a peer does not ACK (reply) to our NEW packet (new call setup
request) within 2000 milliseconds. Instead of the reply to value
yes, you can set this to the number of milliseconds
to wait for the ACK to our NEW packet. You can control the autokill option for each individual peer by
defining qualify for those peers that
you know may be on poor network connections.
The rest of the file contains the definition for our softphone. We
define the type as friend, which tells Asterisk we
will send calls to this device and also accept calls from this device. A
friend is a shortcut for defining a separate
peer (send calls to the softphone), and
user (accept calls from the softphone). We could also
have defined individual definitions for the peer and
user like so:
[idefisk] type=user context=phones [idefisk] type=peer host=dynamic
Once you’ve configured your
iax.conf file, save the file and reload the IAX2
channel module from your Asterisk console with module reload
chan_iax2.so. Confirm your new peer exists by running
iax2 show peers.
localhost*CLI> iax2 show peers
Name/Username Host Mask Port Status
idefisk (Unspecified) (D) 255.255.255.255 0 Unmonitored
1 iax2 peers [0 online, 0 offline, 1 unmonitored]
Once you’ve installed the idefisk softphone, open up the client and you’ll see the main screen shown in Figure 4.6, “idefisk”.
[PROD: fileref for Figure 4.6, “idefisk” was out of sequence (pointing to ast2_0405.pdf|png); I changed it to ast2_0406.pdf|png—DCPS]
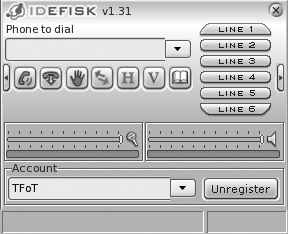
After we’ve started the softphone, we need to configure our softphone so we can place calls. We also need to register to Asterisk so we can receive calls. To do this, Right-click on the icon in the top-left corner of the screen, which will open a drop-down menu. Select Account Options from the drop-down, which will bring up the screen shown in Figure 4.7, “idefisk Account Options screen”.
[PROD: fileref for Figure 4.7, “idefisk Account Options screen” was out of sequence (pointing to ast2_0406.pdf|png); I changed it to ast2_0407.pdf|png—DCPS]
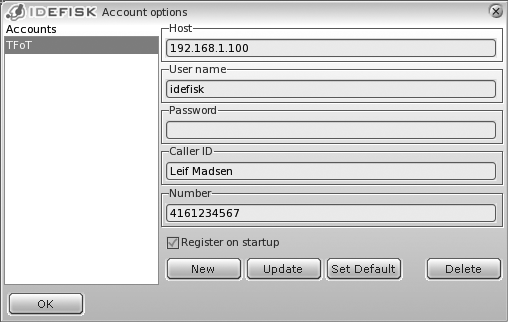
Start by creating a new account on the softphone by clicking the
New button and filling out the relevant information. The Host should
point to the IP address or domain name of your Asterisk system, with the
username matching that of the value located between the square brackets [ ] in
your iax.conf file. Leave the password field blank,
as we did not configure a secret in
iax.conf, and the Caller ID and Number can be set
to whatever you wish. If you want idefisk to register this account on
startup, select the “Register on startup” checkbox. When done, click the
OK button to save the new account.
If you clicked the “Register on startup checkbox,” then the phone will attempt to register to Asterisk. On the Asterisk console you will see output telling you that the phone has registered:
-- Registered IAX2 'idefisk' (UNAUTHENTICATED) at 127.0.0.1:32771
You
can verify your registration with the iax2
show peers command at the Asterisk console:
localhost*CLI> iax2 show peers
Name/Username Host Mask Port Status
idefisk 127.0.0.1 (D) 255.255.255.255 32771 Unmonitored
1 iax2 peers [0 online, 0 offline, 1 unmonitored]
One final thing to do is confirm dialing through our phone by configuring a simple dialplan in extensions.conf. You can simply test that you have audio in both directions by calling extension 500, or you can modify the dialplan we created in the the section called “Setting Up the Dialplan for Some Test Calls”” section of this chapter to place some test calls. If you also configured a SIP phone at extension 1000 in the previous sections, then the following will not overlap with that, as we’ll be using extension 1001 (unless you configured multiple SIP extensions, in which case just configure a unique extension number for your IAX2 softphone):
[globals]
[general]
[default]
exten => s,1,Verbose(1|Unrouted call handler)
exten => s,n,Answer()
exten => s,n,Wait(1)
exten => s,n,Playback(tt-weasels)
exten => s,n,Hangup()
[incoming_calls]
[internal]
exten => 500,1,Verbose(1|Echo test application)
exten => 500,n,Echo()
exten => 500,n,Hangup()
exten => 1001,1,Verbose(1|Extension 1000)
exten => 1001,n,Dial(IAX2/idefisk,30)
exten => 1001,n,Hangup()
[phones]
include => phones
Some Internet Telephony Service Providers (ITSPs) provide the ability to originate and terminate calls via the IAX2 protocol. Beyond minimizing the number of ports required to be open on the firewall (IAX2 only requires a single port for both signaling and media), the protocol’s trunking feature is attractive to both ITSPs and their customers due to the savings in bandwidth that can be obtained when running many simultaneous calls between endpoints.
If your ITSP is offering IAX2 termination, there is a strong chance it is running Asterisk; thus the configuration for connecting to these service providers is more than likely going to be similar to what we are providing here.
The following configuration is a template for connecting to an IAX2 service provider:
[general] autokill=yes register => username:password@my.service-provider.tld [my_unique_id] type=user secret=my_unique_password context=incoming_calls trunking=yes disallow=all allow=gsm allow=ulaw deny=0.0.0.0/0.0.0.0 permit=10.251.100.1/255.255.255.255 [my_unique_id] type=peer host=10.251.100.1 trunking=yes disallow=all allow=gsm allow=ulaw
To accept incoming calls from the Direct Inward Dialing (DID) number that your service provider assigned to you, we need to modify our extensions.conf file. Perhaps you want to send the call to an auto-attendant, or maybe simply to your desk phone. In either case, you can accept calls from your service provider and match on the incoming DID with the following bit of dialplan logic:
[globals]
[general]
autofallthrough=yes
[default]
[incoming_calls]
exten => 14165551212,1,NoOp()
exten => 14165551212,n,Dial(SIP/1000,30)
exten => 14165551212,n,Playback(the-party-you-are-calling&is-curntly-unavail)
exten => 14165551212,n,Hangup()
exten => 4165551212,1,Goto(1${EXTEN})
[internal]
[phones]
include => internal
Often it is desirable to connect two physical Asterisk boxes together via IAX in order to send calls between two physical locations (the distance between these locations may be centimeters or kilometers). One of the advantages to using the IAX protocol to do this is a feature called trunking, which utilizes a method of sending the voice data for multiple calls at once with a single header. This has little effect on only one or two simultaneous calls, but if you are sending tens or hundreds of calls between two locations, the bandwidth savings by utilizing trunking can be tremendous.
Note
You will need a timing interface installed on your system, whether it be hardware from Digium or via the kernel by using the ztdummy driver. This will require you to have Zaptel installed on your system and running. See Chapter 3, Installing Asterisk for more information about installing Zaptel.
We’ll be utilizing a simple topology where we have two Asterisk boxes registered to each other directly, and separate phones registered to each Asterisk box. We’ll call the two Asterisk boxes Toronto and Osakafi (see the section called “Connecting Two Asterisk Boxes Together via SIP””). Bob’s phone will be registered and connected to Toronto, while Alice’s phone will be registered and connected to Osaka.
[PROD: I've commented out figure 4_8 as there's no image file for it...—DCPS]
[PROD: fileref for figure 4_8 was out of sequence (pointing to ast2_0407.pdf|png); I changed it to ast2_0408.pdf|png—DCPS]
The first thing we want to do is create a new channel file (iax.conf) by renaming the current sample file to iax.conf.sample and creating a new blank iax.conf:
#cd /etc/asterisk#mv iax.conf iax.conf.sample#touch iax.conf
Next, open up the iax.conf file and enter the following configuration on the Toronto Asterisk box:
[general] autokill=yes register => toronto:welcome@192.168.1.107 [osaka] type=friend host=dynamic trunk=yes secret=welcome context=incoming_osaka deny=0.0.0.0/0.0.0.0 permit=192.168.1.107/255.255.255.255
autokill=yes
was explained in the previous section, but its purpose is to make sure
new calls being set up to a remote system that are not acknowledged
within a reasonable amount of time (two seconds by default) are torn
down correctly. This saves us from having a lot of hung channels simply
waiting for an acknowledgement that probably isn’t coming.
The register line is used to tell the remote
Asterisk box where we are so that when the box at 192.168.1.107 is ready
to send us a call, it sends it to our IP address (in this case our IP
address is 192.168.1.104, which you’ll see in the iax.conf configuration of the Osaka box). We
send the username Toronto and the password
welcome to Osaka, which authenticates our
registration, and if accepted, writes the location of our Asterisk box
into its memory for when it needs to send us a call.
The [Osaka] definition
is used to control the authentication of the remote box
and delivery into our dialplan. Osaka is the
username used in the incoming authentication. We set the
type to friend because we want to
have both the ability to send calls to Osaka and to receive calls from
Osaka. The host option is set to
dynamic which tells Asterisk to send calls to the IP
address obtained when the opposite endpoint registers with us.
In the introduction to this section, we mentioned the possible
bandwidth savings when utilizing IAX2 trunking. It’s simple to enable
this functionality in Asterisk, as we just need to add trunk=yes to our friend definition. As long as
a timing interface is installed and running (i.e.,
dummy), then we can take advantage of IAX2
trunking.
The secret is straightforward: it’s our
authentication password. We’re defining the [incoming_osaka] context as the place we will process incoming calls for this
friend in the extensions.conf file. Finally, we block all
IP addresses with the deny option from being allowed
to authenticate, and explicitly permit 192.168.1.107.
The iax.conf configuration
for Osaka is nearly identical, except for the changes in IP address and
names:
[general] autokill=yes register => osaka:welcome@192.168.1.104 [toronto] type=friend host=dynamic trunk=yes secret=welcome context=incoming_toronto deny=0.0.0.0/0.0.0.0 permit=192.168.1.104/255.255.255.255
In the the section called “Configure the Softphone”” section, we configured our first IAX2 softphone using idefisk. The configuration we’ll be using here is nearly identical except for minor changes in order to cause the peers to be unique. If you’ve already configured a SIP softphone, then you can also utilize that on one (or both) of the peers. Remember that Asterisk is a multiprotocol application, and you can send a call from a SIP phone to Asterisk, across an IAX2 trunk, and then down to another SIP phone (or H.323, MGCP, etc.).
On Osaka:
[1001] type=friend host=dynamic context=phones
On Toronto:
[2001] type=friend host=dynamic context=phones
Next, configure your IAX2 softphone to register to Asterisk. If the phone successfully registers, you’ll see something like:
*CLI> -- Registered IAX2 '1001' (UNAUTHENTICATED) at 192.168.1.104:4569
In order to allow calling between our two Asterisk boxes over the IAX2 trunk, we need to configure a simple
dialplan. The following dialplan will send all extensions in the 1000
range (1000–1999) to Osaka, and all extensions in the 2000 range
(2000–2999) to Toronto. Our example is going to assume that you have
configured a pair of IAX2 softphones, but feel free to utilize a SIP
phone if you’ve already configured one (or two). Just be aware that
you’ll need to change the Dial() application to send
the call to the SIP phone via the SIP protocol instead of IAX2 (i.e.
Dial(SIP/${EXTEN},30) instead of
Dial(IAX2/${EXTEN},30)).
The extensions.conf file on
Toronto:
[globals] [general] autofallthrough=yes [default] [incoming_calls] [phones] include => internal include => remote [internal] exten => _1XXX,1,NoOp() exten => _1XXX,n,Dial(IAX2/${EXTEN},30) exten => _1XXX,n,Playback(the-party-you-are-calling&is-curntly-unavail) exten => _1XXX,n,Hangup() [remote] exten => _2XXX,1,NoOp() exten => _2XXX,n,Dial(IAX2/toronto/${EXTEN}) exten => _2XXX,n,Hangup() [toronto_incoming] include => internal
The extensions.conf file on Osaka:
[globals] [general] autofallthrough=yes [default] [incoming_calls] [phones] include => internal include => remote [internal] exten => _2XXX,1,NoOp() exten => _2XXX,n,Dial(IAX2/${EXTEN},30) exten => _2XXX,n,Playback(the-party-you-are-calling&is-curntly-unavail) exten => _2XXX,n,Hangup() [remote] exten => _1XXX,1,NoOp() exten => _1XXX,n,Dial(IAX2/osaka/${EXTEN}) exten => _1XXX,n,Hangup() [osaka_incoming] include => internal
There is a little-known secret in Asterisk config files that is so brilliant that we had to devote a little section to it.
Let us say that you have 20 SIP phones that are all pretty much identical in terms of how they are configured. The documented way to create them is to specify the parameters for each. Part of such a sip.conf file might look like this:
[1000] type=friend context=internal host=dynamic disallow=all allow=ulaw dtmfmode=rfc2833 maibox=1000 secret=AllYourSetsAreBelongToUs [1001] type=friend context=internal host=dynamic disallow=all allow=ulaw dtmfmode=rfc2833 maibox=1001 secret=AllYourSetsAreBelongToUs [1002] type=friend context=internal host=dynamic disallow=all allow=ulaw dtmfmode=rfc2833 maibox=1002 secret=AllYourSetsAreBelongToUs
Seems like a lot of extra typing, cutting, and pasting, yes? And what if you decide that you are going to change the context for your sets to another name. Not looking good, is it?
Enter the template. Let’s create the same SIP friends as we did above, only this time using the template construct:
[sets](!) ; <== note the exclamation point in parenthesis. That makes this a template.
type=friend
context=internal
host=dynamic
disallow=all
allow=ulaw
dtmfmode=rfc2833
secret=AllYourSetsAreBelongToUs
[1000](sets) ; <== note the template name in parenthesis. All of that templates
; settings will be inhereted.
maibox=1000
[1001](sets)
maibox=1001
[1002](sets)
maibox=1002This is one of the best kept secrets of
conf file creation. In our experience, very few people use
this, but for no other reason than that they don’t know about it. Well,
that’s about to change. Our goal is to see everyone using these from now
on; and yes, we will be checking.
Several methods of debugging are available in Asterisk. Once you’ve connected to the console, you can enable different levels of verbosity and debugging output, as well as protocol packet tracing. We’ll take a look at the various options in this section.
To connect to the Asterisk console, you can either start the server in the console directly (in which case you will not be able to exit out of the console without killing the Asterisk process), or start Asterisk as a daemon and then connect to a remote console.
To start the Asterisk process directly in the console, use the console flag:
# /usr/sbin/asterisk -c To connect to a remote Asterisk console, start the daemon first
and then connect with the -r
flag:
#/usr/sbin/asterisk#/usr/sbin/asterisk -r
If you are having a problem with a specific module not loading, or
a module causing Asterisk to not load, start the Asterisk process with
the -c flag to monitor the status of modules loading. For example, if
you attempt to load the OSS channel driver (which allows the use of the
CONSOLE channel), and Asterisk is
unable to open /dev/dsp, you will receive the
following error on startup:
WARNING[32174]: chan_oss.c:470 soundcard_init: Unable to open /dev/dsp:
No such file or directory
== No sound card detected -- console channel will be unavailable
== Turn off OSS support by adding 'noload=chan_oss.so' in /etc/
asterisk/modules.confAsterisk can output debugging information in the form of WARNING, NOTICE, and ERROR messages. These messages will give you
information about your system, such as registrations, status, and
progression of calls, and various other useful bits of information. Note
that WARNING and NOTICE messages are not errors; however,
ERROR messages should be
investigated. To enable various levels of verbosity, use set verbose followed by a numerical value.
Useful values range from 3 to 10. For example, to set the highest level
of verbosity, use:
# set verbose 10 You can also enable core debugging messages with set debug followed by a numerical value. To
enable DEBUG output on the console,
you may need to enable it in the logger.conf file
by adding debug to the console => statement, as follows:
console => warning,notice,error,event,debug Useful values for set debug
range from 3 to 10. For example:
# set debug 10 If you've worked through all of the sections in this chapter, you will have configured a pair of analog interfaces, a local SIP and IAX2 channel connected to a softphone and/or a hardphone, and placed calls across servers using the SIP and IAX2 protocols. These configurations are quite basic, but they give us functional channels to work with. We will make use of them in the following chapters, while we learn to build more useful dialplans.
[49] Officially, the current version is IAX2, but since all support for IAX1 was dropped many years ago, whether you say “IAX” or “IAX2,” you are talking about the same version.
[50] This configuration used to be known as the Digium Dev-lite kit. For more information on FXS versus FXO, keep reading. Put simply, this card will give us one port to connect to a traditional analog line from the phone company (FXO), and one port to connect to an analog telephone (FXS), which is any type of phone that will work with a traditional home telephone circuit.
[51] …and H.323 and SCCP and MGCP and UNISTIM
[52] Bidirectional communication is also known as full duplex in some circles. Half duplex means communication is only traveling in one direction at a time.
[53] Yes, there is such a thing as ground-start signaling on channelized T1s, but that has nothing to do with an actual ground condition on the circuit (which is entirely digital).
[54] A far-end disconnect happens when the far end hangs up. In an unsupervised circuit, there is no method of telling the near end that the call has ended. If you are on the phone this is no problem, since you will know the call has ended and will manually hang up your end. If, however, your voicemail system is recording a message, it will have no way of knowing that the far end has terminated and will, thus, keep recording silence, or even the dial tone or reorder tone. Kewlstart can detect these conditions and disconnect the circuit.
[55] It is generally safe to assume that the modules have loaded successfully, but to view the debugging output when loading the module, check the console output (by default this is located on TTY terminal 9, but this is configurable in the safe_asterisk script—see the previous chapter for details).
[56] Also referred to as the Batphone method, and more formally known as an Automatic Ringdown or Private Line Automatic Ringdown (PLAR) circuit. This method is commonly used at rental car counters and airports.
[57] RFC 3261 is available at http://www.ietf.org/rfc/rfc3261.txt.
While the document is fairly large, we strongly encourage anyone who
wishes to become an Asterisk professional to read at least the first
100 or so pages of this document and to understand how calls are set
up, as this knowledge will be imperative when you’re looking at a SIP
trace (sip debug from the Asterisk console) trying
to determine why your calls are not getting set up correctly.
[58] An excellent open source SIP proxy is OpenSER, available at http://www.openser.org.
[59] Yes, there are ways to making the media flow directly between
the phones once the call is set up. This is done in the
sip.conf file using either
directrtpsetup=yes (an experimental option allowing
the media to be redirected in the initial call setup) or
canreinvite=yes (where media initially goes through
Asterisk until a re-INVITE happens, at which point the media can be
sent directly between the phones).
[60] The maximum length of a username is 255 characters.
[61] Typically, it’s at 4 A.M. on the morning of a critical 8 A.M. meeting, after having worked all weekend. Red Bull is probably the most popular drink of the Asterisk developers. Dr. Pepper would be a close second. Red Bull, anyone?
[62] FTP is preferred over TFTP due to the ability of a Polycom phone to see timestamps on FTP files. This allows the phone to avoid redownloading configuration files and firmware updates that it already has—thus shortening boot time.
[63] You can get into assigning complex and unguessable passwords for the phones to use, but unless you are going to input the passwords into each phone manually, you’ll have to pass them their FTP username and password from the DHCP server. Any device that can get on the voice network can get the same information from the DHCP server. We’re not telling you to ignore security; just don’t assume that creating separate passwords for each phone is going to improve security.
[64] Actually, it does serve one useful purpose, which is to allow you to log on to a set via a browser and query its configuration.
[65] You can get into assigning complex and unguessable passwords for the phones to use, but unless you are going to input the passwords into each phone manually, you’ll have to pass them their FTP user name and password from the DHCP server. Any device that can get on the voice network can get the same information from the DHCP server. We’re not telling you to ignore security, just don’t assume that creating separate passwords for each phone is going to improve security.
[66] Be sure to check the policy of any service provider you are looking to connect with, as some of them may not allow you to use a PBX system with its service.
[67] Also known as a VoIP Service Provider (VSP).
[68] We also assume you have configured at least one SIP extension from the previous section.
[69] The Asterisk Guru site is also an excellent source of documentation!
Table of Contents
Everything should be made as simple as possible, but not simpler.
The dialplan is truly the heart of any Asterisk system, as it defines how Asterisk handles inbound and outbound calls. In a nutshell, it consists of a list of instructions or steps that Asterisk will follow. Unlike traditional phone systems, Asterisk’s dialplan is fully customizable. To successfully set up your own Asterisk system, you will need to understand the dialplan.
If you have attempted to read some sample dialplans and found them overwhelming, or if you’ve tried to write an Asterisk dialplan and had no success, help is at hand. This chapter explains how dialplans work in a step-by-step manner and teaches the skills necessary to create your own. The examples have been designed to build upon one another, so feel free to go back and reread a section if something doesn’t quite make sense. Please also note that this chapter is by no means an exhaustive survey of all the possible things dialplans can do; our aim is to cover just the fundamentals. We’ll cover more advanced dialplan topics in later chapters.
The Asterisk dialplan is specified in the configuration file named extensions.conf.
Tip
The extensions.conf file usually resides in the /etc/asterisk/ directory, but its location may vary depending on how you installed Asterisk. Other common locations for this file include /usr/local/asterisk/etc/ and /opt/asterisk/etc/.
The dialplan is made up of four main concepts: contexts, extensions, priorities, and applications. In the next few sections, we’ll cover each of these parts and explain how they work together. After explaining the role each of these elements plays in the dialplan, we will step you though the process of creating a basic, functioning dialplan.
Dialplans are broken into sections called contexts. Contexts are named groups of extensions, which serve several purposes.
Contexts keep different parts of the dialplan from interacting with one another. An extension that is defined in one context is completely isolated from extensions in any other context, unless interaction is specifically allowed. (We’ll cover how to allow interaction between contexts near the end of the chapter.)
As a simple example, let’s imagine we have two companies sharing an Asterisk server. If we place each company’s voice menu in its own context, they are effectively separated from each other. This allows us to independently define what happens when, say, extension 0 is dialed: people pressing 0 at Company A’s voice menu will get Company A’s receptionist, and callers pressing 0 at Company B’s voice menu will get Company B’s receptionist. (This example assumes, of course, that we’ve told Asterisk to transfer the calls to the receptionists when callers press 0.)
Contexts are denoted by placing the name of the context
inside square brackets ([ ]).
The name can be made up of the letters A through Z (upper- and
lowercase), the numbers 0 through 9, and the hyphen and
underscore.[70] For example, a context for incoming calls looks like
this:
[incoming]
Note
Context names have a maximum length of 79 characters (80 characters –1 terminating null)
All of the instructions placed after a context definition are part
of that context, until the next context is defined. At the beginning of
the dialplan, there are two special contexts named [general] and [globals]. The [general] section contains a list of general
dialplan settings (which you’ll probably never have to worry about), and
we will discuss the [globals] context
the the section called “Global variables”” section; for now it’s
just important to know that these two contexts are special. As long as
you avoid the names [general] and
[globals], you may name your contexts
anything you like.
When you define a channel (which is how you connect things to the system), one of the parameters that is defined in the channel definition is the context. In other words, the context is the point in the dialplan where connections from that channel will begin.
Another important use of contexts (perhaps the most important) is to provide security. By using contexts correctly, you can give certain callers access to features (such as long-distance calling) that aren’t made available to others. If you don’t design your dialplan carefully, you may inadvertently allow others to fraudulently use your system. Please keep this in mind as you build your Asterisk system.
Warning
The doc/ subdirectory of the Asterisk source code contains a very important file named security.txt, which outlines several steps you should take to keep your Asterisk system secure. It is vitally important that you read and understand this file. If you ignore the security precautions outlined there, you may end up allowing anyone and everyone to make long-distance or toll calls at your expense!
If you don’t take the security of your Asterisk system seriously, you may end up paying—literally! Please take the time and effort to secure your system from toll fraud.
In the world of telecommunications, the word extension usually refers to a numeric identifier given to a line that rings a particular phone. In Asterisk, however, an extension is far more powerful, as it defines a unique series of steps (each step containing an application) that Asterisk will take that call through. Within each context, we can define as many (or few) extensions as required. When a particular extension is triggered (by an incoming call or by digits being dialed on a channel), Asterisk will follow the steps defined for that extension. It is the extensions, therefore, that specify what happens to calls as they make their way through the dialplan. Although extensions can certainly be used to specify phone extensions in the traditional sense (i.e., extension 153 will cause the SIP telephone set on John’s desk to ring), in an Asterisk dialplan, they can be used for much more.
The syntax for an extension is the word exten, followed by an arrow formed by the equals sign and the greater-than sign, like
this:
exten =>
This is followed by the name (or number) of the extension. When dealing with traditional telephone systems, we tend to think of extensions as the numbers you would dial to make another phone ring. In Asterisk, you get a whole lot more; for example, extension names can be any combination of numbers and letters. Over the course of this chapter and the next, we’ll use both numeric and alphanumeric extensions.
Tip
Assigning names to extensions may seem like a revolutionary concept, but when you realize that many VoIP transports support (or even actively encourage) dialing by name or email address instead of only dialing by number, it makes perfect sense. This is one of the features that makes Asterisk so flexible and powerful.
A complete extension is composed of three components:
These three components are separated by commas, like this:
exten =>name,priority,application()
Here’s a simple example of what a real extension might look like:
exten => 123,1,Answer()
In this example, the extension name is 123, the priority is 1, and the application is Answer(). Now, let’s move
ahead and explain priorities and applications.
Each extension can have multiple steps, called priorities. Each priority is numbered sequentially, starting with 1, and executes one specific application. As an example, the following extension would answer the phone (in priority number 1), and then hang it up (in priority number 2):
exten => 123,1,Answer() exten => 123,2,Hangup()
Don’t worry if you don’t understand what Answer() and Hangup()
are—we’ll cover them shortly. The key point to remember here
is that for a particular extension, Asterisk follows the priorities in
order.
In older releases of Asterisk, the numbering of priorities caused a lot of problems. Imagine having an extension that had 15 priorities, and then needing to add something at step 2. All of the subsequent priorities would have to be manually renumbered. Asterisk does not handle missing steps or misnumbered priorities, and debugging these types of errors was pointless and frustrating.
Beginning with version 1.2, Asterisk addressed this problem. It
introduced the use of the n
priority, which stands for “next.” Each time Asterisk encounters a
priority named n, it takes the
number of the previous priority and adds 1. This makes it easier to
make changes to your dialplan, as you don’t have to keep renumbering
all your steps. For example, your dialplan might look something like
this:
exten => 123,1,Answer() exten => 123,n,do somethingexten => 123,n,do something elseexten => 123,n,do one last thingexten => 123,n,Hangup()
Internally, Asterisk will calculate the next priority number
every time it encounters an n.[71] You should note, however, that you must
always specify priority number 1. If you accidentally put
an n instead of 1 for the first priority, you’ll find that
the extension will not be available.
Starting with Asterisk version 1.2 and higher, common practice is to assign text labels to priorities. This is to ensure that you can refer to a priority by something other than its number, which probably isn’t known, given that dialplans now generally use unnumbered priorities. To assign a text label to a priority, simply add the label inside parentheses after the priority, like this:
exten => 123,n(label),application()
Warning
A very common mistake when writing labels is to insert a comma
between the n and the (, like
this:
exten => 123,n,(label),application();<-- THIS IS NOT GOING TO WORK
This mistake will break that part of your dialplan, and you will get an error that the application cannot be found.
In the next chapter, we’ll cover how to jump between different priorities based on dialplan logic. You’ll be seeing a lot more of priority labels, and you will be using them often in your dialplans.
Applications are the workhorses of the dialplan. Each application performs
a specific action on the current channel, such as playing a sound,
accepting touch-tone input, dialing a channel, hanging up the call, and
so forth. In the previous example, you were introduced to two simple
applications: Answer() and Hangup(). You’ll
learn more about how these work momentarily.
Some applications, such as Answer()and Hangup(), need no other instructions to do
their jobs. Other applications require additional information. These
pieces of information, called arguments, can be passed on to the
applications to affect how they perform their actions. To pass arguments
to an application, place them between the parentheses that follow the
application name, separated by commas.
Tip
Occasionally, you may also see the pipe character (|) being
used as a separator between arguments, instead of a comma. Feel free
to use whichever you prefer. For the examples in this book, we will be
using the comma to separate arguments to an application, as the
authors prefer the look of this syntax. You should be aware, however,
that when Asterisk parses the dialplan, it converts any commas in the
application arguments to pipes.
As we build our first dialplan in the next section, you’ll learn to use applications (and their associated arguments) to your advantage.
Now we’re ready to create our first dialplan. We’ll start with a very simple example. We are going to instruct Asterisk to answer a call, play a sound file, and hang up. We’ll use this simple example to point out the most important dialplan fundamentals.
For the examples in this chapter to work correctly, we’re assuming
that at least one channel (either Zap, SIP, or IAX2) has been created and
configured (as described in the previous chapter), and that all calls
coming into that channel enter the dialplan at the [incoming] context. If you have been creative
with any previous examples, you may need to make adjustments to fit your
particular channel names.
Because of the technology we are using in our channels, we need to cover
one more thing before we get started with our dialplan. We need to
explain extension s. When calls enter
a context without a specific destination extension (for example, a
ringing FXO line), they are passed to the s extension. (The s stands for “start,” as this is where a call
will start if no extension information was passed with the call.)
Since this is exactly what we need for our dialplan, let’s begin
to fill in the pieces. We will be performing three actions on the call
(answer it, play a sound file, and hang it up), so our extension called
s will need three priorities. We’ll
place the three priorities below [incoming], because we have decided that all incoming calls should
start in this context.[72]
[incoming] exten => s,1,application()exten => s,n,application()exten => s,n,application()
Now all we need to do is fill in the applications, and we’ve created our first dialplan.
If we’re going to answer the call, play a sound file, and then hang up,
we’d better learn how to do just that. The Answer() application is used to answer a
channel that is ringing. This does the initial setup for the channel
that receives the incoming call. (A few applications don’t require that
you answer the channel first, but properly answering the channel before
performing any other actions is a very good habit.) As we mentioned
earlier, Answer() takes no
arguments.
The Playback() application is
used for playing a previously recorded sound file over a channel. When
using the Playback() application,
input from the user is simply ignored.
Tip
Asterisk comes with many professionally recorded sound files, which should be found in the default sounds directory (usually /var/lib/asterisk/sounds/). When you compile Asterisk, you can choose to install various sets of sample sounds that have been recorded in a variety of languages and file formats. We’ll be using these files in many of our examples. Several of the files in our examples come from the Extra Sound Package, so please take the time to install it (see Chapter 3, Installing Asterisk). You can also have your own sound prompts recorded in the same voices as the stock prompts by visiting http://thevoice.digium.com/.
To use Playback(), specify a
filename (without a file extension) as the argument. For example,
Playback(filename) would play the
sound file called filename.gsm, assuming it was
located in the default sounds directory. Note that you can include the
full path to the file if you want, like this:
Playback(/home/john/sounds/filename)
The previous example would play filename.gsm from the /home/john/sounds/ directory. You can also use relative paths from the Asterisk sounds directory as follows:
Playback(custom/filename)
This example would play filename.gsm from the custom/ subdirectory of the default sounds directory (probably /var/lib/asterisk/sounds/custom/filename.gsm). Note that if the specified directory contains more than one file with that filename but with different file extensions, Asterisk automatically plays the best file.[73]
The Hangup() application does
exactly as its name implies: it hangs up the active channel. You should
use this application at the end of a context when you want to end the
current call to ensure that callers don’t continue on in the dialplan in
a way you might not have anticipated. The Hangup() application takes no
arguments.
Now that we have designed our extension, let’s put together all the pieces to create our first dialplan. As is typical in many technology books (especially computer programming books), our first example will be called “Hello World!”
In the first priority of our extension, we’ll answer the call. In the second, we’ll play a sound file named hello-world.gsm, and in the third we’ll hang up the call. Here’s what the dialplan looks like:
[incoming] exten => s,1,Answer() exten => s,n,Playback(hello-world) exten => s,n,Hangup()
If you have a channel or two configured, go ahead and try it
out![74] Simply create a file called
extensions.conf, (probably in
/etc/asterisk) and insert the four lines of
dialplan code we just designed. If it doesn’t work, check the Asterisk
console for error messages, and make sure your channels are assigned to
the [incoming] context.
Even though this example is very short and simple, it emphasizes the core concepts of contexts, extensions, priorities, and applications. If you can get this to work, you have the fundamental knowledge on which all dialplans are built.
Let’s build upon our example. After all, a phone system that simply plays a sound file and then hangs up the channel isn’t that useful!
The dialplan we just built was static; it will always perform the same actions on every call. We are going to start adding some logic to our dialplan so that it will perform different actions based on input from the user. To do this, we’re going to need to introduce a few more applications.
One of the most important keys to building interactive Asterisk
dialplans is the Background()[75] application. Like Playback(), it plays a recorded sound
file. Unlike Playback(), however, when the caller
presses a key (or series of keys) on her telephone keypad, it interrupts
the playback and goes to the extension that corresponds with the pressed
digit(s). If a caller presses 5, for example, Asterisk will stop playing
the sound prompt and send control of the call to the first priority of
extension 5.
The most common use of the Background() application is to create voice menus (often called auto-attendants or phone
trees). Many companies use voice menus to direct callers to
the proper extensions, thus relieving their receptionists from having to
answer every single call.
Background() has the same
syntax as Playback():
exten => 123,1,Answer() exten => 123,n,Background(main-menu)
In earlier versions of Asterisk, if the Background() application finished playing the
sound prompt and there were no more priorities in the current extension,
Asterisk would sit and wait for input from the caller. Asterisk no
longer does this by default. If you want Asterisk to wait for input from
the caller after the sound prompt has finished playing, you can call the
WaitExten() application. The WaitExten() application waits for the caller
to enter DTMF digits, and is frequently called directly after the
Background() application, like
this:
exten => 123,1,Answer() exten => 123,n,Background(main-menu) exten => 123,n,WaitExten()
If you’d like the WaitExten()
application to wait a specific number of seconds for a response (instead
of using the default timeout), simply pass the number of seconds as the
first argument to WaitExten(), like
this:
exten => 123,n,WaitExten(5)
Both Background() and WaitExten() allow the caller to enter DTMF
digits. Asterisk then attempts to find an extension in the current
context that matches the digits that the caller entered. If Asterisk
finds an unambiguous match, it will send the call to that extension.
Let’s demonstrate by adding a few lines to our example:
exten => 123,1,Answer() exten => 123,n,Background(main-menu) exten => 123,n,WaitExten() exten => 2,1,Playback(digits/2) exten => 3,1,Playback(digits/3) exten => 4,1,Playback(digits/4)
If you call into extension 123 in the example above, it will play
a sound prompt that says “main menu.” It will then wait for you to enter
either 2, 3, or 4. If
you press one of those digits, Asterisk will read that digit back to
you. You’ll also find that if you enter a different digit (such as
5), it won’t give you what you
expected.
It is also possible that Asterisk will find an ambiguous match.
This can be easily explained if we add an extension named 1 to the previous example:
exten => 123,1,Answer() exten => 123,n,Background(main-menu) exten => 123,n,WaitExten() exten => 1,1,Playback(digits/1) exten => 2,1,Playback(digits/2) exten => 3,1,Playback(digits/3) exten => 4,1,Playback(digits/4)
Dial extension 123, and then at the main menu prompt dial 1. Why doesn’t Asterisk immediately read back
the number one to you? It’s because the digit 1 is ambiguous; Asterisk doesn’t know whether
you’re trying to go to extension 1 or extension 123. It waits a few
seconds to see if you’re going to dial another digit (such as the
2 in extension 123). If you don’t
dial any more digits, Asterisk will eventually time out and send the
call to extension 1. (We’ll learn how to choose our own timeout values
in Chapter 6, More Dialplan Concepts.)
Before going on, let’s review what we’ve done so far. When users
call into our dialplan, they will hear a greeting. If they press
1, they will hear the number one, and
if they press 2, they will hear the
number two, and so on. While that’s a good start, let’s embellish it a
little. We’ll use the Goto()
application to make the dialplan repeat the greeting after playing back
the number.
As its name implies, the Goto()
application is used to send the call to another part of the dialplan.
The syntax for the Goto() application
requires us to pass the destination context, extension, and priority on
as arguments to the application, like this:
exten => 123,n,Goto(context,extension,priority)
Now, let’s use the Goto()
application in our dialplan:
[incoming] exten => 123,1,Answer() exten => 123,n,Background(main-menu) exten => 1,1,Playback(digits/1) exten => 1,n,Goto(incoming,123,1) exten => 2,1,Playback(digits/2) exten => 2,n,Goto(incoming,123,1)
These two new lines (highlighted in bold) will send control of the
call back to the 123 extension after
playing back the selected number.
Tip
If you look up the details of the Goto() application, you’ll find that you can
actually pass either one, two, or three arguments to the application.
If you pass a single argument, Asterisk will assume it’s the
destination priority in the current extension. If you pass two
arguments, Asterisk will treat them as the extension and priority to
go to in the current context.
In this example, we’ve passed all three arguments for the sake of clarity, but passing just the extension and priority would have had the same effect.
Now that our first voice menu is starting to come together, let’s
add some additional special extensions. First, we need an extension for
invalid entries; when a caller presses an invalid entry (e.g., pressing
9 in the above example), the call is sent to the i extension. Second, we need an extension to
handle situations when the caller doesn’t give input in time (the
default timeout is 10 seconds). Calls will be sent to the t extension if the caller takes too long to
press a digit after WaitExten() has
been called. Here is what our dialplan will look like after we’ve added
these two extensions:
[incoming]
exten => 123,1,Answer()
exten => 123,n,Background(enter-ext-of-person)
exten => 123,n,WaitExten()
exten => 1,1,Playback(digits/1)
exten => 1,n,Goto(incoming,123,1)
exten => 2,1,Playback(digits/2)
exten => 2,n,Goto(incoming,123,1)
exten => 3,1,Playback(digits/3)
exten => 3,n,Goto(incoming,123,1)
exten => i,1,Playback(pbx-invalid)
exten => i,n,Goto(incoming,123,1)
exten => t,1,Playback(vm-goodbye)
exten => t,n,Hangup()Using the i and t extensions makes our dialplan a little more
robust and user-friendly. That being said, it is still quite limited,
because outside callers have no way of connecting to a live person. To
do that, we’ll need to learn about another application, called Dial().
One of Asterisk’s most valuable features is its ability to connect
different callers to each other. This is especially useful when callers
are using different methods of communication. For example, caller A
might be communicating over the traditional analog telephone network,
while user B might be sitting in a café halfway around the world and
speaking on an IP telephone. Luckily, Asterisk takes most of the hard
work out of connecting and translating between disparate networks. All
you have to do is learn how to use the Dial() application.
The syntax of the Dial()
application is a little more complex than that of the other applications
we’ve used so far, but don’t let that scare you off. Dial() takes up to four arguments. The first
is the destination you’re attempting to call, which (in its simplest form) is made up of a technology
(or transport) across which to make the call, a forward slash, and the
remote endpoint or resource. Common technology types include Zap (for
analog and T1/E1/J1 channels), SIP, and IAX2. For example, let’s assume
that we want to call a Zap endpoint identified by Zap/1, which is an FXS channel with an analog
phone plugged into it. The technology is Zap, and the
resource is 1. Similarly, a call to a SIP device (as
defined in sip.conf) might have a destination of
SIP/Jane, and a call to an IAX device
(defined in iax.conf) might have a destination of
IAX2/Fred. If we wanted Asterisk to
ring the Zap/1 channel when extension
123 is reached in the dialplan, we’d add the following extension:
exten => 123,1,Dial(Zap/1)
We can also dial multiple channels at the same time, by
concatenating the destinations with an ampersand (&),
like this:
exten => 123,1,Dial(Zap/1&Zap/2&SIP/Jane)
The Dial() application will
ring the specified destinations simultaneously, and bridge the inbound
call with whichever destination channel answers the call first. If the
Dial() application can’t contact any
of the destinations, Asterisk will set a variable called DIALSTATUS with the reason that it couldn’t dial the destinations, and
continue on with the next priority in the extension.[76]
The Dial() application also
allows you to connect to a remote VoIP endpoint not previously defined
in one of the channel configuration files. The full syntax for this type
of connection is:
Dial(technology/user[:password]@remote_host[:port][/remote_extension])
As an example, you can dial into a demonstration server at Digium using the IAX2 protocol by using the following extension:
exten => 500,1,Dial(IAX2/guest@misery.digium.com/s)
The full syntax for the Dial()
application is slightly different when dealing with Zap channels, as
shown:
Dial(Zap/[gGrR]channel_or_group[/remote_extension])
For example, here is how you would dial 1-800-555-1212 on Zap channel number 4.
exten => 501,1,Dial(Zap/4/18005551212)
The second argument to the Dial() application is a timeout, specified in
seconds. If a timeout is given, Dial() will attempt to call the destination(s)
for that number of seconds before giving up and moving on to the next
priority in the extension. If no timeout is specified, Dial() will continue to dial the called
channel(s) until someone answers or the caller hangs up. Let’s add a
timeout of 10 seconds to our extension:
exten => 123,1,Dial(Zap/1,10)
If the call is answered before the timeout, the channels are
bridged and the dialplan is done. If the destination simply does not
answer, is busy, or is otherwise unavailable, Asterisk will set a
variable called DIALSTATUS and then
continue on with the next priority in the extension.
Let’s put what we’ve learned so far into another example:
exten => 123,1,Dial(Zap/1,10)
exten => 123,n,Playback(vm-nobodyavail)
exten => 123,n,Hangup()
As you can see, this example will play the vm-nobodyavail.gsm sound file if the call goes unanswered.
The third argument to Dial() is
an option string. It may contain one or more characters that modify the
behavior of the Dial() application.
While the list of possible options is too long to cover here, one of the
most popular options is the m option.
If you place the letter m as the
third argument, the calling party will hear hold music instead of
ringing while the destination channel is being called (assuming, of
course, that music on hold has been configured correctly). To add the
m option to our last example, we
simply change the first line:
exten => 123,1,Dial(Zap/1,10,m)
exten => 123,n,Playback(vm-nobodyavail)
exten => 123,n,Hangup()Since the extensions numbered 1 and 2 in our dialplan are somewhat
useless now that we know how to use the Dial() application, let’s replace them with
new extensions that will allow outside callers to reach John and
Jane:
[incoming]
exten => 123,1,Answer()
exten => 123,n,Background(enter-ext-of-person)
exten => 123,n,WaitExten()
exten => 1,1,Dial(Zap/1,10)
exten => 1,n,Playback(vm-nobodyavail)
exten => 1,n,Hangup()
exten => 2,1,Dial(SIP/Jane,10)
exten => 2,n,Playback(vm-nobodyavail)
exten => 2,n,Hangup()
exten => i,1,Playback(pbx-invalid)
exten => i,n,Goto(incoming,123,1)
exten => t,1,Playback(vm-goodbye)
exten => t,n,Hangup()The fourth and final argument to the Dial() application is a URL. If the
destination channel supports receiving a URL at the time of the call,
the specified URL will be sent (for example, if you have an IP telephone
that supports receiving a URL, it will appear on the phone’s display;
likewise, if you’re using a soft phone, the URL might pop up on your
computer screen). This argument is very rarely used.
Note that the second, third, and fourth arguments may be left blank. For example, if you want to specify an option but not a timeout, simply leave the timeout argument blank, like this:
exten => 1,1,Dial(Zap/1,,m)
In our examples thus far, we have limited ourselves to a single context,
but it is probably fair to assume that almost all Asterisk installations
will have more than one context in their dialplans. As we mentioned at
the beginning of this chapter, one important function of contexts is to
separate privileges (such as making long-distance calls or calling
certain extensions) for different classes of callers. In our next
example, we’ll add to our dialplan by creating two internal phone
extensions, and we’ll set up the ability for these two extensions to
call each other. To accomplish this, we’ll create a new context called
[employees].
Tip
As in previous examples, we’ve assumed that an FXS analog
channel (Zap/1, in this case) has
already been configured, and that your
zapata.conf file is configured so that any calls
originated by Zap/1 begin in the
[employees] context. For a few
examples at the end of the chapter, we’ll also assume that an FXO Zap
channel has been configured as Zap/4, with calls coming in on this channel
being sent to the [incoming]
context.
We’ve also assumed you have at least one SIP channel (named
SIP/Jane) that is configured to
originate in the [employees]
context. We’ve done this to introduce you to using other types of
channels.
If you don’t have hardware for the channels listed above (such
as Zap/4), or if you’re using
hardware with different channel names (e.g., not SIP/Jane), just change the examples to match
your particular system configuration.
Our dialplan now looks like this:
[incoming]
exten => 123,1,Answer()
exten => 123,n,Background(enter-ext-of-person)
exten => 123,n,WaitExten()
exten => 1,1,Dial(Zap/1,10)
exten => 1,n,Playback(vm-nobodyavail)
exten => 1,n,Hangup()
exten => 2,1,Dial(SIP/Jane,10)
exten => 2,n,Playback(vm-nobodyavail)
exten => 2,n,Hangup()
exten => i,1,Playback(pbx-invalid)
exten => i,n,Goto(incoming,123,1)
exten => t,1,Playback(vm-goodbye)
exten => t,n,Hangup()
[employees]
exten => 101,1,Dial(Zap/1)
exten => 102,1,Dial(SIP/Jane)In this example, we have added two new extensions to the [employees] context. This way, the person
using channel Zap/1 can pick up the
phone and dial the person at channel SIP/Jane by dialing 102. By that same token,
the phone registered as SIP/Jane can
dial Zap/1 by dialing 101.
We’ve arbitrarily decided to use extensions 101 and 102 for our examples, but feel free to use whatever numbering convention you wish for your extensions. You should also be aware that you’re not limited to three-digit extensions; you can use as few or as many digits as you like. (Well, almost. Extensions must be shorter than 80 characters long, and you shouldn’t use single-character extensions for your own use, as they’re reserved.) Don’t forget that you can use names as well, like so:
[incoming] exten => 123,1,Answer() exten => 123,n,Background(enter-ext-of-person) exten => 123,n,WaitExten() exten => 1,1,Dial(Zap/1,10) exten => 1,n,Playback(vm-nobodyavail) exten => 1,n,Hangup() exten => 2,1,Dial(SIP/Jane,10) exten => 2,n,Playback(vm-nobodyavail) exten => 2,n,Hangup() exten => i,1,Playback(pbx-invalid) exten => i,n,Goto(incoming,123,1) exten => t,1,Playback(vm-goodbye) exten => t,n,Hangup() [employees] exten => 101,1,Dial(Zap/1) exten => john,1,Dial(Zap/1) exten => 102,1,Dial(SIP/Jane) exten => jane,1,Dial(SIP/Jane)
It certainly wouldn’t hurt to add named extensions if you think
your users might be dialed via a VoIP protocol such as SIP that supports
dialing by name. You can also see that it is possible to have different
extensions in the dialplan ring the same endpoint. For example, you
could have extension 200 ring SIP/George, and then
have extension 201 play a prompt of some kind and
then ring SIP/George.
Now that our internal callers can call each other, we’re well on our way toward having a complete dialplan. Next, we’ll see how we can make our dialplan more scalable and easier to modify in the future.
Variables can be used in an Asterisk dialplan to help reduce typing, add clarity, or add additional logic to a dialplan. If you have some computer programming experience, you probably already understand what a variable is. If not, don’t worry; we’ll explain what variables are and how they are used.
You can think of a variable as a container that can hold one value
at a time. So, for example, we might create a variable called JOHN and assign it the value of Zap/1. This way, when we’re writing our
dialplan, we can refer to John’s channel by name, instead of remembering
that John is using the channel named Zap/1.
There are two ways to reference a variable. To reference the
variable’s name, simply type the name of the variable, such as JOHN. If, on the other hand, you want to
reference its value, you must type a dollar sign, an opening curly
brace, the name of the variable, and a closing curly brace. Here’s how we’d reference the
variable inside the Dial()
application:
exten => 555,1,Dial(${JOHN})In our dialplan, whenever we write ${JOHN}, Asterisk will automatically replace
it with whatever value has been assigned to the variable named JOHN.
Tip
Note that variable names are case-sensitive. A variable named
JOHN is different than a variable named
John. For readability’s sake, all the variable
names in the examples will be written in uppercase. You should also be
aware that any variables set by Asterisk will be uppercase as well.
Some variables, such as CHANNEL or
EXTEN are reserved by Asterisk. You should not
attempt to set these variables.
There are three types of variables we can use in our dialplan: global variables, channel variables, and environment variables. Let’s take a moment to look at each type.
As their name implies, global
variables apply to all extensions in all contexts. Global
variables are useful in that they can be used anywhere within a
dialplan to increase readability and manageability. Suppose for a
moment that you had a large dialplan and several hundred references to
the Zap/1 channel. Now imagine you
had to go through your dialplan and change all of those references to
Zap/2. It would be a long and
error-prone process, to say the least.
On the other hand, if you had defined a global variable with the
value Zap/1 at the beginning of
your dialplan and then referenced that instead, you would have to
change only one line.
Global variables should be declared in the [globals] context at the beginning of the
extensions.conf file. They can also be defined
programmatically, using the GLOBAL() dialplan function.[77] Here is an example of how both methods look inside of a
dialplan. The first shows the setting of a global variable named
JOHN with a value of Zap/1. This variable is set at the time
Asterisk parses the dialplan. The second example shows how a global
variable can be set in the dialplan. In this case, the variable named
George is being assigned the value
of SIP/George when extension 124 is
dialed in the [employees]context:
[globals] JOHN=Zap/1 [employees] exten => 124,1,Set(GLOBAL(GEORGE)=SIP/George)
A channel variable is a variable that is associated only with a particular call. Unlike global variables, channel variables are defined only for the duration of the current call and are available only to the channels participating in that call.
There are many predefined channel variables available for use
within the dialplan, which are explained in the
channelvariables.txt file in the
doc subdirectory of the Asterisk source. Channel
variables are set via the Set()
application:
exten => 125,1,Set(MAGICNUMBER=42)
We’ll cover many uses for channel variables in Chapter 6, More Dialplan Concepts.
Environment variables are a way of accessing Unix environment variables from within
Asterisk. These are referenced using the ENV() dialplan function. The syntax looks like ${ENV(var)}, where var is
the Unix environment variable you wish to reference. Environment
variables aren’t commonly used in Asterisk dialplans, but they are
available should you need them.
Now that we’ve learned about variables, let’s put them to work in our dialplan. We’ll add global variables for two people, John and Jane:
[globals] JOHN=Zap/1 JANE=SIP/Jane [incoming] exten => 123,1,Answer() exten => 123,n,Background(enter-ext-of-person) exten => 123,n,WaitExten() exten => 1,1,Dial(${JOHN},10) exten => 1,n,Playback(vm-nobodyavail) exten => 1,n,Hangup() exten => 2,1,Dial(${JANE},10) exten => 2,n,Playback(vm-nobodyavail) exten => 2,n,Hangup() exten => i,1,Playback(pbx-invalid) exten => i,n,Goto(incoming,123,1) exten => t,1,Playback(vm-goodbye) exten => t,n,Hangup() [employees] exten => 101,1,Dial(${JOHN}) exten => john,1,Dial(${JOHN}) exten => 102,1,Dial(${JANE}) exten => jane,1,Dial(${JANE})
If we want to be able to allow people to dial through Asterisk and have Asterisk connect the caller to an outside resource, we need a way to match on any possible phone number that the caller might dial. Can you imagine how tedious it would be to manually write a dialplan with an extension for every possible number you could dial? Luckily, Asterisk has just the thing for situations like this: pattern matching. Pattern matching allows you to create one extension in your dialplan that matches many different numbers.
When using pattern matching, certain letters and symbols represent what we are trying to
match. Patterns always start with an underscore (_). This
tells Asterisk that we’re matching on a pattern, and not on an
explicit extension name. (This means, of course, that you should never
start your extension names with an underscore.)
Warning
If you forget the underscore on the front of your pattern, Asterisk will think it’s just a named extension and won’t do any pattern matching. This is one of the most common mistakes people make when starting to learn Asterisk.
After the underscore, you can use one or more of the following characters.
-
X -
Z -
N -
[15-7] Matches a single digit from the range of digits specified. In this case, the pattern matches a single 1, 5, 6, or 7.
.(period)Wildcard match; matches one or more characters, no matter what they are.
Warning
If you’re not careful, wildcard matches can make your dialplans do things you’re not expecting (like matching built-in extensions such as
iorh). You should use the wildcard match in a pattern only after you’ve matched as many other digits as possible. For example, the following pattern match should probably never be used:_.
In fact, Asterisk will warn you if you try to use it. Instead, use this one, if at all possible:
_X.
- ! (bang)
Wildcard match; matches zero or more characters, no matter what they are.
To use pattern matching in your dialplan, simply put the pattern in the place of the extension name (or number):
exten => _NXX,1,Playback(auth-thankyou)
In this example, the pattern matches any three-digit extension
from 200 through 999 (the N matches
any digit between 2 and 9, and each X matches a digit between 0 and 9). That is
to say, if a caller dialed any three-digit extension between 200 and
999 in this context, he would hear the sound file
auth-thankyou.gsm.
One other important thing to know about pattern matching is that
if Asterisk finds more than one pattern that matches the dialed
extension, it will use the most specific one
(going from left to right). Say you had defined the following two
patterns, and a caller dialed 555-1212:
exten => _555XXXX,1,Playback(digits/1) exten => _55512XX,1,Playback(digits/2)
In this case the second extension would be selected, because it is more specific.
Before we go on, let’s look at a few more pattern-matching examples. In each one, see if you can tell what the pattern would match before reading the explanation. We’ll start with an easy one:
_NXXXXXX
This pattern would match any seven-digit number, as long as the first digit was two or higher. This pattern would be compatible with any North American Numbering Plan local seven-digit number. In areas with 10-digit dialing, that pattern would look like this:
_NXXNXXXXXX
Note that neither of these two patterns would handle long distance calls. We’ll cover those shortly.
Let’s try another:
_1NXXNXXXXXX
This one is slightly more difficult. This would match the number 1, followed by an area code between 200 and 999, then any 7-digit number. In the NANP calling area, you would use this pattern to match any long-distance number.[78]
Now for an even trickier example:
_011.
If that one left you scratching your head, look at it again. Did you notice the period on the end? This pattern matches any number that starts with 011 and has at least one more digit. In the NANP, this indicates an international phone number. (We’ll be using these patterns in the next section to add outbound dialing capabilities to our dialplan.)
We know what you’re thinking… You’re sitting there asking yourself, “So what happens if I want to use
pattern matching, but I need to know which digits were actually
dialed?” Luckily, Asterisk has just the answer. Whenever you dial an
extension, Asterisk sets the ${EXTEN} channel variable to the digits that
were dialed. We can use an application called SayDigits() to test it out:
exten => _XXX,1,SayDigits(${EXTEN})In this example, the SayDigits() application will read back to you the three-digit extension you
dialed.
Often, it’s useful to manipulate the ${EXTEN} by stripping a certain number of
digits off the front of the extension. This is accomplished by using
the syntax ${EXTEN:x}, where x is
where you want the returned string to start, from left to right. For
example, if the value of EXTEN is
95551212, ${EXTEN:1} equals
5551212. Let’s take a look at another example:
exten => _XXX,1,SayDigits(${EXTEN:1})In this example, the SayDigits() application would start at the
second digit, and thus read back only the last two digits of the
dialed extension.
Now that we’ve introduced pattern matching, we can go about the process of allowing users to make
outbound calls. The first thing we’ll do is add a variable to the
[globals] context to define
which channel will be used for outbound calls:
[globals]
JOHN=Zap/1
JANE=SIP/Jane
OUTBOUNDTRUNK=Zap/4Next, we will add contexts to our dialplan for outbound dialing.
You may be asking yourself at this point, “Why do we need separate contexts for outbound calls?” This is so that we can regulate and control which callers have permission to make outbound calls, and which types of outbound calls they are allowed to make.
To begin, let’s create a context for local calls. To be consistent
with most traditional phone switches, we’ll put a 9 on the front of our patterns, so that users
have to dial 9 before calling an outside number:
[outbound-local]
exten => _9NXXXXXX,1,Dial(${OUTBOUNDTRUNK}/${EXTEN:1})
exten => _9NXXXXXX,n,Congestion()
exten => _9NXXXXXX,n,Hangup()Tip
Note that dialing 9 doesn’t actually give you an outside line, unlike with many traditional PBX systems. Once you dial 9 on an analog line, the dial tone will stop. If you’d like the dial tone to continue even after dialing 9, add the following line (right after your context definition):
ignorepat => 9
This directive tells Asterisk to continue to provide a dial tone on an analog line, even after the caller has dialed the indicated pattern. This will not work with VoIP telephones, as they usually don’t send digits to the system as they are input; they are sent to Asterisk all at once. Luckily, most of the popular VoIP telephones can be configured to emulate the same functionality.
Let’s review what we’ve just done. We’ve added a global variable
called OUTBOUNDTRUNK, which simply
defines the channel we are using for outbound calls.[79] We’ve also added a context for local outbound calls. In
priority 1, we take the dialed extension, strip off the 9 with the
${EXTEN:1} syntax, and then attempt
to dial that number on the channel signified by the variable OUTBOUNDTRUNK. If the call is successful, the
caller is bridged with the outbound channel. If the call is unsuccessful
(because either the channel is busy or the number can’t be dialed for
some reason), the Congestion()
application is called, which plays a “fast busy signal” (congestion
tone) to let the caller know that the call was unsuccessful.
Before we go any further, let’s make sure our dialplan allows outbound emergency numbers:
[outbound-local]
exten => _9NXXXXXX,1,Dial(${OUTBOUNDTRUNK}/${EXTEN:1})
exten => _9NXXXXXX,n,Congestion()
exten => _9NXXXXXX,n,Hangup()
exten => 911,1,Dial(${OUTBOUNDTRUNK}/911)
exten => 9911,1,Dial(${OUTBOUNDTRUNK}/911) ; So that folks who dial “9”
; first will also get through
Again, we’re assuming for the sake of these examples that we’re inside the United States or Canada. If you’re outside of this area, please replace 911 with the emergency services number in your particular location. This is something you never want to forget to put in your dialplan!
Next, let’s add a context for long-distance calls:
[outbound-long-distance]
exten => _91NXXNXXXXXX,1,Dial(${OUTBOUNDTRUNK}/${EXTEN:1})
exten => _91NXXNXXXXXX,n,Playtones(congestion)
exten => _91NXXNXXXXXX,n,Hangup()Now that we have these two new contexts, how do we allow internal users to take advantage of them? We need a way for contexts to be able to use the functionality contained in other contexts.
Asterisk has a feature that enables us to use the extensions from
one context within another context via the include directive. This is used to control
access to different sections of the dialplan. We’ll use the include
functionality to allow users in our [employees] context the ability to make
outbound phone calls. But first, let’s cover the syntax.
The include statement takes the
following form, where context is the name of
the remote context we want to include in the current context:
include => contextWhen we include other contexts within our current context, we have to be mindful of the order in which we are including them. Asterisk will first try to match the dialed extension in the current context. If unsuccessful, it will then try the first included context (including any contexts included in that context), and then continue to the other included contexts in the order in which they were included.
As it sits, our current dialplan has two contexts for outbound
calls, but there’s no way for people in the [employees] context to use them. Let’s remedy
that by including the two outbound contexts in the [employees] context, like this:
[globals]
JOHN=Zap/1
JANE=SIP/Jane
OUTBOUNDTRUNK=Zap/4
[incoming]
exten => 123,1,Answer()
exten => 123,n,Background(enter-ext-of-person)
exten => 123,n,WaitExten()
exten => 1,1,Dial(${JOHN},10)
exten => 1,n,Playback(vm-nobodyavail)
exten => 1,n,Hangup()
exten => 2,1,Dial(${JANE},10)
exten => 2,n,Playback(vm-nobodyavail)
exten => 2,n,Hangup()
exten => i,1,Playback(pbx-invalid)
exten => i,n,Goto(incoming,123,1)
exten => t,1,Playback(vm-goodbye)
exten => t,n,Hangup()
[employees]
include => outbound-local
include => outbound-long-distance
exten => 101,1,Dial(${JOHN})
exten => john,1,Dial(${JOHN})
exten => 102,1,Dial(${JANE})
exten => jane,1,Dial(${JANE})
[outbound-local]
exten => _9NXXXXXX,1,Dial(${OUTBOUNDTRUNK}/${EXTEN:1})
exten => _9NXXXXXX,n,Congestion()
exten => _9NXXXXXX,n,Hangup()
exten => 911,1,Dial(${OUTBOUNDTRUNK}/911)
exten => 9911,1,Dial(${OUTBOUNDTRUNK}/911)
[outbound-long-distance]
exten => _91NXXNXXXXXX,1,Dial(${OUTBOUNDTRUNK}/${EXTEN:1})
exten => _91NXXNXXXXXX,n,Playtones(congestion)
exten => _91NXXNXXXXXX,n,Hangup()These two include statements
make it possible for callers in the [employees] context to make outbound calls. We
should also note that for security’s sake you should always make sure
that your [inbound] context never
allows outbound dialing. (If by chance it did, people could dial into
your system and then make outbound toll calls that would be charged to
you!)
And there you have it—a basic but functional dialplan. It’s not exactly fully featured, but we’ve covered all of the fundamentals. In the following chapters, we’ll continue to add features to this foundation.
If parts of this dialplan don’t make sense, you may want to go back and re-read a section or two before continuing on to the next chapter. It’s imperative that you understand these principles and how to apply them, as the next chapters build on this information.
[70] Please note that the space is conspicuously absent from the list of allowed characters. Don’t use spaces in your context names—you won’t like the result!
[71] Asterisk permits simple arithmetic within the priority, such
as n+200 or the priority s
(for same), but their usage is considered to be an advanced topic.
Please note that extension s and priority
s are two distinct
concepts.
[72] There is nothing special about any context name. We could have
named this context [stuff_that_comes_in], and as
long as that was the context assigned in the channel definition in
sip.conf, iax.conf,
zaptel.conf, et al., the channel would enter
the dialplan in that context. Having said that, it is strongly
recommended that you give your contexts names that help you to
understand their purpose. Some good context names might include
[incoming], [local_calls],
[long_distance],
[sip_telephones],
[user_services],
[experimental],
[remote_locations], and so forth. Always remember
that a context determines how a channel enters the dialplan, so name
accordingly.
[73] Asterisk selects the best file based on translation cost―that
is, it selects the file that is the least CPU-intensive to convert
to its native audio format. When you start Asterisk, it calculates
the translation costs between the different audio formats (they
often vary from system to system). You can see these translation
costs by typing show translation at the Asterisk
command-line interface. The numbers shown represent how many
milliseconds it takes Asterisk to transcode one second of audio.
We’ll cover more about the different audio formats (known as
codecs) in Chapter 8, Protocols for VoIP.
[74] In fact, if you don’t have any channels configured, now is the time to do so. There is a real satisfaction that comes from passing your first call into an Asterisk system that you built from scratch. People get this funny grin on their face as they realize that they have just created a telephone system. This pleasure can be yours as well, so please, don’t go any further until you have made this little dialplan work.
[75] It should be noted that some people expect that Background(), due to its name, would
continue in the dialplan while the sound is being played, but its
name refers to the fact that it is playing a sound in the
background, while waiting for DTMF in the foreground.
[76] Don’t worry, we’ll cover variables (in the section called “Using Variables””) and show you how to have your
dialplan make decisions based on the value of this DIALSTATUS variable.
[77] Don’t worry! We’ll cover dialplan functions in the the section called “Dialplan Functions”” section.
[78] If you grew up in North America, you may believe that the 1 you dial before a long distance call is “the long distance code.” This is incorrect. The number 1 is in fact the international country code for all countries in NANP. Keep this in mind if you ever send your phone number to someone in another country. They may not know what your country code is, and thus be unable to call you with just your area code and phone number. Your full phone number with country code should be printed as +1 NPA NXX XXXX (where NPA is your area code)―e.g., +1 416 555 1212.
[79] The advantage of this is that if one day we decide to send all
of our calls through some other channel, we have to edit the channel
name assigned to the variable OUTBOUNDTRUNK only in the [globals] context, instead of having to
manually edit every reference to the channel in our dialplan.
Table of Contents
For a list of all the ways technology has failed to improve the quality of life, please press three.
Alrighty. You’ve got the basics of dialplans down, but you know there’s more to come. If you don’t have the last chapter sorted out yet, please go back and give it another read. We’re about to get into more advanced topics.
As we begin our dive into the deeper aspects of dialplans, it is time to introduce you to a few tools that will greatly add to the power you can exercise in your dialplan. These constructs add incredible intelligence to your dialplan by enabling it to make decisions based on different criteria you want to define. Put on your thinking cap, and let’s get started.
Expressions are combinations of variables, operators, and values that you string
together to produce a result. An expression can test values, alter
strings, or perform mathematical calculations. Let’s say we have a
variable called COUNT. In plain
English, two expressions using that variable might be “COUNT plus 1” and “COUNT divided by 2.” Each of these expressions
has a particular result or value, depending on the value of the given
variable.
In Asterisk, expressions always begin with a dollar sign and an opening square bracket and end with a closing square bracket, as shown here:
$[expression]Thus, we would write the above two examples like this:
$[${COUNT} + 1]
$[${COUNT} / 2]When Asterisk encounters an expression in a dialplan, it replaces the entire expression with the resulting value. It is important to note that this takes place after variable substitution. To demonstrate, let’s look at the following code:[80]
exten => 321,1,Set(COUNT=3)
exten => 321,n,Set(NEWCOUNT=$[${COUNT} + 1])
exten => 321,n,SayNumber(${NEWCOUNT})In the first priority, we assign the value of 3 to the variable named COUNT.
In the second priority, only one application—Set()—is involved, but three things actually happen:
Asterisk substitutes
${COUNT}with the number3in the expression. The expression effectively becomes this:exten => 321,n,Set(NEWCOUNT=$[3 + 1])
Asterisk evaluates the expression, adding
1to3, and replaces it with its computed value of4:exten => 321,n,Set(NEWCOUNT=4)
The value
4is assigned to theNEWCOUNTvariable by theSet()application.
The third priority simply invokes the SayNumber() application, which speaks the current value of the variable ${NEWCOUNT} (set to the value 4 in priority two).
Try it out in your own dialplan.
When you create an Asterisk dialplan, you’re really writing code in a specialized scripting language. This means that the Asterisk dialplan—like any programming language—recognizes symbols called operators that allow you to manipulate variables. Let’s look at the types of operators that are available in Asterisk:
- Boolean operators
These operators evaluate the “truth” of a statement. In computing terms, that essentially refers to whether the statement is something or nothing (nonzero or zero, true or false, on or off, and so on). The Boolean operators are:
-
expr1|expr2 This operator (called the “or” operator, or “pipe”) returns the evaluation of
expr1if it is true (neither an empty string nor zero). Otherwise, it returns the evaluation ofexpr2.-
expr1&expr2 This operator (called “and”) returns the evaluation of
expr1if both expressions are true (i.e., neither expression evaluates to an empty string or zero). Otherwise, it returns zero.-
expr1{=, >, >=, <, <=, !=}expr2 These operators return the results of an integer comparison if both arguments are integers; otherwise, they return the results of a string comparison. The result of each comparison is
1if the specified relation is true, or0if the relation is false. (If you are doing string comparisons, they will be done in a manner that’s consistent with the current local settings of your operating system.)
-
- Mathematical operators
Want to perform a calculation? You’ll want one of these:
- Regular expression operator
You can also use the regular expression operator in Asterisk:
-
expr1:expr2 This operator matches
expr1againstexpr2, whereexpr2must be a regular expression.[81] The regular expression is anchored to the beginning of the string with an implicit^.[82]If the match succeeds and the pattern contains at least one regular expression subexpression—
\(...\)—the string corresponding to\1is returned; otherwise, the matching operator returns the number of characters matched. If the match fails and the pattern contains a regular expression subexpression, the null string is returned; otherwise,0is returned.
-
In Asterisk version 1.0 the parser was quite simple, so it required that you put at least one space between the operator and any other values. Consequently, the following might not have worked as expected:
exten => 123,1,Set(TEST=$[2+1])
This would have assigned the variable TEST to the string “2+1”, instead of the value
3. In order to remedy that, we would
put spaces around the operator like so:
exten => 234,1,Set(TEST=$[2 + 1])
This is no longer necessary in Asterisk 1.2 or 1.4 as the expression parser has been made more forgiving in these types of scenarios, however, for readability’s sake, we still recommend the spaces around your operators.
To concatenate text onto the beginning or end of a variable, simply place them together in an expression, like this:
exten => 234,1,Set(NEWTEST=$[blah${TEST}])Dialplan functions allow you to add more power to your expressions; you can think of them as intelligent variables. Dialplan functions allow you to calculate string lengths, dates and times, MD5 checksums, and so on, all from within a dialplan expression.
Dialplan functions have the following basic syntax:
FUNCTION_NAME(argument)
Much like variables, you reference a function’s name as above, but you reference a function’s value with the addition of a dollar sign, an opening curly brace, and a closing curly brace:
${FUNCTION_NAME(argument)}Functions can also encapsulate other functions, like so:
${FUNCTION_NAME(${FUNCTION_NAME(argument)})}
^ ^ ^ ^ ^^^^
1 2 3 4 4321As you’ve probably already figured out, you must be very careful about making sure you have matching parentheses and braces. In the above example, we have labeled the opening parentheses and curly braces with numbers and their corresponding closing counterparts with the same numbers.
Functions are often used in conjunction with the Set() application to either get or set the value of a variable. As a simple
example, let’s look at the LEN()
function. This function calculates the string length of its
argument. Let’s calculate the string length of a variable and read back
the length to the caller:
exten => 123,1,Set(TEST=example)
exten => 123,n,SayNumber(${LEN(${TEST})})The above example would evaluate the string example as having seven characters, assign the
number of characters to the variable length, and then speak the number
to the user with the SayNumber()
application.
Let’s look at another simple example. If we wanted to set one of
the various channel timeouts, we could use the TIMEOUT() function. The TIMEOUT() function accepts one of three arguments: absolute, digit, and response. To set the digit timeout with the
TIMEOUT() function, we could use the
Set() application, like so:
exten => s,1,Set(TIMEOUT(digit)=30)
Notice the lack of ${ }
surrounding the function. Just as if we were assigning a value to a
variable, we assign a value to a function without the use of the
${ } encapsulation.
A complete list of available functions can be found by typing
core show functions at the Asterisk command-line
interface. You can also look them up in Appendix F, Asterisk Manager Interface Actions.
Now that you’ve learned a bit about expressions and functions, it’s time to put them to use. By using expressions and functions, you can add even more advanced logic to your dialplan. To allow your dialplan to make decisions, you’ll use conditional branching. Let’s take a closer look.
The key to conditional branching is the GotoIf() application. GotoIf()
evaluates an expression and sends the caller to a specific destination
based on whether the expression evaluates to true or
false.
GotoIf() uses a special syntax,
often called the conditional syntax:
GotoIf(expression?destination1:destination2)
If the expression evaluates to true, the caller is sent to
destination1. If the expression evaluates to
false, the caller is sent to the second destination. So, what is true
and what is false? An empty string and the number 0 evaluate as false.
Anything else evaluates as true.
The destinations can each be one of the following:
A priority label within the same extension, such as
weaselsAn extension and a priority label within the same context, such as
123,weaselsA context, extension, and priority label, such as
incoming,123,weasels
Either of the destinations may be omitted, but not both. If the omitted destination is to be followed, Asterisk simply goes on to the next priority in the current extension.
Let’s use GotoIf() in an
example:
exten => 345,1,Set(TEST=1)
exten => 345,n,GotoIf($[${TEST} = 1]?weasels:iguanas)
exten => 345,n(weasels),Playback(weasels-eaten-phonesys)
exten => 345,n,Hangup()
exten => 345,n(iguanas),Playback(office-iguanas)
exten => 345,n,Hangup()
Note
You will notice that we have used the Hangup() application following each
Playback() application. This is
done so that when we jump to the weasels label, the call stops before
execution gets to the office-iguanas sound file. It is becoming
increasingly common to see extensions broken up in to multiple
components (protected from each other by the
Hangup() command), each one acting as steps
executed following a GotoIf().
Typically when you have this type of layout where you end up wanting to limit Asterisk from falling through to the next priority after you’ve performed that jump, it’s probably better to jump to separate extensions instead of priority labels. If anything, it makes it a bit more clear when reading the dialplan. We could rewrite the previous bit of dialplan like this:
exten => 345,1,Set(TEST=1)
exten => 345,n,GotoIf($[${TEST} = 1]?weasels,1:iguanas,1); now we're going to
; extension,priority
exten => weasels,1,Playback(weasels-eaten-phonesys); this is NOT a label.
; It is a different extension
exten => weasels,n,Hangup()
exten => iguanas,1,Playback(office-iguanas)
exten => iguanas,n,Hangup()By changing the value assigned
to TEST in the first line, you should
be able to have your Asterisk server play a different greeting.
Let’s look at another example of conditional branching. This time,
we’ll use both Goto() and GotoIf() to count down from 10 and then hang
up:
exten => 123,1,Set(COUNT=10)
exten => 123,n(start),GotoIf($[${COUNT} > 0]?:goodbye)
exten => 123,n,SayNumber(${COUNT})
exten => 123,n,Set(COUNT=$[${COUNT} - 1])
exten => 123,n,Goto(start)
exten => 123,n(goodbye),Hangup()Let’s analyze this example. In the first priority, we set the
variable COUNT to 10. Next, we check to see if COUNT is greater than 0. If it is, we move on to the next priority.
(Don’t forget that if we omit a destination in the GotoIf() application, control goes to the next
priority.) From there we speak the number, subtract 1 from COUNT, and go back to priority label start. If COUNT is less than or equal to 0, control goes to priority label goodbye, and the call is hung up.
The classic example of conditional branching is affectionately known as the anti-girlfriend logic. If the Caller ID number of the incoming call matches the phone number of the recipient’s ex-girlfriend, Asterisk gives a different message than it ordinarily would to any other caller. While somewhat simple and primitive, it’s a good example for learning about conditional branching within the Asterisk dialplan.
This example uses the CALLERID
function, which allows us to retrieve the Caller ID information on the
inbound call. Let’s assume for the sake of this example that the
victim’s phone number is 888-555-1212:
exten => 123,1,GotoIf($[${CALLERID(num)} = 8885551212]?reject:allow)
exten => 123,n(allow),Dial(Zap/4)
exten => 123,n,Hangup()
exten => 123,n(reject),Playback(abandon-all-hope)
exten => 123,n,Hangup()In priority 1, we call the GotoIf() application. It tells Asterisk to go
to priority label reject if the
Caller ID number matches 8885551212,
and otherwise to go to priority label allow (we could have simply omitted the label
name, causing the GotoIf() to fall
through). If the Caller ID number matches, control of the call goes to
priority label reject, which plays
back an uninspiring message to the undesired caller. Otherwise, the call
attempts to dial the recipient on channel Zap/4.
Another way to use conditional branching in your dialplan is with the
GotoIfTime() application. Whereas
GotoIf() evaluates an expression to
decide what to do, GotoIfTime() looks
at the current system time and uses that to decide whether or not to
follow a different branch in the dialplan.
The most obvious use of this application is to give your callers a different greeting before and after normal business hours.
The syntax for the GotoIfTime()
application looks like this:
GotoIfTime(times,days_of_week,days_of_month,months?label)
In short, GotoIfTime() sends
the call to the specified label if the
current date and time match the criteria specified by
times,
days_of_week,
days_of_month, and
months. Let’s look at each argument in more
detail:
-
times This is a list of one or more time ranges, in a 24-hour format. As an example, 9:00 A.M. through 5:00 P.M. would be specified as
09:00-17:00. The day starts at 0:00 and ends at 23:59.Note
It is worth noting that times will properly wrap around. So if you wish to specify the times your office is closed, you might write
18:00-9:00in thetimesparameter, and it will perform as expected. Note that this technique works as well for the other components ofGotoIfTime. For example, you can writesat-sunto specify the weekend days.-
days_of_week This is a list of one or more days of the week. The days should be specified as
mon,tue,wed,thu,fri,sat, and/orsun. Monday through Friday would be expressed asmon-fri. Tuesday and Thursday would be expressed astue&thu.Note
Note that you can specify a combination of ranges and single days, as in:
sun-mon&wed&fri-sat, or, more simply:wed&fri-mon.-
days_of_month This is a list of the numerical days of the month. Days are specified by the numbers
1through31. The 7th through the 12th would be expressed as7-12, and the 15th and 30th of the month would be written as15&30.-
months This is a list of one or more months of the year. The months should be written as
jan-aprfor a range, and separated with ampersands when wanting to include nonsequencial months, such asjan&mar&jun. You can also combine them like so:jan-apr&jun&oct-dec.
If you wish to match on all possible values for any of these
arguments, simply put an * in for that
argument.
The label argument can be any of the following:
A priority label within the same extension, such as
time_has_passedAn extension and a priority within the same context, such as
123,time_has_passedA context, extension, and priority, such as
incoming,123,time_has_passed
Now that we’ve covered the syntax, let’s look at a couple of examples. The following example would match from 9:00 A.M. to 5:59 P.M., on Monday through Friday, on any day of the month, in any month of the year:
exten => s,1,GotoIfTime(09:00-17:59,mon-fri,*,*?open,s,1)
If the caller calls during these hours, the call will be sent to
the first priority of the s extension
in the context named open. If the
call is made outside of the specified times, it will be sent to the next
priority of the current extension. This allows you to easily branch on
multiple times, as shown in the next example (note that you should
always put your most specific time matches before the least specific
ones):
; If it's any hour of the day, on any day of the week, ; during the fourth day of the month, in the month of July, ; we're closed exten => s,1,GotoIfTime(*,*,4,jul?open,s,1) ; During business hours, send calls to the open context exten => s,n,GotoIfTime(09:00-17:59|mon-fri|*|*?open,s,1) exten => s,n,GotoIfTime(09:00-11:59|sat|*|*?open,s,1) ; Otherwise, we're closed exten => s,n,Goto(closed,s,1)
Tip
If you run into the situation where you ask the question, “But I
specified 17:58 and it’s now 17:59. Why is it still doing the same
thing?” it should be noted that the granularity of the GotoIfTime() application is only to a
two-minute period. So if you specify 18:00 as the ending time of a
period, the system will continue to perform the same way for an
additional minute, until 18:01:59.
One of the most popular (or, arguably, unpopular) features of any modern telephone system is voicemail. Naturally, Asterisk has a reasonably flexible voicemail system. Some of the features of Asterisk’s voicemail system include:
Unlimited password-protected voicemail boxes, each containing mailbox folders for organizing voicemail
Different greetings for busy and unavailable states
Default and custom greetings
The ability to associate phones with more than one mailbox and mailboxes with more than one phone
Email notification of voicemail, with the voicemail optionally attached as a sound file[83]
Voicemail forwarding and broadcasts
Message-waiting indicator (flashing light or stuttered dial tone) on many types of phones
Company directory of employees, based on voicemail boxes
And that’s just the tip of the iceberg! In this section, we’ll introduce you to the fundamentals of a typical voicemail setup.
The voicemail configuration is defined in the configuration file called voicemail.conf. This file contains an assortment of settings that you can use to customize the voicemail system to your needs. Covering all of the available options in voicemail.conf would be beyond the scope of this chapter, but the sample configuration file is well documented and quite easy to follow. For now, look near the bottom of the file, where voicemail contexts and voicemail boxes are defined.
Just as dialplan contexts keep different parts of your dialplan
separate, voicemail contexts allow you to define different sets of
mailboxes that are separate from one another. This allows you to host
voicemail for several different companies or offices on the same server.
Voicemail contexts are defined in the same way as dialplan contexts, with
square brackets surrounding the name of the context. For our examples,
we’ll be using the [default] voicemail
context.
Inside each voicemail context, we define different mailboxes. The syntax for defining a mailbox is:
mailbox=>password,name[,pager_email[,options]]]
Let’s explain what each part of the mailbox definition does:
-
mailbox This is the mailbox number. It usually corresponds with the extension number of the associated set.
-
password This is the numeric password that the mailbox owner will use to access her voicemail. If the user changes her password, the system will update this field in the voicemail.conf file.
-
name This is the name of the mailbox owner. The company directory uses the text in this field to allow callers to spell usernames.
-
email This is the email address of the mailbox owner. Asterisk can send voicemail notifications (including the voicemail message itself) to the specified email box.
-
pager_email This is the email address of the mailbox owner’s pager or cell phone. Asterisk can send a short voicemail notification message to the specified email address.
-
options This field is a list of options that sets the mailbox owner’s time zone and overrides the global voicemail settings. There are nine valid options:
attach,serveremail,tz,saycid,review,operator,callback,dialout, andexitcontext. These options should be inoption=valuepairs, separated by the pipe character (|). Thetzoption sets the user’s time zone to a time zone previously defined in the[zonemessages]section of voicemail.conf, and the other eight options override the global voicemail settings with the same names.
A typical mailbox definition might look something like this:
101 => 1234,Joe Public,jpublic@somedomain.com,jpublic@pagergateway.net, tz=central|attach=yes
Continuing with our dialplan from the last chapter, let’s set up
voicemail boxes for John and Jane. We’ll give John a password of
1234 and Jane a password of 4444 (remember, these go in
voicemail.conf, not in
extensions.conf):
[default] 101 => 1234,John Doe,john@asteriskdocs.org,jdoe@pagergateway.tld 102 => 4444,Jane Doe,jane@asteriskdocs.org,jane@pagergateway.tld
Now that we’ve created mailboxes for Jane and John, let’s allow callers
to leave messages for them if they don’t answer the phone. To do this,
we’ll use the VoiceMail()
application.
The VoiceMail() application
sends the caller to the specified mailbox, so that he can
leave a message. The mailbox should be specified as
mailbox @
context, where
context is the name of the voicemail context.
The option letters b or u can be added to request the type of
greeting. If the letter b is used,
the caller will hear the mailbox owner’s busy
message. If the letter u is used, the
caller will hear the mailbox owner’s unavailable
message (if one exists).
Let’s use this in our sample dialplan. Previously, we had a line
like this in our [internal]
context, which allowed us to call John:
exten => 101,1,Dial(${JOHN})Next, let’s add an unavailable message that the caller will be
played if John doesn’t answer the phone within 10 seconds. Remember, the
second argument to the Dial()
application is a timeout. If the call is not answered before the timeout
expires, the call is sent to the next priority. Let’s add a 10-second
timeout, and a priority to send the caller to voicemail if John doesn’t
answer in time:
exten => 101,1,Dial(${JOHN},10)
exten => 101,n,VoiceMail(101@default,u)
Now, let’s change it so that if John is busy (on another call),
it’ll send us to his voicemail, where we’ll hear his busy message. To do
this, we will make use of the ${DIALSTATUS} variable
which contains one of several status values (see core show application dial at the Asterisk
console for a listing of all the possible values):
exten => 101,1,Dial(${JOHN},10)
exten => 101,n,GotoIf($["${DIALSTATUS}" = "BUSY"]?busy:unavail)
exten => 101,n(unavail),Voicemail(101@default,u)
exten => 101,n,Hangup()
exten => 101,n(busy),VoiceMail(101@default,b)
exten => 101,n,Hangup()Now callers will get John’s voicemail (with the appropriate greeting) if John is either busy or unavailable. A slight problem remains, however, in that John has no way of retrieving his messages. Let’s remedy that.
Users can retrieve their voicemail messages, change their voicemail options, and record
their voicemail greetings by using the VoiceMailMain() application. In its typical
form, VoiceMailMain() is called
without any arguments. Let’s add extension 700 to the [internal] context of our dialplan so that
internal users can dial it to access their voicemail messages:
exten => 700,1,VoiceMailMain()
One last feature of the Asterisk voicemail system we should cover
is the dial-by-name directory. This is created with the Directory() application. This application uses the names defined in the mailboxes
in voicemail.conf to present the caller with a
dial-by-name directory of the users.
Directory() takes up to three
arguments: the voicemail context from which to read the names, the
optional dialplan context in which to dial the user, and an option
string (which is also optional). By default, Directory() searches for the user by last
name, but passing the f option forces
it to search by first name instead. Let’s add two dial-by-name
directories to the [incoming] context
of our sample dialplan, so that callers can search by either first or
last name:
exten => 8,1,Directory(default,incoming,f) exten => 9,1,Directory(default,incoming)
If callers press 8, they’ll get a directory by first name. If they dial 9, they’ll get the directory by last name.
Macros[84] are a very useful construct designed to avoid repetition in the dialplan. They also help in making changes to the dialplan. To illustrate this point, let’s look at our sample dialplan again. If you remember the changes we made for voicemail, we ended up with the following for John’s extension:
exten => 101,1,Dial(${JOHN},10)
exten => 101,n,GotoIf($["${DIALSTATUS}" = "BUSY"]?busy:unavail)
exten => 101,n(unavail),Voicemail(101@default,u)
exten => 101,n,Hangup()
exten => 101,n(busy),VoiceMail(101@default,b)
exten => 101,n,Hangup()Now imagine you have a hundred users on your Asterisk system—setting up the extensions would involve a lot of copying and pasting. Then imagine that you need to make a change to the way your extensions work. That would involve a lot of editing, and you’d be almost certain to have errors.
Instead, you can define a macro that contains a list of steps to take, and then have all of the phone extensions refer to that macro. All you need to change is the macro, and everything in the dialplan that references that macro will change as well.
Tip
If you’re familiar with computer programming, you’ll recognize that macros are similar to subroutines in many modern programming languages. If you’re not familiar with computer programming, don’t worry—we’ll walk you through creating a macro.
The best way to appreciate macros is to see one in action, so let’s move right along.
Let’s take the dialplan logic we used above to set up voicemail for John and turn it into a macro. Then we’ll use the macro to give John and Jane (and the rest of their coworkers) the same functionality.
Macro definitions look a lot like contexts. (In fact, you could
argue that they really are small, limited contexts.) You define a macro
by placing macro- and the name of
your macro in square brackets, like this:
[macro-voicemail]
Macro names must start with macro-. This distinguishes them from regular
contexts. The commands within the macro are built almost identically to
anything else in the dialplan; the only limiting factor is that macros
use only the s extension. Let’s add
our voicemail logic to the macro, changing the extension to s as we go:
[macro-voicemail]
exten => s,1,Dial(${JOHN},10)
exten => s,n,GotoIf($["${DIALSTATUS}" = "BUSY"]?busy:unavail)
exten => s,n(unavail),Voicemail(101@default,u)
exten => s,n,Hangup()
exten => s,n(busy),VoiceMail(101@default,b)
exten => s,n,Hangup()That’s a start, but it’s not perfect, as it’s still specific to John and his mailbox number. To make the macro generic so that it will work not only for John but also for all of his coworkers, we’ll take advantage of another property of macros: arguments. But first, let’s see how we call macros in our dialplan.
To use a macro in our dialplan, we use the Macro() application. This application calls
the specified macro and passes it any arguments. For example, to call
our voicemail macro from our dialplan, we can do the following:
exten => 101,1,Macro(voicemail)
The Macro()
application also defines several special variables for our use. They
include:
As we explained earlier, the way we initially defined our macro
was hardcoded for John, instead of being generic. Let’s change our macro
to use ${MACRO_EXTEN} instead of
101 for the mailbox number. That way,
if we call the macro from extension 101 the voicemail messages will go
to mailbox 101, and if we call the macro from extension 102 messages
will go to mailbox 102, and so on:
[macro-voicemail]
exten => s,1,Dial(${JOHN},10)
exten => s,n,GotoIf($["${DIALSTATUS}" = "BUSY"]?busy:unavail)
exten => s,n(unavail),Voicemail(${MACRO_EXTEN}@default,u)
exten => s,n,Hangup()
exten => s,n(busy),VoiceMail(${MACRO_EXTEN}@default,b)
exten => s,n,Hangup()Okay, now we’re getting closer to having the macro the way we want it, but
we still have one thing left to change; we need to pass in the channel
to dial, as it’s currently still hardcoded for ${JOHN} (remember that we defined the variable
JOHN as the channel to call when we
want to reach John). Let’s pass in the channel as an argument, and then
our first macro will be complete:
[macro-voicemail]
exten => s,1,Dial(${ARG1},10)
exten => s,n,GotoIf($["${DIALSTATUS}" = "BUSY"]?busy:unavail)
exten => s,n(unavail),Voicemail(${MCARO_EXTEN}@default,u)
exten => s,n,Hangup()
exten => s,n(busy),VoiceMail(${MCARO_EXTEN}@default,b)
exten => s,n,Hangup()Now that our macro is done, we can use it in our dialplan. Here’s how we can call our macro to provide voicemail to John, Jane, and Jack:
exten => 101,1,Macro(voicemail,${JOHN})
exten => 102,1,Macro(voicemail,${JANE})
exten => 103,1,Macro(voicemail,${JACK})With 50 or more users, this dialplan will still look neat and
organized; we’ll simply have one line per user, referencing a macro that
can be as complicated as required. We could even have a few different
macros for various user types, such as executives, courtesy_phones, call_center_agents, analog_sets, sales_department, and so on.
A more advanced version of the macro might look something like this:
[macro-voicemail]
exten => s,1,Dial(${ARG1},20)
exten => s,n,Goto(s-${DIALSTATUS},1)
exten => s-NOANSWER,1,Voicemail(${MACRO_EXTEN},u)
exten => s-NOANSWER,n,Goto(incoming,s,1)
exten => s-BUSY,1,Voicemail(${MACRO_EXTEN},b)
exten => s-BUSY,n,Goto(incoming,s,1)
exten => _s-.,1,Goto(s-NOANSWER,1)This macro depends on a nice side effect of the Dial() application: when you use the Dial() application, it sets the DIALSTATUS variable to indicate whether the
call was successful or not. In this case, we’re handling the NOANSWER and BUSY cases, and treating all other result
codes as a NOANSWER.
Having fun yet? It gets even better!
Asterisk provides a powerful mechanism for storing values called the Asterisk database (AstDB). The AstDB provides a simple way to store data for use within your dialplan.
Tip
For those of you with experience using relational databases such as PostgreSQL or MySQL, the Asterisk database is not a traditional relational database. It is a Berkeley DB Version 1 database. There are several ways to store data from Asterisk in a relational database. Check out Chapter 12, Relational Database Integration for a more about relational databases.
The Asterisk database stores its data in groupings called families, with values
identified by keys. Within a family, a key may be
used only once. For example, if we had a family called test, we could store only one value with a key
called count. Each stored value must be
associated with a family.
To store a new value in the Asterisk database, we use the
Set()
application,[85] but instead of using it to set a channel variable, we use
it to set an AstDB variable. For example, to assign the count key in the test family with the value of 1, write the following:
exten => 456,1,Set(DB(test/count)=1)
If a key named count already
exists in the test family, its value
will be overwritten with the new value. You can also store values from
the Asterisk command line, by running the command database put family key
value. For our example, you would type database
put test count 1.
To retrieve a value from the Asterisk database and assign it to a
variable, we use the Set()
application again. Let’s retrieve the value of count (again, from the test family), assign it to a variable called
COUNT, and then speak the value to
the caller:
exten => 456,1,Set(DB(test/count)=1)
exten => 456,n,Set(COUNT=${DB(test/count)})
exten => 456,n,SayNumber(${COUNT})You may also check the value of a given key from the Asterisk
command line by running the command database get
family key. To view the entire contents of
the AstDB, use the database show command.
There are two ways to delete data from the Asterisk database. To
delete a key, you can use the DB_DELETE() application. It takes the path to
the key as its arguments, like this:
; deletes the key and returns its value in one step
exten => 457,1,Verbose(0, The value was ${DB_DELETE(test/count)})You can also delete an entire key family by using the DBdeltree() application. The DBdeltree() application takes a single
argument―the name of the key family―to delete. To delete the entire
test family, do the following:
exten => 457,1,DBdeltree(test)
To delete keys and key families from the AstDB via the
command-line interface, use the database del
key and database deltree
family commands, respectively.
There are an infinite number of ways to use the Asterisk database
in a dialplan. To introduce the AstDB, we’ll show two simple examples.
The first is a simple counting example to show that the Asterisk
database is persistent (meaning that it survives system reboots). In the
second example, we’ll use the BLACKLIST() function to evaluate whether or
not a number is on the blacklist and should be blocked.
To begin the counting example, let’s first retrieve a number (the
value of the count key) from the
database and assign it to a variable named COUNT. If the key doesn’t exist, DB() will return NULL (no value). In order to
verify if a value exists in the database or not, we will introduce the
ISNULL() function that will verify
whether a value was returned, and if not, we will initialize the AstDB
with the Set() application, where we
will set the value in the database to 1. The next priority will send us back to
priority 1. This will happen the very first time we dial this
extension:
exten => 678,1,Set(COUNT=${DB(test/count)})
exten => 678,n,GotoIf($[${ISNULL(${COUNT})}]?:continue)
exten => 678,n,Set(DB(test/count)=1)
exten => 678,n,Goto(1)
exten => 678,n(continue),NoOp()Next, we’ll say the current value of COUNT, and then increment COUNT:
exten => 678,1,Set(COUNT=${DB(test/count)})
exten => 678,n,GotoIf($[${ISNULL(${COUNT})}]?:continue)
exten => 678,n,Set(DB(test/count)=1)
exten => 678,n,Goto(1)
exten => 678,n(continue),NoOp()
exten => 678,n,SayNumber(${COUNT})
exten => 678,n,Set(COUNT=$[${COUNT} + 1])Now that we’ve incremented COUNT, let’s put the new value back into the
database. Remember that storing a value for an existing key overwrites
the previous value:
exten => 678,1,Set(COUNT=${DB(test/count)})
exten => 678,n,GotoIf($[${ISNULL(${COUNT})}]?:continue)
exten => 678,n,Set(DB(test/count)=1)
exten => 678,n,Goto(1)
exten => 678,n(continue),NoOp()
exten => 678,n,SayNumber(${COUNT})
exten => 678,n,Set(COUNT=$[${COUNT} + 1])
exten => 678,n,Set(DB(test/count)=${COUNT})Finally, we’ll loop back to the first priority. This way, the application will continue counting:
exten => 678,1,Set(COUNT=${DB(test/count)})
exten => 678,n,GotoIf($[${ISNULL(${COUNT})}]?:continue)
exten => 678,n,Set(DB(test/count)=1)
exten => 678,n,Goto(1)
exten => 678,n(continue),NoOp()
exten => 678,n,SayNumber(${COUNT})
exten => 678,n,Set(COUNT=$[${COUNT} + 1]
exten => 678,n,Set(DB(test/count)=${COUNT})
exten => 678,n,Goto(1)Go ahead and try this example. Listen to it count for a while, and then hang up. When you dial this extension again, it should continue counting from where it left off. The value stored in the database will be persistent, even across a restart of Asterisk.
In the next example, we’ll create dialplan logic around the
BLACKLIST() function, which checks to
see if the current Caller ID number exists in the blacklist. (The
blacklist is simply a family called blacklist in the AstDB.) If BLACKLIST() finds the number in the blacklist,
it returns the value 1, otherwise it will return
0. We can use these values in combination with a
GotoIf() to control whether the call
will execute the Dial() application:
exten => 124,1,GotoIf($[${BLACKLIST()]?blocked,1)
exten => 124,n,Dial(${JOHN})
exten => blocked,1,Playback(privacy-you-are-blacklisted)
exten => blocked,n,Playback(vm-goodbye)
exten => blocked,n,Hangup()To add a number to the blacklist, run the database put
blacklist number
1 command from the Asterisk command-line interface.
Now that we’ve gone over some more of the basics, let’s look at a few popular functions that have been incorporated into Asterisk.
Zapateller() is a simple Asterisk application that plays a special
information tone at the beginning of a call, which causes auto-dialers
(usually used by telemarketers) to think that the line has been
disconnected. Not only will they hang up, but their systems will flag
your number as out of service, which could help you avoid all kinds of
telemarketing calls. To use this functionality within your dialplan,
simply call the Zapateller()
application.
We’ll also use the optional nocallerid option so that the tone will be
played only when there is no Caller ID information on the incoming call.
For example, you might use Zapateller() in the s extension of your [incoming] context, like this:
[incomimg] exten => s,1,Zapateller(nocallerid) exten => s,n,Playback(enter-ext-of-person)
Another handy feature is called call parking. Call parking
allows you to place a call on hold in a “parking lot,” so that it can be
taken off hold from another extension. Parameters for call parking (such
as the extensions to use, the number of spaces, and so on) are all
controlled within the features.conf configuration
file. The [general] section
of the features.conf file contains four
settings related to call parking:
-
parkext This is the parking lot extension. Transfer a call to this extension, and the system will tell you which parking position the call is in. By default, the parking extension is
700.-
parkpos This option defines the number of parking slots. For example, setting it to
701-720creates 20 parking positions, numbered 701 through 720.-
context This is the name of the parking context. To be able to park calls, you must include this context.
-
parkingtime If set, this option controls how long (in seconds) a call can stay in the parking lot. If the call isn’t picked up within the specified time, the extension that parked the call will be called back.
Tip
You must restart Asterisk after editing
features.conf, as the file is read only on
startup. Running the reload command
will not cause the features.conf file to be
read.
Also note that because the user needs to be able to transfer the
calls to the parking lot extension, you should make sure you’re using
the t and/or T options to the Dial()
application.
So, let’s create a simple dialplan to show off call parking:
[incoming] include => parkedcalls exten => 103,1,Dial(SIP/Bob,,tT) exten => 104,1,Dial(SIP/Charlie,,tT)
To illustrate how call parking works, say that Alice calls into the system and dials extension 103 to reach Bob. After a while, Bob transfers the call to extension 700, which tells him that the call from Alice has been parked in position 701. Bob then dials Charlie at extension 104, and tells him that Alice is at extension 701. Charlie then dials extension 701 and begins to talk to Alice. This is a simple and effective way of allowing callers to be transferred between users.
Tip
The t and T arguments to
Dial() are not needed on all
channel types. For example, many SIP phones implement this via a
softkey or hardkey and utilize SIP signaling.
Last but not least, let’s cover setting up an audio conference bridge with the MeetMe() application.[86] This application allows multiple callers to converse
together, as if they were all in the same physical location. Some of the
main features include:
The ability to create password-protected conferences
Conference administration (mute conference, lock conference, kick participants)
The option of muting all but one participant (useful for company announcements, broadcasts, etc.)
Static or dynamic conference creation
Let’s walk through setting up a basic conference room. The
configuration options for the MeetMe conferencing system are found in
meetme.conf. Inside the configuration file, you define conference rooms and
optional numeric passwords. (If a password is defined here, it will be
required to enter all conferences using that room.) For our example,
let’s set up a conference room at extension 600. First, we’ll set up the
conference room in meetme.conf. We’ll call it
600, and we won’t assign a password
at this time:
[rooms] conf => 600
Now that the configuration file is complete, we’ll need to restart
Asterisk so that it can reread the meetme.conf
file. Next, we’ll add support for the conference room to our dialplan
with the MeetMe() application.
MeetMe() takes three arguments: the
name of the conference room (as defined in
meetme.conf), a set of options, and the password
the user must enter to join this conference. Let’s set up a simple
conference using room 600, the
i option (which announces when people
enter and exit the conference), and a password of 54321:
exten => 600,1,MeetMe(600,i,54321)
That’s all there is to it! When callers enter extension 600, they
will be prompted for the password. If they correctly enter 54321, they will be added to the conference.
See Appendix B, Application Reference for a list of all the options
supported by the MeetMe()
application.
Another useful application is MeetMeCount(). As its name suggests, this
application counts the number of users in a particular conference room.
It takes up to two arguments: the
conference room in which to count the number of participants, and
optionally a variable name to assign the count to. If the variable name
is not passed as the second argument, the count is read to the
caller:
exten => 601,1,Playback(conf-thereare) exten => 601,n,MeetMeCount(600) exten => 601,n,Playback(conf-peopleinconf)
If you pass a variable as the second argument to MeetMeCount(), the count is assigned to the variable, and playback of the
count is skipped. You might use this to limit the number of
participants, like this:
; limit the conference room to 10 participants
exten => 600,1,MeetMeCount(600,CONFCOUNT)
exten => 600,n,GotoIf($[${CONFCOUNT} <= 10]?meetme:conf_full,1)
exten => 600,n(meetme),MeetMe(600,i,54321)
exten => conf_full,1,Playback(conf-full)Isn’t Asterisk fun?
In this chapter, we’ve covered a few more of the many applications in the Asterisk dialplan, and hopefully we’ve given you the seeds from which you can explore the creation of your own dialplans. As with the previous chapter, we invite you to go back and reread any sections that require clarification.
The following chapters take us away from Asterisk for a bit, in order to talk about some of the technologies that all telephone systems use. We’ll be referring to Asterisk a lot, but much of what we want to discuss are things that are common to many telecom systems.
[80] Remember that when you reference a variable you can call it by its name, but when you refer to a variable’s value, you have to use the dollar sign and brackets around the variable name.
[81] For more on regular expressions, grab a copy of the ultimate reference, Jeffrey E.F. Friedl’s Mastering Regular Expressions (O’Reilly) or visit http://www.regular-expressions.info.
[82] If you don’t know what a ^ has to do with regular
expressions, you simply must obtain a copy of
Mastering Regular Expressions. It
will change your life!
[83] No, you really don’t have to pay for this—and yes, it really does work.
[84] Although Macro seems like a
general-purpose dialplan subroutine, it has a stack overflow problem
that means you should not try to nest Macro calls more than five levels deep. As
of this writing, we do not know whether the Macro
application will be patched for 1.4, or if it will be rewritten for
future versions. If you plan to do a lot of macros within macros (and
call complex functions within them), you may run into stability
problems. You will know you have a problem with just one test call, so
if your dialplan tests out, you’re good to go. We also recommend that
you take a look at the Gosub and
Return applications, as a lot of
macro functionality can be implemented without actually using
Macro(). Also, please note that we are not
suggesting that you don’t use Macro(). It is
fantastic and works very well; it just doesn’t nest
efficiently.
[85] Previous versions of Asterisk had applications
called DBput() and
DBget() that were used to set
values in and retrieve values from the AstDB. If you’re using an old
version of Asterisk, you’ll want to use those applications
instead.
[86] In the world of legacy PBXes, this type of functionality is very expensive. Either you have to pay big bucks for a dial-in service, or you have to add an expensive conferencing bridge to your proprietary PBX.
Table of Contents
Utility is when you have one telephone, luxury is when you have two, opulence is when you have three—and paradise is when you have none.
We’re now going to take a break from Asterisk for a chapter or two, because we want to spend some time discussing the technologies with which your Asterisk system will need to interface. In this chapter, we are going to talk about some of the technologies of the traditional telephone network—especially those that people most commonly want to connect to Asterisk. (We’ll discuss Voice over IP in the next chapter.)
While tomes could be written about the technologies in use in telecom networks, the material in this chapter was chosen based on our experiences in the community, which helped us to define the specific items that might be most useful. Although this knowledge may not be strictly required in order to configure your Asterisk system, it will be of great benefit when interconnecting to systems (and talking with people) from the world of traditional telecommunications.
The purpose of the Public Switched Telephone Network (PSTN) is to establish and maintain audio connections between two endpoints in order to carry speech.
Although humans can perceive sound vibrations in the range of 20–20,000 Hz,[87] most of the sounds we make when speaking tend to be in the range of 250–3,000 Hz. Since the purpose of the telephone network is to transmit the sounds of people speaking, it was designed with a bandwidth of somewhere in the range of 300–3,500 Hz. This limited bandwidth means that some sound quality will be lost (as anyone who’s had to listen to music on hold can attest to), especially in the higher frequencies.
An analog phone is composed of five parts: the ringer, the dial pad, the hybrid (or network), and the hook switch and handset (both of which are considered parts of the hybrid). The ringer, the dial pad, and the hybrid can operate completely independently of one another.
When the central office (CO) wants to signal an incoming call, it will connect an alternating current (AC) signal of roughly 90 volts to your circuit. This will cause the bell in your telephone to produce a ringing sound. (In electronic telephones, this ringer may be a small electronic warbler rather than a bell. Ultimately, a ringer can be anything that is capable of reacting to the ringing voltage; for example, strobe lights are often employed in noisy environments such as factories.)
Warning
Ringing voltage can be hazardous. Be very careful to take precautions when working with an in-service telephone line.
Many people confuse the AC voltage that triggers the ringer with the direct current (DC) voltage that powers the phone. Remember that a ringer needs an alternating current in order to oscillate (just as a church bell won’t ring if you don’t supply the movement), and you’ve got it.
In North America, the number of ringers you can connect to your line is dependent on the Ringer Equivalence Number (REN) of your various devices. (The REN must be listed on each device.) The total REN for all devices connected to your line cannot exceed 5.0. An REN of 1.0 is equivalent to an old-fashioned analog set with an electromechanical ringer. Some electronic phones have an REN of 0.3 or even less. If you connect too many devices that require too much current, you will find that none of them will be able to ring.
When you place a telephone call, you need some way of letting the network know the address of the party you wish to reach. The dial pad is the portion of the phone that provides this functionality. In the early days of the PSTN, dial pads were in fact rotary devices that used pulses to indicate digits. This was a rather slow process, so the telephone companies eventually introduced touch-tone dialing. With touch-tone—also known as Dual-Tone Multi Frequency (DTMF)—dialing, the dial pad consists of 12 buttons. Each button has two frequencies assigned to it (see Table 7.1, “DTMF digits”).
Table 7.1. DTMF digits
|
1209 Hz |
1336 Hz |
1477 Hz |
1633 Hz [a] | |
|---|---|---|---|---|
|
697 Hz |
1 |
2 |
3 |
A |
|
770 Hz |
4 |
5 |
6 |
B |
|
852 Hz |
7 |
8 |
9 |
C |
|
941 Hz |
* |
0 |
# |
D |
[a] Notice that this column contains letters that are not typically present as keys on a telephone dial pad. They are part of the DTMF standard nonetheless, and any proper telephone contains the electronics required to create them, even if it doesn’t contain the buttons themselves. (These buttons actually do exist on some telephones, which are mostly used in military and government applications.) | ||||
When you press a button on your dial pad, the two corresponding frequencies are transmitted down the line. The far end can interpret these frequencies and note which digit was pressed.
The hybrid is a type of transformer that handles the need to combine the signals transmitted and received across a single pair of wires in the PSTN and two pairs of wires in the handset. One of the functions the hybrid performs is regulating sidetone, which is the amount of your transmitted signal that is returned to your earpiece; its purpose is to provide a more natural-sounding conversation. Too much sidetone, and your voice will sound too loud; too little, and you’ll think the line has gone dead.
This device signals the state of the telephone circuit to the CO. When you pick up your telephone, the hook switch closes the loop between you and the CO, which is seen as a request for a dial tone. When you hang up, the hook switch opens the circuit, which indicates that the call has ended.[88]
The hook switch can also be used for signaling purposes. Some electronic analog phones have a button labeled Link that causes an event called a flash. You can perform a flash manually by depressing the hook switch for a duration of between 200 and 1,200 milliseconds. If you leave it down for longer than that, the carrier may assume you’ve hung up. The purpose of the Link button is to handle this timing for you. If you’ve ever used call waiting or three-way calling on an analog line, you have performed a hook switch flash for the purpose of signaling the network.
In an analog telephone circuit, there are two wires. In North America, these wires are referred to as Tip and Ring.[89] This terminology comes from the days when telephone calls were connected by live operators sitting at cord boards. The plugs that they used had two contacts―one located at the tip of the plug and the other connected to the ring around the middle (Figure 7.1, “Tip and Ring”).

The Tip lead is the positive polarity wire. In North America, this wire is typically green and provides the return path. The Ring wire is the negative polarity wire. In North America, this wire is normally red. For modern Cat 5 and 6 cables, the Tip is usually the white wire, and Ring is the coloured wire. When your telephone is on-hook, this wire will have a potential of –48V DC with respect to Tip. Off-hook, this voltage drops to roughly –7V DC.
Analog telephony is almost dead.
In the PSTN, the famous Last Mile is the final remaining piece of the telephone network still using technology pioneered well over a hundred years ago.[90]
One of the primary challenges when transmitting analog signals is that all sorts of things can interfere with those signals, causing low volume, static, and all manner of other undesired effects. Instead of trying to preserve an analog waveform over distances that may span thousands of miles, why not simply measure the characteristics of the original sound and send that information to the far end? The original waveform wouldn’t get there, but all the information needed to reconstruct it would.
This is the principle of all digital audio (including telephony): sample the characteristics of the source waveform, store the measured information, and send that data to the far end. Then, at the far end, use the transmitted information to generate a completely new audio signal that has the same characteristics as the original. The reproduction is so good that the human ear can’t tell the difference.
The principle advantage of digital audio is that the sampled data can be mathematically checked for errors all along the route to its destination, ensuring that a perfect duplicate of the original arrives at the far end. Distance no longer affects quality, and interference can be detected and eliminated.
There are several ways to digitally encode audio, but the most common method (and the one used in telephony systems) is known as Pulse-Code Modulation (PCM). To illustrate how this works, let’s go through a few examples.
The principle of PCM is that the amplitude[91]of the analog waveform is sampled at specific intervals so that it can later be re-created. The amount of detail that is captured is dependent both on the bit resolution of each sample and on how frequently the samples are taken. A higher bit resolution and a higher sampling rate will provide greater accuracy, but more bandwidth will be required to transmit this more detailed information.
To get a better idea of how PCM works, consider the waveform displayed in Figure 7.2, “A simple sinusoidal (sine) wave”.
To digitally encode the wave, it must be sampled on a regular basis, and the amplitude of the wave at each moment in time must be measured. The process of slicing up a waveform into moments in time and measuring the energy at each moment is called quantization, or sampling.
The samples will need to be taken frequently enough and will need to capture enough information to ensure that the far end can re-create a sufficiently similar waveform. To achieve a more accurate sample, more bits will be required. To explain this concept, we will start with a very low resolution, using four bits to represent our amplitude. This will make it easier to visualize both the quantization process itself and the effect that resolution has on quality.
Figure 7.3, “Sampling our sine wave using four bits” shows the information that will be captured when we sample our sine wave at four-bit resolution.
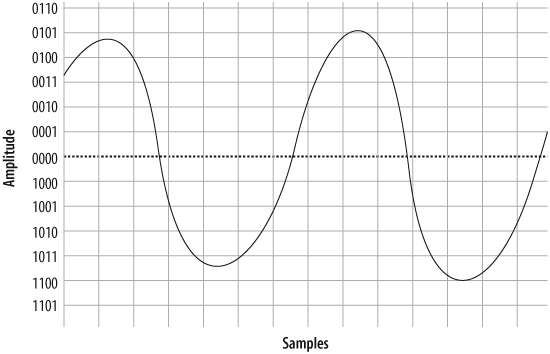
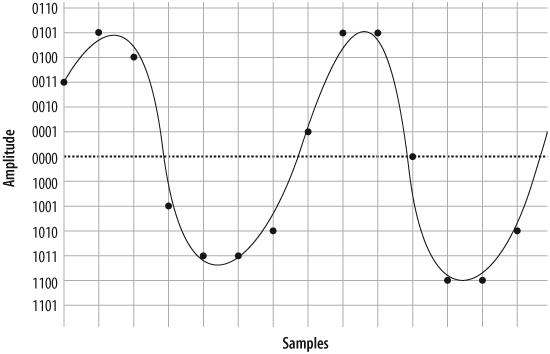
At each time interval, we measure the amplitude of the wave and
record the corresponding intensity—in other words, we sample it. You
will notice that the four-bit resolution limits our accuracy. The
first sample has to be rounded to 0011, and the next quantization yields a
sample of 0101. Then comes 0100, followed by 1001, 1011, and so forth. In total, we have 14
samples (in reality, several thousand samples must be taken per
second).
If we string together all the values, we can send them to the other side as:
0011 0101 0100 1001 1011 1011 1010 0001 0101 0101 0000 1100 1100 1010
On the wire, this code might look something like Figure 7.4, “PCM encoded waveform”.

When the far end’s digital-to-analog (D/A) converter receives this signal, it can use the information to plot the samples, as shown in Figure 7.5, “Plotted PCM signal”.

From this information, the waveform can be reconstructed (see Figure 7.6, “Delineated signal”).
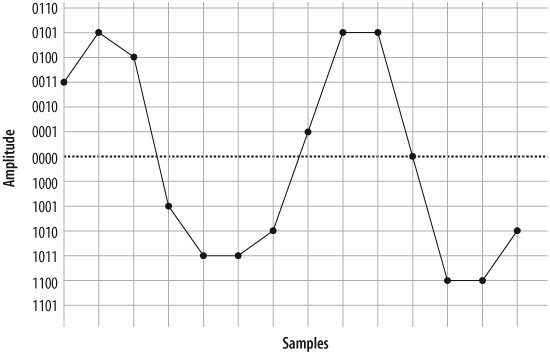
As you can see if you compare Figure 7.2, “A simple sinusoidal (sine) wave” with Figure 7.6, “Delineated signal”, this reconstruction of the waveform is not very accurate. This was done intentionally, to demonstrate an important point: the quality of the digitally encoded waveform is affected by the resolution and rate at which it is sampled. At too low a sampling rate, and with too low a sample resolution, the audio quality will not be acceptable.
Let’s take another look at our original waveform, this time using five bits to define our quantization intervals (Figure 7.7, “The same waveform, on a higher-resolution overlay”).
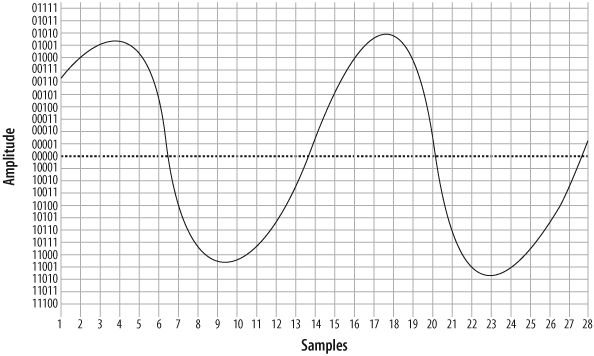
Tip
In reality, there is no such thing as five-bit PCM. In the telephone network, PCM samples are encoded using eight bits.[92]
We’ll also double our sampling frequency. The points plotted this time are shown in Figure 7.8, “The same waveform at double the resolution”.
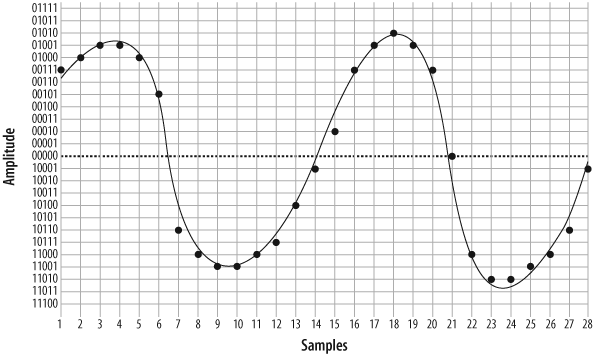
We now have twice the number of samples, at twice the resolution. Here they are:
00111 01000 01001 01001 01000 00101 10110 11000 11001 11001 11000 10111 10100 10001 00010 00111 01001 01010 01001 00111 00000 11000 11010 11010 11001 11000 10110 10001
When received at the other end, that information can now be plotted as shown in Figure 7.9, “Five-bit plotted PCM signal”.

From this information, the waveform shown in Figure 7.10, “Waveform delineated from five-bit PCM” can then be generated.
As you can see, the resultant waveform is a far more accurate representation of the original. However, you can also see that there is still room for improvement.
Tip
Note that 40 bits were required to encode the waveform at 4-bit resolution, while 156 bits were needed to send the same waveform using 5-bit resolution (and also doubling the sampling rate). The point is, there is a tradeoff: the higher the quality of audio you wish to encode, the more bits required to do it, and the more bits you wish to send (in real time, naturally), the more bandwidth you will need to consume.
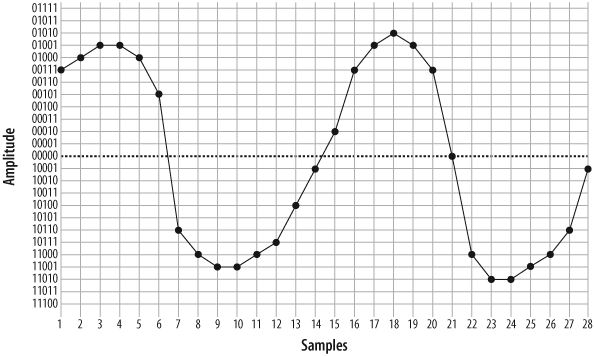
So how much sampling is enough? That very same question was considered in the 1920s by an electrical engineer (and AT&T/Bell employee) named Harry Nyquist. Nyquist’s Theorem states: “When sampling a signal, the sampling frequency must be greater than twice the bandwidth of the input signal in order to be able to reconstruct the original perfectly from the sampled version.”[93]
In essence, what this means is that to accurately encode an analog signal you have to sample it twice as often as the total bandwidth you wish to reproduce. Since the telephone network will not carry frequencies below 300 Hz and above 4,000 Hz, a sampling frequency of 8,000 samples per second will be sufficient to reproduce any frequency within the bandwidth of an analog telephone. Keep that 8,000 samples per second in mind; we’re going to talk about it more later.
So, we’ve gone over the basics of quantization, and we’ve discussed the fact that more quantization intervals (i.e., a higher sampling rate) give better quality but also require more bandwidth. Lastly, we’ve discussed the minimum sample rate needed to accurately measure the range of frequencies we wish to be able to transmit (in the case of the telephone, it’s 8,000 Hz). This is all starting to add up to a fair bit of data being sent on the wire, so we’re going to want to talk about companding.
Companding is a method of improving the dynamic range of a sampling method without losing important accuracy. It works by quantizing higher amplitudes in a much coarser fashion than lower amplitudes. In other words, if you yell into your phone, you will not be sampled as cleanly as you will be when speaking normally. Yelling is also not good for your blood pressure, so it’s best to avoid it.
Two companding methods are commonly employed: μlaw[94] in North America, and alaw in the rest of the world. They operate on the same principles but are otherwise not compatible with each other.
Companding divides the waveform into cords, each of which has several steps. Quantization involves matching the measured amplitude to an appropriate step within a cord. The value of the band and cord numbers (as well as the sign—positive or negative) becomes the signal. The following diagrams will give you a visual idea of what companding does. They are not based on any standard, but rather were made up for the purpose of illustration (again, in the telephone network, companding will be done at an eight-bit, not five-bit, resolution).
Figure 7.11, “Five-bit companding” illustrates five-bit companding. As you can see, amplitudes near the zero-crossing point will be sampled far more accurately than higher amplitudes (either positive or negative). However, since the human ear, the transmitter, and the receiver will also tend to distort loud signals, this isn’t really a problem.

A quantized sample might look like Figure 7.12, “Quantized and companded at 5-bit resolution”. It yields the following bit stream:

00000 10011 10100 10101 01101 00001 00011 11010 00010 00001 01000 10011 10100 10100 00101 00100 00101 10101 10011 10001 00011 00001 00000 10100 10010 10101 01101 10100 00101 11010 00100 00000 01000
If you’ve ever watched the wheels on a wagon turn backward in an old Western movie, you’ve seen the effects of aliasing. The frame rate of the movie cannot keep up with the rotational frequency of the spokes, and a false rotation is perceived.
In a digital audio system (which the modern PSTN arguably is), aliasing always occurs if frequencies that are greater than one-half the sampling rate are presented to the analog-to-digital (A/D) converter. In PSTN, that includes any audio frequencies above 4,000 Hz (half the sampling rate of 8,000 Hz). This problem is easily corrected by passing the audio through a low-pass filter[95] before presenting it to the A/D converter.[96]
For over a hundred years, telephone networks were exclusively circuit-switched. What this meant was that for every telephone call made, a dedicated connection was established between the two endpoints, with a fixed amount of bandwidth allocated to that circuit. Creating such a network was costly, and where distance was concerned, using that network was costly as well. Although we are all predicting the end of the circuit-switched network, many people still use it every day, and it really does work rather well.
In the PSTN, there are many different sizes of circuits serving the various needs of the network. Between the central office and a subscriber, one or more analog circuits, or a few dozen channels delivered over a digital circuit, generally suffice. Between PSTN offices (and with larger customers), fiber-optic circuits are generally used.
Since the standard method of digitizing a telephone call is to record an 8-bit sample 8,000 times per second, we can see that a PCM-encoded telephone circuit will need a bandwidth of eight times 8,000 bits per second, or 64,000 bps. This 64 Kbps channel is referred to as a DS-0 (that’s “Dee-Ess-Zero”). The DS-0 is the fundamental building block of all digital telecommunications circuits.
Even the ubiquitous analog circuit is sampled into a DS-0 as soon as possible. Sometimes this happens where your circuit terminates at the central office, and sometimes well before.[97]
The venerable T1 is one of the more recognized digital telephony terms. A T1 is a digital circuit consisting of 24 DS-0s multiplexed together into a 1.544 Mbps bitstream.[98] This bit stream is properly defined as a DS-1. Voice is encoded on a T1 using the μlaw companding algorithm.
Tip
The European version of the T1 was developed by the European Conference of Postal and Telecommunications Administrations[99] (CEPT), and was first referred to as a CEPT-1. It is now called an E1.
The E1 is comprised of 32 DS-0s, but the method of PCM encoding is different: E1s use alaw companding. This means that connecting between an E1-based network and a T1-based network will always require a transcoding step. Note that an E1, although it has 32 channels, is also considered a DS-1. It is likely that E1 is far more widely deployed, as it is used everywhere in the world except North American and Japan.
The various other T-carriers (T2, T3, and T4) are multiples of the T1, each based on the humble DS-0. Table 7.2, “T-carrier circuits” illustrates the relationships between the different T-carrier circuits.
Table 7.2. T-carrier circuits
|
Carrier |
Equivalent data bitrate |
Number of DS-0s |
Data bitrate |
|---|---|---|---|
|
T1 |
24 DS-0s |
24 |
1.544 Mbps |
|
T2 |
4 T1s |
96 |
6.312 Mbps |
|
T3 |
7 T2s |
672 |
44.736 Mbps |
|
T4 |
6 T3s |
4,032 |
274.176 Mbps |
At densities above T3, it is very uncommon to see a T-carrier circuit. For these speeds, optical carrier (OC) circuits may be used.
The Synchronous Optical Network (SONET) was developed out of a desire to take the T-carrier system to the next technological level: fiber optics. SONET is based on the bandwidth of a T3 (44.736 Mbps), with a slight overhead making it 51.84 Mbps. This is referred to as an OC-1 or STS-1. As Table 7.3, “OC circuits” shows, all higher-speed OC circuits are multiples of this base rate.
Table 7.3. OC circuits
|
Carrier |
Equivalent data bitrate |
Number of DS-0s |
Data bitrate |
|---|---|---|---|
|
OC-1 |
1 DS-3 (plus overhead) |
672 |
51.840 Mbps |
|
OC-3 |
3 DS-3s |
2,016 |
155.520 Mbps |
|
OC-12 |
12 DS-3s |
8,064 |
622.080 Mbps |
|
OC-48 |
48 DS-3s |
32,256 |
2488.320 Mbps |
|
OC-192 |
192 DS-3s |
129,024 |
9953.280 Mbps |
SONET was created in an effort to standardize optical circuits, but due to its high cost, coupled with the value offered by many newer schemes, such as Dense Wave Division Multiplexing (DWDM), there is some controversy surrounding its future.
As with any circuit, it is not enough for the circuits used in the PSTN to just carry (voice) data between endpoints. Mechanisms must also be provided to pass information about the state of the channel between each endpoint. (Disconnect and answer supervision are two examples of basic signaling that might need to take place; Caller ID is an example of a more complex form of signaling.)
Also known as robbed-bit signaling, CAS is what you will use to transmit voice on a T1 when ISDN is not available. Rather than taking advantage of the power of the digital circuit, CAS simulates analog channels. CAS works by stealing bits from the audio stream for signaling purposes. Although the effect on audio quality is not really noticeable, the lack of a powerful signaling channel limits your flexibility.
When configuring a CAS T1, the signaling options at each end must match. E&M (Ear & Mouth or recEive & transMit) signaling is generally preferred, as it offers the best supervision. Having said that, in an Asterisk environment the most likely reason for you to use CAS would be for a channel bank, which means you are most likely going to have to use FXS signaling.
CAS is very rarely used on PSTN circuits anymore, due to the superiority of ISDN-PRI. One of the limitations of CAS is that it does not allow the dynamic assignment of channels to different functions. Also, Caller ID information (which may not even be supported) has to be sent as part of the audio stream. CAS is commonly used on the T1 link in channel banks.
The Integrated Services Digital Network (ISDN) has been around for more than 20 years. Because it separates the channels that carry the traffic (the bearer channels, or B-channels) from the channel that carries the signaling information (the D-channel), ISDN allows for the delivery of a much richer set of features than CAS. In the beginning, ISDN promised to deliver much the same sort of functionality that the Internet has given us, including advanced capabilities for voice, video, and data transfer.
Unfortunately, rather than ratifying a standard and sticking to it, the respective telecommunications manufacturers all decided to add their own tweaks to the protocol, in the belief that their versions were superior and would eventually dominate the market. As a result, getting two ISDN-compliant systems to connect to each other was often a painful and expensive task. The carriers who had to implement and support this expensive technology, in turn, priced it so that it was not rapidly adopted. Currently, ISDN is rarely used for much more than basic trunking—in fact, the acronym ISDN has become a joke in the industry: “It Still Does Nothing.”
Having said that, ISDN has become quite popular for trunking, and it is now (mostly) standards-compliant. If you have a PBX with more than a dozen lines connected to the PSTN, there’s a very good chance that you’ll be running an ISDN-PRI (Primary Rate Interface) circuit. Also, in places where DSL and cable access to the Internet are not available (or are too expensive), an ISDN-BRI (Basic Rate Interface) circuit might provide you with an affordable 128 Kbps connection. In much of North America, the use of BRI for Internet connectivity has been deprecated in favor of DSL and cable modems (and it is never used for voice), but in many European countries it has almost totally replaced analog circuits.
Basic Rate Interface (or Basic Rate Access) is the flavor of ISDN, and is designed to service small endpoints such as workstations.
The BRI flavor of the ISDN specification is often referred to simply as “ISDN,” but this can be a source of confusion, as ISDN is a protocol, not a type of circuit (not to mention that PRI circuits are also correctly referred to as ISDN!).
A Basic Rate ISDN circuit consists of two 64 Kbps B-channels controlled by a 16-Kbps D-channel, for a total of 144 Kbps.
Basic Rate ISDN has been a source of much confusion during its life, due to problems with standards compliance, technical complexity, and poor documentation. Still, many European telecos have widely implemented ISDN-BRI, and thus it is more popular in Europe than in North America.
The Primary Rate Interface (or Primary Rate Access) flavor of ISDN is used to provide ISDN service over larger network connections. A Primary Rate ISDN circuit uses a single DS-0 channel as a signaling link (the D-channel); the remaining channels serve as B-channels.
In North America, Primary Rate ISDN is commonly carried on one or more T1 circuits. Since a T1 has 24 channels, a North American PRI circuit typically consists of 23 B-channels and 1 D-channel. For this reason, PRI is often referred to as 23B+D.[100]
Tip
In Europe, a 32-channel E1 circuit is used, so a Primary Rate ISDN circuit is referred to as 30B+D (the final channel is used for synchronization).
Primary Rate ISDN is very popular, due to its technical benefits and generally competitive pricing at higher densities. If you believe you will require more than a dozen or so PSTN lines, you should look into Primary Rate ISDN pricing.
From a technical perspective, ISDN-PRI is always preferable to CAS.
Signaling System 7 (SS7) is the signaling system used by carriers. It is conceptually similar to ISDN, and it is instrumental in providing a mechanism for the carriers to transmit the additional information ISDN endpoints typically need to pass. However, the technology of SS7 is different from that of ISDN; one big difference is that SS7 runs on a completely separate network from the actual trunks that carry the calls.
SS7 support in Asterisk is on the horizon, as there is much interest in making Asterisk compatible with the carrier networks. An open source version of SS7 (http://www.openss7.org) exists, but work is still needed for full SS7 compliance, and as of this writing it is not known whether this version will be integrated with Asterisk. Another promising source of SS7 support comes from Sangoma Technologies, which offers SS7 functionality in many of its products.
It should be noted that adding support for SS7 in Asterisk is not going to be as simple as writing a proper driver. Connecting equipment to an SS7 network will not be possible without that equipment having passed extremely rigorous certification processes. Even then, it seems doubtful that any traditional carrier is going to be in a hurry to allow such a thing to happen, mostly for strategic and political reasons.
In the mid-1990s, network performance improved to the point where it became possible to send a stream of media information in real time across a network connection. Because the media stream is chopped up into segments, which are then wrapped in an addressing envelope, such connections are referred to as packet-based. The challenge, of course, is to send a flood of these packets between two endpoints, ensuring that the packets arrive in the same order in which they were sent, in less than 150 milliseconds, with none lost. This is the essence of Voice over IP.
This chapter has explored the technologies currently in use in the PSTN. In the next chapter, we will discuss protocols for VoIP: the carrying of telephone connections across IP-based networks. These protocols define different mechanisms for carrying telephone conversations, but their significance is far greater than just that. Bringing the telephone network into the data network will finally erase the line between telephones and computers, which holds the promise of a revolutionary evolution in the way we communicate.
[87] If you want to play around with what different frequencies look like on an oscilloscope, grab a copy of Sound Frequency Analyzer, from Reliable Software. It’s a really simple and fun way to visualize what sounds “look” like. The spectrograph gives a good picture of the complex harmonics our voices can generate, as well as an appreciation for the background sounds that always surround us. You should also try the delightfully annoying NCH Tone Generator, from NCH Swift Sound.
[88] When referring to the state of an analog circuit, people often speak in terms of “off-hook” and “on-hook.” When your line is “off-hook,” your telephone is “on” a call. If your phone is “on-hook,” the telephone is essentially “off,” or idle.
[89] They may have other names elsewhere in the world (such as “A” and “B”).
[90] “The Last Mile” is a term that was originally used to describe the only portion of the PSTN that had not been converted to fiber optics: the connection between the central office and the customer. The Last Mile is more than that, however, as it also has significance as a valuable asset of the traditional phone companies; they own a connection into your home. The Last Mile is becoming more and more difficult to describe in technical terms, as there are now so many ways to connect the network to the customer. As a thing of strategic value to telecom, cable, and other utilities, its importance is obvious.
[91] Amplitude is essentially the power or strength of the signal. If you have ever held a skipping rope or garden hose and given it a whip, you have seen the resultant wave. The taller the wave, the greater the amplitude.
[92] Other digital audio methods may employ 16 bits or more.
[93] Nyquist published two papers, “Certain Factors Affecting Telegraph Speed” (1924) and “Certain Topics in Telegraph Transmission Theory” (1928), in which he postulated what became known as Nyquist’s Theorem. Proven in 1949 by Claude Shannon (“Communication in the Presence of Noise”), it is also referred to as the Nyquist-Shannon sampling theorem.
[94] μlaw is often referred to as “ulaw” because, let’s face it, how many of us have μ keys on our keyboards? μ is in fact the Greek letter Mu; thus, you will also see μlaw written (more correctly) as “Mu-law.” When spoken, it is correct to confidently say “Mew-law,” but if folks look at you strangely, and you’re feeling generous, you can help them out and tell them it’s “ulaw.” Many people just don’t appreciate trivia.
[95] A low-pass filter, as its name implies, allows through only frequencies that are lower than its cut-off frequency. Other types of filters are high-pass filters (which remove low frequencies) and band-pass filters (which filter out both high and low frequencies).
[96] If you ever have to do audio recordings for a system, you might want to take advantage of the band-pass filter that is built into most telephone sets. Doing a recording using even high-end recording equipment can pick up all kinds of background noise that you don’t even hear until you downsample, at which point the background noise produces aliasing (which can sound like all kinds of weird things). Conversely, the phone records in the correct format already, so the noise never enters the audio stream. Having said all that, no matter what you use to do recordings, avoid environments that have a lot of background noise. Typical offices can be a lot noisier than you’d think, as HVAC equipment can produce noise that we don’t even realize is there.
[97] Digital telephone sets (including IP sets) do the analog-to-digital conversion right at the point where the handset plugs into the phone, so the DS-0 is created right at the phone set.
[98] The 24 DS-0s use 1.536 Mbps, and the remaining .008 Mbps is used by framing bits.
[99] Conférence Européenne des Administrations des Postes et des Télécommunications.
[100] PRI is actually quite a bit more flexible than that, as it is possible to span a single PRI circuit across multiple T1 spans. This can give rise, for example, to a 47B+D circuit (where a single D-channel serves two T1s) or a 46B+2D circuit (where primary and backup D-channels serve a pair of T1s). You will sometimes see PRI described as nB+nD, because the number of B- and D-channels is, in fact, quite variable. For this reason, you should never refer to a T1 carrying PRI as “a PRI.” For all you know, the PRI circuit spans multiple T1s, as is common in larger PBX deployments.
Table of Contents
The Internet is a telephone system that’s gotten uppity.
The telecommunications industry spans over 100 years, and Asterisk integrates most—if not all—of the major technologies that it has made use of over the last century. To make the most out of Asterisk, you need not be a professional in all areas, but understanding the differences between the various codecs and protocols will give you a greater appreciation and understanding of the system as a whole.
This chapter explains Voice over IP and what makes VoIP networks different from the traditional circuit-switched voice networks that were the topic of the last chapter. We will explore the need for VoIP protocols, outlining the history and potential future of each. We’ll also look at security considerations and these protocols’ abilities to work within topologies such as Network Address Translation (NAT). The following VoIP protocols will be discussed (some more briefly than others):
IAX
SIP
H.323
MGCP
Skinny/SCCP
UNISTIM
Codecs are the means by which analog voice can be converted to a digital signal and carried across the Internet. Bandwidth at any location is finite, and the number of simultaneous conversations any particular connection can carry is directly related to the type of codec implemented. In this chapter, we’ll also explore the differences between the following codecs in regards to bandwidth requirements (compression level) and quality:
G.711
G.726
G.729A
GSM
iLBC
Speex
MP3
We will then conclude the chapter with a discussion of how voice traffic can be routed reliably, what causes echo and how to deal with it, and how Asterisk controls the authentication of inbound and outbound calls.
The basic premise of VoIP is the packetization[101] of audio streams for transport over Internet Protocol-based networks. The challenges to accomplishing this relate to the manner in which humans communicate. Not only must the signal arrive in essentially the same form that it was transmitted in, but it needs to do so in less than 150 milliseconds. If packets are lost or delayed, there will be degradation to the quality of the communications experience, meaning that two people will have difficulty in carrying on a conversation.
The transport protocols that collectively are called “the Internet” were not originally designed with real-time streaming of media in mind. Endpoints were expected to resolve missing packets by waiting longer for them to arrive, requesting retransmission, or, in some cases, considering the information to be gone for good and simply carrying on without it. In a typical voice conversation, these mechanisms will not serve. Our conversations do not adapt well to the loss of letters or words, nor to any appreciable delay between transmittal and receipt.
The traditional PSTN was designed specifically for the purpose of voice transmission, and it is perfectly suited to the task from a technical standpoint. From a flexibility standpoint, however, its flaws are obvious to even people with a very limited understanding of the technology. VoIP holds the promise of incorporating voice communications into all of the other protocols we carry on our networks, but due to the special demands of a voice conversation, special skills are needed to design, build, and maintain these networks.
The problem with packet-based voice transmission stems from the fact that the way in which we speak is totally incompatible with the way in which IP transports data. Speaking and listening consist of the relaying of a stream of audio, whereas the Internet protocols are designed to chop everything up, encapsulate the bits of information into thousands of packages, and then deliver each package in whatever way possible to the far end. Clearly, some way of dealing with this is required.
The mechanism for carrying a VoIP connection generally involves a series of signaling transactions between the endpoints (and gateways in between), culminating into two persistent media streams (one for each direction) that carry the actual conversation. There are several protocols in existence to handle this. In this section, we will discuss some of those that are important to VoIP in general and to Asterisk specifically.
If you claim to be one of the folks in the know when it comes to Asterisk, your test will come when you have to pronounce the name of this protocol. It would seem that you should say “eye-ay-ex”, but this hardly rolls off the tongue very well.[102] Fortunately, the proper pronunciation is in fact “eeks.”[103] IAX is an open protocol, meaning that anyone can download and develop for it, but it is not yet a standard of any kind.[104]
It is expected that IAX2 will become an IETF protocol soon. IAX2 is currently in draft status with the IETF, and it is widely expected to become an official protocol in a few years’ time.
In Asterisk, IAX is supported by the chan_iax2.so module.
The IAX protocol was developed by Digium for the purpose of communicating with other Asterisk servers (hence the Inter-Asterisk eXchange protocol). It is very important to note that IAX is not at all limited to Asterisk. The standard is open for anyone to use, and it is supported by many other open source telecom projects, as well as by several hardware vendors. IAX is a transport protocol (much like SIP) that uses a single UDP port (4569) for both the channel signaling and media streams. As discussed later in this chapter, this makes it easier to manage when behind NATed firewalls.
IAX also has the unique ability to trunk multiple sessions into one dataflow, which can be a tremendous bandwidth advantage when sending a lot of simultaneous channels to a remote box. Trunking allows multiple media streams to be represented with a single datagram header, that will lower the overhead associated with individual channels. This helps to lower latency and reduce the processing power and bandwidth required, allowing the protocol to scale much more easily with a large number of active channels between endpoints. If you have a large quantity of IP calls to pass between two endpoints, you should take a close look at IAX trunking.
Since IAX was optimized for voice, it has received some criticism for not better supporting video—but in fact, IAX holds the potential to carry pretty much any media stream desired. Because it is an open protocol, future media types are certain to be incorporated as the community desires them.
IAX includes the ability to authenticate in three ways: plain
text, MD5 hashing, and RSA key exchange. This, of course, does nothing to encrypt the media path
or headers between endpoints. Many solutions include using a Virtual Private Network (VPN) appliance or software to
encrypt the stream in another layer of technology, which requires the
endpoints to pre-establish a method of having these tunnels configured
and operational. However, IAX is now also able to encrypt the streams
between endpoints with dynamic key exchange at call setup (using the
configuration option encryption=aes128), allowing the use of
automatic key rollover.
The IAX2 protocol was deliberately designed to work from behind devices performing NAT. The use of a single UDP port for both signaling and transmission of media also keeps the number of holes required in your firewall to a minimum. These considerations have helped make IAX one of the easiest protocols (if not the easiest) to implement in secure networks.
The Session Initiation Protocol (SIP) has taken the telecommunications industry by storm. SIP has pretty much dethroned the once-mighty H.323 as the VoIP protocol of choice—certainly at the endpoints of the network. The premise of SIP is that each end of a connection is a peer; the protocol negotiates capabilities between them. What makes SIP compelling is that it is a relatively simple protocol, with a syntax similar to that of other familiar protocols such as HTTP and SMTP. SIP is supported in Asterisk with the chan_sip.so module.[105]
SIP was originally submitted to the Internet Engineering Task Force (IETF) in February of 1996 as “draft-ietf-mmusic-sip-00.” The initial draft looked nothing like the SIP we know today and contained only a single request type: a call setup request. In March of 1999, after 11 revisions, SIP RFC 2543 was born.
At first, SIP was all but ignored, as H.323 was considered the protocol of choice for VoIP transport negotiation. However, as the buzz grew, SIP began to gain popularity, and while there may be a lot of different factors that accelerated its growth, we’d like to think that a large part of its success is due to its freely available specification.
SIP is an application-layer signaling protocol that uses the well-known port 5060 for communications. SIP can be transported with either the UDP or TCP transport-layer protocols. Asterisk does not currently have a TCP implementation for transporting SIP messages, but it is possible that future versions may support it (and patches to the code base are gladly accepted). SIP is used to “establish, modify, and terminate multimedia sessions such as Internet telephony calls.”[106]
SIP does not transport media between endpoints.
RTP is used to transmit media (i.e., voice) between endpoints. RTP uses high-numbered, unprivileged ports in Asterisk (10,000 through 20,000, by default).
A common topology to illustrate SIP and RTP, commonly referred to as the “SIP trapezoid,” is shown in Figure 8.1, “The SIP trapezoid”. When Alice wants to call Bob, Alice’s phone contacts her proxy server, and the proxy tries to find Bob (often connecting through his proxy). Once the phones have started the call, they communicate directly with each other (if possible), so that the data doesn’t have to tie up the resources of the proxy.
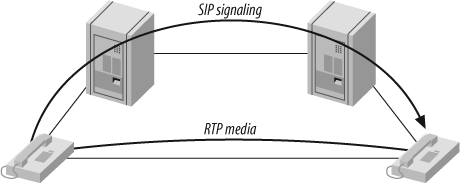
SIP was not the first, and is not the only, VoIP protocol in use today (others include H.323, MGCP, IAX, and so on), but currently it seems to have the most momentum with hardware vendors. The advantages of the SIP protocol lie in its wide acceptance and architectural flexibility (and, we used to say, simplicity!).
SIP has earned its place as the protocol that justified VoIP. All new user and enterprise products are expected to support SIP, and any existing products will now be a tough sell unless a migration path to SIP is offered. SIP is widely expected to deliver far more than VoIP capabilities, including the ability to transmit video, music, and any type of real-time multimedia. While its use as a ubiquitous general-purpose media transport mechanism seems doubtful, SIP is unarguably poised to deliver the majority of new voice applications for the next few years.
SIP uses a challenge/response system to authenticate users. An
initial INVITE is sent to the proxy
with which the end device wishes to communicate. The proxy then sends
back a 407 Proxy Authorization Request message, which contains a
random set of characters referred to as a nonce. This nonce is used along
with the password to generate an MD5 hash, which is then sent back in
the subsequent INVITE. Assuming the
MD5 hash matches the one that the proxy generated, the client is then
authenticated.
Denial of Service (DoS) attacks are probably the most common type of attack on VoIP
communications. A DoS attack can occur when a large number of invalid
INVITE requests are sent to a proxy server in an attempt to overwhelm
the system. These attacks are relatively simple to implement, and
their effects on the users of the system are immediate. SIP has
several methods of minimizing the effects of DoS attacks, but
ultimately they are impossible to prevent.
SIP implements a scheme to guarantee that a secure, encrypted transport mechanism (namely Transport Layer Security, or TLS) is used to establish communication between the caller and the domain of the callee. Beyond that, the request is sent securely to the end device, based upon the local security policies of the network. Note that the encryption of the media (that is, the RTP stream) is beyond the scope of SIP itself and must be dealt with separately.
More information regarding SIP security considerations, including registration hijacking, server impersonation, and session teardown, can be found in Section 26 of SIP RFC 3261.
Probably the biggest technical hurdle SIP has to conquer is the challenge of carrying out transactions across a NAT layer. Because SIP encapsulates addressing information in its data frames, and NAT happens at a lower network layer, the addressing information is not automatically modified and, thus, the media streams will not have the correct addressing information needed to complete the connection when NAT is in place. In addition to this, the firewalls normally integrated with NAT will not consider the incoming media stream to be part of the SIP transaction, and will block the connection. Newer firewalls and Session Border Controllers are SIP-aware, but this is still considered a shortcoming in this protocol, and it causes no end of trouble to network professionals needing to connect SIP endpoints using existing network infrastructure.
This International Telecommunication Union (ITU) protocol was originally designed to provide an IP transport mechanism for video conferencing. It has become the standard in IP-based video-conferencing equipment, and it briefly enjoyed fame as a VoIP protocol as well. While there is much heated debate over whether SIP or H.323 (or IAX) will dominate the VoIP protocol world, in Asterisk, H.323 has largely been deprecated in favor of IAX and SIP. H.323 has not enjoyed much success among users and enterprises, although it might still be the most widely used VoIP protocol among carriers.
The three versions of H.323 supported in Asterisk are handled by
the modules chan_h323.so
(supplied with Asterisk), chan_oh323.so (available as a free add-on),
and chan_ooh323.so (supplied in
asterisk-addons).
Tip
You have probably used H.323 without even knowing it—Microsoft’s NetMeeting client is arguably the most widely deployed H.323 client.
H.323 was developed by the ITU in May of 1996 as a means to transmit voice, video, data, and fax communications across an IP-based network while maintaining connectivity with the PSTN. Since that time, H.323 has gone through several versions and annexes (which add functionality to the protocol), allowing it to operate in pure VoIP networks and more widely distributed networks.
The future of H.323 is a subject of debate. If the media is any measure, it doesn’t look good for H.323; it hardly ever gets mentioned (certainly not with the regularity of SIP). H.323 is often regarded as technically superior to SIP, but, as with so many other technologies, that sort of thing is seldom the deciding factor in whether technology enjoys success. One of the factors that makes H.323 unpopular is its complexity—although many argue that the once-simple SIP is starting to suffer from the same problem.
H.323 still carries by far the majority of worldwide carrier VoIP traffic, but as people become less and less dependent on traditional carriers for their telecom needs, the future of H.323 becomes more difficult to predict with any certainty. While H.323 may not be the protocol of choice for new implementations, we can certainly expect to have to deal with H.323 interoperability issues for some time to come.
H.323 is a relatively secure protocol and does not require many security considerations beyond those that are common to any network communicating with the Internet. Since H.323 uses the RTP protocol for media communications, it does not natively support encrypted media paths. The use of a VPN or other encrypted tunnel between endpoints is the most common way of securely encapsulating communications. Of course, this has the disadvantage of requiring the establishment of these secure tunnels between endpoints, which may not always be convenient (or even possible). As VoIP becomes used more often to communicate with financial institutions such as banks, we’re likely to require extensions to the most commonly used VoIP protocols to natively support strong encryption methods.
The H.323 standard uses the Internet Engineering Task Force (IETF) RTP protocol to transport media between endpoints. Because of this, H.323 has the same issues as SIP when dealing with network topologies involving NAT. The easiest method is to simply forward the appropriate ports through your NAT device to the internal client.
To receive calls, you will always need to forward TCP port 1720 to the client. In addition, you will need to forward the UDP ports for the RTP media and RTCP control streams (see the manual for your device for the port range it requires). Older clients, such as Microsoft NetMeeting, will also require TCP ports forwarded for H.245 tunneling (again, see your client’s manual for the port number range).
If you have a number of clients behind the NAT device, you will need to use a gatekeeper running in proxy mode. The gatekeeper will require an interface attached to the private IP subnet and the public Internet. Your H.323 client on the private IP subnet will then register to the gatekeeper, which will proxy calls on the clients’ behalf. Note that any external clients that wish to call you will also be required to register with the proxy server.
At this time, Asterisk can’t act as an H.323 gatekeeper. You’ll have to use a separate application, such as the open source OpenH323 Gatekeeper (http://www.gnugk.org).
The Media Gateway Control Protocol (MGCP) also comes to us from the IETF. While MGCP deployment is more widespread than one might think, it is quickly losing ground to protocols such as SIP and IAX. Still, Asterisk loves protocols, so naturally it has rudimentary support for it.
MGCP is defined in RFC 3435.[107] It was designed to make the end devices (such as phones) as simple as possible, and have all the call logic and processing handled by media gateways and call agents. Unlike SIP, MGCP uses a centralized model. MGCP phones cannot directly call other MGCP phones; they must always go through some type of controller.
Asterisk supports MGCP through the chan_mgcp.so module, and the endpoints are defined in the configuration file mgcp.conf. Since Asterisk provides only basic call agent services, it cannot emulate an MGCP phone (to register to another MGCP controller as a user agent, for example).
If you have some MGCP phones lying around, you will be able to use them with Asterisk. If you are planning to put MGCP phones into production on an Asterisk system, keep in mind that the community has moved on to more popular protocols, and you will therefore need to budget your software support needs accordingly. If possible (for example, with Cisco phones), you should upgrade MGCP phones to SIP.
Finally, let’s take a look at two proprietary protocols that are supported in Asterisk.
The Skinny Client Control Protocol (SCCP) is proprietary to Cisco VoIP equipment. It is the default protocol for endpoints on a Cisco Call Manager PBX.[108] Skinny is supported in Asterisk, but if you are connecting Cisco phones to Asterisk, it is generally recommended that you obtain SIP images for any phones that support it and connect via SIP instead.
Support for Nortel’s proprietary VoIP protocol, UNISTIM, means that Asterisk is the first PBX in history to natively support proprietary IP terminals from the two biggest players in VoIP—Nortel and Cisco. UNISTIM support is totally experimental, and does not work well enough to put into production, but the fact that somebody took the trouble to do this demonstrates the power of the Asterisk platform.
Codecs are generally understood to be various mathematical models used to digitally encode (and compress) analog audio information. Many of these models take into account the human brain’s ability to form an impression from incomplete information. We’ve all seen optical illusions; likewise, voice-compression algorithms take advantage of our tendency to interpret what we believe we should hear, rather than what we actually hear.[109] The purpose of the various encoding algorithms is to strike a balance between efficiency and quality.[110]
Originally, the term codec referred to a COder/DECoder: a device that converts between analog and digital. Now, the term seems to relate more to COmpression/DECompression.
Before we dig into the individual codecs, take a look at Table 8.1, “Codec quick reference”—it’s a quick reference that you may want to refer back to.
Table 8.1. Codec quick reference
|
Codec |
Data bitrate (Kbps) |
License required? |
|---|---|---|
|
G.711 |
64 Kbps |
No |
|
G.726 |
16, 24, 32, or 40 Kbps |
No |
|
G.729A |
8 Kbps |
Yes (no for passthrough) |
|
GSM |
13 Kbps |
No |
|
iLBC |
13.3 Kbps (30-ms frames) or 15.2 Kbps (20-ms frames) |
No |
|
Speex |
Variable (between 2.15 and 22.4 Kbps) |
No |
G.711 is the fundamental codec of the PSTN. In fact, if someone refers to PCM (discussed in the previous chapter) with respect to a telephone network, you are allowed to think of G.711. Two companding methods are used: μlaw in North America and alaw in the rest of the world. Either one delivers an 8-bit word transmitted 8,000 times per second. If you do the math, you will see that this requires 64,000 bits to be transmitted per second.
Many people will tell you that G.711 is an uncompressed codec. This is not exactly true, as companding is considered a form of compression. What is true is that G.711 is the base codec from which all of the others are derived.
G.711 imposes minimal (almost zero) load on the CPU.
This codec has been around for some time (it used to be G.721, which is now obsolete), and it is one of the original compressed codecs. It is also known as Adaptive Differential Pulse-Code Modulation (ADPCM), and it can run at several bitrates. The most common rates are 16 Kbps, 24 Kbps, and 32 Kbps. As of this writing, Asterisk currently supports only the ADPCM-32 rate, which is far and away the most popular rate for this codec.
G.726 offers quality nearly identical to G.711, but it uses only half the bandwidth. This is possible because rather than sending the result of the quantization measurement, it sends only enough information to describe the difference between the current sample and the previous one. G.726 fell from favor in the 1990s due to its inability to carry modem and fax signals, but because of its bandwidth/CPU performance ratio it is now making a comeback. G.726 is especially attractive because it does not require a lot of computational work from the system.
Considering how little bandwidth it uses, G.729A delivers impressive sound quality. It does this through the use of Conjugate-Structure Algebraic-Code-Excited Linear Prediction (CS-ACELP).[111] Because of patents, you can’t use G729A without paying a licensing fee; however, it is extremely popular and is, thus, well supported on many different phones and systems.
To achieve its impressive compression ratio, this codec requires an equally impressive amount of effort from the CPU. In an Asterisk system, the use of heavily compressed codecs will quickly bog down the CPU.
G.729A uses 8 Kbps of bandwidth.
GSM is the darling codec of Asterisk. This codec does not come encumbered with a licensing requirement the way that G.729A does, and it offers outstanding performance with respect to the demand it places on the CPU. The sound quality is generally considered to be of a lesser grade than that produced by G.729A, but much of this comes down to personal opinion; be sure to try it out. GSM operates at 13 Kbps.
The Internet Low Bitrate Codec (iLBC) provides an attractive mix of low bandwidth usage and quality, and it is especially well suited to sustaining reasonable quality on lossy network links.
Naturally, Asterisk supports it (and support elsewhere is growing), but it is not as popular as the ITU codecs and, thus, may not be compatible with common IP telephones and commercial VoIP systems. IETF RFCs 3951 and 3952 have been published in support of iLBC, and iLBC is on the IETF standards track.
Because iLBC uses complex algorithms to achieve its high levels of compression, it has a fairly high CPU cost in Asterisk.
While you are allowed to use iLBC without paying royalty fees, the holder of the iLBC patent, Global IP Sound (GIPS), wants to know whenever you use it in a commercial application. The way you do that is by downloading and printing a copy of the iLBC license, signing it, and returning it to GIPS. If you want to read about iLBC and its license, you can do so at http://www.ilbcfreeware.org.
iLBC operates at 13.3 Kbps (30 ms frames) and 15.2 Kbps (20 ms frames).
Speex is a variable bitrate (VBR) codec, which means that it is able to dynamically modify its bitrate to respond to changing network conditions. It is offered in both narrowband and wideband versions, depending on whether you want telephone quality or better.
Speex is a totally free codec, licensed under the Xiph.org variant of the BSD license.
An Internet draft for Speex is available, and more information about Speex can be found at its home page (http://www.speex.org).
Speex can operate at anywhere from 2.15 to 22.4 Kbps, due to its variable bitrate.
Sure thing, MP3 is a codec. Specifically, it’s the Moving Picture Experts Group Audio Layer 3 Encoding Standard.[112] With a name like that, it’s no wonder we call it MP3! In Asterisk, the MP3 codec is typically used for Music on Hold (MoH). MP3 is not a telephony codec, as it is optimized for music, not voice; nevertheless, it’s very popular with VoIP telephony systems as a method of delivering Music on Hold.
Quality of Service, or QoS as it’s more popularly termed, refers to the challenge of delivering a time-sensitive stream of data across a network that was designed to deliver data in an ad hoc, best-effort sort of way. Although there is no hard rule, it is generally accepted that if you can deliver the sound produced by the speaker to the listener’s ear within 150 milliseconds, a normal flow of conversation is possible. When delay exceeds 300 milliseconds, it becomes difficult to avoid interrupting each other. Beyond 500 milliseconds, normal conversation becomes increasingly awkward and frustrating.
In addition to getting it there on time, it is also essential to ensure that the transmitted information arrives intact. Too many lost packets will prevent the far end from completely reproducing the sampled audio, and gaps in the data will be heard as static or, in severe cases, entire missed words or sentences. Even packet loss of 5 percent can severely impede a VoIP network.
If you’re going to send data on an IP-based network, it will be transported using one of the three transport protocols discussed here.
The Transmission Control Protocol (TCP) is almost never used for VoIP, for while it does have mechanisms in place to ensure delivery, it is not inherently in any hurry to do so. Unless you have an extremely low-latency interconnection between the two endpoints, TCP will tend to cause more problems than it solves.
The purpose of TCP is to guarantee the delivery of packets. In order to do this, several mechanisms are implemented, such as packet numbering (for reconstructing blocks of data), delivery acknowledgment, and re-requesting lost packets. In the world of VoIP, getting the packets to the endpoint quickly is paramount—but 20 years of cellular telephony has trained us to tolerate a few lost packets.[113]
TCP’s high processing overhead, state management, and acknowledgment of arrival work well for transmitting large amounts of data, but they simply aren’t efficient enough for real-time media communications.
Unlike TCP, the User Datagram Protocol (UDP) does not offer any sort of delivery guarantee. Packets are placed on the wire as quickly as possible and released into the world to find their way to their final destinations, with no word back as to whether they got there or not. Since UDP itself does not offer any kind of guarantee that the data will arrive,[114] it achieves its efficiency by spending very little effort on what it is transporting.
Approved by the IETF as a proposed standard in RFC 2960, SCTP is a relatively new transport protocol. From the ground up, it was designed to address the shortcomings of both TCP and UDP, especially as related to the types of services that used to be delivered over circuit-switched telephony networks.
Some of the goals of SCTP were:
Better congestion-avoidance techniques (specifically, avoiding Denial of Service attacks)
Strict sequencing of data delivery
Lower latency for improved real-time transmissions
By overcoming the major shortcomings of TCP and UDP, the SCTP developers hoped to create a robust protocol for the transmission of SS7 and other types of PSTN signaling over an IP-based network.
Differentiated service, or DiffServ, is not so much a QoS mechanism as a method by which traffic can be flagged and given specific treatment. Obviously, DiffServ can help to provide QoS by allowing certain types of packets to take precedence over others. While this will certainly increase the chance of a VoIP packet passing quickly through each link, it does not guarantee anything.
The ultimate guarantee of QoS is provided by the PSTN. For each conversation, a 64 Kbps channel is completely dedicated to the call; the bandwidth is guaranteed. Similarly, protocols that offer guaranteed service can ensure that a required amount of bandwidth is dedicated to the connection being served. As with any packetized networking technology, these mechanisms generally operate best when traffic is below maximum levels. When a connection approaches its limits, it is next to impossible to eliminate degradation.
Multiprotocol Label Switching (MPLS) is a method for engineering network traffic patterns independent of layer-3 routing tables. The protocol works by assigning short labels (MPLS frames) to network packets, which routers then use to forward the packets to the MPLS egress router, and ultimately to their final destinations. Traditionally, routers make an independent forwarding decision based on an IP table lookup at each hop in the network. In an MPLS network, this lookup is performed only once, when the packet enters the MPLS cloud at the ingress router. The packet is then assigned to a stream, referred to as a Label Switched Path (LSP), and identified by a label. The label is used as a lookup index in the MPLS forwarding table, and the packet traverses the LSP independent of layer-3 routing decisions. This allows the administrators of large networks to fine-tune routing decisions and make the best use of network resources. Additionally, information can be associated with a label to prioritize packet forwarding.
MPLS contains no method to dynamically establish LSPs, but you can use the Reservation Protocol (RSVP) with MPLS. RSVP is a signaling protocol used to simplify the establishment of LSPs and to report problems to the MPLS ingress router. The advantage of using RSVP in conjunction with MPLS is the reduction in administrative overhead. If you don’t use RSVP with MPLS, you’ll have to go to every single router and configure the labels and each path manually. Using RSVP makes the network more dynamic by distributing control of labels to the routers. This enables the network to become more responsive to changing conditions, because it can be set up to change the paths based on certain conditions, such as a certain path going down (perhaps due to a faulty router). The configuration within the router will then be able to use RSVP to distribute new labels to the routers in the MPLS network, with no (or minimal) human intervention.
The simplest, least expensive approach to QoS is not to provide it at all—the “best effort” method. While this might sound like a bad idea, it can in fact work very well. Any VoIP call that traverses the public Internet is almost certain to be best-effort, as QoS mechanisms are not yet common in this environment.
You may not realize it, but echo has been a problem in the PSTN for as long as there have been telephones. You probably haven’t often experienced it, because the telecom industry has spent large sums of money designing expensive echo cancellation devices. Also, when the endpoints are physically close—e.g., when you phone your neighbor down the street—the delay is so minimal that anything you transmit will be returned back so quickly that it will be indistinguishable from the sidetone[115] normally occurring in your telephone. So the fact of the matter is that there is echo on your local calls much of the time, but you cannot perceive it with a regular telephone because it happens almost instantaneously. It may be helpful to understand this if you consider that when you stand in a room and speak, everything you say echos back to you off of the walls and ceiling (and possibly floor if it’s not carpeted), but does not cause any problems because it happens so fast you do not perceive a delay.
The reason that VoIP telephone systems such as Asterisk can experience echo is that the addition of a VoIP telephone introduces a slight delay. It takes a few milliseconds for the packets to travel from your phone and the server (and vice versa). Suddenly there is an appreciable delay, which allows you to perceive the echo that was always there, but never had a delay before.
Before we discuss measures to deal with echo, let’s first take a look at why echo occurs in the analog world.
If you hear echo, it’s not your phone that’s causing the problem; it’s the far end of the circuit. Conversely, echo heard on the far end is being generated at your end. Echo can be caused by the fact that an analog local loop circuit has to transmit and receive on the same pair of wires. If this circuit is not electrically balanced, or if a low-quality telephone is connected to the end of the circuit, signals it receives can be reflected back, becoming part of the return transmission. When this reflected circuit gets back to you, you will hear the words you spoke just moments before. Humans will perceive an echo beyond a certain amount of delay (possibly as low as 20 milliseconds for some people). This echo will become annoying as the delay increases.
In a cheap telephone, it is possible for echo to be generated in the body of the handset. This is why some cheap IP phones can cause echo even when the entire end-to-end connection does not contain an analog circuit.[116] In the VoIP world, echo is usually introduced either by an analog circuit somewhere in the connection, or by a cheap endpoint reflecting back some of the signal (e.g., feedback through a hands-free or poorly designed handset or headset). The greater the latency on the network, the more annoying this echo can be.
In the zconfig.h configuration file, you can choose from one of several echo-canceller algorithms, with the default being MARK2. Experiment with the various echo cancellers on your network to determine the best one for your environment. Asterisk also has an option in the zconfig.h file to make the echo cancellation more aggressive. You can enable it by uncommenting the following line:
#define AGGRESSIVE_SUPPRESSOR
Note that aggressive echo cancellation can create a walkie-talkie, half-duplex effect. It should be enabled only if all other methods of reducing echo have failed.
Enable echo cancellation for Zaptel interfaces in the
zapata.conf file. The default configuration enables
echo cancellation with echocancel=yes. echocancelwhenbridged=yes will enable echo
cancellation for TDM bridged calls. While bridged calls should not
require echo cancellation, this may improve call quality.
When echo cancellation is enabled, the echo canceller learns of
echo on the line by listening for it for the duration of the call.
Consequently, echo may be heard at the beginning of a call and
eventually lessen after a period of time. To avoid this situation, you
can employ a method called echo training, which
will mute the line briefly at the beginning of a call, and then send a
tone from which the amount of echo on the line can be determined. This
allows Asterisk to deal with the echo more quickly. Echo training can be
enabled with echotraining=yes.
The most effective way to handle echo cancellation is not in software. If you are planning on deploying a good quality system, spend the extra money and purchase cards for the system that have onboard hardware echo cancellation. These cards are somewhat more expensive, but they quickly pay for themselves in terms of reduced load on the CPU, as well as reduced load on you due to less user complaints.
It should come as no surprise that Asterisk loves to talk VoIP. But in order to do so, Asterisk needs to know which function it is to perform: that of client, server, or both. One of the most complex and often confusing concepts in Asterisk is the naming scheme of inbound and outbound authentication.
Connections that authenticate to us, or that we authenticate, are defined in the iax.conf and sip.conf files as users and peers. Connections that do both may be defined as friends. When determining which way the authentication is occurring, it is always important to view the direction of the channels from Asterisk’s viewpoint, as connections are being accepted and created by the Asterisk server.
A connection defined as a user is any system/user/endpoint that we allow to connect to
us. Keep in mind that a user
definition does not provide a method with which to call that user; the
user type is used simply to create
a channel for incoming calls.[117] A user definition
will require a context name to be defined to indicate where the
incoming authenticated call will enter the dialplan (in
extensions.conf).
A connection defined as a peer type is an outgoing connection. Think of it this way:
users place calls to us, while we place calls to
our peers. Since peers do not place calls to us,
a peer definition does not
typically require the configuration of a context name. However, there
is one exception: if calls that originate from your system are
returned to your system in a loopback, the incoming calls (which
originate from a SIP proxy, not a user agent) will be matched on the
peer definition. The default context should handle these incoming
calls appropriately, although it’s preferable for contexts to be
defined for them on a per-peer basis.[118]
In order to know where to send a call to a host, we must know
its location in relation to the Internet (that is, its IP address).
The location of a peer may be defined either
statically or dynamically. A dynamic peer is
configured with host=dynamic under
the peer definition heading. Because the IP address of a dynamic
peer may change constantly, it must register with the
Asterisk box to let it know what its IP address is, so calls can
successfully be routed to it. If the remote end is another Asterisk
box, the use of a register
statement is required, as discussed below.
Defining a type as a friend
is a shortcut for defining it as both a user and a peer. However, connections that are both a
user and a peer aren’t always
defined this way, because defining each direction of call creation
individually (using both a user and
a peer definition) allows more
granularity and control over the individual connections.
Figure 8.2, “Call origination relationships of users, peers, and friends to Asterisk” shows the flow of authentication control in relation to Asterisk.
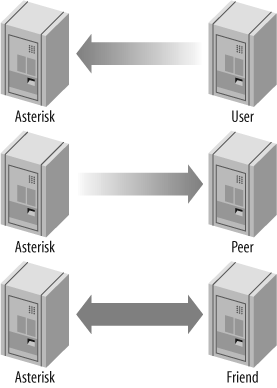
A register statement is a way of telling a remote peer where your Asterisk box
is in relation to the Internet. Asterisk uses register statements to authenticate to remote
providers when you are employing a dynamic IP address, or when the
provider does not have your IP address on record. There are situations
when a register statement is not
required, but to demonstrate when a register statement is
required, let’s look at an example.
Say you have a remote peer that is providing DID services to you. When someone calls the number +1-800-555-1212, the call goes over the physical PSTN network to your service provider and into its Asterisk server, possibly over its T1 connection. This call is then routed to your Asterisk server via the Internet.
Your service provider will have a definition in either its
sip.conf or iax.conf
configuration file (depending on whether you are connecting with the SIP
or IAX protocol, respectively) for your Asterisk server. If you receive
calls only from this provider, you would define them as a user (if it
was another Asterisk system, you might be defined in its system as a
peer).
Now let’s say that your box is on your home Internet connection,
with a dynamic IP address. Your service provider has a static IP address
(or perhaps a fully qualified domain name), which you place in your
configuration file. Since you have a dynamic address, your service
provider specifies host=dynamic in
its configuration file. In order to know where to route your
+1-800-555-1212 call, your service provider needs to know where you are
located in relation to the Internet. This is where the register statement comes into use.
The register statement is a way
of authenticating and telling your peer where you
are. In the [general] section of your
configuration file, you place a statement similar to this:
register => username:secret@my_remote_peer
You can verify a successful register with the use of the iax2 show registry and sip show registry commands at the Asterisk
console.
In this book we can barely scratch the surface of the complex matter of VoIP security; therefore before we dig in, we want to steer you in the direction of the VoIP Security Alliance (http://www.voipsa.org). This fantastic resource contains an excellent mailing list, white papers, howtos, and a general compendium of all matters relating to VoIP security. Just as email has been abused by the selfish and criminal, so too will voice. The fine folks at VoIPSA are doing what they can to ensure that we address these challenges now, before they become an epidemic. In the realm of books on the subject, we recommend the most excellent Hacking Exposed VoIP by David Endler and Mark Collier (McGraw-Hill Osborne Media). If you are responsible for deploying any VoIP system, you need to be aware of this stuff.
We don’t want to think about this, but we know it’s coming. The simple fact is that there are people in this world who lack certain social skills, and, coupled with a kind of mindless greed, these folks think nothing of flooding the Internet with massive volumes of email. These same types of characters will similarly think little of doing the same with voice. We already know what it’s like to get flooded with telemarketing calls; try to imagine what happens when it costs the telemarketer almost nothing to send voice spam. Regulation has not stopped email spam, and it will probably not stop voice spam, so it will be up to us to prevent it.
If you can sniff the packets coming out of an Asterisk system, you can extract the audio from the RTP streams. This data can be fed offline to a speech processing system, which can listen for keywords such as “credit card number” or “PIN”, and present that data to someone who has an interest in it. The stream can also be evaluated to see if there are DTMF tones embedded in it, which is dangerous because many services ask for password and credit card information input via the dialpad. In business, strategic information could also be gleaned from being able to capture and evaluate audio.
Using Secure RTP can combat this problem by encrypting the RTP streams; however, Asterisk does not support SRTP as of this writing. Work is under way to provide SRTP support (a patch exists in the trunk release, but it is not known as of this writing whether this will be back-ported to 1.4).
In the traditional telephone network, it is very difficult to successfully adopt someone else’s identity. Your activities can (and will) be traced back to you, and the authorities will quickly put an end to the fun. In the world of IP, it is much easier to remain anonymous. As such, it is no stretch to imagine that hordes of enterprising criminals will only be too happy to make calls to your credit card company or bank, pretending to be you. If a trusted mechanism is not discovered to combat spoofing, we will quickly learn that we cannot trust VoIP calls.
The first thing to keep in mind when considering security on a VoIP system is that VoIP is based on network protocols, and needs be evaluated from that perspective. This is not to say that traditional telecom security should be ignored, but we need to pay attention to the underlying network.
One of the most effective things that can be done is to secure access to the voice network. The use of firewalls and VLANs are examples of how this can be achieved. By default, the voice network should be accessible only to those things that have a need. For example, if you do not have any softphones in use, do not allow client PCs access to the voice network.
Unless there is a need to have voice and data on the same network, there may be some value in keeping them separate (this can have other benefits as well, such as simplifying QoS configurations). It is not unheard of to build the internal voice network on a totally separate LAN, using existing CAT3 cabling and terminating on inexpensive network switches. It can be less expensive too.
Placing your VoIP system in a DMZ can provide an additional layer of protection for your LAN, while still allowing connectivity for relevant applications. Should your VoIP system be compromised, it will be much more difficult to use it to launch an attack on the rest of your network, since it is not trusted. Regardless of whether you deploy within a DMZ, any abnormal traffic coming out of the system should be suspect.
Hardening your Asterisk server is critical. Not only are there performance benefits to doing this (running nonessential processes can eat up valuable CPU and RAM), the elimination of anything not required will reduce the chance that an exploited vulnerability in the operating system can be used to gain access and launch an attack on other parts of your network.
Running Asterisk as non-root is an essential part of system hardening. See Chapter 11, The Asterisk GUI Framework for more information.
Even though Asterisk does not yet fully support SRTP, it is still possible to encrypt VoIP traffic. For example, between sites a VPN could be employed. Consideration should be given to the performance cost of this, but in general this can be a very effective way to secure VoIP traffic and it is relatively simple to implement.
Physical security should not be ignored. All terminating equipment (such as switches, routers, and the PBX itself) should be secured in an environment that can only be accessed by authorized persons. At the user end (such as under desks), it can be more difficult to deliver physical security, but if the network responds only to devices that it is familiar with (such as restricting DHCP to devices whose MAC is known), unauthorized intrusion can be mitigated somewhat.
If you listen to the buzz in the telecom industry, you might think that VoIP is the future of telephony. But to Asterisk, VoIP is more a case of “been there, done that.” For Asterisk, the future of telephony is much more exciting. We’ll take a look at that vision a bit later, in Chapter 15, Asterisk: The Future of Telephony. In the next chapter, we are going to delve into one of the more revolutionary and powerful concepts of Asterisk: AGI, the Asterisk Gateway Interface.
[101] This word hasn’t quite made it into the dictionary, but it is a term that is becoming more and more common. It refers to the process of chopping a steady stream of information into discrete chunks (or packets), suitable for delivery independently of one another.
[102] It sounds like the name of a Dutch football team.
[103] Go ahead. Say it. Now that sounds much better, doesn’t it?
[104] Officially, the current version is IAX2, but all support for IAX1 has been dropped, so whether you say “IAX” or “IAX2,” it is expected that you are talking about the same version.
[105] Having just called SIP simple, it should be noted that it is by no means lightweight. It has been said that if one were to read all of the IETF RFCs that are relevant to SIP, one would have more than 3,000 pages of reading to do. SIP is quickly earning a reputation for being far too bloated, but that does nothing to lessen its popularity.
[106] RFC 3261, SIP: Session Initiation Protocol, p. 9, Section 2.
[107] RFC 3435 obsoletes RFC 2705.
[108] Cisco has recently announced that it will be migrating toward SIP in its future products.
[109] “Aoccdrnig to rsereach at an Elingsh uinervtisy, it deosn’t mttaer in waht oredr the ltteers in a wrod are, the olny iprmoetnt tihng is taht frist and lsat ltteres are in the rghit pclae. The rset can be a toatl mses and you can sitll raed it wouthit a porbelm. Tihs is bcuseae we do not raed ervey lteter by istlef, but the wrod as a wlohe.” (The source of this quote is unknown―see http://www.bisso.com/ujg_archives/000228.html.) We do the same thing with sound―if there is enough information, our brain can fill in the gaps.
[110] On an audio CD, quality is far more important than saving bandwidth, so the audio is quantized at 16 bits (times 2, as it’s stereo), with a sampling rate of 44,100 Hz. Considering that the CD was invented in the late 1970s, this was quite impressive stuff back then. The telephone network does not require this level of quality (and needs to optimize bandwidth), so telephone signals are encoded using 8 bits, at a sampling frequency of 8,000 Hz.
[111] CELP is a popular method of compressing speech. By mathematically modeling the various ways humans make sounds, a codebook of sounds can be built. Rather than sending an actual sampled sound, a code corresponding to the sound is determined. CELP codecs take this information (which by itself would produce a very robot-like sound) and attempt to add the personality back in. (Of course, there is much more to it than that.) Jason Woodward’s Speech Coding page (http://www-mobile.ecs.soton.ac.uk/speech_codecs/) is a source of helpful information for the non-mathematically inclined. This is fairly heavy stuff, though, so wear your thinking cap.
[112] If you want to learn all about MPEG audio, do a web search for Davis Pan’s paper titled “A Tutorial on MPEG/Audio Compression.”
[113] The order of arrival is important in voice communication, because the audio will be processed and sent to the caller ASAP. However, with a jitter buffer the order of arrival isn’t as important, as it provides a small window of time in which the packets can be reordered before being passed on to the caller.
[114] Keep in mind that the upper-layer protocols or applications can implement their own packet-acknowledgment systems.
[115] As discussed in Chapter 7, Understanding Telephony, sidetone is a function in your telephone that returns part of what you say back to your own ear, to provide a more natural-sounding conversation.
[116] Actually, the handset in any phone, be it traditional or VoIP, is an analog connection.
[117] In SIP, this is not always the case. If
the endpoint is a SIP proxy service (as opposed to a user agent),
Asterisk will authenticate based on the peer definition, matching the IP address
and port in the Contact field
of the SIP header against the hostname (and port, if specified)
defined for the peer (if the port is not specified, the one
defined in the [general]
section will be used). See the discussion of the SIP insecure option in Appendix A, VoIP Channels for more on this subject.
[118] For more information on this topic, see the discussion of
the SIP context option in Appendix A, VoIP Channels.
Table of Contents
Even he, to whom most things that most people would think were pretty smart were pretty dumb, thought it was pretty smart.
The Asterisk Gateway Interface, or AGI, provides a standard interface by which external programs may control the Asterisk dialplan. Usually, AGI scripts are used to do advanced logic, communicate with relational databases (such as PostgreSQL or MySQL), and access other external resources. Turning over control of the dialplan to an external AGI script enables Asterisk to easily perform tasks that would otherwise be difficult or impossible.
This chapter covers the fundamentals of AGI communication. It will not teach you how to be a programmer—rather, we’ll assume that you’re already a competent programmer, so that we can show you how to write AGI programs. If you don’t know how to do computer programming, this chapter probably isn’t for you, and you should skip ahead to the next chapter.
Over the course of this chapter, we’ll write a sample AGI program in each of the Perl, PHP, and Python programming languages. Note, however, that because Asterisk provides a standard interface for AGI scripts, these scripts can be written in almost any modern programming language. We’ve chosen to highlight Perl, PHP, and Python because they’re the languages most commonly used for AGI programming.
Instead of releasing an API for programming, AGI scripts communicate
with Asterisk over communications channels (file handles, in programming
parlance) known as STDIN, STDOUT, and STDERR. Most computer programmers will recognize
these channels, but just in case you’re not familiar with them, we’ll
cover them here.
STDIN , STDOUT , and STDERR are channels by which programs in
Unix-like environments receive information from and send information to
external programs. STDIN, or
standard input, is the information that is sent to
the program, either from the keyboard or from another program. In our
case, information coming from Asterisk itself comes in on the program’s
STDIN file handle. STDOUT, or standard
output, is the file handle that the AGI script uses to pass
information back to Asterisk. Finally, the AGI script can use the
STDERR (standard
error) file handle to write error messages to the Asterisk
console.
Let’s sum up these three communications concepts:
An AGI script reads from
STDINto get information from Asterisk.An AGI script writes data to
STDOUTto send information to Asterisk.An AGI script may write data to
STDERRto send debug information to the Asterisk console.
Warning
At this time, writing to STDERR from within your AGI script writes
the information only to the first Asterisk
console—that is, the first Asterisk console started with the -c parameters.
This is rather unfortunate, and will hopefully be remedied soon by the Asterisk developers.
If you’re using the safe_asterisk program to start Asterisk (which you probably are), it starts a remote console on TTY9. (Try pressing Ctrl-Alt-F9, and see if you get an Asterisk command-line interface.) This means that all of the AGI debug information will print on only that remote console. You may want to disable this console in safe_asterisk to allow you to see the debug information in another console. (You may also want to disable that console for security reasons, as you might not want just anyone to be able to walk up to your Asterisk server and have access to a console without any kind of authentication.)
The communication between Asterisk and an AGI script follows a predefined pattern. Let’s enumerate the steps, and then we’ll walk through one of the sample AGI scripts that come with Asterisk.
When an AGI script starts, Asterisk sends a list of variables and their values to the AGI script. The variables might look something like this:
agi_request: test.py agi_channel: Zap/1-1 agi_language: en agi_callerid: agi_context: default agi_extension: 123 agi_priority: 2
After sending these variables, Asterisk sends a blank line. This is the signal that Asterisk is done sending the variables, and it is time for the AGI script to control the dialplan.
At this point, the AGI script sends commands to Asterisk by
writing to STDOUT. After the script
sends each command, Asterisk sends a response that the AGI script should
read. These actions (sending commands to Asterisk and reading the
responses) can continue for the duration of the AGI script.
You may be asking yourself what commands you can use from within your AGI script. Good question—we’ll cover the basic commands shortly.[119]
In order to work properly, your AGI script must be executable. To use an AGI script
inside your dialplan, simply call the AGI() application, with the name of the AGI
script as the argument, like this:
exten => 123,1,Answer() exten => 123,2,AGI(agi-test.agi)
AGI scripts often reside in the AGI directory (usually located in /var/lib/asterisk/agi-bin), but you can specify the complete path to the AGI script.
In this chapter, we’ll first cover the sample agi-test.agi script that comes with Asterisk (which was written in Perl), then write a weather report AGI program in PHP, and finish up by writing an AGI program in Python to play a math game.
Asterisk comes with a sample AGI script called agi-test.agi. Let’s step through the file while we cover the core concepts of AGI programming. While this particular script is written in Perl, please remember that your own AGI programs may be written in almost any programming language. Just to prove it, we’re going to cover AGI programming in a couple of other languages later in the chapter.
Let’s get started! We’ll look at each section of the code in turn, and describe what it does:
#!/usr/bin/perl
This line tells the system that this particular script is written in Perl, so it should use the Perl interpreter to execute the script. If you’ve done much Linux or Unix scripting, this line should be familiar to you. This line assumes, of course, that your Perl binary is located in the /usr/bin/ directory. Change this to match the location of your Perl interpreter.
use strict;
use strict tells Perl to act, well, strict about possible programming
errors, such as undeclared variables. While not absolutely necessary,
enabling this will help you avoid common programming pitfalls.
$|=1;
This line tells Perl not to buffer its output—in other words, that it should write any data immediately, instead of waiting for a block of data before outputting it. You’ll see this as a recurring theme throughout the chapter.
# Set up some variables my %AGI; my $tests = 0; my $fail = 0; my $pass = 0;
Warning
You should always use unbuffered output when writing AGI scripts. Otherwise, your AGI may not work as expected, because Asterisk may be waiting for the output of your program, while your program thinks it has sent the output to Asterisk and is waiting for a response.
Here, we set up four variables. The first is a hash called AGI, which is used to store the variables that
Asterisk passes to our script at the beginning of the AGI session. The
next three are scalar values, used to count the total number of tests, the
number of failed tests, and the number of passed tests,
respectively.
while(<STDIN>) {
chomp;
last unless length($_);
if (/^agi_(\w+)\:\s+(.*)$/) {
$AGI{$1} = $2;
}
}As we explained earlier, Asterisk sends a group of variables to the
AGI program at startup. This loop simply takes all of these variables and
stores them in the hash named AGI. They
can be used later in the program or simply ignored, but they should always
be read from STDIN before continuing on
with the logic of the program.
print STDERR "AGI Environment Dump:\n";
foreach my $i (sort keys %AGI) {
print STDERR " -- $i = $AGI{$i}\n";
}This loop simply writes each of the values that we stored in the
AGI hash to STDERR. This is useful for debugging the AGI
script, as STDERR is printed to the
Asterisk console.[120]
sub checkresult {
my ($res) = @_;
my $retval;
$tests++;
chomp $res;
if ($res =~ /^200/) {
$res =~ /result=(-?\d+)/;
if (!length($1)) {
print STDERR "FAIL ($res)\n";
$fail++;
} else {
print STDERR "PASS ($1)\n";
$pass++;
}
} else {
print STDERR "FAIL (unexpected result '$res')\n";
$fail++;
}This subroutine reads in the result of an AGI command from Asterisk and decodes the result to determine whether the command passes or fails.
Now that the preliminaries are out of the way, we can get to the core logic of the AGI script:
print STDERR "1. Testing 'sendfile'..."; print "STREAM FILE beep \"\"\n"; my $result = <STDIN>; &checkresult($result);
This first test shows how to use the STREAM
FILE command. The STREAM FILE
command tells Asterisk to play a sound file to the caller, just as
the Background() application does. In
this case, we’re telling Asterisk to play a file called
beep.gsm.[121]
You will notice that the second argument is passed by putting in a set of double quotes, escaped by backslashes. Without the double quotes to indicate the second argument, this command does not work correctly.
Warning
You must pass all required arguments to the AGI commands. If you want to skip a required argument, you must send empty quotes (properly escaped in your particular programming language), as shown above. If you don’t pass the required number of arguments, your AGI script will not work.
You should also make sure you pass a line feed (the \n on the end of the print statement) at the end of the
command.
After sending the STREAM FILE
command, this test reads the result from STDIN and calls the checkresult subroutine to determine if Asterisk
was able to play the file. The STREAM
FILE command takes three arguments, two of which are
required:
The name of the sound file to play back
The digits that may interrupt the playback
The position at which to start playing the sound, specified in number of samples (optional)
In short, this test told Asterisk to play back the file named beep.gsm, and then it checked the result to make sure the command was successfully executed by Asterisk.
print STDERR "2. Testing 'sendtext'..."; print "SEND TEXT \"hello world\"\n"; my $result = <STDIN>; &checkresult($result);
This test shows us how to call the SEND
TEXT command, which is similar to the SendText() application. This command will
send the specified text to the caller, if the caller’s channel type
supports the sending of text.
The SEND TEXT command takes one
argument: the text to send to the channel. If the text contains spaces (as
in the previous code block), the argument should be encapsulated with
quotes, so that Asterisk will know that the entire text string is a single
argument to the command. Again, notice that the quotation marks are
escaped, as they must be sent to Asterisk, not used to terminate the
string in Perl.
print STDERR "3. Testing 'sendimage'..."; print "SEND IMAGE asterisk-image\n"; my $result = <STDIN>; &checkresult($result);
This test calls the SEND IMAGE
command, which is similar to the SendImage() application. Its single argument is
the name of an image file to send to the caller. As with the SEND TEXT command, this command works only if
the calling channel supports the receiving images.
print STDERR "4. Testing 'saynumber'..."; print "SAY NUMBER 192837465 \"\"\n"; my $result = <STDIN>; &checkresult($result);
This test sends Asterisk the SAY
NUMBER command. This command behaves identically to the SayNumber() dialplan application. It takes two
arguments:
The number to say
The digits that may interrupt the command
Again, since we’re not passing in any digits as the second argument, we need to pass in an empty set of quotes.
print STDERR "5. Testing 'waitdtmf'..."; print "WAIT FOR DIGIT 1000\n"; my $result = <STDIN>; &checkresult($result);
This test shows the WAIT FOR
DIGIT command. This command waits the specified number of milliseconds for
the caller to enter a DTMF digit. If you want the command to wait
indefinitely for a digit, use -1 as the
timeout. This application returns the decimal ASCII value of the digit
that was pressed.
print STDERR "6. Testing 'record'..."; print "RECORD FILE testagi gsm 1234 3000\n"; my $result = <STDIN>; &checkresult($result);
This section of code shows us the RECORD
FILE command. This command is used to record the call audio, similar to
the Record() dialplan application. RECORD FILE
takes seven arguments, the last three of which are optional:
The filename of the recorded file.
The format in which to record the audio.
The digits that may interrupt the recording.
The timeout (maximum recording time) in milliseconds, or
-1for no timeout.The number of samples to skip before starting the recording (optional).
The word
BEEP, if you’d like Asterisk to beep before the recording starts (optional).The number of seconds before Asterisk decides that the user is done with the recording and returns, even though the timeout hasn’t been reached and no DTMF digits have been entered (optional). This argument must be preceded by
s=.
In this particular case, we’re recording a file called testagi (in the GSM format), with any of the DTMF digits 1 through 4 terminating the recording, and a maximum recording time of 3,000 milliseconds.
print STDERR "6a. Testing 'record' playback..."; print "STREAM FILE testagi \"\"\n"; my $result = <STDIN>; &checkresult($result);
The second part of this test plays back the audio that was recorded
earlier, using the STREAM FILE command.
We’ve already covered STREAM FILE, so
this section of code needs no further explanation.
print STDERR "================== Complete ======================\n"; print STDERR "$tests tests completed, $pass passed, $fail failed\n"; print STDERR "==================================================\n";
At the end of the AGI script, a summary of the tests is printed to
STDERR, which should end up on the
Asterisk console.
In summary, you should remember the following when writing AGI programs in Perl:
Turn on strict language checking with the
use strictcommand.[122]Turn off output buffering by setting
$|=1.Data from Asterisk is received using a
while(<STDIN>)loop.Write values with the
printcommand.Use the
print STDERRcommand to write debug information to the Asterisk console.
If you are interested in building your own AGI scripts in Perl,
you may want to check out the Asterisk::AGI Perl
module written by James Golovich, which is located at http://asterisk.gnuinter.net.
The Asterisk::AGI module makes it even easier to
write AGI scripts in Perl.
We promised we’d cover several languages, so let’s go ahead and see what an AGI script in PHP looks like. The fundamentals of AGI programming still apply; only the programming language has changed. In this example, we’ll write an AGI script to download a weather report from the Internet and deliver the temperature, wind direction, and wind speed back to the caller:
#!/usr/bin/php -q <?php
The first line tells the system to use the PHP interpreter to run
this script. The -q option turns off
HTML error messages. You should ensure that there aren’t any extra lines
between the first line and the opening PHP tag, as they’ll confuse
Asterisk.
# change this to match the code of your particular city # for a complete list of U.S. cities, go to # http://www.nws.noaa.gov/data/current_obs/ $weatherURL="http://www.nws.noaa.gov/data/current_obs/KMDQ.xml";
This tells our AGI script where to go to get the current weather conditions. In this example, we’re getting the weather for Huntsville, Alabama. Feel free to visit the web site listed above for a complete list of stations throughout the United States of America.[123]
# don't let this script run for more than 60 seconds set_time_limit(60);
Here, we tell PHP not to let this program run for more than 60 seconds. This is a safety net, which will end the script if for some reason it takes more than 60 seconds to run.
# turn off output buffering ob_implicit_flush(false);
This command turns off output buffering, meaning that all data will be sent immediately to the AGI interface and will not be buffered.
# turn off error reporting, as it will most likely interfere with # the AGI interface error_reporting(0);
This command turns off all error reporting, as it can interfere with the AGI interface. (You might find it helpful to comment out this line during testing.)
# create file handles if needed
if (!defined('STDIN'))
{
define('STDIN', fopen('php://stdin', 'r'));
}
if (!defined('STDOUT'))
{
define('STDOUT', fopen('php://stdout', 'w'));
}
if (!defined('STDERR'))
{
define('STDERR', fopen('php://stderr', 'w'));
}This section of code ensures that we have open file handles
for STDIN, STDOUT, and STDERR, which will handle all communication
between Asterisk and our script.
# retrieve all AGI variables from Asterisk
while (!feof(STDIN))
{
$temp = trim(fgets(STDIN,4096));
if (($temp == "") || ($temp == "\n"))
{
break;
}
$s = split(":",$temp);
$name = str_replace("agi_","",$s[0]);
$agi[$name] = trim($s[1]);
}Next, we’ll read in all of the AGI variables passed to us by
Asterisk. Using the fgets command in
PHP to read the data from STDIN, we’ll
save each variable in the hash called $agi. Remember that we could use these variables
in the logic of our AGI script, although we won’t in this example.
# print all AGI variables for debugging purposes
foreach($agi as $key=>$value)
{
fwrite(STDERR,"-- $key = $value\n");
fflush(STDERR);
}Here, we print the variables back out to STDERR for debugging purposes.
#retrieve this web page $weatherPage=file_get_contents($weatherURL);
This line of code retrieves the XML file from the National Weather
Service and puts the contents into the variable called $weatherPage. This variable will be used later
on to extract the pieces of the weather report that we want.
#grab temperature in Fahrenheit
if (preg_match("/<temp_f>([0-9]+)<\/temp_f>/i",$weatherPage,$matches))
{
$currentTemp=$matches[1];
}This section of code extracts the temperature (in Fahrenheit) from
the weather report, using the preg_match command. This command uses
Perl-compatible regular expressions[124]to extract the needed data.
#grab wind direction
if (preg_match("/<wind_dir>North<\/wind_dir>/i",$weatherPage))
{
$currentWindDirection='northerly';
}
elseif (preg_match("/<wind_dir>South<\/wind_dir>/i",$weatherPage))
{
$currentWindDirection='southerly';
}
elseif (preg_match("/<wind_dir>East<\/wind_dir>/i",$weatherPage))
{
$currentWindDirection='easterly';
}
elseif (preg_match("/<wind_dir>West<\/wind_dir>/i",$weatherPage))
{
$currentWindDirection='westerly';
}
elseif (preg_match("/<wind_dir>Northwest<\/wind_dir>/i",$weatherPage))
{
$currentWindDirection='northwesterly';
}
elseif (preg_match("/<wind_dir>Northeast<\/wind_dir>/i",$weatherPage))
{
$currentWindDirection='northeasterly';
}
elseif (preg_match("/<wind_dir>Southwest<\/wind_dir>/i",$weatherPage))
{
$currentWindDirection='southwesterly';
}
elseif (preg_match("/<wind_dir>Southeast<\/wind_dir>/i",$weatherPage))
{
$currentWindDirection='southeasterly';
}The wind direction is found through the use of preg_match (located in the wind_dir tags) and is assigned to the variable
$currentWindDirection.
#grab wind speed
if (preg_match("/<wind_mph>([0-9.]+)<\/wind_mph>/i",$weatherPage,$matches))
{
$currentWindSpeed = $matches[1];
}Finally, we’ll grab the current wind speed and assign it to the
$currentWindSpeed variable.
# tell the caller the current conditions
if ($currentTemp)
{
fwrite(STDOUT,"STREAM FILE temperature \"\"\n");
fflush(STDOUT);
$result = trim(fgets(STDIN,4096));
checkresult($result);
fwrite(STDOUT,"STREAM FILE is \"\"\n");
fflush(STDOUT);
$result = trim(fgets(STDIN,4096));
checkresult($result);
fwrite(STDOUT,"SAY NUMBER $currentTemp \"\"\n");
fflush(STDOUT);
$result = trim(fgets(STDIN,4096));
checkresult($result);
fwrite(STDOUT,"STREAM FILE degrees \"\"\n");
fflush(STDOUT);
$result = trim(fgets(STDIN,4096));
checkresult($result);
fwrite(STDOUT,"STREAM FILE fahrenheit \"\"\n");
fflush(STDOUT);
$result = trim(fgets(STDIN,4096));
checkresult($result);
}
if ($currentWindDirection && $currentWindSpeed)
{
fwrite(STDOUT,"STREAM FILE with \"\"\n");
fflush(STDOUT);
$result = trim(fgets(STDIN,4096));
checkresult($result);
fwrite(STDOUT,"STREAM FILE $currentWindDirection \"\"\n");
fflush(STDOUT);
$result = trim(fgets(STDIN,4096));
checkresult($result);
fwrite(STDOUT,"STREAM FILE wx/winds \"\"\n");
fflush(STDOUT);
$result = trim(fgets(STDIN,4096));
checkresult($result);
fwrite(STDOUT,"STREAM FILE at \"\"\n";)
fflush(STDOUT);
$result = trim(fgets(STDIN,4096));
checkresult($result);
fwrite(STDOUT,"SAY NUMBER $currentWindSpeed \"\"\n");
fflush(STDOUT);
$result = trim(fgets(STDIN,4096));
checkresult($result);
fwrite($STDOUT,"STREAM FILE miles-per-hour \"\"\n");
fflush(STDOUT);
$result = trim(fgets(STDIN,4096));
checkresult($result);
}Now that we’ve collected our data, we can send AGI commands to
Asterisk (checking the results as we go) that will deliver the current
weather conditions to the caller. This will be achieved through the use of
the STREAM FILE and SAY NUMBER AGI
commands.
We’ve said it before, and we’ll say it again: when calling AGI
commands, you must pass in all of the required arguments. In this case,
both STREAM FILE and SAY NUMBER commands require a second argument;
we’ll pass empty quotes escaped by the backslash character.
You should also notice that we call the fflush command each time we write to STDOUT. While this is arguably redundant,
there’s no harm in ensuring that the AGI command is not buffered and is
sent immediately to Asterisk.
function checkresult($res)
{
trim($res);
if (preg_match('/^200/',$res))
{
if (! preg_match('/result=(-?\d+)/',$res,$matches))
{
fwrite(STDERR,"FAIL ($res)\n");
fflush(STDERR);
return 0;
}
else
{
fwrite(STDERR,"PASS (".$matches[1].")\n");
fflush(STDERR);
return $matches[1];
}
}
else
{
fwrite(STDERR,"FAIL (unexpected result '$res')\n");
fflush(STDERR);
return -1;
}
}The checkresult function is
identical in purpose to the checkresult
subroutine we saw in our Perl example. As its name suggests, it checks the
result that Asterisk returns whenever we call an AGI command.
?>
At the end of the file, we have our closing PHP tag. Don’t place any whitespace after the closing PHP tag, as it can confuse the AGI interface.
We’ve now covered two different languages in order to demonstrate the similarities and differences of programming an AGI script in PHP as opposed to Perl. The following things should be remembered when writing an AGI script in PHP:
Invoke PHP with the -
qswitch; it turns off HTML in error messages.Turn off the time limit, or set it to a reasonable value (newer versions of PHP automatically disable the time limit when PHP is invoked from the command line).
Turn off output buffering with the
ob_implicit_flush(false)command.Open file handles to
STDIN,STDOUT, andSTDERR(newer versions of PHP may have one or more of these file handles already opened; see the previous code for a slick way of making this work across most versions of PHP).Use the
fwritefunction to write toSTDOUTandSTDERR.Always call the
fflushfunction after writing to eitherSTDOUTorSTDERR.
For advanced AGI programming in PHP, you may want to check out the PHPAGI project at http://phpagi.sourceforge.net. It was originally written by Matthew Asham and is being developed by several other members of the Asterisk community.
The AGI script we’ll be writing in Python, called “The Subtraction Game,” was inspired by a Perl program written by Ed Guy and discussed by him at the 2004 AstriCon conference. Ed described his enthusiasm for the power and simplicity of Asterisk when he found he could write a quick Perl script to help his young daughter improve her math skills.
Since we’ve already written a Perl program using AGI, and Ed has already written the math program in Perl, we figured we’d take a stab at it in Python!
Let’s go through our Python script:
#!/usr/bin/python
This line tells the system to run this script in the Python
interpreter. For small scripts, you may consider adding the -u option to this line, which will run Python in unbuffered mode. This
is not recommended, however, for larger or frequently used AGI scripts, as
it can affect system performance.
import sys import re import time import random
Here, we import several libraries that we’ll be using in our AGI script.
# Read and ignore AGI environment (read until blank line)
env = {}
tests = 0;
while 1:
line = sys.stdin.readline().strip()
if line == '':
break
key,data = line.split(':')
if key[:4] <> 'agi_':
#skip input that doesn't begin with agi_
sys.stderr.write("Did not work!\n");
sys.stderr.flush()
continue
key = key.strip()
data = data.strip()
if key <> '':
env[key] = data
sys.stderr.write("AGI Environment Dump:\n");
sys.stderr.flush()
for key in env.keys():
sys.stderr.write(" -- %s = %s\n" % (key, env[key]))
sys.stderr.flush()This section of code reads in the variables that are passed to our
script from Asterisk, and saves them into a dictionary named env. These values are then written to STDERR for debugging purposes.
def checkresult (params):
params = params.rstrip()
if re.search('^200',params):
result = re.search('result=(\d+)',params)
if (not result):
sys.stderr.write("FAIL ('%s')\n" % params)
sys.stderr.flush()
return -1
else:
result = result.group(1)
#debug("Result:%s Params:%s" % (result, params))
sys.stderr.write("PASS (%s)\n" % result)
sys.stderr.flush()
return result
else:
sys.stderr.write("FAIL (unexpected result '%s')\n" % params)
sys.stderr.flush()
return -2The checkresult function is
almost identical in purpose to the checkresult subroutine in the sample Perl AGI
script we covered earlier in the chapter. It reads in the result of an
Asterisk command, parses the answer, and reports whether or not the
command was successful.
def sayit (params):
sys.stderr.write("STREAM FILE %s \"\"\n" % str(params))
sys.stderr.flush()
sys.stdout.write("STREAM FILE %s \"\"\n" % str(params))
sys.stdout.flush()
result = sys.stdin.readline().strip()
checkresult(result)The sayit function is a simple
wrapper around the STREAM FILE
command.
def saynumber (params):
sys.stderr.write("SAY NUMBER %s \"\"\n" % params)
sys.stderr.flush()
sys.stdout.write("SAY NUMBER %s \"\"\n" % params)
sys.stdout.flush()
result = sys.stdin.readline().strip()
checkresult(result)The saynumber function is a
simple wrapper around the SAY NUMBER
command.
def getnumber (prompt, timelimit, digcount):
sys.stderr.write("GET DATA %s %d %d\n" % (prompt, timelimit, digcount))
sys.stderr.flush()
sys.stdout.write("GET DATA %s %d %d\n" % (prompt, timelimit, digcount))
sys.stdout.flush()
result = sys.stdin.readline().strip()
result = checkresult(result)
sys.stderr.write("digits are %s\n" % result)
sys.stderr.flush()
if result:
return result
else:
result = -1The getnumber function calls the
GET DATA command to get DTMF input from the caller. It is used in our
program to get the caller’s answers to the subtraction problems.
limit=20 digitcount=2 score=0 count=0 ttanswer=5000
Here, we initialize a few variables that we’ll be using in our program.
starttime = time.time() t = time.time() - starttime
In these lines we set the starttime variable to the current time and
initialize t to 0. We’ll use the
t variable to keep track of the number
of seconds that have elapsed since the AGI script was started.
sayit("subtraction-game-welcome")Next, we welcome the caller to the subtraction game.
while ( t < 180 ):
big = random.randint(0,limit+1)
big += 10
subt= random.randint(0,big)
ans = big - subt
count += 1
#give problem:
sayit("subtraction-game-next");
saynumber(big);
sayit("minus");
saynumber(subt);
res = getnumber("equals",ttanswer,digitcount);
if (int(res) == ans) :
score+=1
sayit("subtraction-game-good");
else :
sayit("subtraction-game-wrong");
saynumber(ans);
t = time.time() - starttimeThis is the heart of the AGI script. We loop through this section of code and give subtraction problems to the caller until 180 seconds have elapsed. Near the top of the loop, we calculate two random numbers and their difference. We then present the problem to the caller, and read in the caller’s response. If the caller answers incorrectly, we give the correct answer.
pct = float(score)/float(count)*100;
sys.stderr.write("Percentage correct is %d\n" % pct)
sys.stderr.flush()
sayit("subtraction-game-timesup")
saynumber(score)
sayit("subtraction-game-right")
saynumber(count)
sayit("subtraction-game-pct")
saynumber(pct)After the user is done answering the subtraction problems, she is given her score.
As you have seen, the basics you should remember when writing AGI scripts in Python are:
Flush the output buffer after every write. This will ensure that your AGI program won’t hang while Asterisk is waiting for the buffer to fill and Python is waiting for the response from Asterisk.
Read data from Asterisk with the
sys.stdin.readlinecommand.Write commands to Asterisk with the
sys.stdout.writecommand. Don’t forget to callsys.stdout.flushafter writing.
If you are planning on writing lot of Python AGI code, you may want to check out Karl Putland’s Python module, Pyst. You can find it at http://www.sourceforge.net/projects/pyst/.
Debugging AGI programs, as with any other type of program, can be frustrating. Luckily,
there are two advantages to debugging AGI scripts. First, since all of the
communications between Asterisk and the AGI program happen over STDIN and STDOUT (and, of course, STDERR), you should be able to run your AGI
script directly from the operating system. Second, Asterisk has a handy
command for showing all of the communications between itself and the AGI
script: agi debug.
As mentioned above, you should be able to run your program directly from the operating system to see how it behaves. The secret here is to act just like Asterisk does, providing your script with the following:
Trying your program directly from the operating system may help you to more easily spot bugs in your program.
The Asterisk command-line interface has a very useful command for
debugging AGI scripts, which is called (appropriately enough) agi debug. If you type agi debug at an Asterisk console and then run an AGI, you’ll see
something like the following:
-- Executing AGI("Zap/1-1", "temperature.php") in new stack
-- Launched AGI Script /var/lib/asterisk/agi-bin/temperature.php
AGI Tx >> agi_request: temperature.php
AGI Tx >> agi_channel: Zap/1-1
AGI Tx >> agi_language: en
AGI Tx >> agi_type: Zap
AGI Tx >> agi_uniqueid: 1116732890.8
AGI Tx >> agi_callerid: 101
AGI Tx >> agi_calleridname: Tom Jones
AGI Tx >> agi_callingpres: 0
AGI Tx >> agi_callingani2: 0
AGI Tx >> agi_callington: 0
AGI Tx >> agi_callingtns: 0
AGI Tx >> agi_dnid: unknown
AGI Tx >> agi_rdnis: unknown
AGI Tx >> agi_context: incoming
AGI Tx >> agi_extension: 141
AGI Tx >> agi_priority: 2
AGI Tx >> agi_enhanced: 0.0
AGI Tx >> agi_accountcode:
AGI Tx >>
AGI Rx << STREAM FILE temperature ""
AGI Tx >> 200 result=0 endpos=6400
AGI Rx << STREAM FILE is ""
AGI Tx >> 200 result=0 endpos=5440
AGI Rx << SAY NUMBER 67 ""
-- Playing 'digits/60' (language 'en')
-- Playing 'digits/7' (language 'en')
AGI Tx >> 200 result=0
AGI Rx << STREAM FILE degrees ""
AGI Tx >> 200 result=0 endpos=6720
AGI Rx << STREAM FILE fahrenheit ""
AGI Tx >> 200 result=0 endpos=8000
-- AGI Script temperature.php completed, returning 0You’ll see three types of lines while your AGI script is running.
The first type, prefaced with AGI TX
>>, are the lines that Asterisk transmits to your
program’s STDIN. The second type,
prefaced with AGI RX <<, are
the commands your AGI program writes back to Asterisk over STDOUT. The third type, prefaced by --
To disable AGI debugging after it has been started, simply type
agi no debug at an Asterisk
console.
Using the agi debug command
will enable you to see the communication between Asterisk and your
program, which can be very useful when debugging. Hopefully, these two
tips will greatly improve your ability to write and debug powerful AGI
programs.
For a developer, AGI is one of the more revolutionary and compelling reasons to choose Asterisk over a closed, proprietary PBX. Still, AGI is only part of the picture. In Chapter 10, Asterisk Manager Interface (AMI) and Adhearsion, we’ll explore another powerful programming interface known as the Asterisk Manager Interface.
[119] To get a list of available AGI commands, type
show agi
[120] Actually, to the first spawned Asterisk console (i.e., the first
instance of Asterisk called with the -c option). If
safe_asterisk was used to start Asterisk, the
first Asterisk console will be on TTY9, which means that you will not
be able to view AGI errors remotely.
[121] Asterisk automatically selects the best format, based on translation cost and availability, so the file extension is never used in the function.
[122] This advice probably applies to any Perl program you might write, especially if you’re new to Perl.
[123] We apologize to our readers outside of the United States for using a weather service that only works for U.S. cities. If you can find a good international weather service that provides its data in XML, it shouldn’t be too hard to change this AGI script to work with that particular service. Once we find one, we’ll update this script for future editions.
[124] The ultimate guide to regular expressions is O’Reilly’s Mastering Regular Expressions, by Jeffrey E.F. Friedl.
Table of Contents
- The Manager Interface
- The Flash Operator Panel
- Asterisk Development with Adhearsion
Do but take care to express yourself in a plain, easy Manner, in well-chosen, significant and decent Terms, and to give a harmonious and pleasing Turn to your Periods: study to explain your Thoughts, and set them in the truest Light, labouring as much as possible, not to leave them dark nor intricate, but clear and intelligible.
The Asterisk Manager Interface (AMI) is a powerful programmatic interface. It allows external programs to both control and monitor an Asterisk system.[125] This interface is often used to integrate Asterisk with existing business processes and systems, CRM (Customer Relationship Management) software. It can also be used for a wide variety of applications, such as automated dialers and click-to-call systems.
The Asterisk Manager Interface listens for connections on a network port. A client program can then connect to the Asterisk Manager Interface on that port, authenticate itself, and send commands to Asterisk. Asterisk will then respond to the request, as well as update the client program with the status of the system.
To use the Manager, you must define an account in the file /etc/asterisk/manager.conf. This file will look something like this:
[general] enabled = yes port = 5038 bindaddr = 0.0.0.0 [oreilly] secret = notvery ;deny=0.0.0.0/0.0.0.0 ;permit=209.16.236.73/255.255.255.0 read = system,call,log,verbose,command,agent,user write = system,call,log,verbose,command,agent,user
In the [general] section,
you have to enable the service by setting the parameter
enabled = yes. You will need to reload
the Manager in order to have this change take effect (module reload manager from the Asterisk
console). The TCP port defaults to 5038.
Next, you create a section for each user that will authenticate to
the system. For each user, you will specify the username in square
brackets ([ ]), followed by the password for that user (secret), any IP addresses you wish to deny access to, any IP addresses you wish to
permit access to, and the read and write permissions for that user.
Warning
It is very important to understand that other than a clear text password and the ability to restrict IP addresses, there is no security of any kind on the Manager interface. If you are running Manager on an untrusted network (or have any other complex needs), you should consider using David Troy’s excellent AstManProxy to handle all of your connections to the manager API.
It is important to keep in mind that the Manager interface is designed to be used by programs, not fingers. That’s not to say that you can’t issue commands to it directly—just don’t expect a typical console interface, because that’s not what Manager is for.
Commands to Manager are delivered in packages with the following syntax (lines are terminated with CR+LF):[126]
Action: <action type>Key 1:Value 1Key 2:Value 2etc ...Variable:ValueVariable:Valueetc...
For example, to authenticate with Manager (which is required if you expect to have any interaction whatsoever), you would send the following:
Action: login Username: oreilly Secret: notvery <CR+LF>
An extra CR+LF on a blank line will submit the entire package to Manager.
Once authenticated, you will be able to initiate actions, as well as see events generated by Asterisk. On a busy system, this can get quite complicated and become totally impossible to keep track of with the unaided eye. To turn keep Asterisk from sending events, you can add the Events parameter to your login command, like this:
Action: login Username: oreilly Secret: notvery Events: off <CR+LF>
If you’re worried about sending your secret across the wire in
plain text (which you should be), you can also
authenticate using an MD5 challenge-response system, which works very
similar to HTTP digest authentication. To do this, you first call the
Challenge
action, which will present you with a challenge token:
Action: Challenge
AuthType: MD5
Response: Success
Challenge: 840415273
You can then take that challenge token, concatenate the plaintext secret onto the end of it, and calculate the MD5 checksum of the resulting string. The result can then be used to login without passing your secret in plain text.
Action: Login
AuthType: MD5
Username: Admin
Key: e7a056e1488882c6c509bbe71a049978
Response: Success
Message: Authentication accepted
Once you’ve successfully logged into the AMI system, you can send commands to Asterisk by using the other actions. We'll show a few commands here so that you can get a feel for how they work.
The Redirect action can be used to transfer a
call. After logging in, you should send an action like the one
below:
Action: Redirect Channel: SIP/John-ae201e78 Context: Lab Exten: 6001 Priority: 1 ActionID: 2340981650981
Note
For each action you sent over the manager interface, you can send along an arbitrary ActionID value. This will allow you to recognize the responses from Asterisk as being related to your actions. It is strongly recommended that you send a unique ActionID with each of your AMI commands.
This URL transfers the specified channel to another extension and priority in the dialplan. The response to this action is:
Response: Success ActionID: 2340981650981 Message: Redirect Successful
To read an Asterisk configuration file via the Manger interface,
we can use the the GetConfig action. The
GetConfig action returns the contents of a
configuration file, or portion thereof. The following command
retrieves the contents of the file
users.conf.
Action: GetConfig Filename: users.conf ActionID: 9873497149817
Asterisk then returns the contents of the
users.conf file. The response looks like:
Response: Success ActionID: 987397149817 Category-000000: general Line-000000-000000: fullname=New User Line-000000-000001: userbase=6000 Line-000000-000002: hasvoicemail=yes Line-000000-000003: hassip=yes Line-000000-000004: hasiax=yes Line-000000-000005: hasmanager=no Line-000000-000006: callwaiting=yes Line-000000-000007: threewaycalling=yes Line-000000-000008: callwaitingcallerid=yes Line-000000-000009: transfer=yes Line-000000-000010: canpark=yes Line-000000-000011: cancallforward=yes Line-000000-000012: callreturn=yes Line-000000-000013: callgroup=1 Line-000000-000014: pickupgroup=1 Line-000000-000015: host=dynamic
It is often useful to be able to update an Asterisk
configuration file via the Asterisk Manager interface. The
UpdateConfig action is used to update one or more
settings in a configuration file. For example, to delete a user named
6003 from users.conf you could issue the
following command:
Action: UpdateConfig Filename: users.conf Reload: yes SrcFilename: users.conf DstFilename: users.conf Action-00000: delcat Cat-00000: 6003 ActionID: 5298795987243
Obviously, we've only scratched the surface of the many different actions available as part of the Asterisk Manager Interface. For a more detailed listing of the available commands, see Appendix F.
The Flash Operator Panel (FOP) is one of the most popular examples of the power of the Manager interface. FOP presents a web-based visual view of your system and allows you control of calls.
FOP is most commonly used to enable a live attendant to view the users in the system and connect calls between them. It can also be used in a call-center environment to provide CRM-triggered screen pops.[127]
The FOP management interface is shown in Figure 10.1, “The Flash Operator Panel management interface”. To grab a copy of FOP, head to http://www.asternic.org.
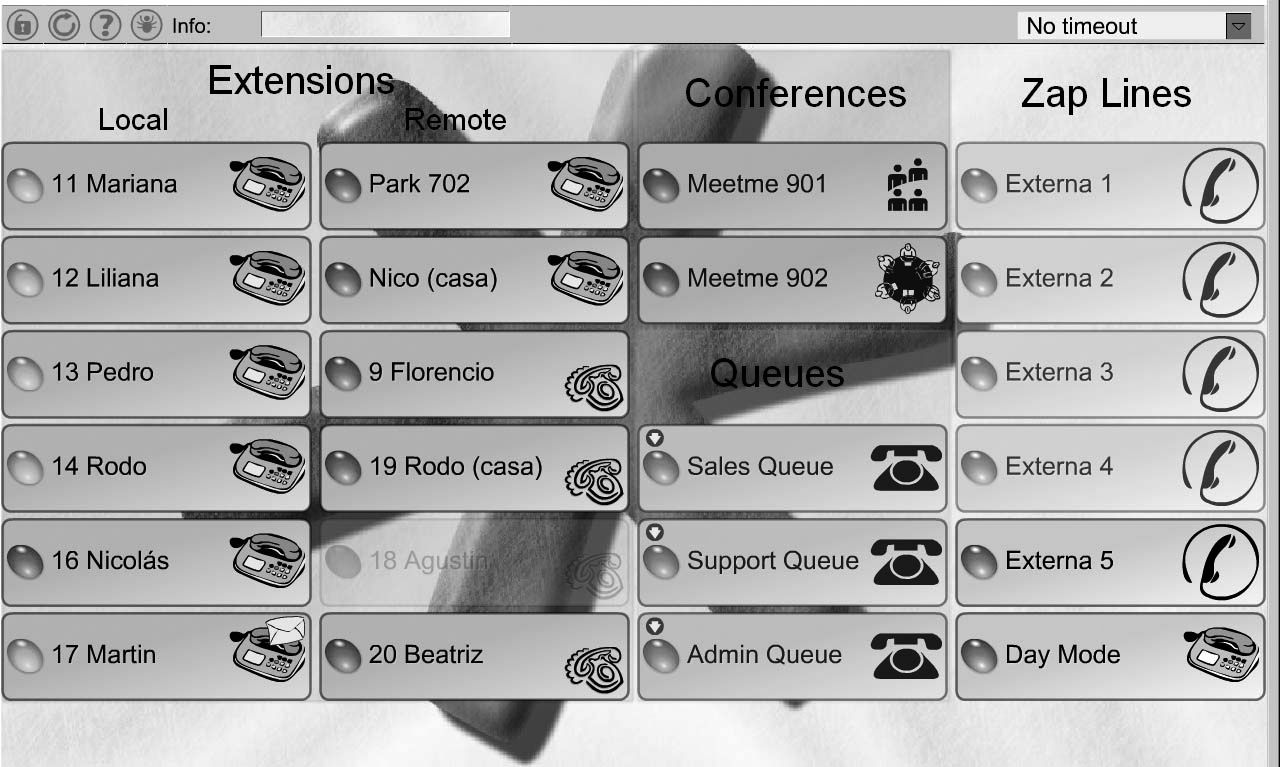
FOP isn’t all that difficult to set up, but it does require several steps to configure. The configuration of FOP is beyond the scope of this book, but if you head on over to the FOP web site you will find the latest documentation detailing the installation and configuration process.
FOP has a fantastic community and a popular mailing list. The success of FOP has also been aided by its inclusion in Trixbox.
Recently, a new bit of technology has come along which has the potential to change the way we create dialplans.[128]
Asterisk has matured both in technological innovation and in popularity, but as one becomes more and more immersed in this wonderful world, one cannot help but bump into limitations. When you handle a lot of complex, enterprise-grade scripting with Asterisk alone, you will face many obstacles using dialplan logic. As flexible and powerful as the dialplan is, as a programming language it is quite odd, and much less flexible than most modern scripting languages. When one needs to provide advanced logic, the dialplan, the GUI, and even the more advanced AEL can become very frustrating.
As you build more and more complexity into your dialplans, some of the following may cause you some head-scratching:
Conditional looping and branching
Variables
Complex data structures
Database/LDAP integration
Use of third-party libraries
Exchanging and distributing VoIP functionality
Extending the configuration languages
Poor error handling
Poor date and time handling
Pattern matching
Usage consistency
Source code organization
Many people addressed these matters by writing the advanced logic in external programs such as Perl and PHP, and connecting to Asterisk via AMI and AGI. Unfortunately, while the desired power was now available, these interactions did not always simplify things for the developer. To the contrary, they often made development more complex. Using existing technologies in Asterisk, but aiming to deliver power and simplicity, Adhearsion has a new approach.
Adhearsion is an open source (LGPL) framework that is designed to
improve Asterisk solution development. It rests above an Asterisk
system, handling parts or all of the dialplan and, in a few unique ways,
manages access to Asterisk with several improved interfaces. Because it
runs as a separate daemon process and integrates through the
already-present Gateway (AGI) and Manager (AMI) interfaces, configuring
a context to use Adhearsion is as simple as adding a few lines to your
dialplan or adding a user to manager.conf.
Adhearsion primarily uses the highly dynamic, object-oriented Ruby programming language, but has optional support for other languages such as C or Java. In the VoIP world, many things exist as conceptual objects, which means that object-oriented programming can make a lot of sense. Those familiar with Python, Perl, or other scripting languages should have no trouble picking up Ruby, and for those who don’t, Ruby is an excellent choice for your first scripting language.
Ruby software is generally installed through Ruby’s package manager (similar to Linux package managers, but for the Ruby platform exclusively). Adhearsion exists as a gem in the standard RubyGems trove so, with Ruby and RubyGems installed, Adhearsion is only one install command away.
AsteriskNOW comes standard with Ruby but not RubyGems (for support reasons). Thankfully, RubyGems can be easily installed from the Ruby rPath trove with the following command:
conary update rubygems=ruby.rpath.org@rpl:devel source /etc/profile
Most Linux distributions’ package managers host a Ruby package, though some do not yet have RubyGems. With your respective distro’s preferred software management application, install Ruby 1.8.5 or later and RubyGems if available. If RubyGems is not available in CentOS, you can install Ruby by typing:
yum install ruby
Next, we need RubyGems. You can get that by navigating to /usr/src/, and entering:
wget http://rubyforge.org/frs/download.php/20585/rubygems-0.9.3.tgz tar zxvf rubygems-0.9.3.tgz cd rubygems-0.9.3 ruby setup.rb
Ruby actually ships standard with OS X, but you will need to upgrade it and install RubyGems from MacPorts, an OS X package manager. With MacPorts installed, (available from http://www.macports.org if you do not already have it) you can install Ruby and RubyGems with the following command:
sudo port install ruby rb-rubygems
You may also need to add /opt/local/bin to your PATH variable in
/etc/profile.
A fantastic “one-click installer” exists for Windows. This installer will automatically install Ruby, RubyGems, and a few commonly used gems all in a matter of minutes. You can download the installer from http://rubyforge.org/projects/rubyinstaller.
With Adhearsion installed, you can begin creating and initializing
a new Adhearsion project with the newly created ahn
command, a command-line utility that manages nearly everything in
Adhearsion.
A sample command for creating a new Adhearsion project is as follows:
ahn create ~/newproject
This creates a folder at the destination specified containing the directory and file hierarchy Adhearsion needs to operate. Right away, you should be able to execute the newly created application by running:
ahn start ~/newproject
To familiarize yourself with the Adhearsion system, take a look through the application’s folders and read the accompanying documentation.
The ability to write dialplans in Adhearsion is typically the first feature newcomers use. Since Ruby permits such fine-grained modification of the language itself at runtime, one of the things Adhearsion does is make aesthetic changes, which are intended to streamline the process of developing dialplans.
Below is an Adhearsion Hello World application:
my_first_context {
play "hello-world"
}Though this is completely valid Ruby syntax, not all Ruby applications look like this. Adhearsion makes the declaration of context names comfortable by interpreting the dialplan script specially. Your scripts will be located in the root folder of your newly created Adhearsion application.
As calls come into Asterisk and subsequently Adhearsion, Adhearsion invokes its own version of the context name from which the AGI request originated. Given this, we should ensure that a context in extensions.conf has this same name and forwards calls properly to Adhearsion.
The syntax for directing calls to Adhearsion is as follows:
[my_first_context] exten => _.,1,AGI(agi://127.0.0.1)
This catches any pattern dialed and goes off to Adhearsion via AGI to handle the call-processing instructions for us. The IP provided here should of course be replaced with the necessary IP to reach your Adhearsion machine.
Now that you have a basic understanding of how Adhearsion and Asterisk interact, here is a more real-world dialplan example in Adhearsion:
internal {
case extension
when 10..99
dial SIP/extension
when 6000..6020, 7000..7030
# Join a MeetMe conference with "join"
join extension
when _'21XX'
if Time.now.hour.between? 2, 10
dial SIP/"berlin-office"/extension[2..4]
else speak "The German office is closed"
end
when US_NUMBER
dial SIP/'us-trunk-out'/extension
when /^\d{11,}$/ # Perl-like regular expression
# Pass any other long numbers straight to our trunk.
dial IAX/'intl-trunk-out'/extension
else
play %w'sorry invalid extension please-try-again'
end
}With just this small amount of code we accomplish quite a lot. Even with limited or no knowledge of Ruby, you can probably infer the following things:
We use a switch-like statement on the “extension” variable (which Adhearsion creates for us) and branch depending on that.
Dialing a number between 10 and 99 routes us to the SIP peer with the dialed numerical username.
Any number dialed between 6000 and 6200 or between 7000 and 7030 goes to a MeetMe conference of that same number. This of course requires meetme.conf to have these conference numbers configured.
The _'21XX' option comes straight from Asterisk’s pattern style. Prepending a String with an underscore in Adhearsion secretly invokes a method that returns a Ruby regular expression. In a Ruby “case” statement, regular expressions can be used in a “when” statement to check against a pattern. The end effect should be very familiar to those with extensions.conf writing experience.
Adhearsion’s syntax for representing channels also comes straight from Asterisk’s traditional format.
SIP/123can be used verbatim to represent the SIP peer 123. If a trunk were involved, SIP/trunkname/username would act as you would expect.The
speak()method abstracts an underlying text-to-speech engine. This can be configured to use most of the popular engines.A full-blown Perl-like regular can be used in a
whenstatement to perform more sophisticated pattern matching if Asterisk’s patterns do not suffice.Adhearsion defines a few constants that may be useful to someone writing dialplans. The
US_NUMBERconstant here is a regular expression for matching an American number.If you find the need to play several files in sequence,
play()accepts an Array of filenames. By luck, Ruby has a convenient way of creating an Array of Strings.
This is of course just a simple example and covers only the absolute basics of Adhearsion’s dialplan authoring capabilities.
Though immensely successful in the web development space for serving dynamic content, database integration has always been an underutilized possibility for driving dynamic voice applications with Asterisk. Most Asterisk applications that do accomplish database integration outsource the complexity to a PHP or Perl AGI script because the extensions.conf or AEL grammars are simply impractical for the level of sophistication required.
Adhearsion uses a database integration library, called ActiveRecord, developed by the makers of the Ruby on Rails framework. With ActiveRecord, the end user seldom, if ever, writes SQL statements. Instead, the developer accesses the database just like any Ruby object. Because Ruby allows such flexible dynamism, access to the database looks and feels quite natural. Additionally, ActiveRecord abstracts the differences between database management systems, making your database access implementation agnostic.
Without going too much into the internals of ActiveRecord and more sophisticated uses of it, let us consider the following simple MySQL schema:
CREATE TABLE groups ( `id` int(11) DEFAULT NULL auto_increment PRIMARY KEY, `description` varchar(255) DEFAULT NULL, `hourly_rate` decimal DEFAULT NULL ); CREATE TABLE customers ( `id` int(11) DEFAULT NULL auto_increment PRIMARY KEY, `name` varchar(255) DEFAULT NULL, `phone_number` varchar(10) DEFAULT NULL, `usage_this_month` int(11) DEFAULT 0, `group_id` int(11) DEFAULT NULL );
In practice we would obviously store much more information about the customer and keep the service usage information in a database-driven call detail record, but this degree of simplicity helps demonstrate ActiveRecord fundamentals more effectively.
To connect Adhearsion to this database, one simply specifies the database access information in a YAML configuration file like so:
adapter: mysql host: localhost database: adhearsion username: root password: pass
This tells Adhearsion how to connect to the database, but how we access information in the tables depends on how we model our ActiveRecord objects. Since an object is an instance of a class, we write a class definition to wrap around each table. We define simple properties and relationships in the class with the superclass’s methods.
Here are two classes we may use with the aforementioned tables:
class Customer < ActiveRecord::Base belongs_to :group validates_presence_of :name, :phone_number validates_uniqueness_of :phone_number validates_associated :group def total_bill self.group.hourly_rate * self.usage_this_month / 1.hour end end class Group < ActiveRecord::Base has_many :customers validates_presence_of :description, :hourly_rate end
From just this small amount of information, ActiveRecord can
make a lot of logical inferences. When these classes interpret,
ActiveRecord assumes the table names to be customers and groups respectively by lowercasing the
classes’ names and making them plural. If this convention is not
desired, the author can easily override it. Additionally, at
interpretation time, ActiveRecord actually peeks into the database’s
columns and makes available many new dynamically created
methods.
The belongs_to and has_many methods in this example define
relationships between Customers and
Groups. Notice again how
ActiveRecord uses pluralization to make the code more expressive in
the has_many :customers line. From
this example, we also see several validations—policies that
ActiveRecord will enforce. When creating a new Customer we must provide a
name and phone_number at the
bare minimum. No two phone numbers can conflict. Every Customer must have a Group. Every Group must have a description and hourly_rate. These help both the developer
and the database stay on track.
Also, notice the total_bill
method in the Customer class. On
any Customer object we extract from
the database, we can call this method, which multiplies the hourly_rate value of the group to which the
Customer belongs by the Customer’s own phone usage this month (in
seconds).
Here are a few examples that may clarify the usefulness of having Ruby objects abstract database logic:
everyone = Customer.find :all
jay = Customer.find_by_name "Jay Phillips"
jay.phone_number # Performs a SELECT statement
jay.total_bill # Performs arithmetic on several SELECT statements
jay.group.customers.average :usage_this_month
jay.group.destroy
jay.group = Group.create :description => "New cool group!",
:hourly_rate => 1.23
jay.saveBecause the database integration here becomes much more natural, Asterisk dialplans becomes much more expressive as well. Below is a sample dialplan of a service provider that imposes a time limit on outgoing calls using information from the database. To remain simple:
# Let's assume we're offering VoIP service to customers
# whom we can identify with their callerid.
service {
# The line of code below performs an SQL SELECT
# statement on our database. The find_by_phone_number()
# method was created automatically because ActiveRecord
# found a phone_number column in the database. Adhearsion
# creates the "callerid" variable for us.
caller = Customer.find_by_phone_number callerid
usage = caller.usage_this_month
if usage >= 100.hours
play "sorry-cant-let-you-do-that"
else
play %w'to-hear-your-account-balance press-1
otherwise wait-moment'
choice = wait_for_digit 3.seconds
p choice
if choice == 1
charge = usage / 60.0 * caller.group.hourly_rate
play %W"your-account will-reflect-charge-of $#{charge}
this month for #{usage / 60} minutes and
#{usage % 60} seconds"
end
# We can also write back to the "usage_this_month"
# property of "caller". When the time method finishes,
# the database will be updated for this caller.
caller.usage_this_month += time do
# Code in this block is timed.
dial IAX/'main-trunk'/extension
end
caller.save
end
}Robust database integration like this through Adhearsion brings new ease to developing for and managing a PBX. Centrally persistent information allows Asterisk to integrate with other services cleanly while empowering more valuable services whose needs are beyond that of traditional Asterisk development technologies.
Because an Adhearsion application resides within a single folder, completely copying the VoIP application is as simple as zipping the files. For one of the first times in the Asterisk community, users can easily exchange and build upon one another’s successful application. In fact, open sourcing individual Adhearsion applications is greatly encouraged.
Additionally, on a more localized level, users can reuse Adhearsion framework extensions, called helpers, or roll their own. Helpers range from entire sub-frameworks like the Micromenus framework for integrating with on-phone micro-browsers to adding a trivial new dialplan method that returns a random quote by Oscar Wilde.
Below is a simple Adhearsion helper written in Ruby. It creates a new method that will exist across the entire framework, including the dialplan. For simplicity’s sake, the method downloads an XML document at a specified HTTP URL and converts it to a Ruby Hash object (Ruby’s associative array type):
def remote_parse url Hash.from_xml open(url).read end
Note that these three lines can work as the entire contents of a helper file. When Adhearsion boots, it executes the script in a way that makes any methods or classes defined available anywhere in the system.
For some issues, particularly ones of scaling Adhearsion, it may be necessary to profile out bottlenecks to the king of efficiency: C. Below is a sample Adhearsion helper that returns the factorial of a number given:
int fast_factorial(int input) {
int fact = 1, count = 1;
while(count <= input) {
fact *= count++;
}
return fact;
}Again, the code here can exist as the entire contents of a helper file. In this case, because it is written in C, it should have the name factorial.alien.c. This tells Adhearsion to invoke its algorithm to read the file, add in the standard C and Ruby language development headers, compile it, cache the shared object, load it into the interpreter, and then wrap the C method in a Ruby equivalent. Below is a sample dialplan that simply speaks back the factorial of six using this C helper:
fast_test {
num = fast_factorial 6
play num
}Note that the C method becomes a first-class Ruby method. Ruby number objects passed to the method are converted to C’s “int” primitive, and the return value is converted back to a Ruby number object.
Helpers promise robust albeit simple extensibility to a VoIP engineer’s toolbox, but, best of all, useful helpers can be traded and benefit the entire community.
With increasing competition between modern IP-enabled desk phone manufacturers, the microbrowser feature has snuck in relatively unnoticed and underutilized. The principle is simple: physical desk phones construct interactive menus on a phone by pulling XML over HTTP or the like. Contending interests, however, lead this technology amiss: every vendor’s XML differs, microbrowsers are often quirky, and available features vary vastly.
The Micromenus framework exists as an Adhearsion helper and aims to abstract the differences between vendors’ phones. For this very particular development domain (i.e., creating menus), Micromenus use a very simple Ruby-based “Domain Specific Language” to program logic cleanly and independent of any phone brands.
Below is a simple example Micromenu:
image 'company-logo'
item "Call an Employee" do
# Creates a list of employees as callable links from a database.
Employee.find(:all).each do |someone|
# Simply select someone to call that person on your phone.
call someone.extension, someone.full_name
end
end
item "Weather Information" do
call "Hear the weather report" do
play weather_report("Portland, OR")
end
item "Current: " + weather("Portland, OR")[:current][:temp]
end
item "System Uptime: " + `uptime`A list item displays in two ways. If given only
a text String, Micromenus renders only a text element. If the arguments
contain a do/end block of nested
information, that text becomes a link to a sub-page rendering that
nested content.
A call item also has two uses, each producing a
link which, when selected, initiates a call. When
call receives no
do/end block, it simulates
physically dialing the number given as the first argument. When a
do/end block exists and all calls
route through Adhearsion, selecting that item executes the dialplan
functionality within the block. This is a great example of how handling
the dialplans and on-screen microbrowsers within the same framework pays
off well.
From this example we can see a few other neat things about Micromenus:
Micromenus support sending images. If the requesting phone does not support images, the response will have no mention of them.
All Adhearsion helpers work here, too. We use the weather helper in this example.
The Micromenus sub-framework can use Adhearsion’s database integration.
Ruby can execute a command inside backticks and return the result as a String. We report the uptime here with it.
This example of course assumes that you have configured your
application’s database integration properly and have an Employee class
mapping to a table with an extension and
full_name column.
Because Micromenus simply render varying responses over HTTP, a normal web browser can make a request to the Micromenus’ server, too. For these more high-tech endpoints, Micromenus render an attractive interface with Ajax loading, DHTML effects, and draggable windows.
In the interest of “adhering” people together, Micromenus exist as another option to make your Adhearsion VoIP applications more robust.
Though Adhearsion by design can integrate with virtually any application, including PHP or Java Servlets, Ruby on Rails makes for a particularly powerful partner. Rails is a web development framework getting a lot of press lately for all the right reasons. Its developers use Ruby to its full potential, showing how meta-programming really does eliminate unnecessary developer work. Rails’ remarkable code clarity and application of the Don’t Repeat Yourself (DRY) principle served as a strong inspiration to the inception of Adhearsion as it exists today.
Starting with Adhearsion version 0.8.0, Adhearsion’s application directory drops in place atop an existing Rails application, sharing data automatically. If you have needs to develop a complex web interface to VoIP functionality, consider this deadly duo.
Eyebrows around the world raised when Sun announced their hiring of the two core developers of the JRuby interpreter project, Charles Nutter and Thomas Enebo, in September 2006. JRuby is a Ruby interpreter written in Java instead of C. Because JRuby can compile parts of a Ruby application to Java bytecode, JRuby is actually outperforming the C implementation of Ruby 1.8 in many different benchmarks and promises to outperform Ruby 1.8 in all cases in the near future.
A Ruby application running in JRuby has the full benefit of not only Ruby libraries but any Java library as well. Running Adhearsion in JRuby brings the dumbfounding assortment of third-party Java libraries to PBX dialplan writing. If your corporate environment requires tight integration with other Java technologies, embedding Adhearsion in a J2EE stack may offer the flexibility needed.
For more information about the fast-moving Adhearsion community, including complete walkthroughs, see Adhearsion’s official web site at http://adhearsion.com, Adhearsion’s official blog at http://blog.adhearsion.com, the web site of Adhearsion’s parent consulting company http://codemecca.com, or for help learning Ruby, see http://jicksta.com.
[125] Contrast this with the Asterisk Gateway Interface (AGI), which allows Asterisk to launch an external program from the dialplan. The AGI and AMI interfaces are very much complimentary to each other.
[126] Carriage Return followed by Line Feed. This is popularly achieved by pressing the Enter key on the keyboard, but there are differences across various OS platforms and programming languages, so if you are having trouble with commands to the interface, it may be worth noting the exact character combination that is required. At the time of writing, Wikipedia had a respectable writeup on this concept (http://en.wikipedia.org/wiki/Newline).
[127] Customer Relationship Management (CRM) is an interface that companies use to help manage customer information and interaction.
[128] We would like to thank Jay Phillips for contributing the ideas and code for this section of the book.
Table of Contents
…I was constructing a lighthouse while all the others were making ships.
This chapter introduces the components that comprise the GUI and help it work with Asterisk. It describes the installation of the web server and the GUI components for those who are not using the AsteriskNOW distribution. It also shows you how to modify the GUI to suit your purposes. Technical information is also provided so that developers wishing to create their own GUI or application can utilize the web server and GUI components. We’d like to thank the folks at Digium for writing this chapter, especially the code examples, which they developed and tested.
Since the beginning, Asterisk has been a phone system for the brave. In the early days it took guts and more than a bit of tenacity to make Asterisk do your bidding. Those willing to accept the learning curve, wade into the config files, and fight for their calls were rewarded with a powerful, flexible phone system (as well as a very marketable skill set). However, the mass market was not, and is not, ready to script extensions, manage peers, and handle the other tasks that are the crux of Asterisk administration.
Since the early pre-1.0 days, people have tried to tame the mighty Asterisk with config file generators tied to databases and managed via a range of graphical user interfaces (GUIs). The most successful of these did a fine job of creating an Asterisk-based application, but none of them provided the full flexibility that the raw scripting environment offers. By replacing the digital haiku of the dialplan with a limited list of options, the resulting system is reduced from Asterisk to an Asterisk-based system. Not a bad thing, but not the whole enchilada.[129]
In order for a GUI to be the Asterisk GUI, it would have to leave intact the manually scripted configuration files that have been the lingua franca of Asterisk since the dawn of time. It would have to provide a simple, graphical means of configuration without compromising the underlying Asterisk software or irrevocably fixing decisions that should be left open to the end user. It would also have to provide advanced functionality without taxing the computer or stealing valuable resources from the core goal of processing calls.
Coinciding with the release of Asterisk 1.4, Digium launched the Asterisk GUI project. The GUI was originally conceived as a component of Digium’s Asterisk embedded appliance. The appliance, sold as the Asterisk Appliance Developers Kit (AADK) as well as in a standalone configuration, is a small, solid-state Linux computer with optional analog (and potentially digital) interfaces. The GUI was built using a flexible and expandable framework that placed as much of the display and validation logic as possible on the client computer. It also took into consideration the need to preserve handwritten config files while providing an automated means of editing them. The resulting framework is known as AJAM (a play on the popular “Web 2.0” technology known as Ajax), which means Asynchronous JavaScript and Asterisk Manager. The core AJAM code, a series of AJAM-enabled web pages, and an extension to the Asterisk manager work together to form the Asterisk GUI framework.
The Asterisk GUI is the interface that comes with the AsteriskNOW distribution or can be added to an existing Asterisk installation. The default interface is geared toward the user who wants to use Asterisk as a PBX for a small business with fairly typical telecom needs. It can best be thought of as a sample of what can be done using AJAM; think of it as a beta interface that can be expected to evolve according to the desires of the community. This has caused a lot of excitement in the Asterisk community, because the underlying technologies behind the GUI raise the bar on what a PBX interface can become. It also enables you to build your own interfaces that are tuned to your unique requirements.
Asterisk is a powerful telephony platform. However, that power is only as valuable as its ability to be used by a particular target user. There is a lot of value to having graphical interfaces (GUIs) for Asterisk. Most GUIs are specifically designed to support a particular task. For example, some GUIs are designed specifically for voicemail systems. Others are specifically targeted to the hospitality industry. There is some demand to have a GUI that targets Asterisk generally, but there is a natural trade-off between the ease of use and simplicity of a GUI, versus the number of available features. For example, the GUI that a seasoned systems administrator might require would likely be different than that of an office administrator who is only responsible for simple moves, adds, and changes to the system. Given this wide ranging demand, Digium developed a GUI framework called (uncreatively) the Asterisk GUI. Rather than developing a single GUI, Digium developed different GUIs and a framework to trivialize the creation and modification of GUIs for different segments.
A second goal was to make sure that the GUI interacted with Asterisk’s traditional configuration methods in a way that did not preclude someone from using them. Most GUIs for Asterisk use an intermediate configuration format or database, then spit out configs for Asterisk to use. Unfortunately that means that any option that is not presented within the GUI cannot be “manually” set in the configuration files. By contrast, the Asterisk GUI actually modifies your traditional Asterisk configuration files, meaning that your changes in the GUI and your changes to the files themselves can co-exist and even flow back and forth. As an example, if you change the caller ID for a user in
users.confthen refresh the GUI, you’ll see the change in the GUI as well. Likewise if you change it in the GUI and reload the file, you’ll see the change in the file. If you add new settings that are not presented in the GUI (for example if you addnat=yesto a particular entry inusers.conf, then change the caller ID in the GUI, you’ll see that thenat=yesline will remain in the file even though the caller ID change goes through. Comments are also generally preserved across GUI edits. This means that not only is the GUI no longer required to display all possible configurations, since esoteric ones can be set manually. This also means that when someone starts by using the Asterisk GUI and then outgrows it, there is a natural path for them to be able to start creating more sophisticated functions without abandoning the GUI with which they’re familiar.
When you first log in to a newly created GUI, the system walks you through a wizard that lets you set up the basic elements of your phone system.
Caution
The GUI may not be able to detect all types of TDM interfaces, and thus may report that it cannot find any cards even though you have some installed. It is expected that the GUI will eventually be able to detect and manage any cards that use the Zaptel interface, but this functionality is going to be complex, and is still in development at this time.
The wizard walks you through some basic settings such as extension length and dialing rules. We are not going to get into detail on how the default GUI works. It is in constant development, and what we write about here is not likely to be what you will experience when you read this.
The standard GUI that comes with AsteriskNOW (or can be downloaded via SVN) has a standard set of elements that represent the sorts of things a typical small office PBX might want. The menu items are currently:
Users
Conferencing
Voicemail
Call Queues
Service Providers
Calling Rules
Incoming Calls
Voice Menus
Record a Menu
Active Channels
Graphs
System Info
Backup
Options
Before we get too far into exploring the Asterisk GUI (or developing your own), it’s important to understand the flow of information between the client (the web browser) and Asterisk. Since these interfaces are Ajax applications, there are a lot of pieces that aren’t immediately obvious. The flow of control goes something like this:
The browser “surfs to” the URL for your management application.
Asterisk’s web server sends the browser an HTML page, libraries, and the application itself (which is written in JavaScript and makes heavy use of Ajax).
The user interacts with the browser; as needed, the JavaScript application sends commands back to the web server. These commands are in the form of URLs that request some action from the Asterisk server itself.
The web server interprets the URLs. If the user has logged in successfully, it sends a command (an action) to Asterisk via the Asterisk Manager Interface (AMI), described in Chapter 10, Asterisk Manager Interface (AMI) and Adhearsion.
Asterisk executes the action and the results (a status code and possibly data) to the web server.
The web server sends Asterisk’s response back to the JavaScript application on the browser.
The JavaScript application updates the browser’s display.
While it may sound a little complicated at first glance, don’t be intimidated. It’s a very flexible and powerful architecture that can be used for a myriad of applications, not just an Asterisk GUI. For now, however, we’ll concentrate on enhancing the Asterisk GUI. Let’s begin by configuring the underlying pieces, and then move on to installing and modifying the Asterisk GUI.
Let’s take a closer look at some of the key components of the Asterisk GUI. We’ll use these components later in the chapter to modify the Asterisk GUI.
As explained in Chapter 10, Asterisk Manager Interface (AMI) and Adhearsion, the Asterisk Manager Interface allows external programs to control Asterisk. The Manager interface is the heart of the Asterisk GUI, as it does all of the heavy lifting.
The web server built into Asterisk allows manager commands to be sent to Asterisk via HTTP, instead of creating a socket connection directly to the Manager interface. This makes it much simpler for a web application to issue AMI commands to Asterisk using the Asynchronous JavaScript Asterisk Manager (AJAM), which we will cover shortly. The web server can also be configured to serve static content, such as HTML files and images.[130]
If you didn’t install AsteriskNOW, you need to download and install the Asterisk GUI files. Once the files are downloaded, you simply compile and install them as part of your Asterisk installation.
Note
You need Asterisk 1.4 or later in order use the Asterisk GUI.
You can get the latest version of the GUI files by checking them out of Digium’s Subversion repository.[131] If you have Subversion installed on your computer, you can downloaded the GUI code by using the following command:
#cd /usr/src# or wherever you prefer to download source code to #svn co http://svn.digium.com/svn/asterisk-gui/trunk asterisk-gui
Installing the GUI is simple as this:
#cd asterisk-gui#./configure#make#make install#make samples
After running the previous commands, the GUI files are installed and part of your Asterisk distribution.
Configuring the Asterisk web server to process AJAM requests involves
several simple steps. In the /etc/asterisk/http.conf file, add (or
un-comment) the following:
[general]
enabled=yes
enablestatic=yes ; without this, you can only send AMI commands, not display
; html content
bindaddr=0.0.0.0 ; address you want the Asterisk HTTP server to respond on
bindport=8088 ; port you want the Asterisk HTTP server to respond on
prefix=asterisk ; will form part of the URI, similar to a directory name
Now that we’ve got httpd.conf set up, we can serve up content to
a browser. To allow the web client to send commands to Asterisk, we have
to make some changes to the Asterisk Manger Interface (AMI). We do this
by adding a few lines to the [general] section of manager.conf, and
by adding a user account with the config permission set. Open up manager.conf and edit it to match the
following:
[general] enabled=yes ; you may already have AMI enabled if you are using it for other things webenabled=yes ; this enables the interaction between the Asterisk web server and AMI [asterisk_http] ; you can name the user whatever you want secret = gooey read = system,call,log,verbose,command,agent,user,config write = system,call,log,verbose,command,agent,user,config
Save the changes and restart Asterisk. You should be able to connect to Asterisk’s web server through the following URI:
http://localhost:8088/asterisk/static/ajamdemo.html
If for some reason you’re having problems getting to that demo
page, go back to the asterisk-gui
source code directory and run:
# make checkconfig And that’s it! Asterisk is now web-enabled. Now, let’s move on to the actual work of developing with the Asterisk GUI.
Once you’ve installed the files for the Asterisk GUI, you can begin to play with developing for the GUI. Over the next few sections, we’ll walk through setting up the various components and putting them together to enhance and expand the capabilities of the GUI.
The Asterisk GUI issues commands to Asterisk by calling specially crafted URLs to the Asterisk web server. This section provides examples of some commonly used commands (actions) and the corresponding web server responses. These AMI URLs have the following general structure:
http://hostname:8088/asterisk/rawman?action=command&....parameter=value pairs... http://hostname:8088/asterisk/manager?action=command&....parameter=value pairs... http://hostname:8088/asterisk/mxml?action=command&....parameter=value pairs...
The difference between the rawman, manager and mxml URLs is important. The web server exports
three different views of the AMI interface. If you use a rawman URL, the server returns a series of
keyword/value pairs in the HTTP response. If you use a manager URL, the server returns the result
formatted as HTML. In a similar style, if you use a mxml URL, the server returns the results
formatted in XML. For modern Ajax-style applications, the rawman and mxml forms are probably more useful.[132]
The actions that can be sent to the server, along with their
parameters, are the ordinary manager commands described in Appendix F, Asterisk Manager Interface Actions. Note that the LOGIN and CHALLENGE actions are unique in that they
aren’t sent to Asterisk itself, but are processed by the Manager
interface to authenticate the user. If the user hasn’t authenticated
correctly, the server returns an error response rather than sending the
action to Asterisk for processing.
Let’s look at some commonly used actions, and see how we can use them to control the server.
The LOGIN command
authenticates credentials for the Manager interface’s HTML view. Once
you are logged in, Asterisk stores a cookie on your browser (valid for the length of the
httptimeout setting). This cookie is used to
connect to the same session. The URL:
http://localhost:8088/asterisk/rawman?action=login&username=asterisk_http&secret=gooey
sends a login command to the web server that includes the credentials. If successful, the web server responds with:
Response: Success Message: Authentication accepted
This, of course, is a very simplistic way for a login to work. Sending the username and secret password in a URL is bad practice, though it’s very useful during development. A more appropriate way to handle the login, and an example of more complex command processing, is to use a challenge/response sequence. Issue a request like this:
http://localhost:8088/asterisk/rawman?action=challenge&AuthType=md5
The CHALLENGE command
initiates a challenge/response sequence that can be used to log in a
user. The server responds by sending a challenge (an arbitrary string)
in the response:
Response: Success Challenge: 113543555
Your application answers the challenge by computing the MD5 hash of the challenge concatenated with the user’s password. Here’s how a user might manually calculate the MD5 hash:
#echo -n 113543555gooey | md5sum50a0f43ad4c9d99a39f1061cf7301d9a -
You can then use the calculated hash as the login key in a URL like this:
http://localhost:8088/asterisk/rawman?action=login&username=asterisk_http&authtype=md5&key=50a0f43ad4c9d99a39f1061cf7301d9a
Warning
For security reasons, the login action must take place within five seconds of the challenge action. Note also that cookies must be enabled for the challenge/response to work, as the cookie ensures that the login action uses the same manager session ID as the challenge action.
If you use a manager URL to
request the challenge (instead of using rawman), the response will be formatted as
HTML:
<title>Asterisk™ Manager Interface</title> <body bgcolor="#ffffff"> <table align=center bgcolor="#f1f1f1" width="500"> <tr><td colspan="2" bgcolor="#f1f1ff"><h1> Manager Tester</h1></td></tr> <tr><td>Response</td><td>Success</td></tr> <tr><td>Challenge</td><td>113543555</td></tr> </table> </body>
Similarly, if you use the mxml view instead, you will receive a
response formatted as XML:
<Ajax-response>
<response type='object' id='unknown'>
<generic response='Success' challenge='113543555' />
</response>
</Ajax-response>Other than the formatting, there are no other differences
between the three types of responses. For most applications, digging
the challenge out of the keyword/value pairs will be much simpler than
using rawman or mxml in a situation like this, where you
don’t need to display the HTML to the user.
The REDIRECT action can be used to transfer a call. Simply generate a
URL such as:
http://localhost:8088/asterisk/rawman?action=redirect&channel=SIP/John-ae201e78&priority=1&exten=6001
This URL transfers the specified channel to another extension and priority in the dialplan. The response to this action is:
Response: Success Message: Redirect Successful
The GETCONFIG command
returns the contents of a configuration file, or portion
thereof. The URL:
http://localhost:8088/asterisk/rawman?action=getconfig&filename=users.conf
returns the contents of the users.conf file. The Asterisk GUI uses this functionality to present the
current Asterisk configuration to the end user. The response looks
like this:
Response: Success Category-000000: general Line-000000-000000: fullname=New User Line-000000-000001: userbase=6000 Line-000000-000002: hasvoicemail=yes Line-000000-000003: hassip=yes Line-000000-000004: hasiax=yes Line-000000-000005: hasmanager=no Line-000000-000006: callwaiting=yes Line-000000-000007: threewaycalling=yes Line-000000-000008: callwaitingcallerid=yes Line-000000-000009: transfer=yes Line-000000-000010: canpark=yes Line-000000-000011: cancallforward=yes Line-000000-000012: callreturn=yes Line-000000-000013: callgroup=1 Line-000000-000014: pickupgroup=1 Line-000000-000015: host=dynamic Category-000001: 6007 Line-000001-000000: fullname=Bill Savage Line-000001-000001: secret=1234 Line-000001-000002: email=bsavage@digium.com Line-000001-000003: cid_number=6001 Line-000001-000004: zapchan= Line-000001-000005: context=numberplan-custom-1 Line-000001-000006: hasvoicemail=yes Line-000001-000007: hasdirectory=no Line-000001-000008: hassip=yes Line-000001-000009: hasiax=yes Line-000001-000010: hasmanager=no Line-000001-000011: callwaiting=yes Line-000001-000012: threewaycalling=yes Line-000001-000013: mailbox=6007 Line-000001-000014: hasagent=yes Line-000001-000015: group=
The UPDATECONFIG
action is used to update one or more settings in a
configuration file. For example, to delete a user you should use a URL
like this:
http://localhost:8088/asterisk/rawman?action=updateconfig&reload=yes&srcfilename=users.conf&dstfilename=users.conf&Action-000000=delcat&Cat-000000=6003&Var-000000=&Value-000000=
A user must be logged in to the web server before any other
commands can be issued. Any of the commands we’ve discussed will
return an error response if the user is not authenticated. If it’s not
given by an authenticated user, this URI http://localhost:8088/asterisk/rawman?action=ping
returns this response to indicate an
error:
Response: Error Message: Authentication Required
As an acronym, Ajax stands for Asynchronous JavaScript and XML. While the term includes the words asynchronous and XML, this does not mean that you can make only asynchronous requests, nor are you required to use XML. Some authors describe Ajax as simply a combination of HTML, JavaScript, DHTML, and DOM. The next generation browsers, such as Mozilla/Firefox, use an XMLHttpRequest (a JavaScript object) to send an asynchronous request to the server. The request is made in the background and processed by the server.
Back on the browser, the result is handled by a callback: whatever the server returns can be stored and used to update the page being displayed. For Internet Explorer 5 or later, the XMLHttp ActiveX object serves the same purpose.
HTML forms are usually submitted by using a submit button (type=submit). When the user clicks the
submit button, processing stops, and doesn’t continue until the server
returns a new page:
<FORM action="login.php" method="POST"> <input type=text name="username"> <input type=password name="password"> <input type=submit> </FORM>
Before going any further with Ajax or JavaScript, let’s take a
look at how a traditional web application works. Traditional web
applications use HTML’s <FORM> element to define a form in
which all of the parameters a user needs to send to the server are
defined. In addition the action="login.php" informs the browser where
to send all of these variables. The method="POST" tells the browser how to send
these variables to the server.
An Ajax application uses JavaScript to send the contents of a form to the server. If you have made the request asynchronously, your JavaScript code doesn’t wait for the server to respond. This also means that you can let the users continue to interact with the page, even though a request may be taking place in the background. This can be dangerous and, thus, you may want to restrict certain actions until a request has completed. The browser, by default, gives no visual indication that a request is being made in the background. It is your responsibility to inform the user of the progress of a request. Here’s the code for submitting the contents of the username and password fields via Ajax:
<script language="javascript" type="text/javascript">
function submitform(){
var uname = document.getElementById("username").value;
var pwd = document.getElementById("password").value;
// xmlHttp = new ActiveXObject("Msxml2.XMLHTTP"); // IE 7
// xmlHttp = new ActiveXObject("Microsoft.XMLHTTP"); // IE 5
xmlHttp = new XMLHttpRequest(); // Mozilla or Firefox
var url = "/rawman?action=login&username=" + escape(uname) + "&secret=" + escape(pwd);
xmlHttp.open("GET", url, true);
xmlHttp.onreadystatechange = dosomething;
// dosomething() would be another JavaScript function
xmlHttp.send(null);
}
</script> The getElementById()
method reads the value of the username and the password
fields. This code then gets an XMLHttpRequest object, which it uses to send these values back to the server.
Note that the kind of object you need depends on whether your users
are using Internet Explorer 7, 5, or Mozilla/Firefox. It’s fairly easy to write code to
handle all of these situations, or to use a library like Prototype to
handle platform independence for you. The username and password are
encoded in a URL and sent to the server. The call to xmlHttp.onreadystatechange registers a
handler to process the result that the server returns to us.
This code only deals with making the XMLHttp request, and it
tells the browser to call the dosomething() function when there is a
response from the server. Here’s a dosomething() function that handles
this response:
<script language="javascript" type="text/javascript">
function dosomething() {
if (xmlHttp.readyState == 4) {
var login_response = xmlHttp.responseText;
}
}
</script>
Tip
Make sure that each XMLHttp step has completed (with either success or failure) before performing the next one.
This function is called whenever there’s a change in the state
of the HTTP request. The if
statement saves the response only if the request’s readyState is 4, which means that the
request has completed. The JavaScript variable login_response now contains the response of
the login page.
Note that this is very far from being production-ready code. In particular, the simplistic username and password handling is appropriate for testing, but would be a serious security problem in a production system—even if the application is used only on a private network. To build more robust and secure password handling, use the challenge/response system presented earlier. If you want to learn more about writing Ajax web applications, we recommend Head Rush Ajax by Brett McLaughlin (O’Reilly).
Prototype (http://prototypejs.org) is a
JavaScript framework released under an MIT-style
license. Prototype can make your job extremely easy while developing
an Ajax application. It provides many ways to make your code shorter
and clearer. For example, in the submitform
function, the call to document.getElementById() can be replaced by
the $() function. Likewise, the
call to value to get the DOM
element’s content can be replaced with a call to $F(). Thus, document.getElementById("username").value
becomes simply $F('username'); the
result is code that’s much simpler and more readable.
Prototype also makes it easy to make XMLHttp requests in an
elegant manner. Using Prototype’s Ajax object, the submitform() function can be rewritten
as:
<script language="javascript" type="text/javascript">
function submitform(){
var url = '/rawman';
var pars = 'username=' + escape($F('username')) + '&secret=' + escape($F('password'));
var myAjax = new Ajax.Request( url,
{ method: 'get',
parameters: pars,
onComplete: dosomething
});
}
</script>Not only is this code much shorter, you don’t have to write
browser-specific code in your web pages; Prototype takes care of the
differences between Mozilla/Firefox and the various versions of
Internet Explorer. Furthermore, it takes care of testing the request’s
readyState, so you leave that
annoying if statement out of your
handler. Prototype has lots of built-in functions, some of which have
been extensively used in the Asterisk framework. There’s no room to
discuss them here, but for more information, see the Short Cuts
Prototype Quick Reference by Scott Raymond and
Prototype and Scriptaculous: Taking the Pain Out of
JavaScript by Chris Angus, both from O’Reilly.
Now that we’ve explored the different pieces that form the
foundation of the Asterisk GUI, we have what we need to be able to
explore the GUI itself and modify it to fit our needs. To get to the
Asterisk GUI, go to the following address in your browser:
http://localhost:8088/asterisk/static/config/cfgbasic.html.
Looking at Figure 11-1 might lead you to conclude that the Asterisk GUI is simply one more Asterisk GUI in an already crowded space. Nothing could be further from the truth. This GUI doesn’t just allow you to tweak it, it practically begs you to. In this section we are going to discuss how you can modify the GUI and use AJAM to build your own extensions to the GUI. In order to benefit the most from this information, you need some HTML and JavaScript knowledge.
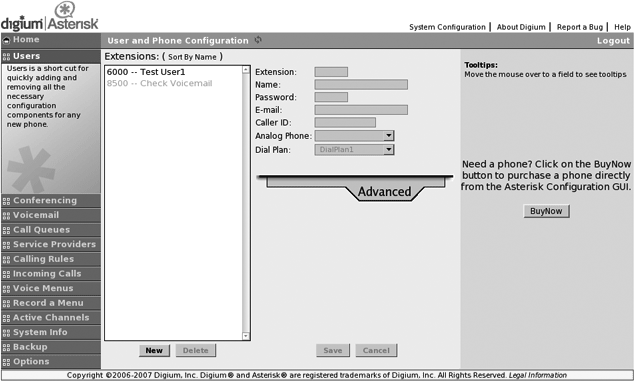
The GUI home page is named cfgbasic.html. All other pages are loaded
into the iframe contained within the cfgbasic.html page. By default, cfgbasic.html loads home.html into the main frame.
For most changes to the GUI, you’ll eventually need to
modify cfgbasic.html, which
is the login screen.
As an example of customizing the Asterisk GUI, let’s create a
new tab that displays the contents of extensions.conf. First, we need to create a
file and put it in the /var/lib/asterisk/static-html/config
directory. In this example, we’ll name the file test.html:
<script src="scripts/prototype.js"></script>
<script src="scripts/astman.js"></script>
<script>
function localAjaxinit() {
parent.loadscreen(this);
makerequest('g','extensions.conf', '' , function(t){
$('ExtensionsDotConf').innerHTML = "<PRE>" + t + "</PRE>";
});
}
</script>
<body onload="localAjaxinit()" bgcolor="EFEFEF">
<div id="ExtensionsDotConf"></div>
</body>This code simply displays the configuration of the extensions.conf file. Obviously it’s a very
simple example, but it shows the fundamentals of creating a new page
for the Asterisk GUI. Let’s walk through the example step by
step.
The first line tells the browser to load the Prototype library.
The second line tells the browser to load the astman.js file, which contains much of the
code designed to interact with the Manager interface.
Next, we define a function called localAjaxinit. The localAjaxinit
function first tells this page’s parent (cfgbasic.html in this case) to run the
loadscreen function, passing in
this page as the parameter. This causes the main GUI screen to load
our new test.html inside the
iframe. The second thing we do inside the localAjaxinit function is to use the
makerequest function. The makerequest function is defined in astman.js and makes it very convenient to
make requests to the web server.[133]
The first parameter of the makerequest function specifies what type of
request is being made. It can be set to any of the following:
-
'g' Use the
GetConfigaction to retrieve the configuration from the configuration file specified in the second parameter.-
'u' Use the
UpdateConfigaction to update the configuration in the configuration file specified in the second parameter. The third parameter to the function specifies the configuration data that should be updated.-
'' If the first parameter to the
makerequestfunction is a set of single quotes, then the custom action specified in the third parameter will be sent.
The fourth parameter is the callback function that will be called with the response to the Ajax request.
The rest of our test.html
simply contains an HTML body with a div element, which is where we’ll place the
configuration data when we get it. Note that the HTML body tag has an
onload attribute, which causes the
browser to execute the localAjaxinit function once the page has
finished loading.
Now that we’ve created a new page, we need to edit cfgbasic.html to add this page as a panel
in the GUI. Open cfgbasic.html
and search for a JavaScript function named returnpanels and insert this code in the
list of panels, where you would like your panel to appear:
newpanel( ["Test", "test.html", "Test"]);
Now reload the GUI in your browser. You should see a new tab on
the lefthand side named Test that
displays the configuration values for extensions.conf when clicked.
While there’s a lot more to learn about the AJAM interface and the Asterisk GUI, this example should show just how easy it is to add new functionality to the GUI. In this next example, we’ll show how simple it is to expose a setting from the configuration files in the GUI.
As explained earlier, one of the unique benefits of the Asterisk
GUI over the other graphical frontends to Asterisk is that it updates
the configuration files in place, taking special care not to overwrite
or erase any extra settings you might have in your configuration
files. To show just how easy it is to expose new settings in the GUI,
we’ll add a simple checkbox to the GUI to make it possible to set the
nat setting in users.conf.
If you open the GUI and click on the tab labeled Users, the GUI loads the file named
users.html in the iframe. Let’s
open up users.html (usually
located in /var/lib/asterisk/static-http/config) and
begin modifying it to add our checkbox.
First, search near the top of the file where a variable named
fieldnames is defined. This
variable contains a list of all of the field names that will be set by
this page of the GUI. Simply add nat to the end of the list, or add the
following line directly below the current definition for fieldnames.
fieldnames.push('nat');This tells the Asterisk GUI that we want to be able to see the
value of nat and to be able to set
it as well. In order to see or set the value, however, we need to add
an element to the HTML form. To do that, search users.html for the IAX checkbox, and add
the following lines between it and the CTI checkbox.
<tr> <td align=right><input type='checkbox' id='nat'></td> <td>NAT</td> </tr>
Simply reload the page, and that’s all there is to it. With just
a few lines of additional code, we’re able to expose the nat setting to the GUI. It couldn’t be much
simpler!
Note
As you’re developing for the Asterisk GUI, you’ll probably find that debugging Ajax and JavaScript code can be somewhat difficult at times. We strongly suggest you make use of an extension to Mozilla Firefox named Firebug that greatly simplifies the task of debugging Ajax, JavaScript, and HTML. Check it out at http://www.getfirebug.com. There is also a scaled-down version for Internet Explorer known as Firebug Lite, which is available for download at the same web site.
Over the course of this chapter, we’ve introduced you to the Asterisk GUI and the AJAM framework. We’ve covered the architecture of how the GUI works, and how to modify the GUI. If you would like more information on developing a graphical interface for Asterisk, please refer to the GUI Developers Guide located at http://asterisknow.org/developers/gui-guide.
[129] In fact, two of the authors of this book once attempted to write the ultimate Asterisk GUI. Lucky for you, they abandoned the project and began writing Asterisk documentation instead!
[130] You may be asking yourself, “Why embed a web server inside of Asterisk? Why not just use an external web server?” While you can use an external web server to serve up the Asterisk GUI, it’s beyond the scope of this chapter, as the security model behind Ajax permits Ajax requests only to the same domain, port, and protocol that sent the HTML page. This is often referred to as the same-origin policy.
[131] There is currently no way to download the GUI via FTP. That situation may change at any time, so feel free to check the Asterisk web site for updated information.
[132] By similar reasoning, the manager form is much easier for humans to
use for debugging purposes.
[133] In reality, makerequest
is a simple wrapper around a call to Prototype’s Ajax.Request method.
Table of Contents
Few things are harder to put up with than the annoyance of a good example.
In this chapter we are going to explore integrating some Asterisk features and functions into a database. There are several databases available for Linux, but we have chosen to limit our discussion to PostgreSQL. While we acknowledge MySQL is also an extremely popular database, we had to choose one, and our experience with PostgreSQL tipped the scale in its favor. All that having been said, what we are actually going to be doing is discussing the ODBC connector, so as long has you have familiarity with getting your favorite database ODBC-ready, the substance of this chapter will apply to you.
Integrating Asterisk with databases is one of the fundamental
elements allowing clustering of Asterisk into a large, distributed system.
By utilizing the power of the database, dynamically changing data can
convey information across an array of Asterisk systems. Our newest
favorite Asterisk function is func_odbc, which we will
cover later in this chapter.
While not all Asterisk deployments will require a relational database, understanding how to harness them opens the lid of a treasure chest full of new ways to design your telecom solution.
The first thing to do is to install the PostgreSQL database server:[134]
# yum install -y postgresql-server
Then start the database, which will take a few seconds to initialize for the first time:
# service postgresql startNext, create a user called asterisk, which we will use to connect to and manage the database. Run the following commands:
#su - postgres$createuser -PEnter name of user to add:asteriskEnter password for new user:Enter it again:Shall the new role be a superuser? (y/n)nShall the new user be allowed to create databases? (y/n)yShall the new user be allowed to create more new users? (y/n)nCREATE USER
By
default, PostgreSQL does not listen on the TCP/IP connection, which
Asterisk will be using. We need to modify the /var/lib/pgsql/data/postgresql.conf file in
order to allow Asterisk to make IP connections to the database. To do
this, simply remove the comment from the beginning of the tcpip_socket and port parameters. Be sure to change the tcpip_socket option from false to true.
tcpip_socket = true max_connections = 100 # note: increasing max_connections costs about 500 bytes of shared # memory per connection slot, in addition to costs from shared_buffers # and max_locks_per_transaction. #superuser_reserved_connections = 2 port = 5432
Now, edit the
/var/lib/pgsql/data/pg_hba.conf file
in order to allow the asterisk user we just created
to connect to the PostgreSQL server over the TCP/IP socket. At the end of
the file, replace everything below # Put your actual
configuration here with the following:
host all asterisk 127.0.0.1 255.255.255.255 md5 local all asterisk trust
Now we can create the database that we will use throughout this
chapter. We’re going to create a database called
asterisk and set the owner to our
asterisk user.
$createdb --owner=asterisk asteriskCREATE DATABASE
Restart the PostgreSQL server after exiting from the postgres user back to root:
$exit#service postgresql restart
We can verify our connection to the PostgreSQL server via TCP/IP like so:
#psql -h 127.0.0.1 -U asteriskPassword: Welcome to psql 7.4.16, the PostgreSQL interactive terminal. Type: \copyright for distribution terms \h for help with SQL commands \? for help on internal slash commands \g or terminate with semicolon to execute query \q to quit asterisk=>
Double-check your configuration as discussed earlier if you get the following error, which means connections via the TCP/IP socket are not allowed:
psql: could not connect to server: Connection refused Is the server running on host "127.0.0.1" and accepting TCP/IP connections on port 5432?
The ODBC connector is a database abstraction layer that makes it possible for Asterisk to communicate with a wide range of databases without requiring the developers to create a separate database connector for every database Asterisk wants to support. This saves a lot of development effort and code maintenance. There is a slight performance cost to this because we are adding another application layer between Asterisk and the database. However, this can be mitigated with proper design and is well worth it when you need powerful, flexible database capabilities in your Asterisk system.
Before we install the connector in Asterisk, we have to install ODBC into Linux itself. To install the ODBC drivers, simply run the command:
# yum install -y unixODBC unixODBC-devel libtool-ltdl libtool-ltdl-devel
Tip
See Chapter 3, Installing Asterisk for the matrix of packages you should have installed.
We need to install the unixODBC-devel package because it is used by Asterisk to create the ODBC modules we will be using throughout this chapter.
Verify that you have the PostgreSQL ODBC driver configured in the
/etc/odbcinst.ini file. It should
look something like this:
[PostgreSQL] Description = ODBC for PostgreSQL Driver = /usr/lib/libodbcpsql.so Setup = /usr/lib/libodbcpsqlS.so FileUsage = 1
Verify the system is able to see the driver by running the following
command. It should return the label name PostgreSQL if
all is well.
#odbcinst -q -d[PostgreSQL]
Next, configure the /etc/odbc.ini file, which is used to create an
identifier that Asterisk will use to reference this configuration. If at
any point in the future you need to change the database to something else,
you simply need to reconfigure this file, allowing Asterisk to continue to
point to the same place.[135]
[asterisk-connector] Description = PostgreSQL connection to 'asterisk' database Driver = PostgreSQL Database = asterisk Servername = localhost UserName = asterisk Password = welcome Port = 5432 Protocol = 7.4 ReadOnly = No RowVersioning = No ShowSystemTables = No ShowOidColumn = No FakeOidIndex = No ConnSettings =
Let’s verify that we can connect to our database using the isql application. The isql
application will not perform the connect as the root
user, and must be run as the same owner as the database. Since the owner
of the asterisk database under PostgreSQL is the
asterisk user, we must create a Linux account with
the same name. In Chapter 14, Potpourri, we will take
advantage of this user to run Asterisk as
non-root.
#su - asterisk$echo "select 1" | isql -v asterisk-connector+---------------------------------------+ | Connected! | | | | sql-statement | | help [tablename] | | quit | | | +---------------------------------------+ SQL> +------------+ | ?column? | +------------+ | 1 | +------------+ SQLRowCount returns 1 1 rows fetched$exit
With
unixODBC installed, configured, and verified to work,
we need to recompile Asterisk so that the ODBC modules are created and
installed. Change back to your Asterisk sources directory and run the
./configure script so it knows you
have installed unixODBC.
#cd /usr/src/asterisk-1.4#make distclean#./configure#make menuselect#make install
Note
Almost everything in this chapter is turned on by default. You
will want to run make menuselect to verify that the
ODBC related modules are enabled. These include
cdr_odbc, func_odbc,
func_realtime, pbx_realtime,
res_config_odbc, res_odbc.
For voicemail stored in an ODBC database, be sure to select
ODBC_STORAGE from the Voicemail Build Options menu.
You can verify the modules exist in the /usr/lib/asterisk/modules/
directory.
ODBC connections are configured in the res_odbc.conf file located in /etc/asterisk. The res_odbc.conf file sets the parameters that the various Asterisk modules will use to connect to the database.[136]
Modify the res_odbc.conf file:
[asterisk] enabled => yes dsn => asterisk-connector username => asterisk password => welcome pooling => no limit => 0 pre-connect => yes
The dsn option points at the database connection
we configured in /etc/odbc.ini, and
the pre-connect option tells Asterisk to open up and maintain a connection to the
database when loading the res_odbc.so module. This
lowers some of the overhead that would come from repeatedly setting up
and tearing down the connection to the database.
Once you’ve configured res_odbc.conf, start
Asterisk and verify the database connection with the odbc show CLI command:
*CLI> odbc show
Name: asterisk
DSN: asterisk-connector
Pooled: no
Connected: yes
The Asterisk Realtime Architecture (ARA) is a method of storing the
configuration files (that would normally be found in
/etc/asterisk) and their configuration options in a
database table. There are two types of realtime;
static and dynamic. The static version is similar
to the traditional method of reading a configuration file, except that the
data is read from the database instead. The dynamic realtime method is
used for things such as user and peer objects (SIP, IAX2), and voicemail
which loads and updates the information as it is required. Changes to
static information requires a reload just as if you had changed the text
file on the system, but dynamic information is polled by Asterisk as
needed and requires no reload. Realtime is configured in the extconfig.conf file located in the
/etc/asterisk directory. This file tells Asterisk what to load from the database and
where to load it from, allowing certain files to be loaded from the
database and other files to be loaded from the standard configuration
files.
Static realtime is used when you want to store the configuration
that you would normally place in the configuration files in /etc/asterisk but want to load from a
database. The same rules that apply to flat files on your system still
apply when using static realtime, such as requiring you to either run
the reload command from the Asterisk CLI, or to reload the module
associated with the configuration file (i.e., module reload
chan_sip.so).
When using static realtime, we tell Asterisk which files we want
to load from the database using the following syntax in the extconfig.conf file:
; /etc/asterisk/extconfig.conf filename.conf => driver,database[,table]
Note
If the table name is not specified, then Asterisk will use the name of the file instead.
The static realtime module uses a specifically formatted table to read the configuration of static files in from the database. You can define the table for static realtime in PostgreSQL as follows:
CREATE TABLE ast_config ( id serial NOT NULL, cat_metric int4 NOT NULL DEFAULT 0, var_metric int4 NOT NULL DEFAULT 0, filename varchar(128) NOT NULL DEFAULT ''::character varying, category varchar(128) NOT NULL DEFAULT 'default'::character varying, var_name varchar(128) NOT NULL DEFAULT ''::character varying, var_val varchar(128) NOT NULL DEFAULT ''::character varying, commented int2 NOT NULL DEFAULT 0, CONSTRAINT ast_config_id_pk PRIMARY KEY (id) ) WITHOUT OIDS;
A brief explanation about the columns is required in order to understand how Asterisk takes the rows from the database and applies them to the configuration for the various modules you may load:
-
cat_metric The weight of the category within the file. A lower metric means it appears higher in the file (see the sidebar A Word About Metrics”).
-
var_metric The weight of an item within a category. A lower metric means it appears higher in the list. This is useful for things like codec order in
sip.conforiax.confwhere you wantdisallow=allto appear first (metric of 0), followed byallow=ulaw(metric of 1), then byallow=gsm(metric of 2) (see the sidebar A Word About Metrics”).-
filename The filename the module would normally read from the hard drive of your system (i.e.,
musiconhold.conf,sip.conf,iax.conf, etc.).-
category The section name within the file, such as
[general], but don’t save to the database using the square brackets.-
var_name The option on the left side of the equals sign (i.e., disallow is the
var_nameindisallow=all).-
var_val The value to an option on the right side of the equals sign (i.e., all is the
var_valindisallow=all).-
commented Any value other than 0 will evaluate as if it were prefixed with a semicolon in the flat file (commented out).
A simple file we can load from static realtime is the musiconhold.conf file. Let’s start by moving this file to a temporary location:
#cd /etc/asterisk#mv musiconhold.conf musiconhold.conf.old
In
order for the classes to be removed from memory, we need to restart
Asterisk. Then we can verify our classes are blank by running
moh show classes:
*CLI>restart now*CLI>moh show classes*CLI>
So let’s put the [default] class
back into Asterisk, but now we’ll load it from the database. Connect to
PostgreSQL and execute the following INSERT
statements:
INSERT INTO ast_config (filename,category,var_name,var_val)
VALUES ('musiconhold.conf','general','mode','files');
INSERT INTO ast_config (filename,category,var_name,var_val)
VALUES ('musiconhold.conf','general','directory','/var/lib/asterisk/moh');You
can verify your values have made it into the database by running a
SELECT statement:
asterisk=# select filename,category,var_name,var_val from ast_config; filename | category | var_name | var_val ------------------+----------------+--------------+------------------------ musiconhold.conf | general | mode | files musiconhold.conf | general | directory | /var/lib/asterisk/moh (2 rows)
And now, there’s just one last thing to modify in the extconfig.conf file in /etc/asterisk directory to tell Asterisk to get the data for musiconhold.conf from the database. Add the following line to the end of the extconfig.conf file, then save it:
musiconhold.conf => odbc,asterisk,ast_config
Then connect to the Asterisk console and perform a reload:
*CLI> module reloadYou
can now verify that we have our music-on-hold classes loading from the
database by running moh show classes:
*CLI> moh show classes
Class: general
Mode: files
Directory: /var/lib/asterisk/mohAnd there you go;
musiconhold.conf loaded from the
database. You can perform the same steps in order to load other flat
files from the database!
The dynamic realtime system is used to load objects that may change often: SIP/IAX2 users and peers, queues and their members, and voicemail. Since this information in the system may either be changing or new records are being added on a regular basis, we can utilize the power of the database to let us load this information on an as-needed basis.
All of realtime is configured in the /etc/asterisk/extconfig.conf file, but
dynamic realtime has well-defined configuration names such as sippeers. Defining something like SIP peers is
done with the following format:
; extconfig.conf sippeers => driver,database[,table]
The table name is
optional, in which case Asterisk will use the predefined name (i.e.,
sippeers) as the table to look up the data. In our
example, we’ll be using the ast_sippeers table to
store our SIP peer information.
Tip
Remember that we have both SIP peers and SIP users; peers are end-points we send calls to, and a user is something we receive calls from. A friend is shorthand that defines both.
So to configure Asterisk to load all SIP peers from a database using realtime, we would define something like:
; extconfig.conf sippeers => odbc,asterisk,ast_sipfriends
To also load our SIP users from the database, define it like so:
sipusers => odbc,asterisk,ast_sipfriends
You
may have noticed we used the same table for both the
sippeers and sipusers. This is
because there will be a type field (just as if you had defined the type
in the sip.conf file) that will let us define a
type of user, peer, or
friend. When defining the table for SIP users and
peers, we need at least the following:
+------+--------+-------+--------+-----+------------+----------+ |name |host |secret | ipaddr | port| regseconds | username | +------+--------+-------+--------+-----+------------+----------+ |100 |dynamic |welcome| | |1096954152 | 1000 | +------+--------+-------+--------+-----+------------+----------+
The
port, regseconds, and ipaddr fields are required to let Asterisk
store the registration information for the peer in order to know where
to send the call. This is assuming the host is dynamic; however, if the peer is static, we would have to populate the ipaddr field ourselves. The port field is optional and would use the
default standard port defined in the [general] section, and the regseconds would remain blank.) There are many
more options for a SIP friend that we can define, such as the caller ID,
and adding that information is as simple as adding the callerid column to the table. See the
sip.conf.sample file for more options
that can be defined for SIP friends.
Call Detail Records (CDR) contain information about calls that have passed through your Asterisk system. They are discussed further in Chapter 13, Managing Your Asterisk System. This is a popular use of databases in Asterisk because CDR can be easier to manage if you store the records in a database (for example, you could keep track of many Asterisk systems in a single table).
Let’s create a table in our database to store CDR. Log in to the PostgreSQL server with the psql application:
# psql -U asterisk -h localhost asterisk
Password:And create the asterisk_cdr
table:
asterisk=> CREATE TABLE asterisk_cdr ( id bigserial NOT NULL, calldate timestamptz, clid varchar(80), src varchar(80), dst varchar(80), dcontext varchar(80), channel varchar(80), dstchannel varchar(80), lastapp varchar(80), lastdata varchar(80), duration int8, billsec int8, disposition varchar(45), amaflags int8, accountcode varchar(20), uniqueid varchar(40), userfield varchar(255), CONSTRAINT asterisk_cdr_id_pk PRIMARY KEY (id) ) WITHOUT OIDS;
You can verify the table was created by
using the \dt command (describe
tables):
asterisk=> \dt asterisk_cdr
List of relations
Schema | Name | Type | Owner
--------+--------------+-------+----------
public | asterisk_cdr | table | asterisk
(1 row)Next, configure Asterisk to store its CDR into the
database. This is done in the /etc/asterisk/cdr_odbc.conf file with the
following configuration:
[global] dsn=asterisk-connector username=asterisk password=welcome loguniqueid=yes table=asterisk_cdr
If Asterisk is already running, from the Asterisk CLI execute
module reload cdr_odbc.so. You can also
just type reload
*CLI> reloadVerify
the status of CDR by entering the following command and looking for
CDR registered backend:
ODBC:
*CLI> cdr status
CDR logging: enabled
CDR mode: simple
CDR registered backend: cdr-custom
CDR registered backend: cdr_manager
CDR registered backend: ODBCNow, perform a call
through your Asterisk box and verify you have data in the asterisk_cdr
table. The easiest way to test a call is with the Asterisk CLI command
console dial (assuming that you have a
sound card and chan_oss installed). However, you can
utilize any method at your disposal to place a test call:
*CLI>console dial 100@default-- Executing [100@default:1] Playback("OSS/dsp", "tt-weasels") in new stack -- <OSS/dsp> Playing 'tt-weasels' (language 'en')
Then
connect to the database and perform a SELECT statement
to verify you have data in the
asterisk_cdr table. You could also do SELECT * FROM asterisk_cdr;, but that will
return a lot more data:
#psql -U asterisk -h localhost asteriskPassword: asterisk=>SELECT id,dst,channel,uniqueid,calldate FROM asterisk_cdr;id | dst | channel | uniqueid | calldate ----+-----+---------+----------------------+------------------------ 1 | 100 | OSS/dsp | toronto-1171611019.0 | 2007-02-16 02:30:19-05 (1 rows)
The func_odbc dialplan function is arguably the coolest and most powerful dialplan function
in Asterisk. It allows you to create and use fairly simple dialplan
functions that retrieve and use information from databases directly in the
dialplan. There are all kinds of ways in which this might be used, such as
managing users or allowing sharing of dynamic information within a
clustered set of Asterisk machines.
What func_odbc allows you to do is define SQL
queries to which you assign function names. In effect, you are
creating custom functions that obtain their results by executing queries
against a database. The func_odbc.conf file is where you specify the relationship between the function
names you create and the SQL statements you wish them to perform. By
referring to the named function in the dialplan, you can retrieve and
update values in the database.
Tip
While using an external script to interact with a database (from which a flat file is created that Asterisk would read) has advantages (if the database went down, your system would continue to function and the script would simply not update any files until connectivity to the database was restored), a major disadvantage is that any changes you make to a user are not available until you run the update script. This is probably not a big issue on small systems, but on large systems, waiting for changes to take effect can cause issues, such as pausing a live call while a large file is loaded and parsed.
You can relieve some of this by utilizing a replicated database
system. In the version of Asterisk following 1.4 (currently trunk),
the syntax of the func_odbc.conf
file changes slightly, but gives the ability to failover to another
database system. This way you can cluster the database backend
utilizing a master-master relationship (pgcluster; Slony-II), or a
master-slave (Slony-I) replication system.
In order to get you into the right frame of mind for what follows, we want you to picture a Dagwood sandwich.[137]
Can you relay the total experience of such a thing by showing
someone a picture of a tomato, or by waving a slice of cheese about? Not
hardly. That is the conundrum we faced when trying to give a useful
example of why func_odbc is so powerful. So, we decided
to build the whole sandwich for you. It’s quite a mouthful, but after a
few bites of this, peanut butter and jelly is never going to be the
same.
For our example, we decided to implement something that we think could have some practical uses. Let’s picture a small company with a sales force of five people who have to share two desks. This is not as cruel as it seems, because these folks spend most of their time on the road, and they are each only in the office for at most one day each week.
Still, when they do get into the office, they’d like the system to know which desk they are sitting at, so that their calls can be directed there. Also, the boss wants to be able to track when they are in the office, and control calling privileges from those phones when no one is there.
This need is typically solved by what is called a hot-desking feature, so we have built
one for you in order to show you the power of
func_odbc.
Lets start with the easy stuff, and create two desktop phones in the
sip.conf file.
; sip.conf ; HOT DESK USERS [desk_1] type=friend host=dynamic secret=my_special_secret context=hotdesk qualify=yes [desk_2] type=friend host=dynamic secret=my_special_secret context=hotdesk qualify=yes ; END HOT DESK USERS
These two desk phones both enter the
dialplan at the [hotdesk] context
in extensions.conf. If
you want to have these devices actually work, you will of course need to
set the appropriate parameters in the devices themselves, but we’ve
covered all that in Chapter 4, Initial Configuration of Asterisk.
That’s all for sip.conf.
We’ve got two slices of bread. Hardly a sandwich yet.
Now let’s get the database part of it set up (we are assuming that you have an ODBC database created and working as outlined in the earlier parts of this chapter). First, connect to the database console like so:
#su - postgres$psql -U asterisk -h localhost asteriskPassword:
Then create the table with the following bit of code:
CREATE TABLE ast_hotdesk
(
id serial NOT NULL,
extension int8,
first_name text,
last_name text,
cid_name text,
cid_number varchar(10),
pin int4,
context text,
status bool DEFAULT false,
"location" text,
CONSTRAINT ast_hotdesk_id_pk PRIMARY KEY (id)
)
WITHOUT OIDS;After that, we populated the database with the following information (some of the values that you see actually would change only after the dialplan work is done, but we have it in here by way of example). At the PostgreSQL console, run the following commands:
asterisk=> INSERT INTO ast_hotdesk ('extension', 'first_name', 'last_name', 'cid_name',
'cid_number', 'pin', 'context', 'location') \
VALUES (1101, 'Leif', 'Madsen', 'Leif Madsen', '4165551101', '555', 'longdistance',
'desk_1');Repeat the previous line and change the
VALUES for all entries you wish to have in the database. You can view the
data in the ast_hotdesk table by running a simple
SELECT statement from the PostgreSQL console:
asterisk=> SELECT * FROM ast_hostdesk;which would give you something like the following output:
| id | extension | first_name | last_name | cid_name | cid_number | pin
|---+-----------+------------+----------------+-----------------+-------------+----
| 1 | 1101 | "Leif" | "Madsen" | "Leif Madsen" | "4165551101" | "555"
| 2 | 1102 | "Jim" | "Van Meggelen" | "Jim Van Meggelen" | "4165551102" | "556"
| 3 | 1103 | "Jared" | "Smith" | "Jared Smith" | "4165551103" | "557"
| 4 | 1104 | "Mark" | "Spencer" | "Mark Spencer" | "4165551104" | "558"
| 5 | 1105 | "Kevin" | "Fleming" | "Kevin Fleming" | "4165551105" | "559"
| context | status | location |$
+-----------------+---------+----------+
| "longdistance" | "TRUE" | "desk_1" |
| "longdistance" | "FALSE" | "" |
| "local" | "FALSE" | "" |
| "international" | "FALSE" | "" |
| "local" | "FALSE" | "" |
We’ve got the condiments now, so let’s get to our dialplan. This is where the magic is going to happen.
Note
Before you start typing, take note that we have placed all of the sample text that follows in appendix H, so while we encourage you to follow us along through the examples, you can also see what it all looks like as a whole, by checking the appendix (and by copying and pasting, if you have an electronic version of this book).
Somewhere in extensions.conf we are going to
have to create the [hotdesk] context.
To start, let’s define a pattern-match extension that will allow the users
to log in:
; extensions.conf
; Hot Desking Feature
[hotdesk]
; Hot Desk Login
exten => _110[1-5],1,NoOp()
exten => _110[1-5],n,Set(E=${EXTEN})
exten => _110[1-5],n,Verbose(1|Hot Desk Extension ${E} is changing status)
exten => _110[1-5],n,Verbose(1|Checking current status of extension ${E})
exten => _110[1-5],n,Set(${E}_STATUS=${HOTDESK_INFO(status,${E})})
exten => _110[1-5],n,Set(${E}_PIN=${HOTDESK_INFO(pin,${E})})We’re not done writing this extension yet, but let’s pause for a moment and see where we’re at so far.
When a sales agent sits down at a desk, they log in by dialing their
own extension number. In this case we have allowed the 1101 through 1105
extensions to log in with our pattern match of _110[1-5]. You could just as easily make this
less restrictive by using _11XX
(allowing 1100 through 1199). This extension uses
func_odbc to perform a lookup with the HOTDESK_INFO() dialplan function (which we will
be creating shortly). This custom function (which we define in the
func_odbc.conf file) performs an SQL
statement and returns whatever is retrieved from the database.
We would define the new function HOTDESK_INFO() in func_odbc.conf like so:
[INFO]
prefix=HOTDESK
dsn=asterisk
read=SELECT ${ARG1} FROM ast_hotdesk WHERE extension = '${ARG2}'That’s a lot of stuff in just a few lines. Let’s quickly cover them before we move on.
First of all, the prefix is
optional. If you don’t configure the prefix, then Asterisk adds “ODBC” to the name of
the function (in this case INFO), which means this function would become
ODBC_INFO(). This is not very
descriptive of what the function is doing, so it can be helpful to assign
a prefix that helps to relate your ODBC functions to the task they are
performing. In this case we chose HOTDESK, which means that this custom
function will be named HOTDESK_INFO.
The dsn attribute tells Asterisk
which connection to use from res_odbc.conf. Since
several database connections could be configured in
res_odbc.conf, we specify which one to use here. In
Figure 12.1, “Relationships between func_odbc.conf, res_odbc.conf,
/etc/odbc.ini (unixODBC), and the database connection”, we show the relationship between
the various file configurations and how they reference down the chain to
connect to the database.
We then define our SQL statement with the read attribute. Dialplan functions have two
different formats that they can be called with: one for retrieving
information, and one for setting information. The read attribute is used when we call the HOTDESK_INFO() function with the retrieve format
(and we could execute a separate SQL statement with the write attribute; we’ll discuss the format for
the write attribute a little bit later
in this chapter).
Reading values from this function would take the format in the dialplan like so:
exten => s,n,Set(RETURNED_VALUE=${HOTDESK_INFO(status,1101)})This
would return the value located in the database within the
status column where the extension
column equals 1101. The status and
1101 we pass to the HOTDESK_INFO() function are then placed
into the SQL statement we assigned to the read
attribute, available as ${ARG1} and
${ARG2}, respectively. If we had passed
a third option, this would have been available as ${ARG3}.
Note
Be sure that your data is unique enough that you only get a single row back. If more than one row is returned, Asterisk will see only the first row returned. With PostgreSQL, you could add a LIMIT 1 to the end of your SQL statement to limit a single row being returned, but this is not a good practice to rely on. A little further into this section we’ll see how we can use the LIMIT and OFFSET PostgreSQL functions to loop through multiple rows of data!
After the SQL statement is executed, the value returned (if any) is
assigned to the RETURNED_VALUE channel variable.
Figure 12.1. Relationships between func_odbc.conf, res_odbc.conf, /etc/odbc.ini (unixODBC), and the database connection
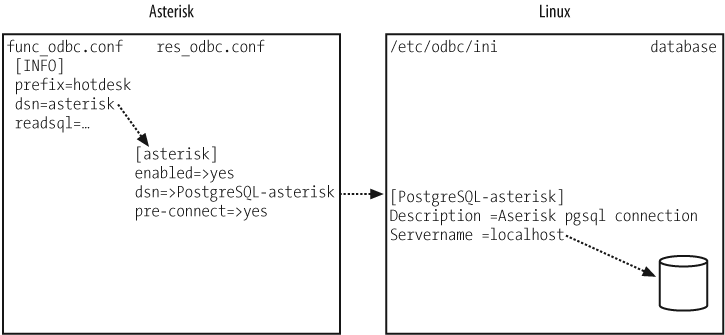
So, in the first two lines of our following block of code we are
passing the value status, and the
value contained in the ${E} variable
(e.g., 1101) to the HOTDESK_INFO()
function. The two values are then replaced in the SQL statement with
${ARG1} and ${ARG2}, respectfully, the SQL statement is
executed, and the value returned is assigned to the ${E}_STATUS channel variable.
OK, let’s finish writing the pattern-match extension now:
exten => _110[1-5],n,Set(${E}_STATUS=${HOTDESK_INFO(status,${E})})
exten => _110[1-5],n,Set(${E}_PIN=${HOTDESK_INFO(pin,${E})})
exten => _110[1-5],n,GotoIf($[${ISNULL(${${E}_STATUS})}]?invalid_user,1)
; check if ${E}_STATUS is NULL
exten => _110[1-5],n,GotoIf($[${${E}_STATUS} = 1]?logout,1:login,1)After
assigning the value of the status column to the
${E}_STATUS variable (if you dialed extension 1101,
then the variable name would be 1101_STATUS), we check
if we received a value back from the database (error checking). We make
use of the ISNULL() function to perform
this check.
The last row in the block checks the status of the phone, and if
currently logged in, will log off the agent. If not already logged in, it
will go to extension login, priority
1 within the same context.[138]
Note
In the version following 1.4 (currently trunk) you can use the
${ODBCROWS} channel variable
with statements executed by a readsql. We could have replaced the GotoIf() with something like:
exten => _110[1-5],n,GotoIf($[${ODBCROWS} < 0]?invalid_user,1)The login extension runs some initial checks to verify the pin code entered by
the agent. We allow him three tries to enter the correct pin, and if
invalid, will send the call to the login_fail extension (which we will be writing
later on).
exten => login,1,NoOp() ; set counter initial value
exten => login,n,Set(PIN_TRIES=0) ; set max number of login attempts
exten => login,n,Set(MAX_PIN_TRIES=3)
exten => login,n(get_pin),NoOp() ; increase pin try counter
exten => login,n,Set(PIN_TRIES=$[${PIN_TRIES} + 1])
exten => login,n,Read(PIN_ENTERED|enter-password|${LEN(${${E}_PIN})})
exten => login,n,GotoIf($[${PIN_ENTERED} = ${${E}_PIN}]?valid_login,1)
exten => login,n,Playback(invalid-pin)
exten => login,n,GotoIf($[${PIN_TRIES} <=${MAX_PIN_TRIES}]?get_pin:login_fail,1)
If the pin entered matches, we validate the login with the
valid_login extension. First we utilize the CHANNEL variable to
figure out which phone device we’re calling from. The
CHANNEL variable is usually populated with something
such as: SIP/desk_1-ab4034c, so we make use of the
CUT() function to first pull off the
SIP/ portion of the string and assign that to LOCATION.
We then strip off the -ab4034c part of the string,
discard it, and assign the remainder of desk_1 to the
LOCATION variable.
exten => valid_login,1,NoOp()
; CUT off the channel technology and assign to the LOCATION variable
exten => valid_login,n,Set(LOCATION=${CUT(CHANNEL,/,2)})
; CUT off the unique identifier and save the remainder to the LOCATION variable
exten => valid_login,n,Set(LOCATION=${CUT(LOCATION,-,1)})We utilize yet another custom function, HOTDESK_CHECK_PHONE_LOGINS(), created in func_odbc.conf to check if any other users were
previously logged in to this phone and had forgotten to log out. If the
number of previously logged in users was greater than 0 (and should only
ever be 1, but we check for more anyway and reset those, too), it runs the
logic in the logout_login
extension.
If no previous agents were logged in, we update the login status for
this user with the HOTDESK_STATUS()
function:
exten => valid_login,n,Set(ARRAY(USERS_LOGGED_IN)=${HOTDESK_CHECK_PHONE_
LOGINS(${LOCATION})})
exten => valid_login,n,GotoIf($[${USERS_LOGGED_IN} > 0]?logout_login,1)
exten => valid_login,n(set_login_status),NoOp()
; Set the status for the phone to '1' and where we're logged into
; NOTE: we need to escape the comma here because the Set() application has arguments
exten => valid_login,n,Set(HOTDESK_STATUS(${E})=1\,${LOCATION})
exten => valid_login,n,GotoIf($[${ODBCROWS} < 1]?error,1)
exten => valid_login,n,Playback(agent-loginok)
exten => valid_login,n,Hangup()
We create a write function in func_odbc.conf like so:
[STATUS]
prefix=HOTDESK
dsn=asterisk
write=UPDATE ast_hotdesk SET status = '${VAL1}', location = '${VAL2}' WHERE extension
= '${ARG1}'
The syntax is very similar to the read syntax
discussed earlier in the chapter, but there are a few new things here, so
let’s discuss them before moving on.
The first thing you may have noticed is that we now have both
${VALx}
and
${ARGx}
variables in our SQL statement. These contain the values we pass
to the function from the dialplan. In this case, we have two
VAL variables, and a single ARG
variable that were set from the dialplan via this statement:
Set(HOTDESK_STATUS(${E})=1\,${LOCATION})
Tip
Because the Set() dialplan
application can also take arguments (you can set
multiple variables and values by separating them with commas
or pipes), you need to escape the comma with the backslash ( \ ) so it is not processed by the
expression parser for the Set()
application, but rather parses it for the HOTDESK_STATUS()
function.
Notice the syntax is slightly different from that of the read style function. This signals to Asterisk that you want to perform a write (this is the same syntax as other dialplan functions).
We are passing the value of the ${E} variable to
the HOTDESK_STATUS() function, whose value is then
accessible in the SQL statement within func_odbc.conf
with the ${ARG1} variable. We then pass two values:
1 and ${LOCATION}. These are
available to the SQL statement in the ${VAL1} and
${VAL2} variables, respectively.
As mentioned previously, if we had to log out one or more agents
before logging in, we would check this with the logout_login extension. This dialplan logic will
utilize the While() application to loop
through the database and perform any database correction that may need to
occur. More than likely this will execute only one loop, but it’s a good
example of how you might update or parse multiple rows in the
database:
exten => logout_login,1,NoOp()
; set all logged in users on this device to logged out status
exten => logout_login,n,Set(ROW_COUNTER=0)
exten => logout_login,n,While($[${ROW_COUNTER} < ${USERS_LOGGED_IN}])The
${USERS_LOGGED_IN} variable was set
previously with the HOTDESK_CHECK_PHONE_LOGINS() function, which
assigned a value of 1 or greater. We did this by counting the number of
rows that were affected:
; func_odbc.conf
[CHECK_PHONE_LOGINS]
prefix=HOTDESK
dsn=asterisk
read=SELECT COUNT(status) FROM ast_hotdesk WHERE status = '1' AND location = '${ARG1}'We
then get the extension number of the user that is logged in with the
HOTDESK_LOGGED_IN_USER() function. The
LOCATION variable is populated with desk_1, which tells us which device we want to
check on, and the ${ROW_COUNTER}
contains which iteration of the loop we’re on. These are both passed as
arguments to the dialplan function. The result is then assigned to the
WHO variable:
exten => logout_login,n,Set(WHO=${HOTDESK_LOGGED_IN_USER(${LOCATION},${ROW_COUNTER})})The
HOTDESK_LOGGED_IN_USER() function then
pulls a specific row out of the database that corresponds with the
iteration of the loops we are trying to process:
[LOGGED_IN_USER]
prefix=HOTDESK
dsn=asterisk
read=SELECT extension FROM ast_hotdesk WHERE status = '1'
AND location = '${ARG1}' ORDER BY id LIMIT '1' OFFSET '${ARG2}'Now
that we know what extension we want to update, we write to the HOTDESK_STATUS() function, and assign a 0 to the
status column where the extension number matches the
value in the ${WHO} variable (i.e., 1101). We then end
the loop with EndWhile() and return back to the
valid_login extension at the
set_login_status priority label (as discussed
previously):
exten => logout_login,n,Set(HOTDESK_STATUS(${WHO})=0) ; logout phone
exten => logout_login,n,Set(ROW_COUNTER=$[${ROW_COUNTER} + 1])
exten => logout_login,n,EndWhile()
exten => logout_login,n,Goto(valid_login,set_login_status) ; return to logging in
The rest of the context should be fairly straightforward (if some of
this doesn’t make sense, we suggest you go back and refresh your memory
with Chapter 5, Dialplan Basics and Chapter 6, More Dialplan Concepts). The one trick you may be unfamiliar with
could be the usage of the ${ODBCROWS}
channel variable, which is set by the HOTDESK_STATUS() function. This tells us how
many rows were affected in the SQL UPDATE, which we
assume to be 1. If the value of ${ODBCROWS} is less than 1, then we assume an
error and handle appropriately:
exten => logout,1,NoOp()
exten => logout,n,Set(HOTDESK_STATUS(${E})=0)
exten => logout,n,GotoIf($[${ODBCROWS} < 1]?error,1)
exten => logout,n,Playback(silence/1&agent-loggedoff)
exten => logout,n,Hangup()
exten => login_fail,1,NoOp()
exten => login_fail,n,Playback(silence/1&login-fail)
exten => login_fail,n,Hangup()
exten => error,1,NoOp()
exten => error,n,Playback(silence/1&connection-failed)
exten => error,n,Hangup()
exten => invalid_user,1,NoOp()
exten => invalid_user,n,Verbose(1|Hot Desk extension ${E} does not exist)
exten => invalid_user,n,Playback(silence/2&invalid)
exten => invalid_user,n,Hangup()We also include the
hotdesk_outbound context which will
handle our outgoing calls after we have logged the agent in to the
system:
include => hotdesk_outbound
The
hotdesk_outbound context utilizes many of the same
principles and usage as previously discussed, so we won’t approach it
quite so thoroughly, but essentially the [hotdesk_outbound]LOCATION variable using the CHANNEL
variable, then determine which extension (agent) is logged in to the
system and assign it to the WHO variable. If this
variable is NULL, then we reject the outgoing call. If
not NULL, then we get the agent information using the
HOTDESK_INFO() function and assign it
to several CHANNEL variables. This includes the context to handle the call
with, where we perform a Goto() to the
context we have been assigned (which controls our outbound access).
If we try to dial a number that is not handled by our context (or
one of the transitive contexts—i.e., international contains -> long
distance, which also contains -> local), then the built-in extension
i is executed which plays back a message stating the
action cannot be performed, then hangs up the caller:
[hotdesk_outbound]
exten => _X.,1,NoOp()
exten => _X.,n,Set(LOCATION=${CUT(CHANNEL,/,2)})
exten => _X.,n,Set(LOCATION=${CUT(LOCATION,-,1)})
exten => _X.,n,Set(WHO=${HOTDESK_PHONE_STATUS(${LOCATION})})
exten => _X.,n,GotoIf($[${ISNULL(${WHO})}]?no_outgoing,1)
exten => _X.,n,Set(${WHO}_CID_NAME=${HOTDESK_INFO(cid_name,${WHO})})
exten => _X.,n,Set(${WHO}_CID_NUMBER=${HOTDESK_INFO(cid_number,${WHO})})
exten => _X.,n,Set(${WHO}_CONTEXT=${HOTDESK_INFO(context,${WHO})})
exten => _X.,n,Goto(${${WHO}_CONTEXT},${EXTEN},1)
[international]
exten => _011.,1,NoOp()
exten => _011.,n,Set(E=${EXTEN})
exten => _011.,n,Goto(outgoing,call,1)
exten => i,1,NoOp()
exten => i,n,Playback(silence/2&sorry-cant-let-you-do-that2)
exten => i,n,Hangup()
include => longdistance
[longdistance]
exten => _1NXXNXXXXXX,1,NoOp()
exten => _1NXXNXXXXXX,n,Set(E=${EXTEN})
exten => _1NXXNXXXXXX,n,Goto(outgoing,call,1)
exten => _NXXNXXXXXX,1,Goto(1${EXTEN},1)
exten => i,1,NoOp()
exten => i,n,Playback(silence/2&sorry-cant-let-you-do-that2)
exten => i,n,Hangup()
include => local
[local]
exten => _416NXXXXXX,1,NoOp()
exten => _416NXXXXXX,n,Set(E=${EXTEN})
exten => _416NXXXXXX,n,Goto(outgoing,call,1)
exten => i,1,NoOp()
exten => i,n,Playback(silence/2&sorry-cant-let-you-do-that2)
exten => i,n,Hangup()If the call is allowed to be
executed, then the call is sent to the [outgoing] context for call processing, where
the caller ID name and number are set with the CALLERID() function. The call is then placed via the
SIP channel using the service_provider
we created in the sip.conf
file:
[outgoing]
exten => call,1,NoOp()
exten => call,n,Set(CALLERID(name)=${${WHO}_CID_NAME})
exten => call,n,Set(CALLERID(number)=${${WHO}_CID_NUMBER})
exten => call,n,Dial(SIP/service_provider/${E})
exten => call,n,Playback(silence/2&pls-try-call-later)
exten => call,n,Hangup()Our service_provider might look something like this
in sip.conf:
[service_provider] type=friend host=switch1.service_provider.net username=my_username fromuser=my_username secret=welcome context=incoming canreinvite=no disallow=all allow=ulaw
And that’s it! The complete dialplan utilized for the hot-desk feature is displayed in full in Appendix G, An Example of func_odbc.
How many things have you just thought of that you could apply func_odbc to? See why we’re so excited about this feature as well?!
Asterisk contains the ability to store voicemail inside the database using the ODBC connector. This is useful in a clustered environment where you want to abstract the voicemail data from the local system so that multiple Asterisk boxes have access to the same data. Of course, you have to take into consideration that you are centralizing a part of Asterisk, and you need to take actions to protect that data, such as regular backups, and possibly clustering the database backend using replication. If you are using PostgreSQL, there are some good projects for doing this: PGcluster (http://pgfoundry.org/projects/pgcluster/) and Slony-I (http://gborg.postgresql.org/project/slony1/projdisplay.php).
Asterisk stores the voicemail inside a Binary Large Object (BLOB). When retrieving the data, it pulls the information out of the BLOB and temporarily stores it on the hard drive while it is being played back to the user. Asterisk then removes the BLOB and records from the database when the user deletes the voicemail. Many databases, such as MySQL, contain native support for BLOBs, but PostgreSQL has a couple of extra steps required to utilize this functionality that we’ll explore in this section. When you’re done, you’ll be able to record, play back, and delete voicemail data from the database just as if it were stored on the local hard drive.
Note
This section builds upon previous configuration sections in this
chapter. If you have not already done so, be sure to follow the steps
in the the section called “Installing the Database”” and the section called “Installing and Configuring ODBC”” sections before continuing.
In the the section called “Installing and Configuring ODBC”” section, be
sure you have enabled ODBC_STORAGE in the
menuselect system under Voicemail Options.
We have to tell PostgreSQL how to handle the large objects. This includes creating a trigger to clean up the data when we delete a record from the database that references a large object.
Connect to the database as the asterisk user from the console:
# psql -h localhost -U asterisk asterisk
Password:At the PostgreSQL console, run the following script to create the large object type:
CREATE FUNCTION loin (cstring) RETURNS lo AS 'oidin' LANGUAGE internal IMMUTABLE STRICT; CREATE FUNCTION loout (lo) RETURNS cstring AS 'oidout' LANGUAGE internal IMMUTABLE STRICT; CREATE FUNCTION lorecv (internal) RETURNS lo AS 'oidrecv' LANGUAGE internal IMMUTABLE STRICT; CREATE FUNCTION losend (lo) RETURNS bytea AS 'oidrecv' LANGUAGE internal IMMUTABLE STRICT; CREATE TYPE lo ( INPUT = loin, OUTPUT = loout, RECEIVE = lorecv, SEND = losend, INTERNALLENGTH = 4, PASSEDBYVALUE ); CREATE CAST (lo AS oid) WITHOUT FUNCTION AS IMPLICIT; CREATE CAST (oid AS lo) WITHOUT FUNCTION AS IMPLICIT;
We’ll be making use of the PostgreSQL procedural language called pgSQL/PL to create a function. This function will be called from a trigger that gets executed whenever we modify or delete a record from the table used to store voicemail. This is so the data is cleaned up and not left as an orphan in the database:
CREATE FUNCTION vm_lo_cleanup() RETURNS "trigger"
AS $$
declare
msgcount INTEGER;
begin
-- raise notice 'Starting lo_cleanup function for large object with oid
%',old.recording;
-- If it is an update action but the BLOB (lo) field was not changed,
dont do anything
if (TG_OP = 'UPDATE') then
if ((old.recording = new.recording) or (old.recording is NULL)) then
raise notice 'Not cleaning up the large object table,
as recording has not changed';
return new;
end if;
end if;
if (old.recording IS NOT NULL) then
SELECT INTO msgcount COUNT(*) AS COUNT FROM voicemessages WHERE recording
= old.recording;
if (msgcount > 0) then
raise notice 'Not deleting record from the large object table, as object is
still referenced';
return new;
else
perform lo_unlink(old.recording);
if found then
raise notice 'Cleaning up the large object table';
return new;
else
raise exception 'Failed to cleanup the large object table';
return old;
end if;
end if;
else
raise notice 'No need to cleanup the large object table, no recording on old row';
return new;
end if;
end$$
LANGUAGE plpgsql;We’re going to create a table called
voicemessages where the voicemail information will be
stored:
CREATE TABLE voicemessages ( uniqueid serial PRIMARY KEY, msgnum int4, dir varchar(80), context varchar(80), macrocontext varchar(80), callerid varchar(40), origtime varchar(40), duration varchar(20), mailboxuser varchar(80), mailboxcontext varchar(80), recording lo, label varchar(30), "read" bool DEFAULT false );
And now we need to associate a trigger with our newly
created table in order to perform cleanup whenever we make a change or
deletion from the voicemessages table:
CREATE TRIGGER vm_cleanup AFTER DELETE OR UPDATE ON voicemessages FOR EACH ROW EXECUTE PROCEDURE vm_lo_cleanup();
There isn’t much to add to the voicemail.conf file to enable the
ODBC voicemail storage. In fact, it’s only three lines! Generally, you
probably have multiple format types defined in the
[general] section of
voicemail.conf, however we need to set this to a
single format. The wav49 format is a compressed WAV file format that
should be playable on both Linux and Microsoft Windows desktops.
The odbcstorage option points at the name you
defined in the res_odbc.conf file (if you’ve been
following along in this chapter, then we called it
asterisk). The odbctable option
refers to the table where voicemail information should be stored. In the
examples in this chapter we use the table named
voicemessages:
[general] format=wav49 odbcstorage=asterisk odbctable=voicemessages
You may want to create a separate voicemail context, or you can utilize the default voicemail context:
[default] 1000 => 1000,J.P. Wiser
Now connect to your Asterisk console and unload then reload the app_voicemail.so module:
*CLI> module unload app_voicemail.so == Unregistered application 'VoiceMail' == Unregistered application 'VoiceMailMain' == Unregistered application 'MailboxExists' == Unregistered application 'VMAuthenticate' *CLI> module load app_voicemail.so Loaded /usr/lib/asterisk/modules/app_voicemail.so => (Comedian Mail (Voicemail System)) == Registered application 'VoiceMail' == Registered application 'VoiceMailMain' == Registered application 'MailboxExists' == Registered application 'VMAuthenticate' == Parsing '/etc/asterisk/voicemail.conf': Found
And verify that your new mailbox loaded successfully:
*CLI> voicemail show users for default
Context Mbox User Zone NewMsg
default 1000 J.P. Wiser 0
Let’s create some simple dialplan logic to leave and retrieve some voicemail from our test voicemail box. We can use the simple dialplan logic as follows:
[odbc_vm_test] exten => 100,1,Voicemail(1000@default) ; leave a voicemail exten => 200,1,VoicemailMain(1000@default) ; retrieve a voicemail
Once you’ve updated your extensions.conf file, be sure to reload the dialplan:
*CLI> dialplan reloadYou
can either include the odbc_vm_test context into a context accessible
by an existing user, or create a separate user to test with. If you wish
to do the latter, you could define a new SIP user in sip.conf like so (this will work assuming the
phone is on the local LAN):
[odbc_test_user] type=friend secret=supersecret context=odbc_vm_test host=dynamic qualify=yes disallow=all allow=ulaw allow=gsm
Don’t forget to reload the SIP module:
*CLI> module reload chan_sip.soAnd verify that the SIP user exists:
*CLI> sip show users like odbc_test_user
Username Secret Accountcode Def.Context ACL NAT
odbc_test_user supersecret odbc_vm_test No RFC3581
Then configure your phone or client with the username odbc_test_user and password supersecret, and then place a call to extension 100 to leave a voicemail. If successful, you should see something like:
-- Executing VoiceMail("SIP/odbc_test_user-10228cac", "1000@default") in new stack
-- Playing 'vm-intro' (language 'en')
-- Playing 'beep' (language 'en')
-- Recording the message
-- x=0, open writing: /var/spool/asterisk/voicemail/default/1000/tmp/dlZunm format:
wav49, 0x101f6534
-- User ended message by pressing #
-- Playing 'auth-thankyou' (language 'en')
== Parsing '/var/spool/asterisk/voicemail/default/1000/INBOX/msg0000.txt': FoundWe
can now make use of the psql
application again to make sure the recording really did make it into the
database:
# psql -h localhost -U asterisk asterisk
Password:Then run a SELECT statement to
verify that you have some data in the voicemessages
table:
localhost=# SELECT id,dir,callerid,mailboxcontext,recording FROM voicemessages; id | dir | callerid | mailboxcontext | recording ---+------------------------------------------+--------------+---------------+------- 1 | /var/spool/asterisk/voicemail/default/1000/INBOX | +18005551212 | default | 47395 (1 row)
If the recording was placed in the database, we should
get a row back. You’ll notice that the recording column contains a
number (which will most certainly be different from that listed here),
which is really the object ID of the large object stored in a system
table. Let’s verify that the large object exists in this system table
with the lo_list command:
localhost=# \lo_list
Large objects
ID | Description
-------+-------------
47395 |
(1 row)What we’re verifying is that the object ID in the
voicemessages table matches that listed in the large
object system table. We can also pull the data out of the database and
store it to the hard drive so we can play the file back to make sure our
message was saved correctly:
localhost=# \lo_export 47395 /tmp/voicemail-47395.wav
lo_export
Then verify the audio with your favorite audio application, such
as the play application:
# play /tmp/voicemail-47395.wav
Input Filename : /tmp/voicemail-47395.wav
Sample Size : 8-bits
Sample Encoding: wav
Channels : 1
Sample Rate : 8000
Time: 00:06.22 [00:00.00] of 00:00.00 ( 0.0%) Output Buffer: 298.36K
Done.And now that we’ve confirmed everything was stored in
the database correctly, we can try listening to it via the
VoicemailMain() application by dialing extension
200:
*CLI>
-- Executing VoiceMailMain("SIP/odbc_test_user-10228cac", "1000@default") in new stack
-- Playing 'vm-password' (language 'en')
-- Playing 'vm-youhave' (language 'en')
-- Playing 'digits/1' (language 'en')
-- Playing 'vm-INBOX' (language 'en')
-- Playing 'vm-message' (language 'en')
-- Playing 'vm-onefor' (language 'en')
-- Playing 'vm-INBOX' (language 'en')
-- Playing 'vm-messages' (language 'en')
-- Playing 'vm-opts' (language 'en')
-- Playing 'vm-first' (language 'en')
-- Playing 'vm-message' (language 'en')
== Parsing '/var/spool/asterisk/voicemail/default/1000/INBOX/msg0000.txt': Found
In this chapter, we learned about several areas where Asterisk can integrate with a relational database. This is useful for systems where you need to start scaling by clustering multiple Asterisk boxes working with the same centralized information, or when you want to start building external applications to modify information without requiring a reload of the system (i.e., not requiring the modification of flatfiles).
[134] On a large, busy system you will want to install this on a completely separate box from your Asterisk system.
[135] Yes, this is excessively verbose. The only entries you really
need are Driver, Database, and Servername. Even the Username and Password are specified elsewhere, as seen
later.
[136] The pooling and limit options are quite useful for MS SQL Server and Sybase
databases. These permit you to establish multiple connections (up to
limit connections) to a database
while ensuring that each connection has only one statement executing
at once (this is due to a limitation in the protocol used by these
database servers).
[137] And if you don’t know what a Dagwood is, that’s what Wikipedia is for. I am not that old.
[138] Remember that in a traditional phone system all extensions must be numbers, but in Asterisk, extensions can have names as well. A possible advantage of using an extension that’s not a number is that it will be much harder for a user to dial it from her phone and, thus, more secure. We’re going to use several named extensions in this example. If you want to be absolutely sure that a malicious user cannot access those named extensions, simply use the trick that the AEL loader uses: start with a priority other than 1.
Table of Contents
It won’t be covered in the book. The source code has to be useful for something, after all.
While there is a cornucopia of creative things that you are going to want to do with your spanking-new Asterisk system, there are also some basic, unglamorous, dare we say, boring things that need to be discussed.
Without even being told, Asterisk assumes that you want to store CDR information.[139]
By default, Asterisk will create a CSV file and place it in the folder /var/log/asterisk/cdr-csv/.[140] To the naked eye, this file looks like a bit of a mess. If, however, you separate each line according to the commas, you will find that each line contains information about a particular call, and that the commas separate the following values:
-
accountcode Assigned if configured for the channel in the channel configuration file (i.e.,
sip.conf). The account code is assigned on a per-channel basis. You can also change this value from the dialplan by settingCDR(accountcode).-
src -
dst -
dcontext -
clid -
channel -
dstchannel -
lastapp -
lastdata -
start -
answer -
end -
duration Total time in system, in seconds (integer), from dial to hangup.
-
billsec Total time call is up, in seconds (integer), from answer to hangup.
-
disposition -
amaflags What flags to use (
DOCUMENTATION,BILL,IGNORE, etc.), specified on a per-channel basis, likeaccountcode. AMA flags stand for Automated Message Accounting flags, which are somewhat standard (supposedly) in the industry.-
userfield
Asterisk activity generates events that will cause the creation of an entry in either the main system logs, or in Asterisk’s own logfiles. On a busy system (or a system that is experiencing a severe problem), these logfiles can grow very large, very quickly. If debugging is turned on, the processes involved in writing to these logfiles can begin to have an effect on system performance. By default, Asterisk will simply add to the files until the hard drive is full. Fortunately, Linux provides utilities to handle the rotation of logfiles (so that no single file becomes too large), and also the deletion of older logfiles (which will prevent the system from getting clogged with logfiles).
The logrotate utility is normally run once per day by the operating system.
Unfortunately, since there is no script installed to instruct
logrotate on how to handle Asterisk, its logfiles
will grow unchecked until a rotate script is added to handle them. In
order to make that happen, we need to set up parameters for Asterisk in a
file in the /etc/logrotate.d
directory. This file will need to rotate the current logfile, and then
send Asterisk instructions to rotate its own logger (causing it to stop
using the now old logfile, and generate a new file).
Create a new file /etc/logrotate.d/asterisk and place the following lines in it:
/var/log/asterisk/* /var/log/asterisk/cdr-csv {
missingok
sharedscripts
monthly
rotate 12
postrotate
asterisk -rx "logger rotate" > /dev/null 2> /dev/null
endscript
}This file tells the logrotate utility to rotate the Asterisk logs every month, save 12 months worth of logs, and then tell Asterisk that the logfiles have been rotated (which will cause Asterisk to create new logfiles and begin writing to them). We selected these values arbitrarily. Feel free to adjust them to suit your needs.
By default, Asterisk runs as the root user, and while we don’t have any hard data, our own experiences lead us to conclude that the vast majority of Asterisk systems are run in this default state. From a security perspective, this represents an unacceptable risk―strangely, one which most of us seem willing to take.
Running Asterisk as non-root is not terribly hard to achieve, but it requires a few extra steps, and debugging it can be frustrating if you do not understand how Linux permissions work. However, from a security perspective it is well worth the effort.
We’re going to run Asterisk as the user asterisk, so we need to create that user on our system first. The following commands will be run as root. We’ll tell you when to switch and use the asterisk user that we’re about to create:
#adduser -c "Asterisk PBX" asterisk#passwd asterisk
Now
that you’ve created the asterisk user, let’s switch
to that user, with which we’ll perform the rest of the commands. Once we
su to the asterisk user,[141] we can download a copy of Asterisk via SVN, FTP or WGET, and
then compile and install. We’re going to grab a copy of Asterisk from the
SVN repository in the following example.
Note
1.4.5 is the current release version at the time of this writing, but it won’t be by the time you read this, so check the Asterisk web site for the latest version. In other words, don’t just type 1.4.5 whenever you see us refer to it. Find out what is current and use that instead.
#su - asterisk$svn co http://svn.digium.com/svn/asterisk/tags/1.4.5 asterisk-1.4.5$cd asterisk-1.4.5$./configure --prefix=$HOME/asterisk-bin --sysconfdir=$HOME/asterisk-bin--localstatedir=$HOME/asterisk-bin$make menuselect$make install
When
running the ./configure script with the --prefix flag, we’re telling the system to
install the binary components into our $HOME[142] directory under the subdirectory called asterisk-bin. The
--sysconfdir flag tells the system where to place the
configuration files, and --localstatedir tells the
system where to install additional files, such as sounds. The key here is
that since we are downloading, compiling, and installing as the user
asterisk, everything that only gets created will be
assigned to that user, and have the permissions granted to that
user.
We can now install the sample files as well into the $HOME/asterisk-bin/asterisk directory:
$ make samplesTest starting up Asterisk with the following command:
$ ./asterisk-bin/sbin/asterisk -cvvv
Normally, Asterisk needs to be run as a service. During
installation, the make config command will install the
init scripts. Unfortunately, this will not work when you are logged in as
the user asterisk, because only the
root user has the authority to make changes to system
startup commands. It would appear that what we need to do is log in as
root, navigate to the /home/asterisk/asterisk-1.4.5 folder, and run
the make config command again (now
with the authority to really make it happen). Problem solved,
right?
Yes, but not quite. If you run the service asterisk
start command, you will find that it complains that it cannot
find asterisk. Know why? Because the
init script figures the asterisk
executable got installed in /usr/sbin, where it would be if we had
installed asterisk as
root. So, we need to tell the init script where to
find asterisk and the safe_asterisk script, like this:
#ln -s /home/asterisk/asterisk-bin/sbin/asterisk /usr/sbin/asterisk#ln -s /home/asterisk/asterisk-bin/sbin/safe_asterisk /usr/sbin/safe_asterisk
Since the init script utilizes the
safe_asterisk script, and by default wants to start
Asterisk as the root user, we have to modify the safe_asterisk script telling it to run Asterisk
as our non-root user. So open up the safe_asterisk script with your favorite text
editor and look for the ASTARGS
variable (around line 78). Then add -U
asterisk between the quotes like so:
# # Don't fork when running "safely" # ASTARGS="-U asterisk"
Go ahead and start Asterisk by running service asterisk
start and verify Asterisk is running as the asterisk user using the ps
command:
#service asterisk start#ps aux | grep asterisk503 30659 0.0 1.8 26036 8692 pts/2 Sl 15:07 0:00 /home/asterisk/asterisk-bin/sbin/asterisk -U asterisk -vvvg -c
The
503 is actually our asterisk user, which we verify by
looking at the /etc/passwd
file:
# cat /etc/passwd
asterisk:x:503:503:Asterisk PBX:/home/asterisk:/bin/bashReboot the system to ensure that everything comes up as required. Keep in mind that a lot of things that you do with Asterisk might assume that you are running as root, so keep an eye out for errors that relate to a lack of permission. Your Asterisk process may think it is the superuser, but we have clipped its wings somewhat.
Why go through the trouble? The advantage of this is simply that if any security vulnerability in Asterisk[143] allows someone to access the box through the Asterisk account, he will be limited to system activities allowed by that account. When Asterisk is run as root, a security compromise gives the intruder full control of your system.
In keeping with the seemingly limitless flexibility of Asterisk, you can also modify the system prompts. This is very simple to explain, but generally difficult to do well.
With more than 300 system prompts in the main distribution, and an additional 600 in the asterisk-sounds add-on, if you’re contemplating customizing all of them you’d better have either a lot of money or a lot of time on your hands.
An audio engineer is also recommended to ensure that the recordings are normalized to –3 dB and that all prompts start and end at a zero-crossing point (with just the right amount of silence prepended and appended).
Once you have the recordings, the actual implementation is easy—simply replace the files in /var/lib/asterisk/sounds with the ones you have created.
Alternatively, you can opt to record your own prompts and place them
in a folder of your choosing. When you refer to sound files with
the Playback() or Background() applications, you can refer to the
full pathname of the sound file, or to any subdirectory of
/var/lib/asterisk/sounds/.
Note that the default sounds that come with Asterisk are delivered in format. We would not normally recommend storing them in this format (unless you have a lot of channels that will be entering the system using the GSM codec). Sure, you save some hard drive space, but the extra load on your CPU when it has to transcode all these files (not to mention the lower overall quality of the sound) makes the use of GSM undesirable, to our thinking. Use uncompressed files (such as .wav, .ulaw or .alaw) and your CPU will not have to work as hard. As an added bonus, your prompts will sound better.
Any popular PBX system offers the ability to supply a source of music to be played for callers while on hold. Asterisk allows for a lot of creativity in this regard.
Nowadays, everyone is familiar with the MP3 music format, and there is a lot of interest in using MP3s as a music-on-hold source. The concept sure seems like a good idea, but there are a few things that we think should be given some consideration:
MP3 files are extremely complex, and require a substantial amount of CPU to decode. If you have a lot of channels pulling music from the system (for example, people sometimes like to listen to music through their phone, or a call center may have several callers on hold), the load on the CPU caused by all of the transcoding of the stored MP3 files could place too much demand on a machine that is otherwise suitable to the performance needs of the system.
Current-generation hard drives hold a lot of data, so there may not be any reason to worry about cutting down hard drive use. Compressed audio makes sense from a distribution standpoint (an MP3 is a much smaller download than the equivalent in .wav format), but once on your system, do we really care how much space they take up?
MP3 files don’t usually come with the right sort of licensing. ;-)
Taking all of this into consideration, we recommend that you convert your music sources into the native format of the various codecs you may be supporting. For example, if you support μlaw for your internal phones, and G.729 on your VoIP circuits, you will want to store your music in both formats so that Asterisk will not have to perform transcoding to play music to calls on those channels.
We often use public domain music (or Creative Commons licensed music) on our systems. Creative Commons music often comes in ogg-Vorbis format (which is conceptually similar to MP3, but not compatible). In order to play .ogg or .mp3 files on our Asterisk system, we are going to convert them to a format that Asterisk can easily handle. This requires the following steps:
We need to make sure that SoX, the Sound eXchange utility, is installed. If not, run the following command to install it:
$
yum install soxDownload the music that you have chosen to a working folder on your system (
/tmpis probably a suitable location). As an example, the following command downloaded some nice piano music by Pachelbel for us:$
wget http://upload.wikimedia.org/wikipedia/commons/6/62/Pachelbel%27s_Canon.oggNow we have to convert the song from ogg-Vorbis format to a format more suitable to Asterisk:
$
sox Pachelbel\'s_Canon.ogg -r 8000 -c 1 -s -w moh1.wav resample -qlTip
You may also need to adjust the amplitude with the
-voption.We’ve now taken our source file, converted it to a .wav file suitable to Asterisk,[146] and saved the resulting file as moh1.wav.
Almost done now. We just need to create a folder for the permanent home of the new files (
/tmpis certainly no place for them):$
mkdir /var/lib/asterisk/mohwavand then move them there:
$
mv *.wav /var/lib/asterisk/mohwavSince we have placed our music files in a different folder from that where Asterisk installs its sample music, we will need to change the configuration file to reflect this. Edit your
/etc/asterisk/musiconhold.conffile with one that contains the following:[default] mode=files directory=/var/lib/asterisk/mohwav random=yes
As for what to play, that will depend on what image you want to project to your callers. Regardless of your choice, you should keep some things in mind:
People don’t actually want to be on hold, so they are not usually planning to be there for long. This means that there is not much point in providing them with a mind-expanding musical experience. If things go as they hope, they won’t be there long enough to get into it.
The fidelity on a phone system does not allow for accurate reproduction of tones. Heavy bass generally sounds terrible, and high frequencies will typically just end up as noise. Keep the music simple, and it is more likely to sound good.
Musical tastes are as varied as people, and while it might be nice to try and cover a wide range of styles, music that is too eclectic is more likely to annoy than enlighten.
Classical music addresses all of the above criteria, and it is easy to obtain. It also sounds classy (go figure!), so it is a pretty safe choice, although we’ll admit it doesn’t usually score any points in the hipness department.
Asterisk includes three songs with the source code download that are licensed for use with Asterisk. These songs are intended as samples. Since there are only three of them, people who call you regularly will quickly tire of them. We have a recurring nightmare in which the worldwide success of Asterisk means that the human race is forced to listen to the same three songs as music on hold. That is why we wrote this section for you.
This chapter could easily become a book (and possibly will one day). We have chosen a few topics to cover that we think will provide value to most readers, but there are certainly many more topics that can be discussed. As with so many things in this book, we have merely scratched the surface.
[139] If you are wondering why such an obviously simple thing seems to be such an achievement, the reason is simply that many traditional PBXes do not have this capability built in. With those systems, you have to purchase some sort of third-party appliance even just to capture the raw call data. Asterisk simply stores it. No drama. No cost. No kidding.
[140] A Comma Separated Values (CSV) file is a common method of formatting database-type information in a text file. You can open CSV files with a text editor, but most spreadsheet and database programs will also read them and properly parse them into rows and columns.
[141] su historically means super-user, but
nowadays it could also mean switch-user or substitute-user. The
- in the command tells su to use
the environment for that user (for example to use the
PATH for that user)
[142] $HOME is a system variable
that defines the path to the home directory for the current user,
i.e., /home/asterisk.
[143] If you walk up to any system that’s running Asterisk, hook a keyboard and screen up to it, and press Alt-F9; you will be connected to the Asterisk CLI. Press ! and hit Return, and you will have a shell. If Asterisk is running as root, you now own that system.
[144] We were going to say “accentless English”, but then we’d have to apologize to folks from the British Isles, Australia, South Africa, and who knows where else. We are not experts in languages, dialects, and such, but our ears tell us that there is a type of accent that in North America is common for professional voices. This is the accent that is common to the Pacific coast from San Diego to Seattle, and most of English-speaking Canada as well. Both June and Allison deliver English prompts in this accent, and we think it sounds great.
[145] Seed a search with the term “Creative Commons music” to find more freely usable music.
[146] Note that we could have used any format that was compatible with Asterisk; we’ve just chosen .wav for this example because it is easy for the CPU to transcode into μlaw/alaw/slin on the fly, yet remains easy to work with in other environments.
Table of Contents
The first 90 percent of the task takes 90 percent of the time, and the last 10 percent of the task takes the other 90 percent of the time.
The toughest part of writing this book was not finding things to write about, but rather deciding what we would not be able to write about. Now that we’ve covered the basics, you are ready to be told the truth: we have not taught you anywhere near all that there is to know about Asterisk.
Now please understand, this is not because we didn’t want to give you our very best; it’s merely because Asterisk is, well, limitless (or so we believe).
In this chapter, we want to give you a taste of some of the wonders Asterisk holds in store for you. Nearly every section in this chapter could become a book in itself (and they will become books, if Asterisk succeeds in the way we think it is going to).
Festival is a popular open source text-to-speech engine. The basic premise of using Festival with Asterisk is that your dialplan can pass a body of text to Festival, which will then “speak” the text to the caller. Probably the most obvious use for Festival would be to have it read your email to you when you are on the road.[147]
There are currently two ways to use Festival with Asterisk. The first (and easiest) method—without having to patch and recompile Festival—is to add the following text to Festival’s configuration file (festival.scm, usually located in /etc/ or /usr/share/festival/):
(define (tts_textasterisk string mode) "(tts_textasterisk STRING MODE) Apply tts to STRING. This function is specifically designed for use in server mode so a single function call may synthesize the string. This function name may be added to the server safe functions." (let ((wholeutt (utt.synth (eval (list 'Utterance 'Text string))))) (utt.wave.resample wholeutt 8000) (utt.wave.rescale wholeutt 5) (utt.send.wave.client wholeutt)))
You may place this text anywhere in the file, as long as it is not between any other parentheses.
The second (and more traditional) way is to compile Festival with an Asterisk-specific patch (located in the contrib/ directory of the Asterisk source).
Information on both of these methods is contained in the README.festival file, located in the contrib/ directory of the Asterisk source.
For either method, you’ll need to modify the Festival access list in the festival.scm file. Simply search for the word “localhost” and replace it with the fully qualified domain name of your server.
Both of these methods set up Festival to be able to correctly
communicate with Asterisk. After setting up Festival, you should start
the Festival server. You can then call the Festival() application from within your dialplan.
The Asterisk configuration file that deals with Festival is aptly called festival.conf. Inside this file, you specify the hostname and port of your Festival server, as well some settings for the caching of Festival speech. For most installations (if you’re going to run Festival on your Asterisk server), the defaults will work just fine.
To start the Festival server for debugging purposes, simply run festival with the --server argument, like this:
[root@asterisk ~]# festival --serverOnce you’re sure that the Festival server is running and not rejecting your connections, you can start Festival by typing:
[root@asterisk ~]# festival_server 2>&1 >/dev/null &Now that Festival is configured and the Festival server is started, let’s call it from within a simple dialplan:
exten => 123,1,Answer() exten => 123,2,Festival(Asterisk and Festival are working together)
Tip
You should always call the Answer() application
before calling Festival(), to ensure that a channel is
established.
As Asterisk connects to Festival, you should see output like this in the terminal where you started the Festival server:
[root@asterisk ~]# festival --server
server Sun May 1 18:38:51 2005 : Festival server started on port 1314
client(1) Sun May 1 18:39:20 2005 : accepted from asterisk.localdomain
client(1) Sun May 1 18:39:21 2005 : disconnectedIf you see output like the following, it means you didn’t add the host to the access list in festival.scm:
[root@asterisk ~]# festival --server
server Sun May 1 18:30:52 2005 : Festival server started on port 1314
client(1) Sun May 1 18:32:32 2005 : rejected from asterisk.localdomain not
in access listCall files allow you to create calls through the Linux shell. These powerful events are triggered by depositing a .call file in the directory /var/spool/asterisk/outgoing/. The actual name of the file does not matter, but it’s good form to give the file a meaningful name and to end the filename with .call.
When a call file appears in the outgoing folder, Asterisk will almost immediatelyact on the instructions contained therein.[148]
Call files are formatted in the following manner. First, we define where we want to call:
Channel: channelWe can control how long to wait for a call to be answered (the
default is 45 seconds), how long to wait between call retries, and the
maximum number of retries. If MaxRetries is omitted, the call will be
attempted only once:
WaitTime:numberRetryTime:numberMaxRetries:number
If the call is answered, we specify where to connect it here:
Context:context-nameExtension:extPriority:priority
Alternatively, we can specify a single application and pass arguments to it:
Application: Playback() Data: hello-world
Next, we set the Caller ID of the outgoing call:
CallerID: Asterisk 800-555-1212Then we set channel variables, as follows:
SetVar:john=Zap/1/5551212SetVar:sally=SIP/1000
and add a CDR account code:
Account: documentationWarning
When you create a call file, do not do so
from the spool directory. Asterisk monitors the spool aggressively and
will try to grab your file before you’ve even finished writing it!
Create call files in some other folder, make a copy in the same folder,
and then mv the copy into the spool
directory. Note that we said mv, not
cp. This is important, because the way that Linux
copies files means that the file appears in the destination folder
before it is completely there. Contrast that with a
mv operation, which will not allow the file to appear
in the destination folder until the move operation is complete. If you
copy, there is a very good chance that Asterisk will read the file
before it is all there, which will cause unexpected results.
If there were any concerns that Mark Spencer was in danger of running out of good ideas, Distributed Universal Number Discovery (DUNDi) ought to lay such thoughts to rest. DUNDi is poised to be as revolutionary as Asterisk. The DUNDi web site (http://www.dundi.com) says it best: “DUNDi™ is a peer to peer system for locating Internet gateways to telephony services. Unlike traditional centralized services (such as the remarkably simple and concise ENUM standard; http://www.faqs.org/rfc/rfc2916.txt), DUNDi is fully distributed with no centralized authority whatsoever.” DUNDi is somewhat of a routing protocol for VoIP.
Think of DUNDi as a large phone book that allows you to ask peers if they know of an alternative VoIP route to an extension number or PSTN telephone number.
For example, assume that you are connected to the DUNDi-test network (a free and open network that terminates calls to traditional PSTN numbers). You ask your friend Bob if he knows how to reach 1-212-555-1212, a number for which you have no direct access. Bob replies, “I don’t know how to reach that number, but let me ask my peer Sally.”
Bob asks Sally if she knows how to reach the requested number, and
she responds with, “You can reach that number at
IAX2/dundi:very_long_password@hostname/extension.”
Bob then stores the address in his database and passes on to you the
information about how to reach 1-800-555-1212 via VoIP, allowing you an
alternative method of reaching the same destination through a different
network.
Because Bob has stored the information he found, he’ll be able to provide it to any peers who later request the same number from him, so the lookup won’t have to go any further. This helps reduce the load on the network and increases response times for numbers that are looked up often. (However, it should be noted that DUNDi creates a rotating key and, thus, stored information is valid for a limited period of time.)
DUNDi performs lookups dynamically, either with a switch => statement in your
extensions.conf file or with the use of the
DUNDiLookup() application. DUNDi is
available only in Asterisk version 1.2 or higher.
You can use the DUNDi protocol in a private network as well. Say you’re the Asterisk administrator of a very large enterprise installation, and you wish to simplify the administration of extension numbers. You could use DUNDi in this situation, allowing multiple Asterisk boxes (presumably located at each of the company’s locations and peered with one another) to perform dynamic lookups for the VoIP addresses of extensions on the network.
There are three files that need to be configured for DUNDi: dundi.conf, extensions.conf, and iax.conf.[149] The dundi.conf file controls the authentication of peers whom we allow to perform lookups through our system. This file also manages the list of peers to whom we might submit our own lookup requests. Since it is possible to run several different networks on the same box, it is necessary to define a different section for each peer, and then configure the networks in which that peer is allowed to perform lookups. Additionally, we need to define which peers we wish to use to perform lookups.
The General Peering Agreement (GPA) is a legally binding license agreement that is designed to prevent abuse of the DUNDi protocol. Before connecting to the DUNDi-test group, you are required to sign a GPA. The GPA is used to protect the members of the group and to create a “trust” between the members. It is a requirement of the DUNDi-test group that your complete and accurate contact information be configured in dundi.conf, so that members of your peer group can contact you. The GPA can be found in the doc/ subdirectory of the Asterisk source.
The [general] section
of dundi.conf contains parameters
relating to the overall operation of the DUNDi client and
server:
; DUNDi configuration file ; [general] ; department=IT organization= toronto.example.com locality=Toronto stateprov=ON country=CA email=support@toronto.example.com phone=+19055551212 ; ; Specify bind address and port number. Default is 4520 ;bindaddr=0.0.0.0 port=4520 entityid=FF:FF:FF:FF:FF:FF ttl=32 autokill=yes ;secretpath=dundi
The entity identifier defined by entityid should generally be the Media Access Control (MAC) address of an interface in
the machine. The entity ID defaults to the first Ethernet address of
the server, but you can override this with entityid, as long as it is set to the MAC
address of something you own. The MAC address of
the primary external interface is recommended. This is the address
that other peers will use to identify you.
The Time To Live (ttl)
field defines how many peers away we wish to receive replies
from and is used to break loops. Each time a request is passed on down
the line because the requested number is not known, the value in the
TTL field is decreased by one, much like the TTL field of an ICMP
packet. The TTL field also defines the maximum number of seconds we
are willing to wait for a reply.
When you request a number lookup, an initial query (called a
DPDISCOVER) is sent to your peers requesting that number. If you do
not receive an acknowledgment (ACK)
of your query (DPDISCOVER) within
2,000 ms (enough time for a single transmission only) and autokill is equal to yes, Asterisk will send a CANCEL to the peers. (Note that an
acknowledgment is not necessarily a reply to the query; it is just an
acknowledgment that the peer has received the request.) The purpose of
autokill is to keep the lookup from
stalling due to hosts with high latency. In addition to the yes and no options, you may also specify the number
of milliseconds to wait.
The pbx_dundi module creates a rotating key
and stores it in the local Asterisk database (AstDB). The key name
secret is stored in the dundi family. The value of the key can be
viewed with the database show
command at the Asterisk console. The database family can be overridden
with the secretpath option.
The dundi.conf file defines DUNDi contexts
that are mapped to dialplan contexts in your extensions.conf file. DUNDi
contexts are a way of defining distinct and separate directory service
groups. The contexts in the mapping section point to contexts in the
extensions.conf file, which control the numbers
that you advertise. When you create a peer, you need to define which
mapping contexts you will allow this peer to search. You do this with
the permit statement (each peer may
contain multiple permit
statements). Mapping contexts
are related to dialplan contexts in the sense that they are a security
boundary for your peers.
Phone numbers must be advertised in the following format:
<country_code><area_code><prefix><number>
For example, a complete North American number could be advertised as 14165551212.
All DUNDi mapping contexts take the form of:
dundi_context=>local_context,weight,technology,destination[,options]]
The following configuration creates a DUNDi mapping context that we will use to advertise our local phone numbers to the DUNDi-test group. Note that this should all appear on one line:
dundi-test => dundi-local,0,IAX2,dundi:${SECRET}@toronto.example.com/
${NUMBER}, nounsolicited,nocomunsolicit,nopartialIn this example, the mapping context is dundi-test, which points to the dundi-local context within
extensions.conf (providing a listing of phone
numbers to reply to). Numbers that resolve to the PBX should be
advertised with a weight of zero (directly
connected). Numbers higher than 0 indicate an increased number of hops
or paths to reach the final destination. This is useful when multiple
replies for the same lookup are received at the end that initially
requested the number; a weight with a lower
number will be the preferred path.
If we can reply to a lookup, our response will contain the method by which the other end can connect to the system. This includes the technology to use (such as IAX2, SIP, H323, and so on), the username and password with which to authenticate, which host to send the authentication to, and finally the extension number.
Asterisk provides some shortcuts to allow us to create a “template” with which we can build our responses. The following channel variables can be used to construct the template:
DUNDi peers are defined in the dundi.conf file. Peers are identified by the unique layer-two MAC address of an interface on the remote system. The dundi.conf file is where we define what context to search for peers requesting a lookup and which peers we want to use when doing a lookup for a particular network:
[00:00:00:00:00:00] ; Remote Office model = symmetric host = montreal.example.com inkey = montreal outkey = toronto include = dundi-test permit = dundi-test qualify = yes dynamic=yes
The remote peer’s identifier (MAC address) is enclosed in
square brackets ([]).
The inkey and outkey are the public/private key pairs that
we use for authentication. Key pairs are generated with the astgenkey script, located in the ./asterisk/contrib/scripts/ source
directory. Be sure to use the -n
flag so that you don’t have to initialize passwords every
time you start Asterisk:
#cd /var/lib/asterisk/keys#/usr/src/asterisk/contrib/scripts/astgenkey -n toronto
The resulting keys, toronto.pub and toronto.key, will be placed in your
/var/lib/asterisk/keys/
directory. The toronto.pub file
is the public key, which you should post to a web server so that it is
easily accessible for anyone with whom you wish to peer. When you
peer, you can give your peers the HTTP-accessible public key, which
they can then place in their /var/lib/asterisk/keys/ directories.
After you have downloaded the keys, you must reload the res_crypto.so
and pbx_dundi.so modules in
Asterisk:
*CLI>module reload res_crypto.so-- Reloading module 'res_crypto.so' (Cryptographic Digital Signatures) -- Loaded PRIVATE key 'toronto' -- Loaded PUBLIC key 'toronto' *CLI>module reload pbx_dundi.so-- Reloading module 'pbx_dundi.so' (Distributed Universal Number Discovery (DUNDi)) == Parsing '/etc/asterisk/dundi.conf': Found
Then, create the dundi user
in the iax.conf file to allow connections into your Asterisk system. When a
call is authenticated, the extension number being requested is passed
to the dundi-local context in the
extensions.conf file, where the
call is then handled by Asterisk.
Here is the user definition for the dundi user:
[dundi] type=user dbsecret=dundi/secret context=dundi-local disallow=all allow=ulaw allow=g726
Instead of using a static password, Asterisk regenerates
passwords every 3,600 seconds (1 hour). The value is stored in
/dundi/secret of the Asterisk database and
advertised using the ${SECRET}
variable defined within the mapping context lines in dundi.conf. You can see the current keys
for all peers, including your local public and private keys, by
performing a show keys at the Asterisk CLI.
The context entry dundi-local is where authorized callers are
sent in extensions.conf. From
there, we can manipulate the call just as we would in the dialplan of
any other incoming connection.
The extensions.conf file
handles what numbers you advertise and what you do with the calls that
connect to them. The dundi-local
context performs double duty:
It controls the numbers we advertise, referenced by the
dundimapping context indundi.conf.It controls what to do with the call, referenced by the
dundiuser iniax.conf.
You have the power of dialplan pattern matching to advertise ranges of numbers and to control the incoming calls. In the following dialplan, we are only advertising the number +1-416-555-1212, but pattern matching could just as easily have been employed to advertise a range of numbers or extensions:
[dundi-local] exten => 14165551212,1,NoOp(dundi-local: Number advertisement and incoming) exten => 14165551212,n,Answer() exten => 14165551212,n(call),Dial(SIP/1000) exten => 14165551212,n,Voicemail(u1000) exten => 14165551212,n,Hangup() exten => 14165551212,n(call)+101,Voicemail(b1000) exten => 14165551212,n,Hangup()
Asterisk’s normal way of storing voicemail is to simply record the
message in a file, which is placed on the local hard drive under the
/var/spool/asterisk/voicemail tree.
While this works well enough for simple PBX deployments, there are more
advanced ways of doing this that can be very useful in larger, distributed
networks, or environments where tighter integration with external
applications is desired.
The ability to store voice messages in the same location as regular email is something that the telecom industry has been promising for a long time. They called it Unified Messaging, and while most PBXes now offer some sort of unified messaging, it is typically very expensive to license and implement.
Naturally, Asterisk cuts through all the silliness and just allows you to have your voicemailbox integrated into an IMAP environment. There are several advantages to storing your voicemail on an IMAP server. When you listen to a voicemail on your phone, the message is set to the read state on the IMAP server. This means that your email client will also note that it has been read. By the same token, if you listen to the message from your email client, the voicemail will turn off the message notification light on any phones that are assigned to that mailbox. Deleting a message from one place will cause it to be deleted from every place. So once deleted, the message is truly gone. This is Unified Messaging, the holy grail of voicemail to email integration, but Asterisk humbly decides not to make a big deal of it.
IMAP integration is still new functionality, so there are a few
things that need to be added in order to get it to function. First off,
Asterisk needs to have an IMAP client installed so that it can
communicate with the IMAP server. Pretty much any IMAP server works
(even Exchange Server), and the authors have personally tested IMAP
voicemail support with both the Courier-IMAP and Dovecot IMAP servers. The IMAP server
may be on the same physical machine as the Asterisk installation, or it
may be on the other side of the globe. To be able to access the IMAP
server, Asterisk requires an IMAP client library. This library is the
University of Washington’s free IMAP client, named
c-client. To install the
c-client you simply need to navigate to your
/usr/src directory and run the
following commands:
# wget ftp://ftp.cac.washington.edu/mail/imap.tar.ZThis downloads the source code. Extract it with:
# tar zxvf imap.tar.ZNote
You’ll want to pay special attention to the name of the
directory that is created by this command, as the directory name will
probably change again by the time you read this. During the production
of this book, the directory name has changed four times. The last time
we checked, it was named /usr/src/imap-2006h.
Navigate into the resulting folder and run:
# make lrh IP6=4This will compile everything Asterisk needs to make use of the IMAP client libraries.[150]
Now we have to recompile Asterisk with the IMAP capabilities.
We’ll need to navigate to the location of our Asterisk source files
(such as /usr/src/asterisk), and
run the following command:
# /configure --with-imap=/usr/src/imap-2006hThe we need to rerun make menuconfig to
incorporate IMAP storage into the compile. Under Voicemail Build Options
select the IMAP_STORAGE parameter, and then press
x to save and exit. This ensures that when we compile
Asterisk, it will build the IMAP module as well. Obviously, the next
step then is to recompile and reinstall Asterisk. A simple way to do
this is, in your terminal, to run:
# make && make installOK, so we’ve got the module compiled and installed. Now it’s time to configure it.
In the /etc/asterisk folder,
we’ll need to add a few lines to the voicemail.conf file, in the [general] section:
imapserver=localhost imapport=143 expungeonhangup=yes authuser=vmail authpassword=vmailsecret imapfolder=Voicemail
Since Dovecot is available in the CentOS package repository, installing a small IMAP server to handle your virtual (voicemail) users on your Asterisk box is simple:
# yum install dovecotNow make sure that IMAP support is enabled in /etc/dovecot.conf by uncommenting the protocols line so that it appears as follows:
protocols = imap imaps
After you’ve enabled IMAP support, create the user account that will be storing the mail:
# groupadd vmail # useradd vmail -g vmail -s /bin/true -c "asterisk voicemail user" -p vmailsecret -d /var/spool/asterisk/imap-voicemail vmail # chown -R vmail.vmail /var/spool/asterisk/imap-voicemail
Now restart Dovecot and Asterisk, and you should be good to go.
#service dovecot restart#service asterisk restart
Congratulations! You’ve successfully installed basic IMAP
voicemail support with Asterisk! This is just the tip of the iceberg,
though. With IMAP voicemail storage, it is easy to implement shared
(e.g., departmental) voicemail using shared IMAP folders. Many companies
already have departmental email, so having a shared voicemail box is a
very natural and logical progression of the technology. With IMAP
voicemail storage, each employee can manage several voicemail boxes
without becoming confused as to whether a particular voicemail message
is for them personally or for a department to which they belong. There
is nothing unusual to configure from Asterisk’s point of view; you
simply call the VoiceMail()
application with the desired mailbox and context, and make sure that the
department employees have the shared IMAP folder included in their email
client’s folder list.
Finally, you may want to use per-mailbox authorization (i.e., each
voicemail box authenticates as a specific user) instead of a global
Asterisk IMAP user. Asterisk supports this through the imapuser and imappassword options in the individual
voicemail box definition entries:
[imapvoicemail] 100 => 1234,Sue's Mailbox,,,imapuser=sue@example.tld|imapsecret=suesimapsecret 101 => 5555,Bob's Mailbox,,,imapuser=bob@example.tld|imapsecret=bobsimapsecret
In
this particular example, if a message is left in IMAP mailbox 100 in the
imapvoicemail context, Asterisk
will authenticate to the IMAP server as sue@example.tld, using suesimapsecret as the password. Similarly,
bob@example.tld/bobsimapsecret will
be used to authenticate if a message is left in mailbox 101 of the same
voicemail context.
In case you missed it, you can also store voicemail in a database via the ODBC connector. See Chapter 12, Relational Database Integration for details!
The name Jabber is actually the original name for the IETF XMPP protocols (RFC 3920-3923). Since Jabber is by far a better name than XMPP, the original name has stuck. This protocol was originally designed to be a decentralized, nonproprietary, open-standards messaging and presence framework. It supports offline message delivery and encryption, and has grown to include voice messaging, which Asterisk supports.
It is interesting to note that in the beginning, Jabber was seen as a competitor to the SIMPLE protocol, which is SIP-based. XMPP is designed as a more general protocol, and is of course XML-based.
Asterisk can be configured to utilize XMPP in several capacities. It may utilize XMPP as a presence framework (e.g., Extension 205 is away or on the phone), or, through the voice messaging framework JINGLE, support full voice communications with other services such as Google Talk.
Unlike other messaging networks such as MSN and Yahoo!, XMPP is decentralized. Anyone may have his own Jabber server and run any number of services on his server. You send messages in much the same way that you send email: the Jabber server you use contacts the Jabber server of the other person, and a direct connection is established. If the other person is not online, the message is stored, and when she log in to her Jabber server, any stored messages are delivered. With encryption (the XMPP protocol supports TLS), it is no wonder why many businesses are starting to implement their internal messaging networks using this amazing protocol, and Asterisk is able to seamlessly integrate into this communications network.
That’s pretty much all that this chapter is going to teach you, but it’s nowhere near all there is to learn. Hopefully, you are starting to get an idea of how big this Asterisk thing really is.
In the next chapter, we’re going to try and predict the future of telecom, and we’ll discuss how (and why) we believe that Asterisk is well positioned to play a starring role.
[147] Probably the coolest use of Festival is in Simon Ditner’s ZoIP, a port of the famous Zork game to a fully speech-enabled engine running on Asterisk (ZoIP also uses Sphinx, which we will not be covering in this book). We’re going to have to come up with a new kind of name for this sort of thing. It’s not a video game, since there is no screen, so do we need to call these audio games? Regardless, check it out at http://www.zoip.org.
[148] We’re talking within milliseconds here. Don’t believe us? Try it for yourself!
[149] The dundi.conf and extensions.conf files must be configured. We have chosen to configure iax.conf for our address advertisement on the network, but DUNDi is protocol-agnostic—thus sip.conf, h323.conf, or mgcp.conf could be used instead.
[150] The lrh option tells the
compiler that this is a Linux Red Hat system. The
IP6=4 option tells the compiler that we don’t
want to compile in support for IPV6. Read the
Makefile for other options. For RHEL 5 or
CentOS 5, you should use lr5
instead of lrh.
Table of Contents
First they ignore you, then they laugh at you, then they fight you, then you win.
We have arrived at the final chapter of this book. We’ve covered a lot, but we hope that you now realize that we have barely begun to scratch the surface of this phenomenon called Asterisk. To wrap things up, we want to spend some time exploring what we might see from Asterisk and open source telephony in the near future.
While prognostication is always a thankless task, we are confident in asserting that open source communications engines such as Asterisk herald a shift in thinking that will transform the telecommunications industry. In this chapter, we will discuss some of our reasons for this belief.
Although Alexander Graham Bell is most famously remembered as the father of the telephone, the reality is that during the latter half of the 1800s, dozens of minds were working toward the goal of carrying voice over telegraph lines. These people were mostly business-minded folks, looking to create a product through which they might make their fortunes.
We have come to think of traditional telephone companies as monopolies, but this was not true in their early days. The early history of telephone service took place in a very competitive environment, with new companies springing up all over the world, often with little or no respect for the patents they might be violating. Many famous monopolies got their start through the waging (and winning) of patent wars.
It’s interesting to contrast the history of the telephone with the history of Linux and the Internet. While the telephone was created as a commercial exercise, and the telecom industry was forged through lawsuits and corporate takeovers, Linux and the Internet arose out of the academic community, which has always valued the sharing of knowledge over profit.
The cultural differences are obvious. Telecommunications technologies tend to be closed, confusing, and expensive, while networking technologies are generally open, well-documented, and competitive.
If one compares the culture of the telecommunications industry to that of the Internet, it is sometimes difficult to believe the two are related. The Internet was designed by enthusiasts, whereas contributing to the development of the PSTN is impossible for any individual to contemplate. This is an exclusive club; membership is not open to just anyone.[151]
The International Telecommunication Union (ITU) clearly exhibits this type of closed thinking. If you want access to its knowledge, you have to be prepared to pay for it. Membership requires proof of your qualifications, and you will be expected to pay thousands of dollars to gain access to its library of publications.
Although the ITU is the United Nations’s sanctioned body responsible for international telecommunications, many of the VoIP protocols (SIP, MGCP, RTP, STUN) come not from the hallowed halls of the ITU, but rather from the IETF (which publishes all of its standards free to all, and allows anyone to submit an Internet Draft for consideration).
Open protocols such as SIP may have a tactical advantage over ITU protocols, such as H.323, due to the ease with which one can obtain them. Although H.323 is widely deployed by carriers as a VoIP protocol in the backbone, it is much more difficult to find H.323-based endpoints; newer products are far more likely to support SIP.
The success of the IETF’s open approach has not gone unnoticed by the mighty ITU. It has recently become possible to download up to three documents free of charge from the ITU web site.[152]Openness is clearly on its minds. Recent statements by the ITU suggest that there is a desire to achieve “Greater participation in ITU by civil society and the academic world.” Mr. Houlin Zhao, the ITU’s Director of the Telecommunication Standardization Bureau (TSB), believes that “ITU should take some steps to encourage this.”[153]
The roadmap to achieving this openness is unclear, but the ITU is beginning to realize the inevitable.
As for Asterisk, it embraces both the past and the future: H.323 support is available, although the community has for the most part shunned H.323 in favor of the IETF protocol SIP and the darling of the Asterisk community, IAX.
One of the oddest things about all of the standards that exist in the world of legacy telecommunications is the various manufacturers’ seeming inability to implement them consistently. Each manufacturer desires a total monopoly, so the concept of interoperability tends to take a back seat to being first to market with a creative new idea.
The ISDN protocols are a classic example of this. Deployment of ISDN was (and in many ways still is) a painful and expensive proposition, as each manufacturer decided to implement it in a slightly different way. ISDN could very well have helped to usher in a massive public data network, 10 years before the Internet. Unfortunately, due to its cost, complexity, and compatibility issues, ISDN never delivered much more than voice, with the occasional video or data connection for those willing to pay. ISDN is quite common (especially in Europe, and in North America in larger PBX implementations), but it is not delivering anywhere near the capabilities that were envisioned for it.
As VoIP becomes more and more ubiquitous, the need for ISDN will disappear.
It can take months, or sometimes years, for the big guys to admit to a trend, let alone release a product that is compatible with it. It seems that before a new technology can be embraced, it must be analyzed to death, and then it must pass successfully through various layers of bureaucracy before it is even scheduled into the development cycle. Months or even years must pass before any useful product can be expected. When those products are finally released, they are often based on hardware that is obsolete; they also tend to be expensive and to offer no more than a minimal feature set.
These slow release cycles simply don’t work in today’s world of business communications. On the Internet, new ideas can take root in a matter of weeks and become viable in extremely short periods of time. Since every other technology must adapt to these changes, so too must telecommunications.
Open source development is inherently better able to adapt to rapid technological change, which gives it an enormous competitive advantage.
The spectacular crash of the telecom industry may have been caused in large part by an inability to change. Perhaps that continued inability is why recovery has been so slow. Now, there is no choice: change, or cease to be. Community-driven technologies such as Asterisk will see to that.
Traditional telecommunications companies have lost touch with their customers. While the concept of adding functionality beyond the basic telephone is well understood, the idea that the user should be the one defining this functionality is not.
Nowadays, people have nearly limitless flexibility in every other form of communication. They simply cannot understand why telecommunications cannot be delivered as flexibly as the industry has been promising for so many years. The concept of flexibility is not familiar to the telecom industry, and very well might not be until open source products such as Asterisk begin to transform the fundamental nature of the industry. This is a revolution similar to the one Linux and the Internet willingly started more than 10 years ago (and IBM unwittingly started with the PC, 15 years before that). What is this revolution? The commoditization of telephony hardware and software, enabling a proliferation of tailor-made telecommunications systems.
In “Paradigm Shift” (http://tim.oreilly.com/articles/paradigmshift_0504.html), Tim O’Reilly talks about a paradigm shift that is occurring in the way technology (both hardware and software) is delivered.[154] O’Reilly identifies three trends: the commoditization of software, network-enabled collaboration, and software customizability (software as a service). These three concepts provide evidence to suggest that open source telephony is an idea whose time has come.
Every good work of software starts by scratching a developer’s personal itch.
In his book The Cathedral and the Bazaar (O’Reilly), Eric S. Raymond explains that “Given enough eyeballs, all bugs are shallow.” The reason open source software development produces such consistent quality is simple: crap can’t hide.
In this era of custom database and web site development, people are not only tired of hearing that their telephone system “can’t do that,” they quite frankly just don’t believe it. The creative needs of the customers, coupled with the limitations of the technology, have spawned a type of creativity born of necessity: telecom engineers are like contestants in an episode of Junkyard Wars, trying to create functional devices out of a pile of mismatched components.
The development methodology of a proprietary telephone system dictates that it will have a huge number of features, and that the number of features will in large part determine the price. Manufacturers will tell you that their products give you hundreds of features, but if you only need five of them, who cares? Worse, if there’s one missing feature you really can’t do without, the value of that system will be diluted by the fact that it can’t completely address your needs.
The fact that a customer might only need 5 out of 500 features is ignored, and that customer’s desire to have 5 unavailable features that address the needs of his business is dismissed as unreasonable.[155] Until flexibility becomes standard, telecom will remain stuck in the last century—all the VoIP in the world notwithstanding.
Asterisk addresses that problem directly and solves it in a way that few other telecom systems can. This is extremely disruptive technology, in large part because it is based on concepts that have been proven time and time again: “the closed-source world cannot win an evolutionary arms race with open-source communities that can put orders of magnitude more skilled time into a problem.”[156]
One of the stumbling blocks of the traditional telecommunications industry has been its apparent refusal to cooperate with itself. The big telecommunications giants have all been around for over a hundred years. The concept of closed, proprietary systems is so ingrained in their culture that even their attempts at standards compliancy are tainted by their desire to get the jump on the competition, by adding that one feature that no one else supports. For an example of this thinking, one simply has to look at the VoIP products being offered by the telecom industry today. While they claim standards compliance, the thought that you would actually expect to be able to connect a Cisco phone to a Nortel switch, or that an Avaya voicemail system could be integrated via IP to a Siemens PBX, is not one that bears discussing.
In the computer industry, things are different. Twenty years ago, if you bought an IBM server, you needed an IBM network and IBM terminals to talk to it. Now, that IBM server is likely to interconnect to Dell terminals though a Cisco network (and run Linux, of all things). Anyone can easily think of thousands of variations on this theme. If any one of these companies were to suggest that we could only use their products with whatever they told us, they would be laughed out of business.
The telecommunications industry is facing the same changes, but it’s in no hurry to accept them. Asterisk, on the other hand, is in a big hurry to not only accept change, but embrace it.
Cisco, Nortel, Avaya, and Polycom IP phones (to name just a few) have all been successfully connected to Asterisk systems. There is no other PBX in the world today that can make this claim. None.
Openness is the power of Asterisk.
In the past few years, it has become clear that standards evolve at such a rapid pace that to keep up with them requires an ability to quickly respond to emerging technology trends. Asterisk, by virtue of being an open source, community-driven development effort, is uniquely suited to the kind of rapid development that standards compliance demands.
Asterisk does not focus on cost-benefit analysis or market research. It evolves in response to whatever the community finds exciting—or necessary.
After Mark Spencer attended his first SIP Interoperability Test (SIPIT) event, he had a rudimentary but working SIP stack for Asterisk coded within a few days. This was before SIP had emerged as the protocol of choice in the VoIP world, but he saw its value and momentum and ensured that Asterisk would be ready.
This kind of foresight and flexibility is typical in an open source development community (and very unusual in a large corporation).
The Asterisk-users list receives many email messages per day. More than 10,000 people are subscribed to it. This kind of community support is unheard of in the world of proprietary telecommunications, while in the open source world it is commonplace.
The very first AstriCon event was expected to attract 100 participants. Nearly 500 showed up (far more wanted to but couldn’t attend). This kind of community support virtually guarantees the success of an open source effort.
So what sorts of things can be built using Asterisk? Let’s look at some of the things we’ve come up with.
Asterisk can be used as a fantastic bridge between an old PBX and the future. You can place it in front of the PBX as a gateway (and migrate users off the PBX as needs dictate), or you can put it behind the PBX as a peripheral application server. You can even do both at the same time, as shown in Figure 15.1, “Asterisk as a PBX gateway”.
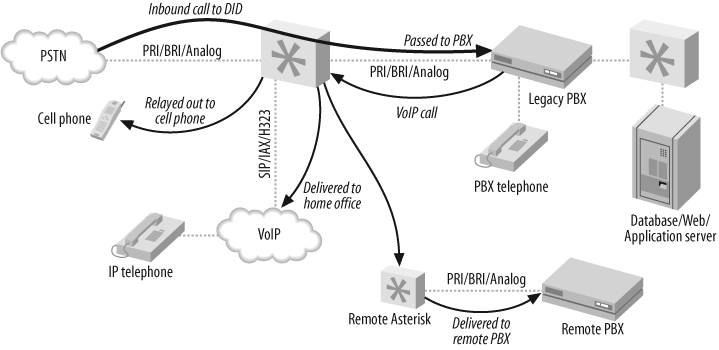
Here are some of the options you can implement:
- Keep your old PBX, but evolve to IP
Companies that have spent vast sums of money in the past few years buying proprietary PBX equipment want a way out of proprietary jail, but they can’t stomach the thought of throwing away all of their otherwise functioning equipment. No problem—Asterisk can solve all kinds of dilemmas, from replacing a voicemail system to providing a way to add IP-based users beyond the nominal capacity of the system.
- Find-me-follow-me
Provide the PBX a list of numbers where you can be reached, and it will ring them all whenever a call to your DID (Direct Inward Dialing, a.k.a. phone number) arrives. Figure 15.2, “Find-me-follow-me” illustrates this technology.
- VoIP calling
If a legacy telephony connection from an Asterisk PBX to an old PBX can be established, Asterisk can provide access to VoIP services, while the old PBX continues to connect to the outside world as it always has. As a gateway, Asterisk simply needs to emulate the functions of the PSTN, and the old PBX won’t know that anything has changed. Figure 15.3, “VoIP-enabling a legacy PBX” shows how you can use Asterisk to VoIP-enable a legacy PBX.
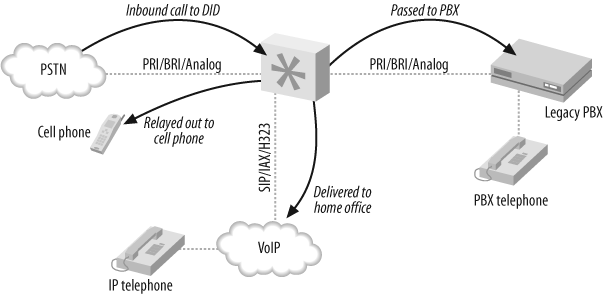
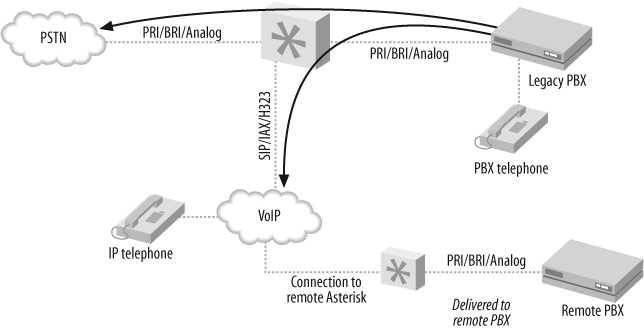
Many people confuse the term “Interactive Voice Response,” or IVR, with the Automated Attendant (AA). Since the Automated Attendant was the very first thing IVR was used for, this is understandable. Nevertheless, to the telecom industry, the term IVR represents far more than an AA. An AA generally does little more than present a way for callers to be transferred to extensions, and it is built into most proprietary voicemail systems—but IVR can be so much more.
IVR systems are generally very expensive not only to purchase, but also to configure. A custom IVR system will usually require connectivity to an external database or application. Asterisk is arguably the perfect IVR, as it embraces the concepts of connectivity to databases and applications at its deepest level.
Here are a few examples of relatively simple IVRs that an Asterisk system could be used to create:
- Weather reporting
Using the Internet, you can obtain text-based weather reports from around the world in a myriad of ways. Capturing these reports and running them through a purpose-built parser (Perl would probably eat this up) would allow the information to be available to the dialplan. Asterisk’s sound library already contains all of the required prompts, so it would not be an onerous task to produce an interactive menu to play current forecasts for anywhere in the world.
- Math programs
Ed Guy (the architect of Pulver’s FWD network) did a presentation at AstriCon 2004 in which he talked about a little math program he’d cooked up for his daughter to use. The program took him no more than an hour to write. What it did was present her with a number of math questions, the answers to which she keyed into the telephone. When all the questions were tabulated, the system presented her with her score. This extremely simple Asterisk application would cost tens of thousands of dollars to implement on any closed PBX platform, assuming it could be done at all. See Chapter 9, The Asterisk Gateway Interface (AGI) for further details. As is so often the case, things that are simple for Asterisk would be either impossible or massively expensive with any other IVR system.
- Distributed IVR
The cost of a proprietary IVR system is such that when a company with many small retail locations wants to provide IVR, it is forced to transfer callers to a central server to process the transactions. With Asterisk, it becomes possible to distribute the application to each node and, thus, handle the requests locally. Literally thousands of little Asterisk systems deployed at retail locations across the world could serve up IVR functionality in a way that would be impossible to achieve with any other system. No more long-distance transfers to a central IVR server, no more huge trunking facility dedicated to the task—more power with less expense.
These are three rather simple examples of the potential of Asterisk.
This little gem is going to end up being one of the killer functions of Asterisk. In the Asterisk community, everyone finds themselves using conference rooms more and more, for purposes such as these:
Small companies need an easy way for business partners to get together for a chat.
Sales teams have a meeting once per week where everyone can dial in from wherever they are.
Development teams designate a common place and time to update one another on progress.
Asterisk is still too much of an über-geek’s tool to be able to serve in the average home, but with no more than average Linux and Asterisk skills, the following things become plausible:
- Monitoring the kids
Parents who want to check up on the babysitter (or the kids home alone) could dial an extension context protected by a password. Once authenticated, a two-way audio connection would be created to all the IP phones in the house, allowing Mom and Dad to listen for trouble. Creepy? Yes. But an interesting concept nonetheless.
- Locking down your phones
Going out for the night? Don’t want the babysitter tying up the phone? No problem! A simple tweak to the dialplan, and the only calls that can be made are to 911, your cell phone, and the pizza parlor. Any other call attempt will get the recording “We are paying you to babysit our kids, not make personal calls.”
Pretty evil, huh?
- Controlling the alarm system
You get a call while on vacation that your Mom wants to borrow some cooking utensils. She forgot her key and is standing in front of the house shivering. Piece of cake; a call to your Asterisk system, a quick digit string into the context you created for the purpose, and your alarm system is instructed to disable the alarm for 15 minutes. Mom better get her stuff and get out quick, though, or the cops’ll be showing up!
- Managing teenagers’ calls
How about allocating a specific phone-time limit to your teenagers? To use the phone, they have to enter their access codes. They can earn extra minutes by doing chores, scoring all As, dumping that annoying bum with the bad haircut—you get the idea. Once they’ve used up their minutes... click... you get your phone back.
Incoming calls can be managed as well, via Caller ID. “Donny, this is Suzy’s father. She is no longer interested in seeing you, as she has decided to raise her standards a bit. Also, you should consider getting a haircut.”
We’ve come to love the Internet, both because it is so rich in content and inexpensive, and, perhaps more importantly, because it allows us to define how we communicate. As its ability to carry richer forms of media advances, we’ll find ourselves using it more and more. Once Internet voice delivers quality that rivals (or betters) the capabilities of the PSTN, the phone company had better look for another line of business. The PSTN will cease to exist and become little more than one more communications protocol that the Internet happily carries for us. As with most of the rest of the Internet, open source technologies will lead this transformation.
The dream of having our technical inventions talk to us is older than the telephone itself. Each new advance in technology spurs a new wave of eager experimentation. Generally, results never quite meet expectations, possibly because as soon as a machine says something that sounds intelligent, most people assume that it is intelligent.
People who program and maintain computers realize their limitations and, thus, tend to allow for their weaknesses. Everybody else just expects their computers and software to work. The amount of thinking a user must do to interact with a computer is often inversely proportional to the amount of thinking the design team did. Simple interfaces belie complex design decisions.
The challenge, therefore, is to design a system that has anticipated the most common desires of its users, and that can also adroitly handle unexpected challenges.
The Festival text-to-speech server can transform text into spoken words. While this is a whole lot of fun to play with, there are many challenges to overcome.
For Asterisk, an obvious value of text-to-speech might be the ability to have your telephone system read your emails back to you. Of course, if you’ve noticed the somewhat poor grammar, punctuation, and spelling typically found in email messages these days, you can perhaps appreciate the challenges this poses.
One cannot help but wonder if the emergence of text-to-speech will inspire a new generation of people dedicated to proper writing. Seeing spelling and punctuation errors on the screen is frustrating enough; having to hear a computer speak such things will require a level of Zazen that few possess.
If text-to-speech is rocket science, speech recognition is science fiction.
Speech recognition can actually work very well, but unfortunately this is generally true only if you provide it with the right conditions—and the right conditions are not those found on a telephone network. Even a perfect PSTN connection is considered to be at the lowest acceptable limit for accurate speech recognition. Add in compressed and lossy VoIP connections, or a cell phone, and you will discover far more limitations than uses.
Asterisk now has an entire speech API so that outside companies (or even open source projects) can tie their speech recognition engines into Asterisk. One company that has done this is LumenVox. By using its speech recognition engine along with Asterisk, you can make voice-driven menus and IVR systems in record time! For more information, see http://www.lumenvox.com.
As we gain access to more and more bandwidth, it becomes less and less easy to understand why we still use low-fidelity codecs. Many people do not realize that Skype uses a higher fidelity than a telephone; it’s a large part of the reason why Skype has a reputation for sounding so good.
If you were ever to phone CNN, wouldn’t you love to hear James Earl Jones’s mellifluous voice saying “This is CNN,” instead of some tinny electronic recording? And if you think Allison Smith[157] sounds good through the phone, you should hear her in person!
In the future, we will expect, and get, high-fidelity voice though our communications equipment.
Beginning in Asterisk 1.4, there is limited support for the G.722 codec. As more and more hardware vendors start building support for high-fidelity voice into their VoIP hardware, you’ll see more support in Asterisk for making better-than PSTN quality calls.
While most of this book focuses on audio, video is also supported in many ways within Asterisk. Video support is not complete, however. The problem is not so much one of functionality as it is one of bandwidth and processing power. More significantly, it is not yet important enough to the community to merit the attention it needs.
The concept of video-conferencing has been around since the invention of the cathode ray tube. The telecom industry has been promising a video-conferencing device in every home for decades.
As with so many other communications technologies, if you have video-conferencing in your house, you are probably running it over the Internet, with a simple, inexpensive webcam. Still, it seems that people see video-conferencing as a bit gimmicky. Yes, you can see the person you’re talking to, but there’s something missing.
Video-conferencing promises a richer communications experience than the telephone. Rather than hearing a disembodied voice, the nuances of speech that come from eye-to-eye communication are possible.
There are some challenges to overcome, though, and not all of them are technical.
Consider this: using a plain telephone, people working from their home offices can have business conversations, unshowered, in their underwear, feet on the desk, coffee in hand. A similar video conversation would require half an hour of grooming to prepare for, and couldn’t happen in the kitchen, on the patio, or... well, you get the idea.
Also, the promise of eye-to-eye communication over video will never happen as long as the focal points of the participants are not in line with the cameras. If you look at the camera, your audience will see you looking at them, but you won’t see them. If you look at your screen to see whom you are talking to, the camera will show you looking down at something—not at your audience. That looks impersonal. Perhaps if a videophone could be designed like a TelePromptR, where the camera was behind the screen, it wouldn’t feel so unnatural. As it stands, there’s something psychological that’s missing. Video ends up being a gimmick.
Since Asterisk is fully VoIP-enabled, wireless is all part of the package.
This is a term that has been hyped by the telecom industry for years, but adoption has been far slower than predicted.
Unified Messaging is the concept of tying voice and text-messaging systems into one. With Asterisk, the two don’t need to be artificially combined, as Asterisk already treats them the same way.
Just by examining the terms, unified and messaging, we can see that the integration of email and voicemail must be merely the beginning; Unified Messaging needs to do a lot more than just that if it is to deserve its name.
Perhaps we need to define “messaging” as communication that does not occur in real time. In other words, when you send a message, you expect that the reply may take moments, minutes, hours, or even days to arrive. You compose what you wish to say, and your audience is expected to compose a reply.
Contrast this with conversing, which happens in real time. When you talk to someone on a telephone connection, you expect no more than a few seconds’ delay before the response arrives.
In 2002, Tim O’Reilly delivered a speech titled “Watching the Alpha Geeks: OS X and the Next Big Thing” (http://www.macdevcenter.com/pub/a/mac/2002/05/14/oreilly_wwdc_keynote.html), in which he talked about someone piping IRC through a text-to-speech engine. One could imagine doing the reverse as well, allowing us to join an IRC or instant messaging chat over our Wi-Fi phone, our Asterisk PBX providing the speech-to-text-to-speech translations.
As monopoly networks such as the PSTN give way to community-based networks like the Internet, there will be a period of time where it is necessary to interconnect the two. While the traditional providers would prefer that the existing model be carried into the new paradigm, it is increasingly likely that telephone calls will become little more than another application the Internet happily carries.
But a challenge remains: how to manage the telephone numbering plan with which we are all familiar and comfortable?
The ITU defined a numbering plan in its E.164 specification. If you’ve used a telephone to make a call across the PSTN, you can confidently state that you are familiar with the concept of E.164 numbering. Prior to the advent of publicly available VoIP, nobody cared about E.164 except the telephone companies—nobody needed to.
Now that calls are hopping from PSTN to Internet to who-knows-what, some consideration must be given to E.164.
In response to this challenge, the IETF has sponsored the Telephone Number Mapping (ENUM) working group, the purpose of which is to map E.164 numbers into the Domain Name System (DNS).
While the concept of ENUM is sound, it requires cooperation from the telecom industry to achieve success. However, cooperation is not what the telecom industry is famous for and, thus, far ENUM has foundered.
The folks at e164.org are trying to contribute to the success of ENUM. You can log on to this site, register your phone number, and inform the system of alternative methods of communicating with you. This means that someone who knows your phone number can connect a VoIP call to you, as the e164.org DNS zone will provide the IP addressing and protocol information needed to connect to your location.
As more and more people publish VoIP connectivity information, fewer and fewer calls will be connected through the PSTN.
Distributed Universal Number Discovery (DUNDi) is an open routing protocol designed to maintain dynamic telecom routing tables between compatible systems (see Chapter 14, Potpourri for more information). While Asterisk is currently the only PBX to support DUNDi, the openness of the standard ensures that anyone can implement it.
DUNDi has huge potential, but it is very much in its infancy. This is the one to watch.
As is true with any worthwhile thing, Asterisk will face challenges. Let’s take a glance at what some of them may be.
These days, the Internet is changing so fast, and offers so much diverse content, that it is impossible for even the most attentive geek to keep on top of it all. While this is as it should be, it also means that an enormous amount of technology churn is an inevitable part of keeping any communications system current.
Yes, it’s coming. There will always be people who believe they have the right to inconvenience and harass others in their pursuit of money. Efforts are under way to try and address this, but only time will tell how efficacious they will be.
The industry is making the transition from ignorance to laughter. If Gandhi is correct, we can expect the fight to begin soon.
As their revenue streams become increasingly threatened by open source telephony, the traditional industry players are certain to mount a fear campaign, in hopes of undermining the revolution.
There is a rumor making the rounds that the major network providers will begin to artificially cripple VoIP traffic by tagging and prioritizing the traffic of their premium VoIP services and, worse, detecting and bumping any VoIP traffic generated by services not approved by them.
Some of this is already taking place, with service providers blocking traffic of certain types through their networks, ostensibly due to some public service being rendered (such as blocking popular file-sharing services to protect us from piracy). In the United States, the FCC has taken a clear stand on the matter and fined companies that engage in such practices. In the rest of the world, regulatory bodies are not always as accepting of VoIP.
What seems clear is that the community and the network will find ways around blockages, just as they always have.
The recently departed Chairman of the United States Federal Communications Commission, Michael Powell, delivered a gift that may well have altered the path of the VoIP revolution. Rather than attempting to regulate VoIP as a telecom service, he has championed the concept that VoIP represents an entirely new way of communicating and requires its own regulatory space in which to evolve.
VoIP will become regulated, but not everywhere as a telephony service. Some of the regulations that may be created include:
- Presence information for emergency services
One of the characteristics of a traditional PSTN circuit is that it is always in the same location. This is very helpful to emergency services, as they can pinpoint the location of a caller by identifying the address of the circuit from which the call was placed. The proliferation of cell phones has made this much more difficult to achieve, since a cell phone does not have a known address. A cell phone can be plugged into any network and can register to any server. If the phone does not identify its physical location, an emergency call from it will provide no clue as to the where the caller is. VoIP creates similar challenges.
- Call monitoring for law enforcement agencies
Law enforcement agencies have always been able to obtain wiretaps on traditional circuit-switched telephone lines. While regulations are being enacted that are designed to achieve the same end on the network, the technical challenge of delivering this functionality will probably never be completely solved. People value their privacy, and the more governments want to stifle it, the more effort will be put toward maintaining it.
- Anti-monopolistic practices
These practices are already being seen in the U.S., with fines being levied against network providers who attempt to filter traffic based on content.
When it comes to regulation, Asterisk is both a saint and a devil: a saint because it feeds the poor, and a devil because it empowers the phrackers and spammers like nothing ever has. The regulation of open source telephony may in part be determined by how well the community regulates itself. Concepts such as DUNDi, which incorporate anti-spam processes, are an excellent start. On the other hand, concepts such as Caller ID-spoofing are ripe with opportunities for abuse.
Due to the best-effort reality of the TCP/IP-based Internet, it is not yet known how well increasing realtime VoIP traffic will affect overall network performance. Currently, there is so much excess bandwidth in the backbone that best-effort delivery is generally quite good indeed. Still, it has been proven time and time again that whenever we are provided with more bandwidth, we figure out a way to use it up. The 1 MB DSL connection undreamt of five years ago is now barely adequate.
Perhaps a corollary of Moore’s Law[158] will apply to network bandwidth. QoS may become moot, due to the network’s ability to deliver adequate performance without any special processing. Organizations that require higher levels of reliability may elect to pay a premium for a higher grade of service. Perhaps the era of paying by the minute for long-distance connections will give way to paying by the millisecond for guaranteed low latency, or by the percentage point for reduced packet loss. Premium services will offer the five-nines reliability[159] the traditional telecom companies have always touted as their advantage over VoIP.
Open systems require new approaches toward solution design. Just because the hardware and software are cheap doesn’t mean the solution will be. Asterisk does not come out of the box ready to run; it has to be designed and built, and then maintained. While the base software is free, and the hardware costs will be based on commodity pricing, it is fair to say that the configuration costs for a highly customized system will be a sizeable part of the solution costs—in many cases, because of its high degree of complexity and configurability, more than would be expected with a traditional PBX.
The rule of thumb is generally considered to be something like this: if it can be done in the dialplan, the system design will be roughly the same as for any similarly featured traditional PBX. Beyond that, only experience will allow one to accurately estimate the time required to build a system.
There is much to learn.
Open source telephony creates limitless opportunities. Here are some of the more compelling ones.
Some people would tell you that price is the key, but we believe that the real reason Asterisk will succeed is because it is now possible to build a telephone system as one would a web site: with complete, total customization of each and every facet of the system. Customers have wanted this for years. Only Asterisk can deliver.
Anyone can contribute to the future of communicating. It is now possible for someone with an old $200 PC to develop a communications system that has intelligence to rival the most expensive proprietary systems. Granted, the hardware would not be production-ready, but there is no reason the software couldn’t be. This is one of the reasons why closed systems will have a hard time competing. The sheer number of people who have access to the required equipment is impossible to equal in a closed shop.
The design of a PBX was always a kind of art form, but before Asterisk, the art lay in finding creative ways to overcome the limitations of the technology. With limitless technology, those same creative skills can now be properly applied to the task of completely answering the needs of the customer. Open source telephony engines such as Asterisk will enable this. Telecom designers will dance for joy, as their considerable creative skills will now actually serve the needs of their customers, rather than be focused on managing kludge.
Ultimately, the promise of open source comes to nothing if it cannot fulfill the need people have to solve problems. The closed industries lost sight of the customer and tried to fit the customer to the product.
Open source telephony brings voice communications in line with other information technologies. It is finally possible to properly begin the task of integrating email, voice, video, and anything else we might conceive of over flexible transport networks (whether wired or wireless), in response to the needs of the user, not the whims of monopolies.
Welcome to the future of telecom!
[151] Contrast this with the IETF’s membership page, which states: “The IETF is not a membership organization (no cards, no dues, no secret handshakes :-)... It is open to any interested individual... Welcome to the IETF.” Talk about community!
[152] Considering the thousands of documents available, and the fact that each document generally contains references to dozens more, the value of this free information is difficult to judge.
[154] Much of the following section is merely our interpretation of O’Reilly’s article. To get the full gist of these ideas, the full read is highly recommended.
[155] From the perspective of the closed-source industry, this attitude is understandable. In his book The Mythical Man-Month: Essays on Software Engineering (Addison-Wesley), Fred Brooks opined that “the complexity and communication costs of a project rise with the square of the number of developers, while work done only rises linearly.” Without a community-based development methodology, it is very difficult to deliver products that at best are little more than incremental improvements over their predecessors, and at worst are merely collections of patches.
[156] Eric S. Raymond, The Cathedral and the Bazaar.
[157] Allison Smith is The Voice of Asterisk; it is her voice in all of the system prompts. To have Allison produce your own prompt, simply visit http://thevoice.digium.com.
[158] Gordon Moore wrote a paper in 1965 that predicted the doubling of transistors on a processor every few years.
[159] This term refers to 99.999%, which is touted as the reliability of traditional telecom networks. Achieving five nines requires that service interruptions for an entire year total no more than 5 minutes and 15 seconds. Many people believe that VoIP will need to achieve this level of reliability before it can be expected to fully replace the PSTN. Many other people believe that the PSTN doesn’t even come close to five-nines reliability. We believe that this could have been an excellent term to describe high reliability, but marketing departments abuse it far too frequently.
Table of Contents
VoIP channels in Asterisk represent connections to the protocols they support. Each protocol you wish to use requires a configuration file, containing general parameters defining how your system handles the protocol as well as specific parameters for each channel (or device) you will want to reference in your dialplan. In this appendix, we’ll take an in-depth look at the IAX and SIP configuration files.
The IAX configuration file (iax.conf) contains
all of the configuration information Asterisk needs to create and manage
IAX protocol channels. The sections in the file are separated by headings,
which are formed by a word framed in square brackets ([]). The
name in the brackets will be the name of the channel, with one notable
exception: the [general]
section, which is not a channel, is the area where global protocol
parameters are defined.
This section examines the various general and channel-specific
settings for iax.conf. We will define each parameter
and then give an example of its use. Certain options may have several
valid arguments. These arguments are listed beside the option, separated
with the pipe symbol (|). For
example, bandwidth=low|medium|high
means that the bandwidth option accepts
one of the values low, medium, or high as its argument.
You can insert comments anywhere in the
iax.conf file, by preceding the comment text with the
semicolon character (;). Everything to
the right of the semicolon will be ignored. Feel free to use comments
liberally.
The first non-comment line in your iax.conf
file must be the heading [general].
The parameters in this section will apply to all connections using this
protocol, unless defined differently in a specific channel’s definition.
Since some of these settings can be defined on a per-channel basis, we
have identified settings that are always global with the tag “(global)”
and those that can optionally be configured for individual channels with
the tag “(channel).” If you define a channel parameter under the
[general] section, you do not need to
define it in each channel; its value becomes the default. Keep in mind
that setting a parameter in the [general] section does not prevent you from
setting it differently for specific channels; it merely makes this
setting the default. Also keep in mind that not defining these
parameters may, in some cases, cause a system default to be used
instead.
Here are the parameters that you can configure:
accountcode(channel)The account code can be defined on a per-user basis. If defined, this account code will be assigned to a call record whenever no specific user account code is set. The
accountcodename configured will be used as the filename.csv in the /var/log/asterisk/cdr-csv/ directory to store Call Detail Records (CDRs) for the user/peer/friend:accountcode=iax-
usernameadsi(channel)Support for ADSI (Analog Display Services Interface) can be enabled if you have ADSI-compatible CPE equipment:
adsi=yes|no
allowanddisallow(channel)Specific codecs can be allowed or disallowed, limiting codec use to those preferred by the system designer.
allowanddisallowcan also be defined on a per-channel basis. Keep in mind thatallowstatements in the[general]section will carry over to each of the channels, unless you reset with adisallow=all. Codec negotiation is attempted in the order in which the codecs are defined. Best practice suggests that you definedisallow=all, followed by explicitallowstatements for each codec you wish to use. If nothing is defined,allow=allis assumed:disallow=all allow=ulaw allow=gsm allow=ilbc
amaflags(channel)Automatic Message Accounting (AMA) is defined in the Telcordia Family of Documents listed under FR-AMA-1. These documents specify standard mechanisms for generation and transmission of CDRs. You can specify one of four AMA flags to apply to all IAX connections:
amaflags=default|omit|billing|documentation
authdebug(global)You can minimize the amount of authorization debugging by disabling it with
authdebug=no. Authorization debugging is enabled by default if not explicitly disabled:authdebug=no
autokill(global)To minimize the danger of stalling when a host is unreachable, you can set
autokilltoyesto specify that any new connection should be torn down if anACKis not received within 2,000 ms. (This is obviously not advised for hosts with high latency.) Alternatively, you can replaceyeswith the number of milliseconds to wait before considering a peer unreachable.autokillconfigures the wait for all IAX2 peers, but you can configure it differently for individual peers with the use of thequalifycommand:autokill=
1500bandwidth(channel)bandwidthis a shortcut that may help you get around usingdisallow=alland multipleallowstatements to specify which codecs to use. The valid options are:bindportandbindaddr(global)These optional parameters allow you to control the IP interface and port on which you wish to accept IAX connections. If omitted, the port will be set to 4569, and all IP addresses in your Asterisk system will accept incoming IAX connections. If multiple bind addresses are configured, only the defined interface will accept IAX connections.[160] The address 0.0.0.0 tells Asterisk to listen on all interfaces:
bindport=4569 bindaddr=192.168.0.1
codecpriority(channel)The
codecpriorityoption controls which end of an inbound call leg will have priority over the negotiation of codecs. If set in the[general]section, the selected options will be inherited by all user entries in the channel configuration file; however, they can be defined in the individual user entries for more granular control. If set in both the[general]and user sections, the user entry will override the entry that is configured in the[general]section. If this parameter is not configured, the value defaults tohost.Valid options include:
-
caller The inbound caller has priority over the host.
-
host The host has priority over the inbound caller.
-
disabled Codec preferences are not considered; this is the default behavior before the implementation of codec preferences.
-
reqonly Codec preferences are ignored, and the call is accepted only if the requested codec is available:
codecpriority=caller|host|disabled|reqonly
-
delayreject(global)If an incorrect password is received on an IAX channel, this will delay the sending of the
REGREQorAUTHREPreject messages, which will help to secure against brute-force password attacks. The delay time is 1,000 ms:delayreject=yes|no
forcejitterbuffer(channel)Since Asterisk attempts to bridge channels (endpoints) directly together, the endpoints are normally allowed to perform jitter buffering themselves. However, if the endpoints have a poor jitter buffer implementation, you may wish to force Asterisk to perform jitter buffering no matter what. You can force jitter buffering to be performed with
forcejitterbuffer=yes:forcejitterbuffer=yes
iaxthreadsandiaxmaxthreads(global)The
iaxthreadssetting specifies the number of IAX helper threads that are created on startup to handle IAX communications.The
iaxmaxthreadssetting specifies the maximum number of additional IAX helper threads that may be spawned to handle higher IAX traffic levels:iaxthreads=
10iaxmaxthreads=100jitterbuffer(channel)Jitter refers to the varying latency between packets. When packets are sent from an end device, they are sent at a constant rate with very little latency variation. However, as the packets traverse the Internet, the latency between the packets may become varied; thus, they may arrive at the destination at different times, and possibly even out of order.
The jitter buffer is, in a sense, a staging area where the packets can be reordered and delivered in a regulated stream. Without a jitter buffer, the user may perceive anomalies in the stream, experienced as static, strange sound effects, garbled words, or, in severe cases, missed words or syllables.
The jitter buffer affects only data received from the far end. Any data you transmit will not be affected by your jitter buffer, as the far end will be responsible for the de-jittering of its incoming connections.
The jitter buffer is enabled with the use of
jitterbuffer=yes:jitterbuffer=yes|no
language(channel)This sets the language flag to whatever you define. The global default language is English. The language that is set is sent by the channel as an information element. It is also used by applications such as
SayNumber()that have different files for different languages. Keep in mind that languages other than English are not explicitly installed on the system, and it is up to you to configure the system to ensure that the language you specify is handled properly:language=
enmailboxdetail(global)If
mailboxdetailis set toyes, the new/old message count is sent to the user, instead of a simple statement of whether new and old messages exist.mailboxdetailcan also be set on a per-peer basis:mailboxdetail=yes
maxjitterbuffer(channel)This parameter is used to set the maximum size of the jitter buffer, in milliseconds. Be sure not to set
maxjitterbuffertoo high, or you will needlessly increase your latency:maxjitterbuffer=
500maxjitterinterps(channel)The maximum number of interpolation frames the jitter buffer should return in a row. Since some clients do not send CNG/DTX frames to indicate silence, the jitter buffer will assume silence has begun after returning this many interpolations. This prevents interpolating throughout a long silence:
maxjitterinterps=
10maxregexpireandminregexpire(channel)Specifies the maximum and minimum time intervals for registration expiration, in seconds:
maxregexpire=
180minregexpire=60mohinterpret(channel)This option specifies a preference for which music-on-hold class this channel should listen to when put on hold if the music class has not been set on the channel with
Set(CHANNEL(musicclass)=in the dialplan, and the peer channel putting this all on hold did not suggest a music class.whatever)If this option is set to
passthrough, then the hold message will always be passed through as signaling instead of generating hold music locally.This option may be specified globally, or on a per-user or per-peer basis:
mohinterpret=default
mohsuggest(channel)This option specifies which music-on-hold class (as defined in
musiconhold.conf) to suggest to the peer channel when this channel places the peer on hold. It may be specified globally or on a per-user or per-peer basis:mohsuggest=default
nochecksums(global)If set, Asterisk will disable the calculation of UDP checksums and no longer check UDP checksums on systems supporting this feature:
nochecksums=yes
regcontext(channel)By specifying the context that contains the actions to perform, you can configure Asterisk to perform a number of actions when a peer registers to your server. This option works in conjunction with
regexten, which specifies the extension to execute. If noregextenis configured, the peer name is used as the extension. Asterisk will dynamically create and destroy aNoOpat priority 1 for the extension. All actions to be performed upon registration should start at priority 2. More than oneregextenmay be supplied, if separated by an&.regcontextcan be set on a per-peer basis or globally:regcontext=
registered-phonesregexten(channel)The
regextenoption is used in conjunction withregcontextto specify the extension to be executed within the configured context. Ifregextenis not explicitly configured, the peer name is used as the extension to match:regexten=
myphoneresyncthreshold(channel)The resynchronize threshold is used to resynchronize the jitter buffer if a significant change is detected over a few frames, assuming that the change was caused by a timestamp mixup. The resynchronization threshold is defined as the measured jitter plus the
resyncthresholdvalue, defined in milliseconds:resyncthreshold=
1000rtautoclear(global)This specifies whether or not Asterisk should auto-expire friends created on the fly on the same schedule as if they had just registered. If set to
yes, when the registration expires, the friend will vanish from the configuration until requested again. If set to an integer, friends expire within that number of seconds instead of the normal registration interval:rtautoclear=yes|no|
secondsrtcachefriends(global)If
rtcachefriendsis turned on, Asterisk will cache friends that come from the realtime engine, just as if they had come fromiax.conf. This often helps with items such as message-waiting indications on realtime peers:rtcachefriends=yes|no
rtignoreregexpire(global)If
rtignoreregexpireis set toyes, and a realtime peer’s registration has expired (based on its registration interval), then Asterisk will continue to use the IP address and port stored in the database:rtignoreregexpire=yes|no
rtupdate(global)If set to
yesAsterisk will update the IP address, origination port, and registration period of a peer upon registration. Defaults toyes:rtupdate=yes|no
tos(global)Asterisk can set the Type of Service (TOS) bits in the IP header to help improve performance on routers that respect TOS bits in their routing calculations. The following values are valid:
CS0,CS1,CS2,CS3,CS4,CS5,CS6,CS7,AF11,AF12,AF13,AF21,AF22,AF23,AF31,AF32,AF33,AF41,AF42,AF43, andef(expedited forwarding). You may also use a numeric value for the TOS bits.For more information, see the
doc/ip-tos.txtfile in the Asterisk source directory.trunk(channel)IAX2 trunking enables Asterisk to send media (as mini-frames) from multiple channels using a single header. The reduction in overhead makes the IAX2 protocol more efficient when sending multiple streams to the same endpoint (usually another Asterisk server):
trunk=yes|no
trunkfreq(channel)trunkfreqis used to control how frequently you send trunk messages, in milliseconds. Trunk messages are sent in conjunction with thetrunk=yescommand:trunkfreq=20
trunktimestamps(channel)Specifies whether or not Asterisk should send timestamps for the individual sub-frames within trunk frames. There is a small bandwidth penalty for sending these timestamps (less than 1 kbps/call), but they ensure that frame timestamps get sent end-to-end properly. If both ends of all your trunks go directly to TDM and your
trunkfreqequals the frame length for your codecs, you can probably suppress these. The receiver must also support this feature, although it does not also need to have it enabled:trunktimestamps=yes|no
The register switch (register
=>) is used to register your Asterisk box to a remote server—this lets
the remote end know where you are, in case you are configured with a
dynamic IP address. Note that register statements are used only when the
remote end has you configured as a peer, and when host=dynamic.
The basic format for a register
statement is:
register =>username:password@remote-host
The password is optional (if not
configured on the remote system).
Alternatively, you can specify an RSA key by framing the
appropriate RSA key name[161] in square brackets ([]):
register =>username:[rsa-key-name]@remote-host
By default, register requests
will be sent via port 4569. You can direct them to a different port by
explicitly specifying it, as follows:
register =>username:password@remote-host:1234
With the general settings defined, we can now define our channels. Defining a guest channel is recommended whenever you want to accept anonymous IAX calls. This is a very common way for folks in the Asterisk community to contact one another. Before you decide that this is not for you, keep in mind that anyone whom you want to be able to connect to you via IAX (without you specifically configuring an account for them) will need to connect as a guest. This account, in effect, becomes your “IAX phone number.” Your guest channel definition should look something like this:
[guest] type=user context=incoming callerid="Incoming IAX Guest"
Tip
No doubt the spammers will find a way to harass these addresses, but in the short term this has not proven to be a problem. In the long term, we’ll probably use DUNDi (see Chapter 14, Potpourri for more information).
If you wish to accept calls from the Free World Dialup network,
Asterisk comes with a predefined security key that ensures that
anonymous connections cannot spoof an incoming Free World Dialup call.
You’ll want to set up an iaxfwd
channel:
[iaxfwd] type=user context=incoming auth=rsa inkeys=freeworlddialup
If you have resources advertised on a DUNDi network, the associated user must be defined in iax.conf:
[dundi] type=user dbsecret=dundi/secret context=dundi-incoming
If you have IAX-based devices (such as an IAXy), or IAX-based users at a remote node, you may want to provide them with their own user definition with which to connect to the system.
Let’s say you have a user on a remote node for whom you want to
define an IAX user. We’ll call this hypothetical user sushi. The user definition might look
something like this:
[sushi] type=user context=local_users auth=md5,plaintext,rsa secret=wasabi transfer=no jitterbuffer=yes callerid="Happy Tempura" <(800) 555-1234> accountcode=seaweed deny=0.0.0.0/0.0.0.0 permit=192.168.1.100/255.255.255.0 language=en
Incoming calls from this user will arrive in the context local_users and will ask the system to accept
the Caller ID Happy Tempura <(800)
555-1234>. The system will be willing to accept MD5,
plain-text, or RSA authentication from this user, so long as the
password wasabi is provided and the
call comes from the IP address 192.168.1.100. All calls related to this
channel will be assigned the account code seaweed. Because we’ve set transfer to no, the media path for this channel will
always pass through Asterisk; it cannot be redirected to another IAX
node.
If you yourself are a remote node, and you need to connect into a remote node as a user, you would define that main node as your peer:
[sashimi_platter] type=peer username=sushi secret=wasabi host=192.168.1.101 qualify=yes trunk=yes
A peer is called from the dialplan by
using Dial() with the name
contained in square brackets. If you need to authenticate to the peer
with a username, you can set that username and secret in the username and secret fields.
Tip
Remember, an incoming call from a user
specified in iax.conf must
authenticate using the name specified in square brackets. When
Asterisk itself is calling to an outside peer
however, you can use the username
setting to set the authentication username.
host is specified using
either IP dotted notation or a fully qualified domain name (FQDN). You
can determine the latency between you and the remote host, and whether
the peer is alive, with qualify=yes.
To minimize the amount of overhead for multiple calls going to the same
peer, you can trunk them.
Trunking is unique to IAX and is designed to take advantage of the fact that
two large sites may have multiple, simultaneous VoIP connections between
them. IAX trunking reduces overhead by loading the audio from several
concurrent calls into each signaling packet.[162] You can enable trunking for a channel with trunk=yes in
iax.conf.
Figure A.1, “Trunking disabled” shows a channel with trunking disabled, and Figure A.2, “Trunking enabled” shows a channel with trunking enabled.


Now, let’s take a look at the channel-specific parameters:
-
callerid You can set a suggested Caller ID string for a user or peer with
callerid. If you define a Caller ID field for a user, any calls that come in on that channel will have that Caller ID assigned to them, regardless of what the far end sends to you. If you define Caller ID for a peer, you are requesting that the far end use that to identify you (although you have no way of ensuring it will do so). If you want incoming users to be able to define their own Caller IDs (i.e., for guests), make sure you do not set thecalleridfield:callerid=
John Smith <(800) 555-1234>-
defaultip The
defaultipsetting complementshost=dynamic. If a host has not yet registered with your server, you’ll attempt to send messages to the default IP address configured here:defaultip=
192.168.1.101-
inkeys You can use the
inkeysoption to authenticate a user with the use of an RSA key. To associate more than one RSA key with a user channel definition, separate the key names with a colon (:). Any one of those keys will be sufficient to validate a connection. The “inkey” is the public key you distribute to your users:inkeys=
server_one:server_two-
mailbox If you associate a mailbox with a peer within the channel definition, voicemail will send a message waiting indication (MWI) to the nodes on the end of that channel. If the mailbox number is in a voicemail context other than
default, you can specify it asmailbox@context. To associate multiple mailboxes with a single peer, use multiplemailboxstatements:mailbox=
1000@internal-
outkey You can use the
outkeyoption to authenticate a peer with the use of an RSA key. Only one RSA key may be used for outgoing authentication. The “outkey” is not distributed; it is your private key:outkey=
private_key-
qualify You can set
qualifytoyes,no, or a time in milliseconds. If you setqualify=yes,PINGmessages will be sent periodically to the remote peers to determine whether they are available and what the latency between replies is. The peers will respond withPONGmessages. A peer will be determined unreachable if no reply is received within 2,000 ms (to change this default, instead setqualifyto the number of milliseconds to wait for the reply).qualifyfreqokandqualifyfreqnotokThese two settings are used to determine how frequently Asterisk should ping a peer when
qualifyis set. Thequalifyfreqoksetting determines how often to ping the peer when it’s in an OK state, andqualifyfreqnotokdetermines how often to ping the peer when it’s not in an OK state.-
qualifysmoothing You can set
qualifysmoothingtoyesorno. If enabled, Asterisk will take the average of the last two qualify times. This helps eliminate having peers marked asLAGGED, especially on a lossy network.-
sendani The SS7 PSTN network uses Automatic Number Identification (ANI) to identify a caller, and Caller ID is what is delivered to the user. The Caller ID is generated from the ANI, so it’s easy to confuse the two. Blocking Caller ID sets a privacy flag on the ANI, but the backbone network still knows where the call is coming from:
sendani=yes
-
transfer You can set
transfertoyes,no, ormediaonly. If set toyes, Asterisk will transfer the call away from itself if it can, in order to make the packet path shorter between the two endpoints. (This obviously won’t work if Asterisk needs to transcode or translate between protocols, or if network conditions don’t allow the two endpoints to talk directly to each other.) If it is set tono, Asterisk will not try to transfer the call away from itself.If set to
mediaonly, Asterisk will attempt to transfer the media stream so that it goes directly between the two endpoints, but the call signaling (call setup and teardown messages) will still go through Asterisk. This is useful because it ensures that call detail records are still accurate, even though the media is no longer flowing through the Asterisk box.
Just as with IAX, the SIP configuration file
(sip.conf) contains configuration information for SIP
channels. The headings for the channel definitions are formed by a word
framed in square brackets ([])—again,
with the exception of the [general]
section, where we define global SIP parameters. Don’t forget to use
comments generously in your sip.conf file. Precede
the comment text with a semicolon; everything to the right will be
ignored.
The following options are to be used within the [general] section of
sip.conf:
-
allowexternalinvites If set to
no, this setting disables INVITE and REFER messages to non-local domains. See thedomainsetting.allowexternalinvites=yes|no
-
allowguest If set to
no, this disallows guest SIP connections. The default is to allow guest connections. SIP normally requires authentication, but you can accept calls from users who do not support authentication (i.e., do not have asecretfield defined). Certain SIP appliances (such as the Cisco Call Manager v4.1) do not support authentication, so they will not be able to connect if you setallowguest=no:allowguest=no|yes
-
allowoverlap If set to
no, overlap dialing is disabled:allowoverlap=no|yes
-
allowsubscribe Specifies whether or not to allow external devices to subscribe to extension status (as set in the
hintpriority). Defaults toyes:allowsubscribe=yes|no
-
allowtransfers If set to
no, transfers are disabled for all SIP calls, unless specifically enabled on a per-user or per-peer basis:allowtransfers=no|yes
-
alwaysauthreject If this option is enabled, whenever Asterisk rejects an INVITE or REGISTER, it will always reject it with a
401 Unauthorizedmessage instead of letting the caller know whether there was a matching user or peer for his request:alwaysauthreject=no|yes
-
autodomain Set this option to
yesto have Asterisk add the local hostname and local IP addresses to the domain list:autodomain=yes|no
-
bindaddrandbindport These optional parameters allow you to control the IP interface and port on which you wish to accept SIP connections. If omitted, the port will be set to 5060, and all IP addresses in your Asterisk system will accept incoming SIP connections. If multiple bind addresses are configured, only those interfaces will listen for connections. The address 0.0.0.0 tells Asterisk to listen on all interfaces:
bindaddr=
0.0.0.0bindport=5060-
buggymwi This setting allows Asterisk to send a message-waiting indication to certain Cisco SIP phones with firmware that doesn’t fully support the message-waiting Internet RFC. Enable this option to avoid getting error messages when sending MWI messages on phones with this bug:
buggymwi=no|yes
-
callevents Set this to
yeswhen you want SIP to generate Manager events. This will be important if you have external programs that use the Asterisk Manager interface, such as the Flash Operator Panel:callevents=yes
-
checkmwi This option specifies the default amount of time, in seconds, between mailbox checks for peers:
checkmwi=
30-
compactheaders You can set
compactheaderstoyesorno. If it’s set toyes, the SIP headers will use a compact format, which may be required if the size of the SIP header is larger than the maximum transmission unit (MTU) of your IP headers, causing the IP packet to be fragmented. Do not use this option unless you know what you are doing:compactheaders=yes|no
-
defaultexpiry This sets the default SIP registration expiration time, in seconds, for incoming and outgoing registrations. A client will normally define this value when it initially registers, so the default value you set here will be used only if the client does not specify a timeout when it registers. If you are registering to another user agent server (UAS), this is the registration timeout that it will send to the far end:
defaultexpiry=300
-
directrtpsetup This setting configures the direct RTP setup between two endpoints without the need for RE-INVITEs.
directrtpsetup=yes|no
Warning
As of the time that this book was written,
directrtpsetupwas still considered experimental, and as such should not be enabled unless you fully understand the consequences. This option will not work for video calls and cases where the called party sends RTP payloads and FMTP headers in the200 OKresponse that do not match the caller’s INVITE request.-
domain Sets the default domain for this Asterisk server. If configured, Asterisk will allow
INVITEandREFERmessages only to nonlocal domains. You can use the CLI commandsip show domainsto list the local domains:domain=
example.com-
dumphistory You can set
dumphistorytoyesornoto enable or disable the printing of the SIP history report at the end of the SIP dialog. The SIP history is printed to the DEBUG logging channel:dumphistory=yes|no
-
externhost externhosttakes a fully qualified domain name as its argument. If Asterisk is behind NAT, the SIP header will normally use the private IP address assigned to the server. If you set this option, Asterisk will perform periodic DNS lookups on the hostname and replace the private IP address with the IP address returned from the DNS lookup:externhost=
my.hostname.tld-
externip externiptakes an IP address as its argument. If Asterisk is behind NAT, the SIP header will normally use the private IP address assigned to the server. The remote server will not know how to route back to this address; thus, it must be replaced with a valid, routeable address:externip=
216.239.39.104-
externrefresh If
externhostis used,externrefreshconfigures how long, in seconds, should pass between DNS lookups:externrefresh=
30-
g726nonstandard This parameter can be set when dealing with peers that incorrectly use the wrong encoding for the G.726 codec. This setting tells Asterisk to use AAL2 packing order instead of RFC3551 packing order if the peer negotiates G726-32 audio. Ordinarily, that would be contrary to the RFC3551 specification, as the peer should be negotiating AAL2-G726-32 instead. You may need to set this option if you’re using a Sipura or Grandstream device:
g726nonstandard=yes
ignoreregexpire(global)If
ignoreregexpireis set toyes, Asterisk could do one of two things, for:- Non-realtime peers
When their registration expires, the information will not be removed from memory or the Asterisk database. If you attempt to place a call to the peer, the existing information will be used in spite of it having expired.
- Realtime peers
When the peer is retrieved from realtime storage, the registration information will be used regardless of whether it has expired or not; if it expires while the realtime peer is still in memory (due to caching or other reasons), the information will not be removed from realtime storage:
ignoreregexpire=yes|no
-
jbenable Enables the use of an RTP jitter buffer on the receiving side of a SIP channel. Defaults to
no. An enabled jitter buffer will be used only if the sending side can create and the receiving side cannot accept jitter. The SIP channel can accept jitter; thus a jitter buffer on the receiving side will be used only if it is forced and enabled:jbenable=yes|no
-
jbforce Forces the use of the RTP jitter buffer on the receiving side of a SIP channel. Defaults to
no:jbforce=yes|no
-
jbimpl This setting is used to specify which jitter buffer implementation to use, the
fixedjitter buffer or theadaptivejitter buffer. If thefixedjitter buffer is used, it will always be the size defined byjbmaxsize. If theadaptivejitter buffer is specified, then the jitter buffer will vary in size up to the maximum size specified byjbmaxsize. This setting defaults tofixed:jbimpl=fixed|adaptive
-
jblog Specifies whether or not to enable jitter buffer frame logging. Defaults to
no:jblog=yes|no
-
jbmaxsize Sets the maximum length of the jitter buffer, in milliseconds:
jbmaxsize=
200-
jbresyncthreshold Jump in the frame timestamps over which the jitter buffer is resynchronized. This is useful to improve the quality of the voice, with big jumps in/broken timestamps that are usually sent from exotic devices and programs. Defaults to
1000:jbresyncthreshold=
1000-
limitonpeers This setting tells Asterisk to apply call limits to peers only. This will improve call limits and status notification for devices set to
type=friendbecause the peer limit will be checked, and not create a separate limit for the user and peer portions of a friend:limitonpeers=yes|no
-
localnet localnetis used to tell Asterisk which IP addresses are considered local, so that the address in the SIP header can be translated to that specified byexternipor the IP address can be looked up withexternhost. The IP addresses should be specified in CIDR notation:localnet=
192.168.1.0/24localnet=172.16.0.0/16-
matchexterniplocally Specifies that Asterisk should substitute the
externiporexternhostsetting only if it matches yourlocalnetsetting. Unless you have some sort of strange network setup you will not need to enable this:matchexterniplocally=yes|no
-
maxexpiry This sets the maximum amount of time, in seconds, until a peer’s registration expires:
maxexpiry=
3600-
minexpiry This sets the minimum amount of time, in seconds, allowed for a registration or subscription:
maxexpiry=
3600-
notifymimetype This takes as its argument a string specifying the MIME type used for the message-waiting indication (MWI) in the SIP
NOTIFYmessage. The most common setting for this field istext/plain, although it can be customized if need be:notifymimetype=
text/plain-
notifyringing Specifies whether Asterisk should notify subscriptions on RINGING state:
notifyringing=yes|no
-
notifyhold Specifies whether Asterisk should notify subscriptions on HOLD state:
notifyhold=yes|no
-
pedantic You can set
pedantictoyesorno. Setting it toyesenables slow pedantic checking for phones that require it, such as the Pingtel, and enables more strict SIP RFC compliancy. In an effort to improve performance, SIP RFC compliance is not normally strictly adhered to:pedantic=yes
-
realm This option sets the realm for digest authentication. Set
realmto your fully qualified domain name, which must be globally unique:realm=
mybox.example.com-
recordhistory You can set
recordhistorytoyesornoto enable or disable SIP history recording for all channels:recordhistory=yes|no
-
registerattempts Specifies how many times Asterisk will attempt its outbound registrations before giving up. This setting defaults to 0, which means that Asterisk will retry indefinitely:
registerattempts=
0-
registertimeout Specifies how often Asterisk should attempt to re-register to other devices:
registertimeout=
30-
relaxdtmf You can set
relaxdtmftoyesorno. Setting it toyeswill relax the DTMF detection handling. Use this if Asterisk is having a difficult time determining the DTMF on the SIP channel. Note that this may cause “talkoff,” where Asterisk incorrectly detects DTMF when it should not:relaxdtmf=yes|no
rtautoclear(global)This specifies whether or not Asterisk should auto-expire friends created on the fly on the same schedule as if they had just registered. If set to
yes, when the registration expires, the friend will vanish from the configuration until requested again. If set to an integer, friends expire within that number of seconds instead of the normal registration interval:rtautoclear=yes|no|
secondsrtcachefriends(global)If
rtcachefriendsis turned on, Asterisk will cache friends that come from the realtime engine, just as if they had come fromsip.conf. This often helps with items such as message-waiting indications on realtime peers:rtcachefriends=yes|no
rtsavesysname(global)Specifies whether or not Asterisk should save the systemname in the realtime database at the time of registration:
rtsavesysname=yes|no
rtupdate(global)If set to
yesAsterisk will update the IP address, origination port, and registration period of a peer upon registration. Defaults toyes:rtupdate=yes|no
-
sipdebug Specifies whether or not Asterisk should turn on SIP debugging from the time that Asterisk loads the SIP channel driver:
sipdebug=yes|no
-
sendrpid Specifies whether or not Asterisk should send a Remote-Party-ID header:
sendrpid=yes|no
-
srvlookup DNS SRV records are a way of setting up a logical, resolvable address where you can be reached. This allows calls to be forwarded to different locations without the need to change the logical address. By using SRV records, you gain many of the advantages of DNS, whereas disabling them removes the ability to place SIP calls based on domain names.
Warning
Currently, the support for SRV records in Asterisk is somewhat lacking. If multiple SRV records are returned, Asterisk will use only the first record.
Using DNS SRV record lookups is highly recommended. To enable them, set
srvlookup=yesin the[general]section of sip.conf:srvlookup=yes
-
t1min This is the minimum round-trip time for messages to monitored hosts in milliseconds. Defaults to 100 milliseconds:
t1min=100
-
subscribecontext Limits SUBSCRIBE requests to the specified context. This is useful if you want to limit subscriptions to internal extensions, for example.
This option may also be set on a per-user or per-peer basis:
subscribecontext=internal
-
t38pt_udptl Setting
t38pt_udptlto yes enables T.38 fax (UDPTL) passthrough on SIP-to-SIP calls, provided both parties have T.38 support. This setting must be enabled in the general section for all devices to work. You can then disable it on a per-device basis:t38pt_udptl=yes|no
Warning
T.38 fax passthrough works only in SIP-to-SIP calls, without any local or agent channel being used. Asterisk cannot currently originate or terminate T.38 fax calls; it can only passthrough UDPTL from one device to another.
tos_sip,tos_audio, andtos_videoAsterisk can set the TOS bits in the IP header to help improve performance on routers that respect TOS bits in their routing calculations. The
tos_sip,tos_audio, andtos_videosettings control the TOS bits for the SIP messages, the RTP audio, and RTP video respectively. Valid:CS0,CS1,CS2,CS3,CS4,CS5,CS6,CS7,AF11,AF12,AF13,AF21,AF22,AF23,AF31,AF32,AF33,AF41,AF42,AF43, andef(expedited forwarding). You may also use a numeric value for the TOS bits.For more information, see the
doc/ip-tos.txtfile in the Asterisk source directory.-
trustrpid Specifies whether or not Asterisk should trust the value in the Remote-Party-ID header:
trustrpid=yes|no
-
useragent useragenttakes as its argument a string specifying the value for theuseragentfield in the SIP header. The default value isasterisk:useragent=
Asterisk PBX v1.4-
usereqphone The
usereqphoneoption tells Asterisk to add;user=phoneto SIP URIs that contain a valid phone number:usereqphone
videosupport(both)You can set
videosupporttoyesorno. You can turn it off on a per-peer basis if general video support is enabled, but you can’t enable it for one peer only without enabling it in the general section:videosupport=yes|no
-
vmexten This option sets the dialplan extension to reach the voicemailbox, and will be sent in the
Message-Accountsection of the MWI NOTIFY message. Set this if your SIP device supports theMessage-Accountsetting. This option defaults toasterisk:vmexten=
8500
Now that we’ve covered the global SIP parameters, we will discuss the channel-specific parameters. These parameters can be defined for a user, a peer, or both (as noted in parentheses):
accountcode(both)The account code can be defined on a per-user basis. If defined, this account code will be assigned to a call record whenever no specific user account code is set. The
accountcodename configured will be used as the <filename>.csv in the /var/log/asterisk/cdr-csv/ directory to store CDRs for the user/peer/friend:accountcode=
iax-username-
allowanddisallow(both) Specific codecs can be allowed or disallowed, limiting codec use to those preferred by the system designer.
allowanddisallowcan also be defined on a per-channel basis. Keep in mind that allow statements in the[general]section will carry over to each of the channels, unless you reset with adisallow=all. Codec negotiation is attempted in the order in which the codecs are defined. Best practice suggests that you definedisallow=all, followed by explicitallowstatements for each codec you wish to use. If nothing is defined,allow=allis assumed:disallow=all allow=ulaw allow=gsm allow=ilbc
amaflags(both)Automatic Message Accounting (AMA) is defined in the Telcordia Family of Documents listed under FR-AMA-1. These documents specify standard mechanisms for generation and transmission of CDRs. You can specify one of four AMA flags (
default,omit,billing, ordocumentation) to apply to all SIP connections:amaflags=documentation
callerid(both)You can set a suggested Caller ID string for a user or peer with
callerid. If you define a Caller ID field for a user, any calls that come in on that channel will have that Caller ID assigned to them, regardless of what the far end sends to you. If Caller ID is defined for a peer, you are requesting that the far end use that to identify you (keep in mind, however, that you have no way to ensure that it will do so). If you want incoming callers to be able to define their own Caller IDs (i.e., for guests), make sure you do not set thecalleridfield:callerid=
John Smith <(800) 555-1234>-
callgroupandpickupgroup(both) You can use the
callgroupparameter to assign a channel definition to one or more groups, and you can use thepickupgroupoption in conjunction with this parameter to allow a ringing phone to be answered from another extension. Thepickupgroupoption is used to control which callgroups a channel may pick up—a channel is given authority to answer another ringing channel if it is assigned to the samepickupgroupas the ringing channel’s callgroup. By default, remote ringing extensions can be answered with*8(this is configurable in the features.conf file):callgroup=
1,3-5pickupgroup=1,3-5callingpres(both)Sets Caller ID presentation for this user/peer. This setting takes one of the following options:
-
allowed_not_screened Presentation allowed, not screened
-
allowed_passed_screen Presentation allowed, passed screen
-
allowed_failed_screen Presentation allowed, failed screen
-
allowed Presentation allowed, network number
-
prohib_not_screened Presentation prohibited, not screened
-
prohib_passed_screen Presentation prohibited, passed screen
-
prohib_failed_screen Presentation prohibited, failed screen
-
prohib Presentation prohibited, network number
-
unavailable Number unavailable
=yes|no
-
canreinvite(both)The SIP protocol tries to connect endpoints directly. However, Asterisk must remain in the transmission path between the endpoints if it is required to detect DTMF (for more information, see Chapter 4, Initial Configuration of Asterisk):
canreinvite=no
context(both)A context is assigned to a channel definition to direct incoming calls into the matching context in extensions.conf, where call handling is performed (see Chapters Chapter 4, Initial Configuration of Asterisk and Chapter 5, Dialplan Basics). Any channel connecting to an Asterisk machine has to have a context defined into which it will arrive. The context is essential for any
userchannel definition; if you do not define a context, incoming calls will be directed to thedefaultcontext:context=
incomingWarning
You should be aware of an unusual scenario that will require a context definition for a peer. When a call comes through the SIP channel, it first tries to find a matching user definition (based on the user name in square brackets and the secret). If it can’t find any matching users, it then looks for matching peers, based on the IP address that the call is coming from. Since peers don’t normally have contexts, this will cause such a call to arrive in the
defaultcontext. While this will work, thedefaultcontext shouldn’t really be used to handle incoming calls. The solution is to define a context, on a per-peer basis, for any peers that might match on incoming calls. To experiment with this, you can call your Free World Dialup number; the call will come right back to you.defaultip(peer)The
defaultipsetting complementshost=dynamic. If a host has not yet registered with your server, you’ll attempt to send messages to the default IP address configured here:defaultip=192.168.1.101
deny(both)Specific IP addresses and ranges can be controlled with the
denyoption. To restrict access from a range of IP addresses, use a subnet mask—for example,deny=192.168.1.0/255.255.255.0. You can also deny all addresses withdeny=0.0.0.0/0.0.0.0and then allow only certain addresses with thepermitcommand. Be aware of the security implications of this setting (see alsopermit):deny=
0.0.0.0/0.0.0.0disallow(both)dtmfmode(both)You can set
dtmfmodetoinband,rfc2833, orinfo. DTMF digits can be sent either in band (as part of the audio stream), or out of band (as signaling information), using the RFC 2833 or INFO methods. Theinbandmethod works reliably only when using an uncompressed codec such as G.711, μlaw, or alaw. The recommended method is to userfc2833; however, some devices—such as those by Grandstream—support theinfomethod:dtmfmode=rfc2833
Note
In Asterisk 1.4, Variable Length DTMF was introduced in order to allow Asterisk to correctly signal to the far end the duration of a key press on the phone connected to the incoming channel (per IETF RFC 2833). Older Asterisk systems do not understand the variable-length parameter. In older Asterisk systems, DTMF delivered via RFC 2833 may not be correctly interpreted, leading to strange effects in sessions such as voicemail. If you want to have the older (pre-1.4) behaviour of the
rfc2833setting, you must add therfc2833compensate=yesoption to the peer in sip.conf that defines communication with your pre-1.4 Asterisk system.fromdomain(peer)This allows you to set the domain in the
From:field of the SIP header. It may be required by some providers for authentication:fromdomain=my.hostname.tldfromuser(peer)This allows you to set the username with which to authenticate. The name contained within the square brackets of the channel definition is usually used, but this can be overridden with the
fromuseroption. This allows a channel definition to be referenced with a name other than that used to authenticate:fromuser=john_smithhost(peer)This configures the host to which this peer is to connect. Use a fully qualified domain name:
host=remote.hostname.tldincominglimit(both)This option limits the total number of simultaneous calls for a peer or user. It sets the max number of simultaneous outgoing calls for a peer, or the max number of incoming calls for a user.
incominglimit=3insecure(both)When an
INVITEis received from a remote location, Asterisk attempts to authenticate the string of characters before the@sign on theINVITEline received in the SIP header with the name of a channel definition in sip.conf. If the remote end is a user agent, it will authenticate based on auserdefinition. However, if the remote end is a SIP proxy service, it will authenticate on thepeerentry. When calls come from a provider such as Free World Dialup, which acts as a proxy for the true remote end who is calling you, that provider cannot authenticate the call on behalf of the endpoint. Since it would be impractical to have an authentication configured for every FWD user, and since FWD cannot respond to a 407 Proxy Authentication Required response, there must be an alternate way to allow calls from these callers.If you set
insecure=invite, you’ll determine which peer to match on by comparing the IP address or hostname and port number to those provided in theContactfield of the SIP header with thehostandportoptions in sip.conf. If a match is found, authentication will not be required on the initialINVITE, and the call will be allowed.If you have multiple endpoints behind a NAT device, you need to enable
insecure=portto match against only the IP address. To not require authentication on the incomingINVITEfor the peer, setinsecure=invite,port:insecure=invite
language(both)This sets the language flag to whatever you define. The global default language is English. The language that is set is sent by the channel as an information element. It is also used by applications such as
SayNumber()that have different files for different languages. Keep in mind that languages other than English are not explicitly installed on the system, and it is up to you to configure the system to ensure that the language you specify is handled properly:language=enmailbox(peer)If you associate a
mailboxwith a peer within the channel definition, voicemail will send a MWI to the nodes on the end of that channel. If the mailbox number is in a voicemail context other thandefault, you can specify it asmailbox@context. To associate multiple mailboxes with a single peer, use multiplemailboxstatements:mailbox=1000@internal
maxcallbitrate(both)Sets the maximum bitrate for an individual call from this user or to this peer. Defaults to 384 Kb/s:
maxcallbitrate=384md5secret(both)If you do not wish to have plain-text secrets in your sip.conf files, you can use
md5secretto configure the MD5 hash that can be used for authentication. To generate the MD5 hash from the Linux console, use the following command:#
echo -n "username:realm:secret" | md5sumBe sure to use the -
nflag, orechowill add a\nto the end of the string; the line feed will then be calculated into the MD5 hash, creating the incorrect hash. Therealm, if not specified with therealmoption (discussed in the list of general SIP parameters), defaults toasterisk. If both anmd5secretand asecretare specified in the same channel definition, thesecretwill be ignored:md5secret=0bcbe762982374c276fb01af6d272dca
mohinterpret(channel)This option specifies a preference for which MoH class this channel should listen to when put on hold if the music class has not been set on the channel with
Set(CHANNEL(musicclass)=in the dialplan, and the peer channel putting this one on hold did not suggest a music class.whatever)This option may be specified globally, or on a per-user or per-peer basis:
mohinterpret=
defaultmohsuggest(channel)This option specifies which music-on-hold class (as defined in
musiconhold.conf) to suggest to the peer channel when this channel places the peer on hold. It may be specified globally or on a per-user or per-peer basis:mohsuggest=
defaultmusicclass(both)This option sets the default music-on-hold class:
musicclass=
classicalnat(both)You can set
nattoyes,no, ornever. If you set it toyes, Asterisk ignores the IP address in the SIP and SDP headers and responds to the address and port in the IP header. Theneveroption is for devices that cannot handlerportin the SIP header, such as the Uniden UIP200:nat=yes|no|never
permit(both)pickupgroup(both)port(peer)You can use this to define the port on which to listen for SIP signaling, if you want to listen on a nonstandard port. (The default port for SIP signaling is 5060.)
port=
5060progressinband(both)You can set
progressinbandtoyes,no, ornever, to configure whether or not to generate in-band ringing. Normally, Asterisk will send the progress of a call via a few methods, such as 183 Session Progress, 180 Ringing, 486 Busy, and so on. If you setprogressinband=yes, Asterisk will indicate the call progress in band by generating tones:progressinband=yes|no|never
promiscredir(both)You can set
promiscredirtoyesorno. Normally, when you perform call forwarding on a phone, Asterisk will use the Local channel (for example,local/18005551212@peer). If you setpromiscredir=yes, Asterisk will use the SIP channel instead, which enables you to forward the calls to remote boxes:promiscredir=yes|no
qualify(peer)You can set
qualifytoyes,no, or a time in milliseconds. If you setqualify=yes,NOTIFYmessages will be sent periodically to the remote peers to determine whether they are available and what the latency between replies is. A peer is determined unreachable if no reply is received within 2,000 ms (to change this default, instead setqualifyto the number of milliseconds to wait for the reply). Use this option in conjunction withnat=yesto keep the path through the NAT device alive:qualify=yes|no|
secondsregcontext(peer)By specifying the context that contains the actions to perform, you can configure Asterisk to perform a number of actions when a peer registers to your server. This option works in conjunction with
regextenby specifying the extension to execute. If noregextenis configured, the peer name is used as the extension. Asterisk will dynamically create and destroy aNoOpat priority 1 for the extension. All actions to be performed upon registration should start at priority 2. More than oneregextenmay be supplied, if separated by an&.regcontextcan be set on a per-peer basis or globally:regcontext=
peer_registrationsregexten(peer)The
regextenoption is used in conjunction withregcontextto specify the extension that is executed within the configured context. Ifregextenis not explicitly configured, the peer name is used as the extension to match:regexten=
1000rtpholdtimeout(peer)This takes as its argument an integer, specified in seconds. It terminates a call if no RTP data is received while on hold within the time specified. The value of
rtpholdtimeoutmust be greater than that ofrtptimeout(see alsortptimeout):rtpholdtimeout=
120rtpkeepalive(peer)Specifies how often Asterisk should send keepalives in the RTP stream, in seconds. Defaults to zero, which means Asterisk won’t send any RTP keepalives:
rtpkeepalive=
45rtptimeout(peer)This takes as its argument an integer, specified in seconds. It terminates a call if no RTP data is received within the time specified:
rtptimeout=
60secret(both)This sets the password to use for authentication:
secret=
welcomesetvar(both)This sets a channel variable, which will be available when a channel to the peer or user is created and will be destroyed when the call is hung up. For example, to set the channel variable
foowith a value ofbar, use:setvar=
foo=barusername(peer)The
usernamefield allows you to attempt contact with a peer before it has registered with you. At registration, a SIP device tells Asterisk which SIP URI to use to contact it. The username is used in conjunction withdefaultipto create the SIP URI in the SIPINVITEheader. This might be useful following a reboot, in order to place a call. The endpoints will not attempt to register with the server until their registration timeouts expire, so you will not know their locations. For nondynamic hosts, you will require the username to be specified, as it is used to construct the authorization username:username=
john_smith
[160] Currently, Asterisk will only work with a single
bindaddr option. If you
wish to listen to more than one address, you’ll need to use
0.0.0.0. Note that Asterisk will work in a multihomed
environment, but not with multi-address interfaces. Asterisk
will use the system’s routing table to select which interface
it sends the packet out on and it will use the primary address
on that interface as the source.
[161] Asterisk RSA keys are typically located in /var/lib/asterisk/keys/. You can generate your own keys using the astkeygen script.
[162] You can think of IAX trunking as carpooling for VoIP packets. This becomes very useful in many situations, as the IP overhead (UDP headers, IP headers, and so forth) is often bigger than the audio payload it carries. If you have several concurrent calls between two Asterisk boxes, you definitely want to turn on IAX trunking!
Table of Contents
- AddQueueMember()
- ADSIProg()
- AgentCallbackLogin()
- AgentLogin()
- AgentMonitorOutgoing()
- AGI()
- AlarmReceiver()
- AMD()
- Answer()
- AppendCDRUserField()
- Authenticate()
- Background()
- BackgroundDetect()
- Busy()
- ChangeMonitor()
- ChanIsAvail()
- ChannelRedirect()
- ChanSpy()
- Congestion()
- ContinueWhile()
- ControlPlayback()
- DateTime()
- DBdel()
- DBdeltree()
- DeadAGI()
- Dial()
- Dictate()
- Directory()
- DISA()
- DumpChan()
- EAGI()
- Echo()
- EndWhile()
- Exec()
- ExecIf()
- ExitWhile()
- ExtenSpy()
- ExternalIVR()
- FastAGI()
- Festival()
- Flash()
- FollowMe()
- ForkCDR()
- GetCPEID()
- Gosub()
- GosubIf()
- Goto()
- GotoIf()
- GotoIfTime()
- Hangup()
- HasNewVoicemail()
- HasVoicemail()
- IAX2Provision()
- ICES()
- ImportVar()
- Log()
- LookupBlacklist()
- LookupCIDName()
- Macro()
- MacroExclusive()
- MacroExit()
- MacroIf()
- MailboxExists()
- MeetMe()
- MeetMeAdmin()
- MeetMeCount()
- Milliwatt()
- MixMonitor()
- Monitor()
- MorseCode()
- MP3Player()
- MusicOnHold()
- NBScat()
- NoCDR()
- NoOp()
- Page()
- Park()
- ParkAndAnnounce()
- ParkedCall()
- PauseMonitor()
- PauseQueueMember()
- Pickup()
- Playback()
- Playtones()
- PrivacyManager()
- Progress()
- Queue()
- QueueLog()
- Random()
- Read()
- ReadFile()
- RealTime
- RealTimeUpdate()
- Record()
- RemoveQueueMember()
- ResetCDR()
- RetryDial()
- Return()
- Ringing()
- SayAlpha()
- SayDigits()
- SayNumber()
- SayPhonetic()
- SayUnixTime()
- SendDTMF()
- SendImage()
- SendText()
- SendURL()
- Set()
- SetAMAFlags()
- SetCallerID()
- SetCallerPres()
- SetCDRUserField()
- SetGlobalVar()
- SetMusicOnHold()
- SetTransferCapability()
- SIPAddHeader()
- SIPDtmfMode()
- SLAStation()
- SLATrunk()
- SoftHangup()
- StackPop()
- StartMusicOnHold()
- StopMixMonitor()
- StopMonitor()
- StopPlaytones()
- StopMusicOnHold()
- System()
- Transfer()
- TryExec()
- TrySystem()
- UnpauseMonitor()
- UnpauseQueueMember()
- UserEvent()
- Verbose()
- VMAuthenticate()
- VoiceMail()
- VoiceMailMain()
- Wait()
- WaitExten()
- WaitForRing()
- WaitForSilence()
- WaitMusicOnHold()
- While()
- Zapateller()
- ZapBarge()
- ZapRAS()
- ZapScan()
Applications are the core functionality of the dialplan. Generally these all will operate on the channel, whereas functions, described in Appendix F, merely return values that can be used by applications. There are a few applications that still simply return values, but these will probably be deprecated in a future version and replaced with dialplan functions.
There are a few things to keep in mind about applications. First, when they exit, they will either terminate normally or abnormally. Abnormal termination almost always occurs when an application detects that the channel has hung up (or if it doesn’t, the dialplan will detect that shortly thereafter). An application may also exit abnormally when it wishes to indicate to the dialplan that some condition has not been satisfied and that it should force a hangup. In all other cases, an application will exit normally, which indicates that processing should continue at the next priority in the dialplan.
In many cases, if you wish to override the application’s wish to cause a hangup, you may wrap the application in a TryExec().
In many places throughout this reference, you will see what’s
described as a label. This is shorthand for
describing a location in the dialplan, whether it is simply a
priority; an extension
and a priority; or a
context, an extension,
and a priority. Note that if a text
label is defined for a particular priority, the
priority may be replaced with that
text label in any of those cases. See the GotoIf() application for more information and an
example.
Note
You will find many of the examples in this appendix to contain numbered priorities, which is not the preferred method of writing dialplans. We prefer the use of the 'n' priority for all priority numbers except 1 (which is required), but we have decided to utilize them in order to make some of the examples more clear.
Name
AddQueueMember() — Dynamically adds queue members to the specified call queue
Dynamically adds the specified
interface to an existing queue named
queuename, as specified in queues.conf. If specified,
penalty sets the penalty for queues to use
this member. Members with a lower penalty are called before members with
a higher penalty.
The AddQueueMember()
application sets a channel variable named AQMSTATUS upon completion. The AQMSTATUS variable will be set to one of the
following values:
ADDED
|
MEMBERALREADY
|
NOSUCHQUEUE
|
Calling AddQueueMember()
without an interface argument will use the
interface that the caller is currently using.
If the option argument is set to
j, Asterisk cannot add the
interface to the specified queue, and there
exists an n+101 priority (where
n is the number of the current
priority), the call will jump to that priority.
The membername argument may be set to
the name of the queue member. Consequently, this name will show up in
the entries of the queue_log as
well as Asterisk Manager Interface events, making it easier to identify
the agent for reporting purposes:
; add SIP/3000 to the techsupport queue, with a penalty of 1
exten => 123,1,AddQueueMember(techsupport,SIP/3000,1)Name
ADSIProg() — Loads an ADSI script into an ADSI-capable phone
Programs an Analog Display Services Interface (ADSI) phone
with the given script. If none is specified,
the default script, asterisk.adsi, is used. The
path for the script is relative to the
Asterisk configuration directory (usually
/etc/asterisk/). You may also provide the full path
to the script.
To get the CPE ID and other information from your ADSI-capable
phone, use the GetCPEID()
application:
; program the ADSI phone with the telcordia-1.adsi script
exten => 123,1,ADSIProg(telcordia-1.adsi)Name
AgentCallbackLogin() — Enables agent login with callback
Allows a call agent identified by
AgentNumber to log in to the call queue
system, to be called back when a call comes in for that agent.
When a call comes in for the agent, Asterisk calls the specified
exten (with an optional
context).
The options argument may contain the
letter s, which causes the login to
be silent:
; silently log in as agent number 42, and have Asterisk
; call extension 123 in the internal context
; when a call comes in for this agent
exten => 123,1,AgentCallbackLogin(42,s,123@internal)Note
This application is deprecated, and the functionality has been
replaced with AEL dialplan logic located in the doc/queues-with-callback-members.txt file
within the Asterisk source.
Name
AgentLogin() — Allows a call agent to log in to the system
Logs the current caller in to the call queue system as a
call agent (optionally identified by
AgentNumber). While logged in, the agent can
receive calls and will hear a beep on the line when a new call comes in.
The agent can hang up the current call by pressing the asterisk
(*) key. If
AgentNumber is not specified, the caller will
be prompted to enter her agent number. Agents are defined in agents.conf.
The options argument may contain the
letter s, which causes the login to
be silent:
; silently log in the caller as agent number 42, as defined in agents.conf
exten => 123,1,AgentLogin(42,s)Name
AgentMonitorOutgoing() — Records an agent’s outgoing calls
Records all outbound calls made by a call agent.
This application tries to figure out the ID of the agent who is
placing an outgoing call based on a comparison of the Caller ID of the
current interface and the global variable set by the AgentCallbackLogin() application. As such, it
should be used only in conjunction with (and after!) the AgentCallbackLogin() application. It uses the
monitoring functions in the chan_agent module instead of the Monitor() application to record the calls.
This means that call recording must be configured correctly in the
agents.conf file.
By default, recorded calls are saved to the
/var/spool/asterisk/monitor/ directory. This may be
overridden by changing the savecallsin parameter in
agents.conf.
If the Caller ID and/or agent ID are not found, this application
will go to priority n+1, if it exists
(where n is the current
priority).
Returns 0 unless overridden by
one of the options.
The options argument may include one or
more of the following:
-
d Make this application return
-1if there is an error condition and there is no extensionn+101.-
c Change the Call Detail Record so that the source of the call is recorded as
Agent/agent_id.-
n Don’t generate warnings when there is no Caller ID or if the agent ID is not known. This option is useful if you want to have a shared context for agent and non-agent calls.
; record outbound calls for this agent, and change the CDR to reflect ; that the call is being made by an agent
exten => 123,1,AgentMonitorOutgoing(c)
Name
AGI() — Executes an AGI-compliant application
Executes an Asterisk Gateway Interface-compliant
program on the current channel. AGI programs
allow external programs (written in almost any language) to control the
telephony channel by playing audio, reading DTMF digits, and so on.
Asterisk communicates with the AGI program on STDIN and STDOUT. The specified
arguments are passed to the AGI
program.
The program must be set as executable
in the underlying filesystem. The program path is relative to the
Asterisk AGI directory, which by default is
/var/lib/asterisk/agi-bin/.
If you want to run an AGI when no channel exists (such as in an
h extension), use the DeadAGI() application instead. You may want to
use the FastAGI() application if you
want to do AGI processing across the network.
If you want access to the inbound audio stream from within your
AGI program, use EAGI() instead of
AGI(). Inbound audio can then be read
in on file descriptor 3.
If the channel hangs up prematurely, the process initiated by the
AGI command will be sent a HUP signal to tell it that the channel has
hung up. If your program does not catch this signal, it will be
terminated. You can override this behavior by setting the channel
variable AGISIGHUP to 0:
; call the demo AGI program
exten => 123,1,AGI(agi-test)
exten => 123,2,EAGI(eagi-test)Name
AlarmReceiver() — Provides support for receiving alarm reports from a burglar or fire alarm panel
Emulates an alarm receiver, and allows Asterisk to receive and decode special data from fire and/or burglar alarm panels. At this time, only the Ademco Contact ID format is supported.
When called, AlarmReceiver()
will handshake with the alarm panel, receive events, validate them,
handshake them, and store them until the panel hangs up. Once the panel
hangs up, the application will run the command line specified by the
eventcmd setting in
alarmreceiver.conf and pipe the events to the
standard input of the application.
alarmreceiver.conf also contains settings for DTMF
timing and for the loudness of the acknowledgment tones.
; set up Asterisk to answer a call from a supported fire alarm panel
exten => s,1,AlarmReceiver()
Name
AMD() — Answering machine detection
Synopsis
AMD([initialSilence[,greeting[,afterGreetingSilence[,totalAnalysisTime[,minimumWordLength[,betweenWordsSilence[,maximumNumberOfWords[,silenceThreshold]]]]]]]])
This application attempts to detect an answering machine,
based on the timing patterns. This application is usually used by
outbound calls originated from either call files or from the Asterisk
manager Interface. This application sets AMDSTATUS variable is set to one of the
following, to show what type of call was detected:
-
MACHINE The called party is believed to be an answering machine.
-
HUMAN The called party is believed to be a human being, and not an answering machine.
-
NOTSURE The application was unable to tell whether the called party was a human or an answering machine.
-
HANGUP A hangup occurred during the detection.
The AMD() application also sets
a channel variable named AMDCAUSE
with the cause that lead to the conclusion stated in the AMDSTATUS variable. The AMDCAUSE variable will be set to one of the
following values:
TOOLONG-
|
INITIALSILENCE-
|
HUMAN-
|
MAXWORDS-
|
LONGGREETING-
|
The parameters to this application all help tune it so that it can
more effectively tell the difference between a human and an answering
machine. If the parameters are not passed to this application, Asterisk
will read the default values as configured in amd.conf. The parameters are:
-
initialSilence The maximum silence duration before the greeting. If exceeded, then the
AMDSTATUSvariable will be set toMACHINE.-
greeting The maximum length of the greeting. If exceeded, then the
AMDSTATUSvariable will set toMACHINE.-
afterGreetingSilence The maximum silence after detecting a greeting. If exceeded, then the
AMDSTATUSvariable will be set toMACHINE.-
totalAnalysisTime The maximum time allowed for the algorithm to decide whether the called party is a human or an answering machine.
-
minimumWordLength If the duration of the voice activity is shorter than
minimumWordLength, it will not be considered to be human speech.-
betweenWordsSilence The minimum duration of silence after a word to consider the audio that follows as a new word.
-
maximumNumberOfWords The maximum number of words detected in the greeting. If exceeded, then the
AMDSTATUSvariable will set toMACHINE.-
silenceThreshold How sensitive the algorithm should be when detecting silence
; Use answering machine detection. If the called party
; is human, connect them to Bob. Otherwise, play a
; message and hang up
exten => 123,1,Answer()
exten => 123,n,AMD()
exten => 123,n,GotoIf($["${AMDSTATUS}" = "HUMAN"]?human:machine)
exten => 123,n(machine),WaitForSilence(2000)
exten => 123,n,Playback(asterisk-friend)
exten => 123,n,Hangup()
exten => 123,n(human),Verbose(3, We've got a human on the line!)
exten => 123,n,Playback(transfer)
exten => 123,n,Dial(SIP/bob)
exten => 123,n,Playback(im-sorry)
exten => 123,n,Hangup()Name
Answer() — Answers a channel, if it is ringing
Causes Asterisk to answer the channel if it is currently ringing. If the current channel is not ringing, this application does nothing.
If a delay is specified, Asterisk will
answer the call and then wait delay
milliseconds before going on to the next priority in the
dialplan.
It is often a good idea to use Answer() on the channel before calling any
other applications, unless you have a very good reason not to. There are
several key applications that require that the channel be answered
before they are called, and may not work correctly otherwise:
exten => 123,1,Answer(750)
exten => 123,n,Playback(tt-weasels)Name
AppendCDRUserField() — Appends a value to the user field of the Call Detail Record
Appends value to the user field
of the Call Detail Record (CDR). The user field is often used to store
arbitrary data about the call, which may not be appropriate for any of
the other fields:
; set the user field to 'abcde'
exten => 123,1,SetCDRUserField(abcde)
; now append 'xyz'
exten => 123,1,AppendCDRUserField(xyz)
Note
This application has been deprecated in favor of the CDR function.
exten => 123,1,Set(CDR(userfield)=${CDR(userfield)}12345)Name
Authenticate() — Requires that the caller enter a correct password before continuing
Requires a caller to enter a given
password in order to continue execution of
the next priority in the dialplan. Authenticate() gives the caller three chances
to enter the password correctly. If the password is not correctly
entered after three tries, the channel is hung up.
If password begins with the / character, it is interpreted as a file that
contains a list of valid passwords (one per line). Passwords may also be
stored in the Asterisk database (AstDB); see the d option below.
The maxdigits parameter sets the
maximum number of digits that may be entered by the caller. It not set,
the application will accept an unlimited number of digits and will wait
for the caller to press the # key
after entering his authentication code.
A set of options may be provided,
consisting of one or more of the letters in the following list:
-
a Sets the CDR field named
accountcodeand the channel variableACCOUNTCODEto the password that is entered-
d Interprets the path as the database key from the Asterisk database in which to find the password, not a literal file. When using a database key, the value associated with the key can be anything.
-
j Supports jumping to priority
n+101if authentication fails-
m Interprets the given path as a file that contains a list of account codes and password hashes delimited with
:(colon character), listed one per line in the file. When one of the passwords is matched, the channel will have its account code set to the corresponding account code in the file.-
r Removes the database key upon successful entry (valid with
donly).
; force the caller to enter the password before continuing,
; and set the CDR field named 'accountcode' to the entered password
exten => 123,1,Answer()
exten => 123,n,Authenticate(1234,a)
exten => 123,n,Playback(pin-number-accepted)
exten => 123,n,SayDigits(${ACCOUNTCODE})Name
Background() — Plays a file while accepting touch-tone (DTMF) digits
Plays the specified audio file(s) while waiting for the
user to begin entering DTMF digits. Once the user begins to enter DTMF
digits, the playback is terminated. Asterisk tries to find a matching
extension in the destination context (or the
current context if none is specified), and execution of the dialplan
will continue at the matching extension as soon as an unambiguous match
is found.
The filename should be specified
without a file extension, as Asterisk will automatically find the file
format with the lowest translation cost.
Valid options include one of the
following:
-
s Causes the playback of the message to be skipped if the channel is not in the “up” state (i.e., hasn’t yet been answered). If
sis specified, the application will return immediately should the channel not be off-hook.-
n Does not answer the channel before playing the specified file. Without this option, the channel will automatically be answered before the sound is played. Not all channels support playing messages before being answered.
-
m Only break if a digit hit matches a one-digit extension in the destination context.
The language argument may be used to
specify a language to use for playing the prompt, if it differs from the
current language of the channel.
exten => 123,1,Answer()
exten => 123,2,Background('exter-ext-of-person');
Name
BackgroundDetect() — Plays a file in the background and detects talking
Similar to Background(), but attempts to detect
talking.
During the playback of the file, audio is monitored in the receive
direction. If a period of non-silence that is greater than
min milliseconds yet less than
max milliseconds and is followed by silence
for at least sil milliseconds occurs, the
audio playback is aborted and processing jumps to the talk extension, if available.
If unspecified, sil,
min, and max
default to 1,000 ms, 100 ms, and infinity, respectively.
exten => 123,1,BackgroundDetect(tt-monkeys)
exten => 123,2,Playback(im-sorry)
exten => talk,1,Playback(yes-dear)Name
Busy() — Indicates a busy condition to the channel
Requests that the channel indicate the busy condition and
then waits for the user to hang up or for the optional
timeout (in seconds) to expire.
This application signals a busy condition only to the bridged
channel. Each particular channel type has its own way of communicating
the busy condition to the caller. You can use Playtones(busy) to play a busy tone to the
caller.
exten => 123,1,Playback(im-sorry)
exten => 123,2,Playtones(busy)
exten => 123,3,Busy()
Name
ChangeMonitor() — Changes the monitoring filename of a channel
Changes the name of the recorded file created by
monitoring a channel with the Monitor() application. This application
has no effect if the channel is not monitored. The argument
filename_base is the new filename base to use
for monitoring the channel.
; start recording this channel with a basename of 'sample'
exten => 123,1,Monitor(sample)
; change the filename base to 'example'
exten => 123,2,ChangeMonitor(example)
Name
ChanIsAvail() — Finds out if a specified channel is currently available
Checks to see if any of the requested channels are available. This application also sets the following channel variables:
-
AVAILCHAN The name of the available channel, including the call session number used to perform the test
-
AVAILORIGCHAN The canonical channel name that was used to create the channel—that is, the channel name without any session number
-
AVAILSTATUS The status code for the channel
If the option s (which stands
for “state”) is specified, Asterisk will consider the channel
unavailable whenever it is in use, even if it can take another
call.
If the j option is specified,
and none of the requested channels are available, the new priority will
be n+101n is the current priority), if that priority
exists.
; check both Zap/1 and Zap/2 to see if they're available
exten => 123,1,ChanIsAvail(Zap/1&Zap/2)
; print the available channel name to the Asterisk CLI
exten => 123,2,Verbose(0,${AVAILORIGCHAN})Warning
This application does not work correctly on MGCP channels.
Name
ChannelRedirect() — Redirects a channel to a new location in the dialplan
This application redirects the specified
channel to a new
priority in the dialplan. If
extension is not specified, the current
extension is assumed. If context is not
specified, the current context will be assumed:
; Transfer SIP/Bob to hold music when extension 123 is dialed
exten => 123,1,ChannelRedirect(SIP/Bob,124,1)
exten => 124,1,Answer()
exten => 124,2,MusicOnHold()Name
ChanSpy() — Listens to the audio on a channel, and optionally whisper to the calling channel
This application is used to listen to the audio going to
and from an Asterisk channel. If the
chanprefix parameter is specified, only
channels beginning with this value will be spied upon.
While a channel is being spied upon, the following actions may be performed:
Dialing
#cycles the volume level.Dialing
*will cause the application to spy on the next available channel.Dialing a series of digits followed by
#builds a channel name (which will be appended tochanprefix). For example, placingChanSpy(Zap)and then dialing the digits42#while spying will begin spying on the channelZap/42.
The options parameter may contain zero
or more of the following options:
-
b Only spy on channels that are involved in a bridged call.
-
g(group) Only spy on channels that contain a channel variable named
SPYGROUP, which should containgroupin an optional colon-delimited list.-
q Quiet mode. Tells the application not to beep or read the selected channel’s name when spying begins.
-
r[(basename)] Records the channel audio to the monitor spool directory (usually
/var/spool/asterisk/monitor). An optionalbasenameset the base filename of the recordings, which defaults tochanspy.-
v([value]) Adjusts the volume of the audio being listened to. The
valuemust be in the range of4to-4. A negativevaluewill make the volume quieter, while a positive value will make it louder.-
w Whisper mode. This allows the spying channel to talk to the spied-upon channel, without any other bridged channel being able to hear the audio.
-
W Private whisper mode. This enables the spying channel to speak to the spied-upon channel without being able to hear the audio from the spied-upon channel.
; Spy on the Zap channels in whisper mode
exten => 123,1,ChannelSpy(Zap,w)
Name
Congestion() — Indicates congestion on the channel
Requests that the channel indicate congestion and then
waits for the user to hang up or for the optional
timeout (in seconds) to expire.
This application signals congestion only to the far end; it
doesn’t actually play a congestion tone to the user. Use Playtones(congestion) to play a congestion
tone to the caller.
Warning
If you use this command without a timeout, you run the risk of
having a channel get stuck in this state. This is not really needed
when you want to indicate congestion to a user. Just use Playtones(congestion) so they hear the
fast-busy, and then Hangup().
Always exits abnormally:
; if the Caller ID number is 555-1234, always play congestion
exten => 123,1,GotoIf($[${CALLERID(num)} = 5551234]?5:2)
exten => 123,2,Playtones(congestion)
exten => 123,3,Congestion(3)
exten => 123,4,Hangup()
exten => 123,5,Dial(Zap/1)Name
ControlPlayback() — Plays a file, with the ability to fast forward and rewind the file
Plays back a given file
(without the file extension), while allowing the caller to move forward
and backward through the file by pressing ff
and rew keys. By default, you can use
* and # to rewind and fast-forward the playback of
the file, respectively.
The skipms option specifies how far
forward or backward to jump in the file with each press of
ff or rew.
If stop is specified, the application
will stop playback when stop is
pressed.
A pause argument may also be specified,
which when pressed will pause playback of the file. Pressing
pause again will continue the playback of the
file.
If the restart parameter is specified,
the specified key may be used to restart the playback of the
file.
If the options parameter is set to
j, and the
file does not exist, the application jumps to
priority n+101n is the current priority number).
The ControlPlayback()
application sets a channel variable named CPLAYBACKSTATUS upon completion. The CPLAYBACKSTATUS variable will be set to one of
the following values:
SUCCESS
|
USERSTOPPED
|
ERROR
|
; allow the caller to control the playback of this file
exten => 123,1,ControlPlayback(tt-monkeys|3000|#|*|5|0)Name
DateTime() — Says the date and/or time in the user-specified format
If the unixtime parameter is
specified, this application says that date and time. Otherwise, it says
the current date and time. If a timezone is
specified, the date and time is calculated according to that time zone.
Otherwise, the time zone setting of the Asterisk server is used. If the
format parameter is specified, the date and
time will be said according to that format. (See the sample
voicemail.conf file for more information on the
date and time format.)
; say the current date and time in several time zones exten => 123,1,DateTime(,America/New_York) exten => 123,2,DateTime(,America/Chicago) exten => 123,3,DateTime(,America/Denver) exten => 123,4,DateTime(,America/Los_Angeles)
Name
DBdel() — Deletes a key from the AstDB
Deletes the key specified by
key from the key family named
family in the AstDB.
exten => 123,1,DBput(test/name=John) ; add name to AstDB
exten => 123,2,DBget(NAME=test/name) ; retrieve name from AstDB
exten => 123,3,DBdel(test/name) ; delete from AstDB
Note
This application is deprecated and the functionality has been
replaced with the DB_DELETE() function.
Name
DBdeltree() — Deletes a family or key tree from the AstDB
Name
DeadAGI() — Executes an AGI-compliant script on a dead (hung-up) channel
Executes an AGI-compliant
program on a dead (hung-up) channel. AGI
allows Asterisk to launch external programs written in almost any
language to control a telephony channel, play audio, read DTMF digits,
and so on by communicating with the AGI protocol on STDIN and STDOUT. The arguments specified by
args will be passed to the program.
This application has been written specifically for dead channels, as the normal AGI interface doesn’t work correctly if the channel has been hung up.
Use the show agi command on the
command-line interface to list all of the available AGI commands.
exten => h,1,DeadAGI(agi-test)
Name
Dial() — Attempts to connect channels
Synopsis
Dial(tech/username:password@hostname/extension[&tech2/peer2...] [,ring-timeout[,flags[,URL]]])
Allows you to connect together all of the various channel
types.[163]Dial() is the most
important application in Asterisk; you’ll want to read through this
section a few times.
Any valid channel type (such as SIP, IAX2, H.323, MGCP, Local, or
Zap) is acceptable to Dial(), but the
parameters that need to be passed to each channel will depend on the
information the channel type needs to do its job. For example, a SIP
channel will need a network address and user to connect to, whereas a
Zap channel is going to want some sort of phone number.
When you specify a channel type that is network-based, you can
pass the destination host (name or IP address), username, password, and
remote extension as part of the options to Dial(), or you can refer to the name of a
channel entry in the appropriate .conf file; all the required information will
then need to be obtained from that file. The username and password can
be replaced with the name contained within square brackets ([]) of the channel configuration file. The
hostname is optional.
This is a valid Dial
statement:
exten => s,1,Dial(SIP/sake:arigato@thathostoverthere.tld)
This is effectively identical:
exten => s,1,Dial(SIP/some_SIP_friend)
but will work only if there is a channel defined in sip.conf as [some_SIP_friend], whose channel definition
contains fromuser=sake, password=arigato, and host=thathostoverthere.tld.
An extension number is often attached after the address information, like this:
exten => s,1,Dial(IAX2/user:pass@otherend.com/500)This asks the far end to connect the call to extension 500 in the
context in which the channel arrived. The extension is not required by
Dial(), as the information in the
remote end’s channel configuration file may be used, or the remote
server will pass the call to the s
extension in the context in which the call came in. Ultimately, the far
end controls what happens to the call; you can only request a specific
treatment.
If no ring-timeout is specified, the
channel will ring indefinitely. This is not always a bad thing, so don’t
feel you need to set it; just be aware that “indefinitely” could mean a
very long time. ring-timeout is specified in
seconds. The ring timeout always follows the addressing information,
like this:
exten => s,1,Dial(IAX2/user:pass@otherend.com/500,ring-timeout)Much of the power of the Dial()
application is in the flags. These are assigned following the addressing
and timeout information, like this:
exten => s,1,Dial(IAX2/user:pass@otherend.com/500,60,flags)Tip
If you don’t have a timeout specified, and you want to assign flags, you must still assign a spot for the timeout. You do this by adding an extra comma in the spot where the timeout would normally go, like this:
exten => s,1,Dial(IAX2/user:pass@otherend.com/500,,flags)The valid flags that may be used with the Dial() application are:
-
A(x) Plays an announcement to the called party;
xis the filename of the sound file to play as the announcement.-
C Resets the Call Detail Record for the call. Since the CDR time is set to when you
Answer()the call, you may wish to reset the CDR so the end user is not billed for the time prior to theDial()application being invoked.-
d Allows the user to dial a one-digit extension while waiting for a call to be answered. The call will then exit to that extension (either in the current context, if it exists, or in the context specified by the
EXITCONTEXTvariable).-
D([called][:calling]) Sends DTMF digits after the call has been answered, but before the call is bridged. The
calledparameter is passed to the called party, and thecallingparameter is passed to the calling party. Either parameter may be used individually.-
f Forces the Caller ID of the calling party to be set as the extension associated with the channel using a dialplan hint. This is often used when a provider doesn’t allow the Caller ID to be set to anything other than a number that is assigned to you. For example, if you had a PRI, you would use the
fflag to override any Caller ID set locally on a SIP phone.-
g Execution of the dialplan goes on in the current context if the destination channel hangs up.
-
G(context^extension^priority) When the call is answered, the calling party is transferred to the specified priority and the called party to the specified priority+1. You cannot use any additional action post-answer options in conjunction with this option.
-
h Allows the called user to hang up the channel by pressing the
*key.-
H Allows the calling user to hang up the channel by pressing the
*key.-
i Causes Asterisk to ignore any forwarding requests it may receive on this dial attempt.
-
j Causes Asterisk to jump to priority
n+101 if all the requested channels were busy (wherenis the current priority).-
L(x[:y][:z]) Limits the call to
xmilliseconds, warning whenymilliseconds are left and repeating everyzmilliseconds until the limit is reached. Thexparameter is required; theyandzparameters are optional. The following special variables may also be set to provide additional control:-
LIMIT_PLAYAUDIO_CALLER=yes|no Specifies whether to play sounds to the caller. Defaults to yes.
-
LIMIT_PLAYAUDIO_CALLEE=yes|no Specifies whether to play sounds to the callee.
-
LIMIT_TIMEOUT_FILE=filename Specifies which file to play when time is up.
-
LIMIT_CONNECT_FILE=filename Specifies which file to play when call begins.
-
LIMIT_WARNING_FILE=filename Specifies the file to play if the argument
yis defined. Defaults to saying the time remaining.
-
m[class]Provides music to the calling party until the call is answered. You may also optionally indicate the music-on-hold
class, as defined inmusiconhold.conf.-
M(x[^arg]) Executes the macro
xupon the connection of a call, optionally passing arguments delimited by^. The macro can also set theMACRO_RESULTchannel variable to one of the following values, to determine what should happen after the macro has finished:-
ABORT Hangs up both legs of the call.
-
CONGESTION Acts as if the line encountered congestion.
-
BUSY Acts as if the line was busy. If the
joption is specified, it sends the call to priorityn+101, wherenis the current priority.-
CONTINUE Hangs up the called party and continues on in the dialplan.
-
GOTO:<context>^<extension>^<priority> Transfers the call to the specified destination.
Warning
You cannot use any additional action post-answer options in conjunction with this option. Also, PBX services are not run on the called channel, so you will not be able to set timeouts via the
TIMEOUTfunction in this macro.-
-
n This option is a modifier for the screen/privacy mode. It specifies that no introductions are to be saved in the priv-callerintros directory.
-
N This option is a modifier for the screen/privacy mode. It tells Asterisk not to screen the call if Caller ID is present.
-
o Uses the Caller ID received on the inbound leg of the call for the Caller ID on the outbound leg of the call. This is useful if you are accepting a call and then forwarding it to another destination, but you wish to pass the Caller ID from the inbound leg of the call instead of overwriting it with the local Caller ID settings. This was the default behavior on Asterisk versions prior to 1.0.
O[x]This option turns on Operator Services mode on a Zaptel channel. If this option is used on a non-Zaptel interface, it will be ignored. When the destination answers (presumably an operator services station), the originator no longer has control of her line. She may hang up, but the switch will not release her line until the destination party (the operator) hangs up. Specified without an arg, or with
1as an arg, the originator hanging up will cause the phone to ring back immediately. With a2specified as the argument, when the “operator” flashes the trunk, it will ring the caller’s phone.-
p This option enables screening mode. This is basically Privacy mode without memory.
P[(x)]Sets the privacy mode, optionally specifying
xas the family/key value in the local AstDB database. This option is useful for accepting calls based on a blacklist (explicitly denying calls from listed numbers) or whitelist (explicitly accepting calls from listed numbers). See alsoLookupBlacklist().-
r Indicates ringing to the calling party, without passing any audio until the call is answered. This flag is not normally required to indicate ringing, as Asterisk will signal ringing if a channel is actually being called.
S(x)Hangs up the call
xseconds after the called party has answered the call.-
t Permits the called party to transfer a call by pressing the
#key. Please note that if this option is used, reinvites are disabled, as Asterisk needs to monitor the call to detect when the called party presses the#key.-
T Permits the caller to transfer a connected call by pressing the
#key. Again, note that if this option is used, reinvites are disabled, as Asterisk needs to monitor the call to detect when the caller presses the#key.-
w Permits the called user to start and stop recording the call audio to disk by pressing the
automonsequence (as configured infeatures.conf). If the variableTOUCH_MONITORis set, its value will be passed as the arguments to theMonitor()application when recording is started. If it is not set, the default values ofWAV||mare passed toMonitor().-
W Permits the calling user to record the call audio to disk by pressing the
automonsequence (as configured infeatures.conf).-
k Permits the called party to park the call by sending the DTMF sequence defined for call parking in
features.conf.-
K Permits the calling party to park the call by sending the DTMF sequence defined for call parking in
features.conf.
If the URL argument is included, that
URL will be sent to the channel (if supported).
Note
If the channel variable named OUTBOUND_GROUP is set before Dial() is called, all peer channels created
by this application will be put in to that call group. In the
following example, all peer channels created by the Dial() application will be part of the
test call group:
; using OUTBOUND_GROUP exten => 123,1,Set(OUTBOUND_GROUP=test) exten => 123,n,Dial(IAX2/anotherbox/12345)
If the OUTBOUND_GROUP_ONCE
variable is set, all peer channels created by this application will be
put in to that group. Unlike OUTBOUND_GROUP, however, the variable will
be unset after use.
The Dial() application sets the
following variables upon exiting:
-
DIALEDTIME The total time elapsed from execution of
Dial()until completion.-
ANSWEREDTIME The total time elapsed during the call.
-
DIALSTATUS The status of the call, set as one of the following values:
-
CHANUNAVAIL The channel is unavailable.
-
CONGESTION The channel returned a congestion signal, usually indicating that it was unable to complete the connection.
-
NOANSWER The channel did not answer in the time indicated by the ring-timeout option.
-
BUSY The dialed channel is currently busy.
-
ANSWER The channel answered the call.
-
CANCEL The call was cancelled.
-
DONTCALL The call was set to
DONTCALLby the screening or privacy options.-
TORTURE The call was set to
TORTUREby the screening or privacy options.-
INVALIDARGS Invalid arguments were passed to the
Dial()application.
; dial a seven-digit number on Zap channel 4
exten => 123,1,Dial(Zap/4/2317154); dial the same number, but this time only have it ring for 10 seconds ; before continuing on with the dialplanexten => 124,1,Dial(Zap/4/2317154,10)exten => 124,2,Playback(im-sorry) exten => 124,3,Hangup() ; dial the same number, but this time with no timeout, and using the ; t, T, and m flagsexten => 125,1,Dial(Zap/4/2317154,,tTm); dial extension 500 at a remote host (over the IAX protocol), using ; the specified username and passwordexten => 126,1,Dial(IAX2/username:password@remotehost/500); dial a number, but limit the call to 5 minutes (300,000 milliseconds) ; start warning the caller 4 minutes (240,000 milliseconds) in to the call, ; and repeat the warning every 30 seconds (30,000 milliseconds)exten => 127,1,Dial(Zap/4/2317154,,L[300000:240000:30000])-
[163] The fact that Asterisk will happily connect IAX, SIP, H.323,
Skinny, PRI, FX(O/S), and anything else is amazing, but possibly the
most amazing of all is the Local channel. By allowing a single
Dial() command to connect to
multiple Local channels, one Dial() event can trigger a multitude of
completely independent and unique actions in other parts of the
dialplan. The power of this concept is truly revolutionary and has
to be experienced to be believed.
Name
Dictate() — Virtual dictation machine
This application allows the recording and playback of
files, similar to a traditional dictation machine. The
base_dir parameter specifies the directory in
which Asterisk will write the recorded files. If not specified, it
defaults to the dictate subdirectory of the
Asterisk spool directory (as defined in asterisk.conf).
If the filename parameter is specified,
it will be used when the file is written. If not specified, Asterisk
will prompt the caller for a numeric filename for the file.
Note
Asterisk writes the files in raw, headerless, signed-linear
format. If you’d like to convert the file to another format, you can
use an outside utility such as sox,
or use the file convert command
from the Asterisk command-line interface.
The Dictate() application has
two main modes: recording mode and playback mode. The caller can press
the 1 key to switch between these
modes. In both modes, the 0 key can
be used to get help. The * key is
used to pause or unpause the recording or playback. The # key allows the caller to choose a new
filename.
In recording mode, the 8 key
can be used to erase the entire recording and start over.
In playback mode, the 7 key
rewinds the recording a few frames, and the 8 key forwards the recording a few frames. The
2 key is used to toggle the playback
speed (either 1x, 2x, 3x, or 4x).
; begin dictating, and save the files in the /tmp/dictate directory
exten => 123,1,Dictate(/tmp/dictate)
Name
Directory() — Provides a dialable directory of extensions
Presents users with a directory of extensions from which
they may select by name. The list of names and extensions is discovered
from voicemail.conf. The
vm-context argument is required; it specifies
the context of voicemail.conf to use.
The dial-context argument is the
context to use for dialing the users, and it defaults to
vm-context if unspecified. If the
options argument is set to f, Asterisk will find a directory match based
on the first name in voicemail.conf instead of the last
name. If the e option is specified,
Asterisk will read the extension of the directory match as well as the
person’s name.
If the user enters 0 (zero) and
there exists an extension o (the
lowercase letter o) in the current context, the call control will go to
that extension. Entering * will exit
similarly, but to the a extension,
much like Voicemail()’s
behavior.
exten => *,1,Directory(default,incoming)
exten => #,1,Directory(default,incoming,f)
exten => 9,1,Directory(default,incoming,fe)
Name
DISA() — Direct Inward System Access: allows inbound callers to make outbound calls
Synopsis
DISA(password[,context[,callerid[,mailbox[@vmcontext]]]]) DISA(password-file[,callerid[,mailbox[@vmcontext]]])
Allows outside callers to obtain an “internal” system dial
tone and to place calls from it as if they were placing calls from
within the switch. The user is given a dial tone, after which she should
enter her passcode, followed by #. If
the passcode is correct, the user is then given a system dial tone on
which a call may be placed.
Warning
Obviously, this type of access has serious security implications, and extreme care must be taken not to compromise the security of your phone system.
The password argument is a numeric
passcode that the user must enter to be able to make outbound calls.
Using this syntax, all callers to this extension will use the same
password. To allow users to use DISA() without a password, use the string
no-password instead of the
password.
The context argument specifies the
context in which the user will be dialing. If no context is specified,
the DISA() application defaults the
context to disa.
The callerid argument specifies a new
Caller ID string that will be used on the outbound call.
The mailbox argument is the mailbox
number (and optional voicemail context,
vmcontext) of a voicemail box. The caller
will hear a stuttered dial tone if there are any new messages in the
specified voicemail box.
Additionally, you may use an alternate syntax and pass the name of
a global password file instead of the
password and
context arguments. On each line, the file may
contain either a passcode, or a passcode and context, separated by a
pipe character (|). If a context is
not specified, the application defaults to the context named disa.
If the user login is successful, the application parses the dialed
number in the specified context:
; allow outside callers to call 1-800 numbers, as long
; as they know the passcode. Set their Caller IDs to make
; it appear that they are dialing from within the company
[incoming]
exten => 123,1,DISA(4569,disa,"Company ABC" <(234) 123-4567>)
[disa]
exten => _1800NXXXXXX,1,Dial(Zap/4/${EXTEN})Name
DumpChan() — Dumps information about the calling channel to the console
Displays information about the calling channel, as well as
a listing of all channel variables. If
min_verbose_level is specified, output is
displayed only when the verbosity level is currently set to that number
or greater.
Warning
If you have many channel variables set, DumpChan() will show only the first 1,024
characters of your channel variable listing.
exten => s,1,Answer()
exten => s,2,DumpChan()
exten => s,3,Background(enter-ext-of-person)Name
Echo() — Echoes inbound audio back to the caller
Name
EndWhile() — Ends a while
loop
Returns to the previously called While() application. See While() for a complete description of how to use
a while loop.
exten => 123,1,Set(COUNT=1)
exten => 123,2,While($[ ${COUNT} < 5 ])
exten => 123,3,SayNumber(${COUNT})
exten => 123,4,Set(COUNT=$[${COUNT} + 1]
exten => 123,5,EndWhile()Name
Exec() — Executes an Asterisk application dynamically
Allows an arbitrary application to be invoked even when
not hard-coded in to the dialplan. Exits exactly the same as the
underlying application, or abnormally, if the
underlying application cannot be found. The
arguments are passed to the called
application.
This application allows you to dynamically call applications by pulling them from a database or other external source.
exten => 123,1,Set(MYAPP=SayDigits(12345))
exten => 123,2,Exec(${MYAPP})
Name
ExecIf() — Conditionally executes an Asterisk application
If expression is true, executes
the given application with
arguments as its arguments, and returns the
result. For more information on Asterisk expressions, see Chapter 6, More Dialplan Concepts or the channelvariables.txt file in the
doc/ subdirectory of the Asterisk source.
If expression is false, execution
continues at the next priority.
exten => 123,1,ExecIf($[ ${CALLERIDNUM} = 101 ],SayDigits,12345)
exten => 123,2,SayDigits(6789)Name
ExitWhile() — Exit from a While() loop, whether or not
the conditional has been satisfied
Will cause a While() loop to exit whether or not the conditional expression has been satisfied.
exten => 123,1,Set(COUNT=1)
exten => 123,n,While($[${COUNT} < 5])
exten => 123,n,GotoIf($[${COUNT} != 3]?continue)
exten => 123,n,ExitWhile()
exten => 123,n(continue),NoOp()
exten => 123,n,SayNumber(${COUNT})
exten => 123,n,Set(COUNT=$[${COUNT} + 1])
exten => 123,n,EndWhile()
Name
ExtenSpy() — Listen to the audio on an extension, and optionally whisper to the calling channel
This application is used to listen to the audio going to and from an Asterisk channel. Only channels created by outgoing calls for the specified extension will be selected for spying.
While a channel is being spied upon, the following actions may be performed:
Dialing
#cycles the volume levelDialing
*will cause the application to spy on the next available channel
The options parameter may contain zero
or more of the following options:
-
b Only spy on channels that are involved in a bridged call.
-
g(group) Only spy on channels that contain a channel variable named
SPYGROUP, which should containgroupin an optional colon-delimited list.-
q Quiet mode. Tells the application not to beep or read the selected channel’s name when spying begins.
-
r[(basename)] Records the channel audio to the monitor spool directory (usually
/var/spool/asterisk/monitor). An optionalbasenameset the base filename of the recordings, which defaults tochanspy.-
v([value]) Adjusts the volume of the audio being listened to. The
valuemust be in the range of4to-4. A negativevaluewill make the volume quieter, while a positive value will make it louder.-
w Whisper mode. This allows the spying channel to talk to the spied-upon channel, without any other bridged channel being able to hear the audio.
-
W Private whisper mode. This enables the spying channel to speak to the spied-upon channel without being able to hear the audio from the spied-upon channel.
; Spy on channels created by extension 125 in the lab context
exten => 123,1,ExtenSpy(125@lab,w)
Name
ExternalIVR() — Interfaces with an external IVR application
Forks a process to run the specified ExternalIVR-compliant
command, and starts a generator on the
channel. The generator’s play list is controlled by the external
application, which can add and clear entries via simple commands issued
over STDOUT. The external application
will receive notifications of all DTMF events received on the channel,
and notification if the channel is hung up. The application will not be
forcibly terminated when the channel is hung up.
See doc/externalivr.txt in
the Asterisk source code for the specification of the ExternalIVR
interface.
; Run a test external IVR program, passing an argument
exten => 123,1,ExternalIVR(test_program,${MYARGUMENT})
Name
FastAGI() — Executes an AGI-compliant script across a network connection
Executes an AGI-compliant program across the network. This
application is very similar to AGI(),
except that it calls a specially written FastAGI script across a network
connection. The main purposes for using FastAGI are to offload
CPU-intensive AGI scripts to remote servers and to help reduce AGI
script startup times (the FastAGI program is already running before
Asterisk connects to it).
FastAGI() tries to connect
directly to the running FastAGI program, which must already be listening
for connections on the specified port on the
server specified by hostname. If
port is not specified, it defaults to port
4573. If script is specified, it is passed to
the FastAGI program as the agi_network_script variable. The arguments
specified by args will be passed to the
program.
Tip
See agi/fastagi-test in the Asterisk source directory for a sample FastAGI script. This should serve as a good roadmap for writing your own FastAGI programs.
Returns -1 if the application
requested a hangup, or 0 on a
non-hangup exit.
; connect to the sample fastagi-test program, which must already be running ; on the local machine exten => 123,1,Answer() exten => 123,2,FastAGI(agi://localhost) ; connect to a FastAGI script on a host named "calvin" on port 8000, and pass along ; a script name of "testing", with the argument "12345" exten => 124,1,Answer() exten => 124,2,FastAGI(agi://calvin:8000/testing,12345)
Name
Festival() — Uses the Festival text-to-speech engine to read text to the caller
Connects to the locally running Festival server, sends it
the text specified by text, and plays the
resulting sound file back to the user. This application allows the
caller to press a key (specified by intkeys)
to immediately stop the playback and return the value of
intkeys. If
intkeys is set to any, Festival() will send control of the channel to
the extension entered by the user.
See Chapter 14, Potpourri for more in-depth information on using Festival with Asterisk and the README.festival file located in the contrib/ subdirectory of the Asterisk source.
You must start the Festival server before starting Asterisk, and
you must use the Answer() application to answer the
channel before calling Festival().
exten => 123,1,Answer()
exten => 123,2,Festival('This is sample speech from Festival',#)
Name
FollowMe() — Find me/follow me functionality
This application attempts to locate the callee by dialing
many different destinations either serially or in parallel, as defined
in followme.conf.
The followmeid identifies the section
of followme.conf that specifies how
this callee should be found. The options
parameter can be zero or more of the following:
-
s Playback the incoming status message prior to starting the follow-me step(s)
-
a Record the caller’s name so it can be announced to the callee on each step
-
n Playback the unreachable status message if we’ve run out of steps to reach the callee or the callee has elected not to be reachable
exten => 123,1,Answer()
exten => 123,2,FollowMe(123,san)
exten => 123,3,VoiceMail(123,u)Name
ForkCDR() — Creates an additional CDR from the current call
Creates an additional Call Detail Record for the remainder of the current call.
This application is often used in calling-card applications to distinguish the inbound call (the original CDR) from the billable call time (the second CDR).
If the v option is specified,
all the CDR variables from the current record will be inherited by the
new CDR record.
exten => 123,1,Answer()
exten => 123,2,ForkCDR(v)
exten => 123,3,Playback(tt-monkeys)
exten => 123,4,Hangup()Name
GetCPEID() — Gets the CPE ID from an ADSI-capable telephone
Obtains the CPE ID and other information and displays it
on the Asterisk console. This information is often needed in order to
properly set up zapata.conf for
on-hook operations with ADSI-capable telephones.
Returns -1 on hangup
only.
; use this extension to get the necessary information to set up ADSI
; telephones
exten => 123,1,GetCPEID()
Name
Gosub() — Branches to a new location, saving the return address
Name
GosubIf() — Conditionally branches to a new location, saving the return address
Based upon the evaluation of
condition, Gosub will branch execution either to
labeliftrue() or
labeliffalse. You may return to this same
place in the dialplan by later calling Return.
Tip
The word label is often used
to denote that you may specify a priority;
an extension and a
priority; or a
context, an
extension and a
priority. We use the word label to avoid having to spell out all of
the possible options each time.
; Specify a default outgoing Caller*ID if one is not set by a specific channel. exten => _NXXXXXX,1,GosubIf($["${CALLERID(num)}" = ""]?setcallerid,1) exten => _NXXXXXX,n,Dial(Zap/g1/${EXTEN}) exten => _1NXXNXXXXXX,1,GosubIf($["${CALLERID(num)}" = ""]?setcallerid,1) exten => _1NXXNXXXXXX,n,Dial(Zap/g1/${EXTEN}) exten => setcallerid,1,Set(CALLERID(num)=6152345678) exten => setcallerid,n,Return
Name
Goto() — Sends the call to the specified priority, extension, and context
Sends control of the current channel to the specified
priority, optionally setting the destination
extension and
context.
Optionally, you can use the application to go to the named
priority specified by the named_priority
argument. Named priorities work only within the current
extension.
exten => 123,1,Answer()
exten => 123,2,Set(COUNT=1)
exten => 123,3,SayNumber(${COUNT})
exten => 123,4,Set(COUNT=$[ ${COUNT} + 1 ])
exten => 123,5,Goto(3)
; same as above, but using a named priority
exten => 124,1,Answer()
exten => 124,2,Set(COUNT=1)
exten => 124,3(repeat),SayNumber(${COUNT})
exten => 124,4,Set(COUNT=$[ ${COUNT} + 1 ])
exten => 124,5,Goto(repeat)
Name
GotoIf() — Conditionally goes to the specified priority
Sends the call to label1 if
condition is true or to
label2 if
condition is false. Either
label1 or label2
may be omitted (in that case, we just don’t take the particular branch),
but not both.
A label can be any one of the following:
A priority, such as
10An extension and a priority, such as
123,10A context, extension, and priority, such as
incoming,123,10A named priority within the same extension, such as
passed
Each type of label is explained in this example:
[globals]
; set TEST to something else besides 101 to see what GotoIf()
; does when the condition is false
TEST=101
;
[incoming]
; set a variable
; go to priority 10 if ${TEST} is 101, otherwise go to priority 20
exten => 123,1,GotoIf($[ ${TEST} = 101 ]?10:20)
exten => 123,10,Playback(the-monkeys-twice)
exten => 123,20,Playback(tt-somethingwrong)
;
; same thing as above, but this time we'll specify an extension
; and a priority for each label
exten => 124,1,GotoIf($[ ${TEST} = 101 ]?123,10:123,20)
;
; same thing as above, but these labels have a context, extension, and
; priority
exten => 125,1,GotoIf($[ ${TEST} = 101 ]?incoming,123,10:incoming,123,20)
;
; same thing as above, but this time we'll go to named priorities
exten => 126,1,GotoIf($[ ${TEST} = 101 ]?passed:failed)
exten => 126,15(passed),Playback(the-monkeys-twice)
exten => 126,25(failed),Playback(the-monkeys-twice)Name
GotoIfTime() — Conditionally branches, depending on the time and day
Branches to the specified extension, if the current time
matches the specified time. Each of the elements may be specified either
as * (for always) or as a
range.
The arguments to this application are:
-
times Time ranges, in 24-hour format
-
days_of_week Days of the week (
mon,tue,wed,thu,fri,sat,sun)-
days_of_month Days of the month (
1-31)-
months Months (
jan,feb,mar,apr, etc.); If we're open, then go to the open context ; We're open from 9am to 6pm Monday through Friday exten => s,1,GotoIfTime(09:00-17:59,mon-fri,*,*?open,s,1) ; ; We're also late on Tuesday and Thursday exten => s,n,GotoIfTime(09:00-19:59,tue&thru,*,*?open,s,1) ; ; We're also open from 9am to noon on Saturday exten => s,n,GotoIfTime(09:00-11:59,sat,*,*?open,s,1) ; ; Otherwise, we're closed exten => s,n,Goto(closed,s,1)
Name
Hangup() — Unconditionally hangs up the current channel
Unconditionally hangs up the current channel. If supported
on the channel, cause-code will be specified
to the remote end as the reason for ending the call.
cause-code defaults to 16 (normal call
clearing). Acceptable values for cause-code
are the following:
- 16
Normal call clearing
- 17
Busy
- 19
No answer
- 21
Rejected
- 34
Congestion
exten => 123,1,Answer()
exten => 123,2,Playback(im-sorry)
exten => 123,3,Hangup()
Name
HasNewVoicemail() — Checks to see if there is new voicemail in the indicated voicemail box
Note
The application has been deprecated in favor of the
VMCOUNT() function.
Similar to HasVoicemail(). This
application sets the VMSTATUS to
1 or 0, to indicate whether there is new (unheard)
voicemail in the voicemail box indicated by
vmbox. The context
argument corresponds to the voicemail context, and
folder corresponds to a voicemail folder. If
the voicemail folder is not specified, it defaults to the
INBOX folder. If the
varname argument is present, HasNewVoicemail() assigns the number of
messages in the specified folder to that variable.
If the options argument is set to the
letter j, then Asterisk will send the
call to priority n+101 if there is
new voicemail.
; check to see if there's unheard voicemail in INBOX of mailbox 123
; in the default voicemail context
exten => 123,1,Answer()
exten => 123,n,HasNewVoicemail(123@default)
exten => 123,n,GotoIf($[${HASVMSTATUS} > 0]?newvm)
exten => 123,n,Playback(vm-youhave)
exten => 123,n,Playback(vm-no)
exten => 123,n,Playback(vm-messages)
exten => 123,n,Goto(done)
exten => 123,n(newvm),Playback(vm-youhave)
exten => 123,n,SayNumber(${HASVMSTATUS})
exten => 123,n,Playback(vm-INBOX)
exten => 123,n,Playback(vm-messages)
exten => 123,n(done),NoOp()Name
HasVoicemail() — Indicates whether there is voicemail in the indicated voicemail box
Sets the HASVMSTATUS
channel variable to indicate whether there is voicemail in the voicemail
box indicated by vmbox. The
context argument corresponds to the voicemail
context, and folder corresponds to a
voicemail folder. If the folder is not specified, it defaults to the
INBOX folder. If the
varname argument is passed, this application
assigns the number of messages in the specified folder to that
variable.
If the options argument is set to the
letter j, then Asterisk will send the
call to priority n+101 if there is voicemail in the specified
folder.
; check to see if there's any voicemail at all in INBOX of mailbox 123
; in the default voicemail context
exten => 123,1,Answer()
exten => 123,2,HasVoicemail(123@default,COUNT)
exten => 123,3,GotoIf(${VMSTATUS}?1000)
exten => 123,4,Playback(vm-youhave)
exten => 123,5,Playback(vm-no)
exten => 123,6,Playback(vm-messages)
exten => 123,1000,Playback(vm-youhave)
exten => 123,1001,SayNumber($COUNT)
exten => 123,1002,Playback(vm-messages)Name
IAX2Provision() — Provisions a calling IAXy device
Provisions a calling IAXy device (assuming that the
calling entity is an IAXy) with the given
template. If no template is specified, the
default template is used. IAXy provisioning templates are defined in the
iaxprov.conf configuration
file.
; provision IAXy devices with the default template when they dial this extension
exten => 123,1,IAX2Provision(default)
Name
ImportVar() — Sets a variable based on a channel variable from a different channel
Sets variable newvar to
variable as evaluated on the specified
channel (instead of the current channel). If
newvar is prefixed with _, single inheritance is assumed. If prefixed
with _ _, infinite inheritance is
assumed.
; read the Caller ID information from channel Zap/1
exten => 123,1,Answer()
exten => 123,n,ImportVar(cidinfo=Zap/1,CALLERID(all))
Name
Log() — Logs a custom message from the dialplan
Sends a custom message to the logfiles from the dialplan.
This application can be useful to log an exceptional condition to the
logfiles, for later examination. Level may be
one of the following:
- DEBUG
Debugging message. This is generally not logged on a production system.
- NOTICE
An informational message.
- WARNING
A condition that may be serious, but is not a definite error.
- ERROR
Something went terribly wrong.
Name
LookupBlacklist() — Performs a lookup of a Caller ID name/number from the blacklist database
Note
This application has been deprecated in favor of
GotoIf(${BLACKLIST()}?context|extension|priority)
Looks up the Caller ID number on the active channel in the
Asterisk database (family blacklist).
If the Caller ID number is found in the blacklist, Asterisk sets the
LOOKUPBLSTATUS channel variable to
FOUND. Otherwise, the variable is set
to NOTFOUND.
If the j option is used in the
options parameter, and the number is found,
and if there exists a priority n+101
(where n is the priority of the
current instance), the channel will be set up to continue at that
priority level.
To add to the blacklist from the Asterisk CLI, type database put blacklist name/ number
; send blacklisted numbers to an endless loop
; otherwise, dial the number defined by the variable ${JOHN}
exten => 123,1,Answer()
exten => s,2,LookupBlacklist()
; if the Caller ID number is found in the blacklist, jump to the "goaway" label
exten => 123,n,GotoIf($["${LOOKUPBLSTATUS}" = "FOUND"]?goaway)
; otherwise, go ahead and call John
exten => 123,n,Dial(${JOHN})
exten => 123,n(goaway),Busy(5)
exten => 123,n,Hangup()Name
LookupCIDName() — Performs a lookup of a Caller ID name from the AstDB
Note
This application has been deprecated in favor of
Set(CALLERID(name)=${DB(cidname/${CALLERID(num)})})
Uses the Caller ID number on the active channel to retrieve the
Caller ID name from the AstDB (family cidname). This application does nothing if no
Caller ID was received on the channel. This is useful if you do not
subscribe to Caller ID name delivery, or if you want to change the
Caller ID names on some incoming calls.
; look up the Caller ID information from the AstDB, and pass it along
; to Jane's phone
exten => 123,1,Answer()
exten => 123,2,LookupCIDName()
exten => 123,3,Dial(SIP/Jane)Name
Macro() — Calls a previously defined dialplan macro
Executes a macro defined in the context named macro-macroname,
jumping to the s extension of that
context and executing each step, then returning when the steps
end.
The calling extension, context, and priority are stored in
${MACRO_EXTEN}, ${MACRO_CONTEXT}, and ${MACRO_PRIORITY}, respectively. Arguments
arg1, arg2, etc.
become ${ARG1}, ${ARG2}, etc. in the macro context.
Macro() exits abnormally if any
step in the macro exited abnormally or indicated a hangup. If ${MACRO_OFFSET} is set at termination, this
application will attempt to continue at priority MACRO_OFFSET+n+1 if such a step exists, and at n+1 otherwise. (In both cases, n stands for the current priority.)
If you call the Goto()
application inside of the macro to specify a context outside of the
currently executing macro, the macro will terminate and control will go
to the destination of the Goto().
; define a macro to count down from the specified value
[macro-countdown]
exten => s,1,Set(COUNT=${ARG1})
exten => s,2,While($[ ${COUNT} > 0])
exten => s,3,SayNumber(${COUNT})
exten => s,4,Set(COUNT=$[ ${COUNT} - 1 ])
exten => s,5,EndWhile()
; call our macro with two different values
[example]
exten => 123,1,Macro(countdown,10)
exten => 124,1,Macro(countdown,5)
Note
While a macro is being executed, it becomes the current context.
This means that if a hangup occurs, for instance, the macro will be
searched for an h extension,
not the context from which the macro was called.
So, make sure to define all appropriate extensions in your macro (you
can use catch in AEL).
Warning
Because of the way Macro() is
implemented (it executes the priorities contained within it via
sub-engine), and a fixed per-thread memory stack allowance, macros are
limited to seven levels of nesting (macro calling macro calling macro,
etc.); It may be possible that stack-intensive applications in deeply
nested macros could cause Asterisk to crash earlier than this
limit.
Name
MacroExclusive() — Runs a macro, exclusive of any other channel
Name
MacroExit() — Explicitly returns from a macro
Name
MacroIf() — Conditionally calls a previously defined macro
Evaluates condition, then
executes one of either macroiftrue or
macroiffalse. Once beyond the
condition, however, note that MacroIf() behaves identically to Macro().
; define a macro to count down from the specified value
[macro-countdown]
exten => s,1,Set(COUNT=${ARG1})
exten => s,2,While($[ ${COUNT} > 0])
exten => s,3,SayNumber(${COUNT})
exten => s,4,Set(COUNT=$[ ${COUNT} - 1])
exten => s,5,EndWhile()
; define a macro to count up to the specified value
[macro-countup]
exten => s,1,Set(COUNT=1)
exten => s,2,While($[ ${COUNT} < ${ARG1}])
exten => s,3,SayNumber(${COUNT})
exten => s,4,Set(COUNT=$[ ${COUNT} + 1])
exten => s,5,EndWhile()
; call our macro with two different values
[example]
exten => 123,1,MacroIf($[ ${foo} < 5 ]?countup,${foo}:countdown,${foo})
Name
MailboxExists() — Conditionally branches if the specified voicemail box exists
Checks to see if the mailbox specified by the
mailbox argument exists in the Asterisk
voicemail system. You may pass a voicemail
context if the mailbox is not in the default voicemail context.
This application sets a channel variable named VMBOXEXISTSSTATUS. If the mailbox exists, it
will be set to SUCCESS. Otherwise, it
will be set to FAILED.
If the j option is passed as
the options parameter, the application will
jump to priority n+101 (where
n is the current priority) if the
voicemail box specified by the mailbox
argument exists.
exten => 123,1,Answer()
exten => 123,n,Set(MYMAILBOX=123@default)
exten => 123,n,MailboxExists(${MYMAILBOX})
exten => 123,n,GotoIf($["${VMBOXEXISTSSTATUS}" = "SUCCESS"]?exists)
exten => 123,n,Playback(im-sorry)
exten => 123,n,Hangup()
exten => 123,n(exists),Voicemail(u123)Name
MeetMe() — Puts the caller in to a MeetMe conference bridge
Places the caller in to the audio conference bridge
specified by the confno argument. If the
conference number is omitted, the user will be prompted to enter
one.
If the PIN argument is passed, the
caller must enter that PIN number to successfully enter the
conference.
The options string may contain zero or
more of the characters in the following list:
-
a Sets admin mode.
-
A Sets marked mode.
-
b Runs the AGI script specified in
${MEETME_AGI_BACKGROUND}; default: conf-background.agi. (Note: this does not work with non-Zap channels in the same conference.)-
c Announces user(s) count upon joining a conference.
-
d Dynamically adds conference.
-
D Dynamically adds conference, prompting for a PIN.
-
e Selects an empty conference.
-
E Selects an empty Pinless conference.
-
F Passes DTMF digits through the conference to other participants. DTMF digits used to enable conference features will not be passed through.
-
i Announces user join/leave with review.
-
I Announces user join/leave without review.
-
l Sets listen only mode (listen only, no talking).
-
m Sets the participant as initially muted.
-
M Enables music on hold when the conference has a single caller.
-
o Turns on talker optimization. With talker optimization, Asterisk treats talkers who aren’t speaking as being muted, meaning that no encoding is done on transmission and that received audio that is not registered as talking is omitted, causing no buildup in background noise.
-
p Allows user to exit the conference by pressing
#.-
P Always prompts for the PIN even if it is specified.
-
q Sets quiet mode. In quiet mode, Asterisk won’t play sounds as conference participants enter or leave.
-
r Records conference (as
${MEETME_RECORDINGFILE}using format${MEETME_RECORDINGFORMAT}). The default filename is meetme-conf-rec-${CONFNO}-{UNIQUEID}and the default format is .wav.-
s Presents the menu (user menu or admin menu, depending on whether the caller is marked as an administrator) when
*is received.-
t Sets talk-only mode (talk only, no listening).
-
T Sets talker detection. Asterisk will sends events on the Manager Interface identifying the channel that is talking. The talker will also be identified on the output of the
meetme listCLI command.-
w[(seconds)] Waits for a marked admin to join the conference. If
secondsis not specified, the conference will wait indefinitely for the admin to join. Ifsecondsis specified, the conference will wait the specified number of seconds. If the admin still hasn’t joined, the call will continue on with the next priority in the dialplan.-
x Closes the conference when the last marked user exits.
-
X Allows user to exit the conference by entering a valid single-digit extension (set via the variable
${MEETME_EXIT_CONTEXT}), or the number of an extension in the current context if that variable is not defined.-
1 Doesn’t play initial message when the first person joins the conference.
exten => 123,1,Answer()
; add the caller to conference number 501 with pin 1234
exten => 123,2,MeetMe(501,DpM,1234)
Name
MeetMeAdmin() — Performs MeetMe conference administration
Runs the specified MeetMe administration
command on the specified conference. On some
commands, you may specify the user on which
to run the specified command. The command may
be one of the following:
-
e Ejects the last user that joined.
-
k Kicks the specified
userout of the conference.-
K Kicks all users out of the conference.
-
l Unlocks the conference.
-
L Locks the conference.
-
m Unmutes the specified
user.-
M Mutes the specified
user.-
n Unmutes the entire conference.
-
N Mutes all non-admin participants in the conference.
-
r Resets the volume settings for the specified
user.-
R Resets the volume settings for all participants.
-
s Lowers the speaking volume for the entire conference.
-
S Raises the speaking volume for the entire conference.
-
t Lowers the speaking volume for the specified
user.-
T Raises the speaking volume for the specified
user.-
u Lowers the listening volume for the specified
user.-
U Raises the listening volume for the specified
user.-
v Lowers the listening volume for the entire conference.
-
V Raises the listening volume for the entire conference.
; mute conference 501exten => 123,1,MeetMeAdmin(501,N); kick user 1234 from conference 501exten => 124,1,MeetMeAdmin(501,k,1234)
Tip
You can find a list of users in the conference by using the
meetme list command from the
Asterisk CLI, or by using the Asterisk Manager Interface.
Name
MeetMeCount() — Counts the number of participants in a MeetMe conference
Plays back the number of users in the MeetMe conference
identified by confno. If a variable is
specified by the variable argument, playback
will be skipped and the count will be assigned to
variable.
; count the number of users in conference 501, and assign that number
to ${COUNT}
exten => 123,1,MeetMeCount(501,COUNT)
Name
Milliwatt() — Generates a 1,000 Hz tone
This application generates a constant 1,000 Hz tone at 0 dbm (μlaw). This application is often used for testing the audio properties of a particular channel.
; generate a 1000HZ tone
exten => 123,1,Milliwatt()
Warning
Please note that there is a service that the carriers use to
test circuits for loss, that folks in the industry have nicknamed
“1,000-cycles.” The thing is, the tone the carrier equipment sends
is actually 1,004 Hz, so if you want to test circuit loss on an
analog channel from Asterisk, Milliwatt() may not give you exactly
what you want.
Name
MixMonitor() — Records a channel in the background, mixing both directions synchronously
Records the audio on the current channel to the specified
file. If the filename is an absolute path, MixMonitor() uses that path; otherwise it
creates the file in the configured monitoring directory from asterisk.conf.
If command is specified, it will be run
when recording ends, either by hangup or by calling StopMixMonitor().
The options parameter can contain zero
or more of the following options:
- a
Append to the file, instead of overwriting it.
- b
Only save audio when the channel is bridged.
Note
This does not include conferences or sounds played to each bridged party.
- v(
x) Adjust the heard volume by a factor of
x(range-4to4).- V(
x) Adjust the spoken volume by a factor of
x(range-4to4).- W(
x) Adjust both the heard and the spoken volumes by a factor of
x(range-4to4).
; Record channel
exten => 123,1,MixMonitor(/var/lib/asterisk/sounds/123.wav)
Name
Monitor() — Monitors (records) the audio on the current channel
Starts monitoring a channel. The channel’s input and
output voice packets are logged to files until the channel hangs up or
monitoring is stopped by the StopMonitor() application.
Monitor() takes the following
arguments:
-
file_format Specifies the file format. If not set, defaults to
wav.-
fname_base If set, changes the filename used to the one specified.
-
options One of two options can be specified:
-
m When the recording ends, mix the two leg files in to one and delete the original leg files. If the variable
${MONITOR_EXEC}is set, the application referenced in it will be executed instead of soxmix, and the raw leg files will not be deleted automatically. soxmix (or${MONITOR_EXEC}) is handed three arguments: the two leg files and the filename for the target mixed file, which is the same as the leg filenames but without the in/out designator. If${MONITOR_EXEC_ARGS}is set, the contents will be passed on as additional arguments to${MONITOR_EXEC}. Both${MONITOR_EXEC}and themflag can be set from the administrator interface.-
b Don’t begin recording unless a call is bridged to another channel.
-
exten => 123,1,Answer()
; record the current channel, and mix the audio channels at the end of
; recording
exten => 123,2,Monitor(wav,monitor_test,mb)
exten => 123,3,SayDigits(12345678901234567890)
exten => 123,4,StopMonitor()Name
MorseCode() — Plays Morse code
Plays the string, encoded in
International Morse Code. The following channel variables will affect
the playback:
-
MORSEDITLEN The length, in milliseconds, of a DIT. Defaults to 80 ms.
Note
All of the other tone and silence lengths are defined in the International Morse Code standard with respect to the length of a DIT, and therefore, each of the other lengths will be adjusted suitably.
-
MORSETONE The tone, in Hertz (Hz), which will be used. Defaults to 800 Hz.
; dah-dit-dah dit-dit dit-dit-dit-dit-dah dah-dit-dah dit-dit-dah dit-dah
exten => 123,1,Answer()
exten => 123,2,MorseCode(KI4KUA)
Name
MP3Player() — Plays an MP3 file or stream
Uses the mpg123
program to play the given location to the
caller. The specified location can be either
a filename or a valid URL. The caller can exit by pressing any
key.
Warning
The correct version of mpg123 must be installed for this
application to work properly. Asterisk currently works best with
mpg123-0.59r. Other versions may
give less than desirable results.
exten => 123,1,Answer() exten => 123,2,MP3Player(test.mp3) exten => 123,1,Answer() exten => 123,2,MP3Player(http://example.com/test.mp3)
Name
MusicOnHold() — Plays music on hold indefinitely
Plays hold music specified by
class, as configured in musiconhold.conf. If omitted, the default
music class for the channel will be used. You can use the MUSICCLASS dialplan function to set the default
music class for the channel.
; transfer telemarketers to this extension to keep them busy
exten => 123,1,Answer()
exten => 123,n,Playback(tt-allbusy)
exten => 123,n,MusicOnHold(default)
Name
NoCDR() — Disables Call Detail Records for the current call
Name
NoOp() — Does nothing
Does nothing—this application is simply a placeholder.
This application is often used as a debugging tool. Whenever Asterisk’s
core verbosity level is set to 3 or above, Asterisk evaluates and prints
each line of the dialplan before executing it. This means that any
arguments passed to the NoOp()
application (in the text parameter) are
printed to the console. By watching the console output, a skilled
Asterisk administrator can use this output to debug problems in the
dialplan.
exten => 123,1,NoOp(CallerID is ${CALLERID})
Name
Page() — Opens one-way audio to multiple phones
Places outbound calls to the given technology/resource and dumps them in to a conference bridge as muted participants. The original caller is dumped in to the conference as a speaker, and the room is destroyed when the original caller leaves. The following options may be specified:
-
d Full duplex audio. Allow the paged persons to respond to the caller.
-
q Quiet. Do not play a beep to the caller.
-
r Record the page. See the
roption toMeetMefor more information.
exten => 123,1,Page(SIP/101&SIP/102&IAX2/iaxy123)
Name
Park() — Parks the current call
Parks the current call (typically in combination with a
supervised transfer to determine the parking space number). This
application is always registered internally and does not need to be
explicitly added in to the dialplan, although you should include the
parkedcalls context. Parking
configuration is set in features.conf.
; explicitly park the caller
include => parkedcalls
exten => 123,1,Answer()
exten => 123,n,Park()
Name
ParkAndAnnounce() — Parks the current call and announces the call over the specified channel
Parks the current call in the parking lot and announces
the call over the specified channel. The
template is a colon-separated list of files
to announce; the word PARKED is
replaced with the parking space number of the call. The
timeout argument is the time in seconds
before the call returns to the
return_context. The
channel argument is the channel to call to
make the announcement. Console/dsp
calls the console. The return_context
argument is a Goto()-style label to
jump the call back in to after timeout, which defaults to n+1 (where n is the current priority) in the
return_context context.
include => parkedcalls
exten => 123,1,Answer()
exten => 123,2,ParkAndAnnounce(vm-youhave:a:pbx-transfer:at:vm-extension:PARKED,120,
Console/dsp)
exten => 123,3,Playback(vm-nobodyavail)
exten => 123,4,Playback(vm-goodbye)
exten => 123,5,Hangup()Name
ParkedCall() — Answers a parked call
Connects the caller to the parked call in the parking
space identified by parkingslot. This
application is always registered internally and does not need to be
explicitly added in to the dialplan, although you should include the
parkedcalls context.
; pick up the call parked in parking space 701
exten => 123,1,Answer()
exten => 123,2,ParkedCall(701)
Name
PauseMonitor() — Suspends monitoring of a channel
Temporarily suspends the monitoring (recording) of the current channel
exten => 123,1,Answer()
exten => 123,n,Monitor(wav,monitor_test)
exten => 123,n,Playback(demo-congrats)
; temporarily pause the monitoring while we gather some secret info
exten => 123,n,PauseMonitor()
exten => 123,n,Read(NEWPASS,vm-newpassword)
exten => 123,n,SayDigits(${NEWPASS})
exten => 123,n,UnpauseMonitor()
exten => 123,n,Dial(${JOHN})Name
PauseQueueMember() — Temporarily blocks a queue member from receiving calls
Pauses the specified queue
interface. This prevents any calls from being
distributed from the queue to the interface
until it is unpaused by the UnpauseQueueMember() application or the
Manager Interface. If no queuename is given,
the interface is paused in every queue it is a member of.
This application sets a channel variable named PQMSTATUS to either PAUSED or NOTFOUND upon completion.
If the options parameter is set to
j and the
interface is not in the named queue, or if no
queue is given and the interface is not in
any queue, it will jump to priority n+101 (where n is the current priority), if it
exists.
exten => 123,1,PauseQueueMember(,SIP/300)
exten => 124,1,UnpauseQueueMember(,SIP/300)Name
Pickup() — Answers a ringing call from another phone
Picks up any ringing channel that is ringing the specified
extension. If multiple extensions are
specified, Pickup() will retrieve the
first matching call found. If no context is
specified, the current context will be used.
There is also a special context name of
PICKUPMARK. If specified, Pickup will find the first ringing channel
with the channel variable PICKUPMARK
set, with a value corresponding to the value of
extension.
Name
Playback() — Plays the specified audio file to the caller
Plays back a given filename to the caller. The filename
should not contain the file extension, as Asterisk will automatically
choose the audio file with the lowest conversion cost. Zero or more
options may also be included. The skip option causes the playback of the message
to be skipped if the channel is not in the “up” state (i.e., it hasn’t
yet been answered). If skip is
specified, the application will return immediately should the channel
not be off-hook. Otherwise, unless noanswer is specified, the channel will be
answered before the sound file is played. (Not all the channels support
playing messages while still on-hook.) If j is passed as one of
options and the file does not exist, this
application jumps to priority n+101
(where n is the current priority), if
it exists.
exten => 123,1,Answer()
exten => 123,n,Playback(tt-weasels)
Name
Playtones() — Plays a tone list
Plays a tone list. Execution immediately continues with
the next step, while the tones continue to play. The
tonelist is either the tone name defined in
the indications.conf configuration
file, or a specified list of frequencies and durations. See indications.conf for a description of the
specification of a tone list.
Use the StopPlaytones()
application to stop the tones from playing.
; play a busy signal for two seconds, and then a congestion tone for two seconds exten => 123,1,Playtones(busy) exten => 123,2,Wait(2) exten => 123,3,StopPlaytones() exten => 123,4,Playtones(congestion) exten => 123,5,Wait(2) exten => 123,6,StopPlaytones() exten => 123,7,Goto(1)
Name
PrivacyManager() — Requires a caller to enter his phone number, if no Caller ID information is received
If no Caller ID is received, this application answers the
channel and asks the caller to enter his phone number. By default, the
caller is given three attempts. PrivacyManager() sets a channel variable
named PRIVACYMGRSTATUS to either
SUCCESS or FAILURE. If Caller ID is received on the
channel, PrivacyManager() does
nothing.
If the options parameter is set to
j and the caller fails to enter his
Caller ID number, the call will continue at priority n+101 (where n is the current priority).
The privacy.conf
configuration file changes the functionality of the PrivacyManger() application. It contains the
following two lines:
-
maxretries Specifies the maximum number of attempts the caller is allowed to input a Caller ID number (default:
3).-
minlength Specifies the minimum allowable digits in the input Caller ID number (default:
10).
The maxretries and
minlength settings may also be passed to the
application as parameters. Parameters passed to the application override
any settings in privacy.conf.
exten => 123,1,Answer()
exten => 123,n,PrivacyManager()
exten => 123,n,GotoIf($["${PRIVACYMGRSTATUS}" = "FAILURE"]?bad)
exten => 123,n,Dial(Zap/1)
exten => 123,n,Hangup()
exten => 123,n(bad),Playback(im-sorry)
exten => 123,n,Playback(vm-goodbye)
exten => 123,n,Hangup()Name
Progress() — Indicates progress
Requests that the channel indicate that in-band progress is available to the user. Each channel type in Asterisk has its own way of signaling progress on the call.
; indicate progress to the calling channel, wait 5 seconds,
; and then answer the call
exten => 123,1,Progress()
exten => 123,n,Wait(5)
exten => 123,n,Answer()Name
Queue() — Places the current call in to the specified call queue
Places an incoming call in to the call queue specified by
queuename, as defined in queues.conf.
The options argument may contain zero
or more of the following characters:
-
d Specifies a data-quality (modem) call (minimum delay).
-
h Allows callee to hang up by hitting
*.-
H Allows caller to hang up by hitting
*.-
i Ignores call forward requests from queue members and does nothing when they are requested.
-
n Disallows retries on the timeout; exits this application and goes to the next step.
-
r Rings instead of playing music on hold.
-
t Allows the called user to transfer the call.
-
T Allows the calling user to transfer the call.
-
w Allows the called user to write the conversation to disk.
-
W Allows the calling user to write the conversation to disk.
In addition to being transferred, a call may be parked and then picked up by another user.
The announceoverride argument overrides
the standard announcement played to queue agents before they answer the
specified call.
The optional URL will be sent to the
called party if the channel supports it.
The timeout will cause the queue to
fail out after a specified number of seconds, checked between each queues.conf
timeout and retry
cycle. The call will continue on with the next priority in the
dialplan.
This application sets a channel variable named QUEUESTATUS upon completion. It will take one
of the following values:
-
TIMEOUT The call was in the queue too long, and timed out. See the
timeoutparameter.-
FULL The queue was already full. See the
maxlensetting for the queue inqueues.conf.-
JOINEMPTY The caller could not join the queue, as there were no queue members to answer the call. See the
joinemptysetting for the queue inqueues.conf.-
LEAVEEMPTY The caller joined the queue, but then all queue members left. See the
leavewhenemptysetting for the queue inqueues.conf.-
JOINUNAVAIL The caller could not join the queue, as there were no queue members available to answer the call. See the
joinemptysetting for the queue inqueues.conf.The caller joined the queue, but then all of the queue members became unavailable. See the
leavewhenemptysetting for the queue inqueues.conf.
; place the caller in the techsupport queue
exten => 123,1,Answer()
exten => 123,2,Queue(techsupport,t)
Name
QueueLog() — Writes arbitrary queue events to the queue log
Writes an arbitrary queue event to the queue log. The
queuename parameter specifies the name of the
queue. The uniqueid parameter specifies the
unique identifier for the channel. The member
parameter specifies which queue member the event pertains to. The
event and
additionalinfo parameters may be set to
arbitrary data, as needed.
; Write an arbitary event to the queue log
exten => 123,1,QueueLog(myqueue,${UNIQUEID},Agent/123,MyTestEvent)
Name
Random() — Conditionally branches, based upon a probability
Conditionally jumps to the specified
priority (and optional
extension and
context), based on the specified
probability.
probability should be an integer between 1
and 100. The application will jump to the specified destination
priority percent of the time.
; choose a random number over and over again
exten => 123,1,SayNumber(${RAND(1|10)})
exten => 123,n,Goto(1)Name
Read() — Reads DTMF digits from the caller and assigns the result to a variable
Reads a #-terminated
string of digits from the user in to the given
variable.
Other arguments include:
-
filename Specifies the file to play before reading digits.
-
maxdigits Sets the maximum acceptable number of digits. If this argument is specified, the application stops reading after
maxdigitshave been entered (without requiring the user to press the#key). Defaults to0(no limit, wait for the user to press the#key). Any value below0means the same. The maximum accepted value is255.-
option Zero or more of the following options:
sReturn immediately if the line is not answered.
iInterpret the filename as an indication tone setting from
indications.conf.nRead digits even if the line has not been answered.
-
attempts If greater than
1, that many attempts will be made in the event that no data is entered.-
timeout If greater than
0, that value will override the default timeout.
; read a two-digit number and repeat it back to the caller
exten => 123,1,Read(NUMBER,,2)
exten => 123,2,SayNumber(${NUMBER})
exten => 123,3,Goto(1)Name
ReadFile() — Reads the contents of a file in to a variable
Name
RealTime — Looks up information from the RealTime configuration handler
Uses the RealTime configuration handler system to read
data in to channel variables. All unique column names (from the
specified family) will be set as channel
variables, with an optional prefix to the
name (e.g., a prefix of var_ would
make the column name become the
variable ${var_name}).
; retrieve all columns from the sipfriends table where the name column
; matches "John", and prefix all the variables with "John_"
exten => 123,1,RealTime(sipfriends,name,John,John_)
; now, let's read the value of the column named "port"
exten => 123,n,SayNumber(${John_port})Name
RealTimeUpdate() — Updates a value via the RealTime configuration handler
Uses the RealTime configuration handler system to update a
value. The column newcol in
family matching column
colmatch =
value will be updated to
newval.
A channel variable named REALTIMECOUNT will be set with the number of
rows updated or -1 if an error
occurs.
; this will update the port column in the sipfriends table to a new
; value of 5061, where the name column matches "John"
exten => 123,1,RealTimeUpdate(sipfriends,name,John,port,5061)
Name
Record() — Records channel audio to a file
Records audio from the channel in to the given
filename. If the file already exists, it will
be overwritten.
Optional arguments include:
-
format Specifies the format of the file type to be recorded.
-
silence Specifies the number of seconds of silence to allow before ending the recording and continuing on with the next priority in the dialplan.
-
maxduration Specifies the maximum recording duration, in seconds. If not specified or
0, there is no maximum.-
options May contain any of the following letters:
-
a Append to the recording, instead of overwriting it.
-
n Do not answer, but record anyway if the line is not yet answered.
-
q Quiet mode; do not play a beep tone at the beginning of the recording.
-
s Skip recording if the line is not yet answered.
-
t Use the alternate
*terminator key instead of the default#.-
x Ignore all termination keys and keep recording until hangup.
-
If the filename contains %d, these characters will be replaced with a
number incremented by one each time the file is recorded.
The user can press # to
terminate the recording and continue to the next priority in the
dialplan.
; record the caller's name
exten => 123,1,Playback(pls-rcrd-name-at-tone)
exten => 123,n,Record(/tmp/name.gsm,3,30)
exten => 123,n,Playback(/tmp/name)Name
RemoveQueueMember() — Dynamically removes queue members
Dynamically removes the specified
interface from the
queuename call queue. If
interface is not specified, this application
removes the current channel from the queue.
If the options parameter is set to
j, and the interface is not in the
queue and there exists a priority n+101 (where n is the current priority), the application
will jump to that priority.
; remove SIP/3000 from the techsupport queue
exten => 123,1,RemoveQueueMember(techsupport,SIP/3000)
Name
ResetCDR() — Resets the Call Detail Record
Causes the Call Detail Record to be reset for the current
channel. The options parameter can be zero or
more of the following options:
-
a Store any stacked records.
-
w Store the current CDR record before resetting it.
-
v Save CDR variables.
; write a copy of the current CDR record, and then reset the CDR
exten => 123,1,Answer()
exten => 123,2,Playback(tt-monkeys)
exten => 123,3,ResetCDR(wv)
exten => 123,4,Playback(tt-monkeys)Name
RetryDial() — Attempts to place a call, and retries on failure
Synopsis
RetryDial(announce,sleep,loops,technology/resource[&Technology2/resource2...] [,timeout][,options][,URL])
Attempts to place a call. If no channel can be reached,
plays the file defined by announce, waiting
sleep seconds to retry the call. If the
specified number of attempts matches loops,
the call will continue with the next priority in the dialplan. If
loops is set to 0, the call will retry endlessly.
While waiting, a one-digit extension may be dialed. If that
extension exists in either the context defined in ${EXITCONTEXT} (if defined) or the current
one, the call will transfer to that extension immediately.
All arguments after loops are passed
directly to the Dial()
application.
; attempt to dial the number three times via IAX, retrying every five seconds exten => 123,1,RetryDial(priv-trying,5,3,IAX2/VOIP/8885551212,30) ; if the caller presses 9 while waiting, dial the number on the Zap/4 channel exten => 9,1,RetryDial(priv-trying,5,3,Zap/4/8885551212,30)
Name
Return() — Returns from a Gosub() or
GosubIf()
Name
Ringing() — Indicates ringing tone
Requests that the channel indicate ringing tone to the user. It is up to the channel driver to specify exactly how ringing is indicated.
Note that this application does not actually provide audio ringing
to the caller. Use the Playtones()
application to do this.
; indicate that the phone is ringing, even though it isn't
exten => 123,1,Ringing()
exten => 123,2,Wait(5)
exten => 123,3,Playback(tt-somethingwrong)Name
SayAlpha() — Spells a string
Spells out the specified
string, using the current language setting
for the channel. See the CHANNEL function
for more information on changing the language for the current
channel.
exten => 123,1,SayAlpha(ABC123XYZ)
Name
SayDigits() — Says the specified digits
Says the specified digits,
using the current language setting for the channel. See the CHANNEL function for more information on changing
the language for the current channel.
exten => 123,1,SayDigits(1234)
Name
SayNumber() — Says the specified number
Says the specified number, using the current language setting for the channel. See the CHANNEL function for more information on changing the language for the current channel.
If the current language supports different genders, you can pass
the gender argument to change the gender of
the spoken number. You can use the following
gender arguments:
Use the
genderargumentsffor female,mfor male, andnfor neuter in European languages such as Portuguese, French, Spanish, and German.Use the
genderargumentcfor commune andnfor neuter in Nordic languages such as Danish, Swedish, and Norwegian.Use the
genderargumentpfor plural enumerations in German.
; say the number in English
exten => 123,1,Set(CHANNEL(language)=en)
exten => 123,2,SayNumber(1234)
Name
SayUnixTime() — Says the specified time in a custom format
Speaks the specified time according to the specified time zone and format. The arguments are:
-
unixtime The time, in seconds, since January 1, 1970. May be negative. Defaults to now.
-
timezone The time zone. See /usr/share/zoneinfo/ for a list. Defaults to the machine default.
-
format The format in which the time is to be spoken. See
voicemail.conffor a list of formats. Defaults to"ABdY 'digits/at' IMp".
exten => 123,1,SayUnixTime(,,IMp)
Name
SendDTMF() — Sends arbitrary DTMF digits to the channel
Sends the specified DTMF digits on a channel. Valid DTMF
digits include 0–9, *, #, and
A–D. You may also use the letter
w as a digit, which indicates a 500
millisecond wait. The timeout_ms argument is
the amount of time between digits, in milliseconds. If not specified,
timeout_ms defaults to 250
milliseconds.
exten => 123,1,SendDTMF(3212333w222w366w3212333322321,250)
Name
SendImage() — Sends an image file
Sends an image on a channel, if image transport is
supported. This application sets a channel variable named SENDIMAGESTATUS to either OK or NOSUPPORT upon completion.
If the options parameter is set to
j and the channel does not support
image transport, and there exists a priority n+101 (where n is the current priority), execution will
continue at that step.
exten => 123,1,SendImage(logo.jpg)
Name
SendText() — Sends text to the channel
Sends text on a channel, if
text transport is supported. Upon completion, a channel variable named
SENDTEXTSTATUS will be set to one of
the following values:
-
SUCCESS The transmission of the text was successful.
-
FAILURE The transmission of the text failed.
-
NOSUPPORT The underlying channel does not support the transmission of text.
If the options parameter is set to
j and the channel does not support
text transport, and there exists a priority n+101 (where n is the current priority), execution will
continue at that step.
exten => 123,1,SendText(Welcome to Asterisk)
Name
SendURL() — Sends the specified URL to the channel (if supported)
Requests that the client go to the specified URL. The
application also sets a channel variable named SENDURLSTATUS to one of the following values
upon completion:
-
SUCCESS The transmission of the URL was successful.
-
FAILURE The transmission of the URL failed.
-
NOLOAD The is web-enabled but failed to load the URL.
-
NOSUPPORT The underlying channel does not support the transmission of the URL.
If the options parameter contains the
wait option, execution will wait for
an acknowledgment that the URL has been loaded before continuing.
If the options parameter contains the
j option and the client does not
support HTML transport, and there exists a priority n+101 (where n is the number of the current priority),
execution will continue at that step.
exten => 123,1,SendURL(www.asterisk.org,wait)
Name
Set() — Sets a variable to the specified value
Sets the variable n to the
specified value. Also sets the variable
n2 to the value of
value2. If the variable name is prefixed with
_, single inheritance is assumed. If
the variable name is prefixed with _
_, infinite inheritance is assumed. Inheritance is used when
you want channels created from the current channel to inherit the
variable from the current channel.
If the options parameter is set to
g, the variables will be set as
global variables instead of channel variables.
; set a variable called DIALTIME, then use it
exten => 123,1,Set(DIALTIME=20)
exten => 123,1,Dial(Zap/4/5551212,,${DIALTIME})Note
The setting of multiple variables and the use of the g option have been deprecated. Please use
multiple calls to Set() and the
GLOBAL() dialplan function
instead.
Name
SetAMAFlags() — Sets AMA flags in the Call Detail Record
Name
SetCallerID() — Sets the Caller ID for the channel
Name
SetCallerPres() — Sets Caller ID presentation flags
Sets the Caller ID presentation flags on a Q931 PRI connection.
Valid presentations are:
-
allowed_not_screened Presentation allowed, not screened
-
allowed_passed_screen Presentation allowed, passed screen
-
allowed_failed_screen Presentation allowed, failed screen
-
allowed Presentation allowed, network number
-
prohib_not_screened Presentation prohibited, not screened
-
prohib_passed_screen Presentation prohibited, passed screen
-
prohib_failed_screen Presentation prohibited, failed screen
-
prohib Presentation prohibited, network number
-
unavailable Number unavailable
exten => 123,1,SetCallerPres(allowed_not_screened)
exten => 123,2,Dial(Zap/g1/8885551212)Name
SetCDRUserField() — Sets the Call Detail Record user field
Sets the CDR user field to the specified
value. The CDR user field is an extra field
that you can use for data not stored anywhere else in the record. CDR
records can be used for billing purposes or for storing other arbitrary
data about a particular call.
exten => 123,1,SetCDRUserField(testing)
exten => 123,2,Playback(tt-monkeys)Note
This application has been deprecated in favor of the CDR() function.
exten => 123,1,Set(CDR(userfield)=54321)
Name
SetGlobalVar() — Sets a global variable to the specified value
Name
SetMusicOnHold() — Sets the default music-on-hold class for the current channel
Name
SetTransferCapability() — Sets the ISDN transfer capability of a channel
This application sets the ISDN transfer capability of the
current channel to a new value. Valid values for
transfercapability are:
-
SPEECH 0x00, speech (default, voice calls)
-
DIGITAL 0x08, unrestricted digital information (data calls)
-
RESTRICTED_DIGITAL 0x09, restricted digital information
-
3K1AUDIO 0x10, 3.1kHz Audio (fax calls)
-
DIGITAL_W_TONES 0x11, unrestricted digital information with tones/announcements
-
VIDEO 0x18, video
Name
SIPAddHeader() — Adds a SIP header to the outbound call
Adds a header to a SIP call placed with the Dial() application. A nonstandard SIP header
should begin with X-, such as
X-Asterisk-Accountcode:. Use this
application with care—adding the wrong headers may cause any number of
problems.
For more flexibility, see the SIP_HEADER() dialplan function.
exten => 123,1,SIPAddHeader(X-Asterisk-Testing: Just testing!)
exten => 123,2,Dial(SIP/123)Name
SIPDtmfMode() — Changes the DTMF method for a SIP call
Name
SLAStation() — Shared line appearance station
This application should be executed by an SLA station. The
format of the station parameter depends on
how the call was initiated. If the phone was just taken off hook, then
the station parameter should contain only the
station name. If the call was initiated by pressing a line key, then the
station name should be preceded by an underscore and the trunk name
associated with that line button (station1_line2, for example).
For more information on shared line appearances, see the doc/sla.pdf file in the Asterisk
source.
exten => 123,1,SLAStation(station1)
exten => 124,1,SLAStation(station1_line2)
Name
SLATrunk() — Shared line appearance trunk
This application should be executed by an SLA trunk on an
inbound call. The channel calling this application should correspond to
the SLA trunk specified by the trunkparameter.
For more information on shared line appearances, see the doc/sla.pdf file in the Asterisk
source.
exten => 123,1,SLATrunk(line2)
Name
SoftHangup() — Performs a soft hangup of the requested channel
Hangs up the requested channel. The
options argument may contain the letter
a, which causes all channels on the
specified device to be hung up (currently, the
options argument may contain only a).
; hang up all calls using Zap/4 so we can use it
exten => 123,1,SoftHangup(Zap/4,a)
exten => 123,2,Wait(2)
exten => 123,3,Dial(Zap/4/5551212)Name
StackPop() — Removes last address from Gosub() stack
Removes the last address from the Gosub() stack. This is frequently used when
handling error conditions within Gosub() routines when it is no longer
appropriate to return control of the dialplan back to where the Gosub() routine was called from.
exten => s,1,Read(input,get-input)
exten => s,n,Gosub(validate,1)
exten => s,n,Dial(SIP/${input})
; Ensure that input is between 400 and 499
exten => validate,1,GotoIf($[ ${input} > 499 ]?error,1)
exten => validate,n,GotoIf($[ ${input} < 400 ]?error,1)
exten => validate,n,Return
exten => error,1,StackPop()
exten => error,2,Goto(s,1)Name
StartMusicOnHold() — Starts music on hold
Plays hold music specified by
class, as configured in musiconhold.conf. If omitted, the default
music class for the channel will be used. You can use the CHANNEL(musicclass)
function to set the default music class for the channel.
Returns immediately.
; transfer telemarketers to this extension to keep them busy
exten => 123,1,Answer()
exten => 123,2,Playback(tt-allbusy)
exten => 123,3,StartMusicOnHold(default)
exten => 123,4,Wait(600)
exten => 123,5,StopMusicOnHold()Name
StopMixMonitor() — Stops monitoring a channel
Name
StopMonitor() — Stops monitoring a channel
Name
StopPlaytones() — Stops playing a tone list
Name
StopMusicOnHold() — Stops music on hold
Ends playing music on hold on a channel. If music on hold was not already playing, has no effect.
; transfer telemarketers to this extension to keep them busy
exten => 123,1,Answer()
exten => 123,2,Playback(tt-allbusy)
exten => 123,3,StartMusicOnHold(default)
exten => 123,4,Wait(600)
exten => 123,5,StopMusicOnHold()
Name
System() — Executes an operating system command
Executes a command in the
underlying operating system. This application sets a channel variable
named SYSTEMSTATUS to either FAILURE or SUCCESS, depending on whether or not Asterisk
was successfully able to run the command.
This application is very similar to the TrySystem() application, except that it will
return -1 if it is unable to execute
the system command, whereas the TrySystem() application will always return
0.
exten => 123,1,System(echo hello > /tmp/hello.txt)
Name
Transfer() — Transfers the caller to a remote extension
Requests that the remote caller be transferred to the
given (optional Technology and)
destination. If the
Technology is set to IAX2, SIP, Zap, etc.,
then transfer will happen only if the incoming call is of the same
channel type.
Upon completion, this application sets a channel variable named
TRANSFERSTATUS to one of the
following values:
-
SUCCESS The transfer was successful.
-
FAILURE The transfer was not successful.
-
UNSUPPORTED The transfer was not supported by the underlying channel driver.
If the options parameter is set to the
letter j and the transfer is
not supported or successful, and there exists a
priority n+101 (where n is the current priority), that priority will
be taken next.
; transfer calls from extension 123 to extension SIP/123@otherserver
exten => 123,1,Transfer(SIP/123@otherserver)
Name
TryExec() — Tries to execute an Asterisk application
Attempts to run the specified Asterisk application.
This application is very similar to the Exec() application, except that it always
returns normally, whereas the Exec()
application will act as if the underlying application was natively
called, including exit status. This application can be used to catch a
condition that would normally cause the underlying application to exit
abnormally.
exten => 123,1,TryExec(VMAuthenticate(@default))
Name
TrySystem() — Tries to execute an operating system command
Attempts to execute a command
in the underlying operating system. The result of the
command will be placed in the SYSTEMSTATUS channel variable and will be one
of the following:
-
FAILURE The specified
commandcould not be executed.-
SUCCESS The specified
commandexecuted successfully.-
APPERROR The specified
commandexecuted, but returned an error code.
This application is very similar to the System() application, except that it always
returns normally, whereas the System() application will return abnormally if
it is unable to execute the system command.
exten => 123,1,TrySystem(echo hello > /tmp/hello.txt)
Name
UnpauseMonitor() — Resumes monitoring of a channel
Resumes monitoring a channel, after being suspended by
PauseMonitor().
exten => 123,1,Answer()
exten => 123,n,Monitor(wav,monitor_test)
exten => 123,n,Playback(demo-congrats)
; temporarily pause the monitoring while we gather some secret info
exten => 123,n,PauseMonitor()
exten => 123,n,Read(NEWPASS,vm-newpassword)
exten => 123,n,SayDigits(${NEWPASS})
; unpause the recording and continue recording the call
exten => 123,n,UnpauseMonitor()
exten => 123,n,Dial(${JOHN})Name
UnpauseQueueMember() — Unpauses a queue member
Unpauses (resumes calls to) a queue member. This is the
counterpart to PauseQueueMember(),
and it operates exactly the same way, except it unpauses instead of
pausing the given interface.
Upon completion, this application sets a channel variable named
UPQMSTATUS to either UNPAUSED or NOTFOUND.
If the options parameter is set to the
letter j and the queue member can not
be found, and there exists a priority n+101 (where n is the current priority), control of the
call will continue at that priority
exten => 123,1,PauseQueueMember(myqueue,SIP/300)
exten => 124,1,UnpauseQueueMember(myqueue,SIP/300)
Name
UserEvent() — Sends an arbitrary event to the Manager Interface
Sends an arbitrary event to the Manager Interface, with an optional body representing additional arguments. The format of the event is:
Event: UserEvent UserEvent:eventnamebody
If the body is not specified, only the Event and UserEvent fields will be present in the Manager event.
exten => 123,1,UserEvent(BossCalled,${CALLERID(name)} has called the boss!)
exten => 123,2,Dial(${BOSS})Name
Verbose() — Sends arbitrary text to verbose output
Sends the specified message to
verbose output. The level must be an integer
value. If not specified, level defaults to
0.
exten => 123,1,Verbose(Somebody called extension 123)
exten => 123,2,Playback(extension)
exten => 123,3,SayDigits(${EXTEN})Warning
The optional argument level is not so
optional, if you include the delimiter | in your invocation of Verbose(). If the delimiter is found,
Verbose() assumes that you meant to
specify level (and chops off everything
preceding the initial |). It is
therefore probably best to get in the habit of always specifying the
level.
Name
VMAuthenticate() — Authenticates the caller from voicemail passwords
Behaves identically to the Authenticate() application, with the exception
that the passwords are taken from voicemail.conf.
If mailbox is
specified, only that mailbox’s password will be considered valid. If
mailbox is not specified, the channel
variable AUTH_MAILBOX will be set
with the authenticated mailbox.
If the options parameter is set to the
letter s, Asterisk will skip the
initial prompts.
; authenticate off of any mailbox password in the default voicemail context
; and tell us the matching mailbox number
exten => 123,1,VMAuthenticate(@default)
exten => 123,2,SayDigits(${AUTH_MAILBOX})Name
VoiceMail() — Leaves a voicemail message in the specified mailbox
Leaves voicemail for a given
mailbox (must be configured in voicemail.conf). If more than one mailbox is
specified, the greetings will be taken from the first mailbox specified.
Options:
- s
Skip the playback of instructions.
- u
Play the user’s unavailable greeting.
- b
Play the user’s busy greeting.
- g(
num) Amplify the recording by
numdecibels (dB).- j
If the requested mailbox does not exist, and there exists a priority
n+101 (wherenis the current priority), that priority will be taken next.
If the caller presses 0 (zero)
during the prompt, the call jumps to the o (lowercase letter o)
extension in the current context, if operator=yes was specified in voicemail.conf.
If the caller presses * during
the prompt, the call jumps to extension a in the current context. This is often used
to send the caller to a personal assistant.
Upon completion, this application sets a channel variable named
VMSTATUS. It will contain one of the
following values:
-
SUCCESS The call was successfully sent to voicemail.
-
USEREXIT The caller exited from the voicemail system.
-
FAILED The system was not able to send the call to voicemail.
; send caller to unavailable voicemail for mailbox 123
exten => 123,1,VoiceMail(123@default,u)
Name
VoiceMailMain() — Enters the voicemail system
Enters the main voicemail system for the checking of
voicemail. Passing the mailbox argument will
stop the voicemail system from prompting the user for the mailbox
number. You should also specify a voicemail
context.
The options string can contain zero or
more of the following options:
-
s Skip the password check.
-
p This option tells Asterisk to interpret the
mailboxas a number that should be prepended to the mailbox entered by the caller. This is most often used when many voicemail boxes for different companies are hosted on the same Asterisk server.-
g(gain) When recording voicemail messages, increase the volume by
gain. This option should be specified in an integer number of decibels.-
a(folder) Skip the folder prompt and go directly to the specified
folder. This option defaults to theINBOX.
; go to voicemail menu for mailbox 123 in the default voicemail context
exten => 123,1,VoiceMailMain(123@default)
Name
Wait() — Waits for a specified number of seconds
Waits for the specified number of
seconds. You can pass fractions of a second.
For example, setting seconds to 1.5 would make the dialplan wait 1.5 seconds
before going on to the next priority in the dialplan.
; wait 1.5 seconds before playing the prompt
exten => s,1,Answer()
exten => s,2,Wait(1.5)
exten => s,3,Background(enter-ext-of-person)Name
WaitExten() — Waits for an extension to be entered
Waits for the user to enter a new extension for the
specified number of seconds. You can pass fractions of a second (e.g.,
1.5 = 1.5 seconds). If seconds is
unspecified, the default extension timeout will be used. Most often,
this application is used without specifying the
seconds options.
The options parameter may be set to the
following option:
-
m[(class)[ Provide music on hold to the caller while waiting for an extension. Optionally, you can specify the music on hold
classwithin parentheses.
; wait 15 seconds for the user to dial an extension
exten => s,1,Answer()
exten => s,2,Playback(enter-ext-of-person)
exten => s,3,WaitExten(15)
Name
WaitForRing() — Waits the specified number of seconds for a ring
Name
WaitForSilence() — Waits for a specified amount of silence
Waits for repeat instances of
silencerequired milliseconds of silence. If
repeat is omitted, the application waits for
a single instance of silencerequired
milliseconds of silence.
If the timeout option is specified,
this application will return to the next priority in the dialplan after
the specified number of seconds, even if silence has not been
detected.
Warning
Please use the timeout with caution,
as it may defeat the purpose of this application, which is to wait
indefinitely until silence is detected on the line. You may want to
set the timeout to a high value only to avoid an infinite loop in
cases where silence is never detected.
This applications sets a channel variable named WAITSTATUS to either SILENCE or TIMEOUT.
; wait for three instances of 300 ms of silence
exten => 123,WaitForSilence(300,3)
Name
WaitMusicOnHold() — Waits the specified number of seconds, playing music on hold
Plays hold music for the specified number of seconds. If no hold music is available, the delay will still occur but with no sound.
Returns 0 when done, or
-1 on hangup.
; allow caller to hear Music on Hold for five minutes
exten => 123,1,Answer()
exten => 123,2,WaitMusicOnHold(300)
exten => 123,3,Hangup()Name
While() — Starts a while
loop
Starts a while loop.
Execution will return to this point when EndWhile() is called, until
expr is no longer true. If a condition is met
causing the loop to exit, Asterisk continues execution of the dialplan
on the next priority after the corresponding EndWhile().
exten => 123,1,Set(COUNT=1)
exten => 123,2,While($[ ${COUNT} < 5 ])
exten => 123,3,SayNumber(${COUNT})
exten => 123,4,Set(COUNT=$[${COUNT} + 1])
exten => 123,5,EndWhile()Name
Zapateller() — Uses a special information tone to block telemarketers
Name
ZapBarge() — Barges in on (monitors) a Zap channel
Barges in on a specified Zap
channel, or prompts if one is not specified.
The people on the channel won’t be able to hear you and will have no
indication that their call is being monitored.
If channel is not specified, you will
be prompted for the channel number. Enter 4# for Zap/4, for example.
exten => 123,1,ZapBarge(Zap/2)
exten => 123,2,Hangup()Name
ZapRAS() — Executes the Zaptel ISDN Remote Access Server
Executes an ISDN RAS server using pppd on the current channel. The channel must be a clear channel (i.e., PRI source) and a Zaptel channel to be able to use this function (no modem emulation is included).
Your pppd must be patched to be Zaptel-aware.
args is a pipe-delimited list of arguments.
This application is for use only on ISDN lines, and your kernel
must be patched to support ZapRAS().
You must also have ppp support in your
kernel.
exten => 123,1,Answer()
exten => 123,1,ZapRas(debug|64000|noauth|netmask|255.255.255.0|
10.0.0.1:10.0.0.2)
Name
ZapScan() — Scans Zap channels to monitor calls
[163] The fact that Asterisk will happily connect IAX, SIP, H.323,
Skinny, PRI, FX(O/S), and anything else is amazing, but possibly the
most amazing of all is the Local channel. By allowing a single
Dial() command to connect to
multiple Local channels, one Dial() event can trigger a multitude of
completely independent and unique actions in other parts of the
dialplan. The power of this concept is truly revolutionary and has
to be experienced to be believed.
Table of Contents
- ANSWER
- CHANNEL STATUS
- DATABASE DEL
- DATABASE DELTREE
- DATABASE GET
- DATABASE PUT
- EXEC
- GET DATA
- GET FULL VARIABLE
- GET OPTION
- GET VARIABLE
- HANGUP
- NoOp
- RECEIVE CHAR
- RECORD FILE
- SAY ALPHA
- SAY DATE
- SAY DATETIME
- SAY DIGITS
- SAY NUMBER
- SAY PHONETIC
- SAY TIME
- SEND IMAGE
- SEND TEXT
- SET AUTOHANGUP
- SET CALLERID
- SET CONTEXT
- SET EXTENSION
- SET MUSIC ON
- SET PRIORITY
- SET VARIABLE
- STREAM FILE
- TDD MODE
- VERBOSE
- WAIT FOR DIGIT
Name
GET VARIABLE —
If the variable is set, returns its value in parentheses.
This command does not understand complex variables or built-in
variables; use the GET FULL VARIABLE
command if your application requires these types of variables.
Return values:
-
0 No channel, or variable not set
-
1 (value) Value is retrieved (and is included in parentheses)
Name
RECEIVE CHAR —
Receives a character of text on a channel. Specify a
timeout in milliseconds as the maximum amount
of time to wait for input, or set to 0 to wait infinitely. Note that most channels
do not support the reception of text.
Return values:
-
-1 (hangup) Failure or hangup
-
char(timeout) Timeout
-
value ASCII value of character, in decimal
Name
RECORD FILE —
Records the channel audio to the specified file until the
reception of a defined escape (DTMF) digit. The
format argument defines the type of file to
be recorded (wav, gsm, etc.). The
timeout argument is the maximum number of
milliseconds the recording can last, and can be set to -1 for no timeout. The
offset_samples argument is optional; if
provided, it will seek to the offset without exceeding the end of the
file. The BEEP argument will play a
beep to the user to signify the start of the record operation. The
silence argument is the number of seconds of
silence allowed before the function returns despite the lack of DTMF
digits or reaching the timeout. The silence value must be preceded by
s= and is also optional.
Return values:
-
-1 Failure
-
0 Successful recording
Name
SAY DATE —
Says a given date, returning
early if any of the given DTMF digits are received on the channel. The
date is the number of seconds elapsed since
00:00:00 on January 1, 1970, Coordinated Universal Time (UTC).
Return values:
-
-1 Error or hangup
-
0 Playback completed without being interrupted by an escape digit
-
value ASCII value of digit (if pressed), in decimal
Name
SAY DATETIME —
Says the given datetime,
returning early if any of the given DTMF digits are received on the
channel. The datetime is the number of
seconds elapsed since 00:00:00 on January 1, 1970, Coordinated Universal
Time (UTC). The optional format argument is
the format in which the time should be spoken. (See
voicemail.conf for a complete description of the
format options.) format defaults to "ABdY 'digits/at' IMp". Acceptable values for
timezone can be found in
/usr/share/zoneinfo/.
timezone defaults to the default time zone of
the Asterisk server.
Return values:
-
-1 Error or hangup
-
0 Playback completed without being interrupted by an escape digit
-
value ASCII value of digit (if pressed), in decimal
Name
SAY TIME —
Says the indicated time,
returning early if any of the given DTMF digits are received on the
channel. The time is the number of seconds
elapsed since 00:00:00 on January 1, 1970, Coordinated Universal Time
(UTC).
Return values:
-
-1 Error or hangup
-
0 Playback completed without being interrupted by an escape digit
-
value ASCII value of digit (if pressed), in decimal
Name
SEND TEXT —
Sends the specified text on the current channel. Most channels do not support the transmission of text. Text consisting of more than one word should be placed in quotes, since the command accepts only a single argument.
Return values:
-
-1 Error or hangup
-
0 Text sent, or channel does not support sending text
Name
STREAM FILE —
Play the audio file indicated by
filename, allowing playback to be interrupted
by the digits specified by escape_digits, if
any. Use double quotes for the digits if you wish none to be permitted.
If sample_offset is provided, the audio will
seek to sample_offset before playback
starts.
Remember, the file extension must not be included in the filename.
Return values:
-
0 Playback completed with no digit pressed
-
-1 Error or hangup
-
value ASCII value of digit (if pressed), in decimal
Table of Contents
- modules.conf
- adsi.conf
- adtranvofr.conf
- agents.conf
- alarmreceiver.conf
- alsa.conf
- amd.conf
- asterisk.conf
- cdr.conf
- cdr_manager.conf
- cdr_odbc.conf
- cdr_pgsql.conf
- cdr_tds.conf
- codecs.conf
- dnsmgr.conf
- dundi.conf
- enum.conf
- extconfig.conf
- extensions.conf
- extensions.ael
- features.conf
- festival.conf
- followme.conf
- func_odbc.conf
- gtalk.conf
- http.conf
- iax.conf
- iaxprov.conf
- indications.conf
- jabber.conf
- logger.conf
- manager.conf
- meetme.conf
- mgcp.conf
- modem.conf
- musiconhold.conf
- osp.conf
- oss.conf
- phone.conf
- privacy.conf
- queues.conf
- res_odbc.conf
- res_snmp.conf
- rpt.conf
- rtp.conf
- say.conf
- sip.conf
- sip_notify.conf
- skinny.conf
- sla.conf
- smdi.conf
- udptl.conf
- users.conf
- voicemail.conf
- vpb.conf
- zapata.conf
- zaptel.conf
Tip
This appendix contains a reference to the configuration files not covered in the previous appendices. If you are looking for VoIP channel configurations, refer to Appendix A, VoIP Channels. For a dialplan reference, you’ll want to use Appendix B, Application Reference.
A configuration file is required for each Asterisk module you wish to use. These .conf files contain channel definitions, describe internal services, define the locations of other modules, or relate to the dialplan. You do not need to configure all of them to have a functioning system, only the ones required for your configuration. Although Asterisk ships with samples of all of the configuration files, it is possible to start Asterisk without any of them. This will not provide you with a working system, but it clearly demonstrates the modularity of the platform.
If no .conf files are found, Asterisk will make some decisions with respect to modules. For example, the following steps are always taken:
The Asterisk Event Logger is loaded, and events are logged to /var/log/asterisk/event_log.
Manager actions are registered.
The PBX core is initialized.
The RTP port range is allocated from 5,000 through 31,000.
Several built-in applications are loaded, such as
Answer(),Background(),GotoIf(),NoOp(), andSet().The dynamic loader is started; this is the engine responsible for loading modules defined in modules.conf.
This appendix starts with an in-depth look at the modules.conf configuration file. We’ll then briefly examine all the other files that you may need to configure for your Asterisk system.
The modules.conf file controls which
modules are loaded or not loaded at Asterisk startup. This is done through
the use of the load => or noload => constructs.
Tip
This file is a key component to building a secure Asterisk installation: best practice suggests that only required modules be loaded.
The modules.conf file always starts with the
[modules] header. The autoload statement tells Asterisk whether to
automatically load all modules contained within the modules directory or
to load only those modules specifically defined by load => statements. We recommend you manually
load only those modules you need, but many people find it easier to let
Asterisk attempt to autoload whatever
it finds in /usr/lib/asterisk/modules. You can then
exclude[164] certain modules with noload
=> statements.
Here’s a sample modules.conf file:
[modules]
autoload=no ; set this to yes and Asterisk will load any
; modules it finds in /usr/lib/asterisk/modules
load => res_adsi.so
load => pbx_config.so ; Requires: N/A
load => chan_iax2.so ; Requires: res_crypto.so, res_features.so
load => chan_sip.so ; Requires: res_features.so
load => codec_alaw.so ; Requires: N/A
load => codec_gsm.so ; Requires: N/A
load => codec_ulaw.so ; Requires: N/A
load => format_gsm.so ; Requires: N/A
load => app_dial.so ; Requires: res_features.so, res_musiconhold.soSince we assume Asterisk is built on Linux, all the module names we use end in a .so extension. However, this may not be the case if you have built Asterisk on a different operating system.
As of this writing, there are eight module types: resources, applications, Call Detail Record database connectors, channels, codecs, formats, PBX modules, and standalone functions. Let’s take a look at each of them.
The Analog Display Services Interface (ADSI) was designed to allow telephone companies to deliver enhanced services across analog telephone circuits. In Asterisk, you can use this file to send ADSI commands to compatible telephones. Please note that the phone must be directly connected to a Zapata channel. ADSI messages cannot be sent across a VoIP connection to a remote analog phone.
The res_adsi.so module is required for the
Voicemail() application; however, the
adsi.conf file is not necessarily used. Detailed
information about ADSI is not publicly available, and documentation needs
to be purchased from Telcordia.
Prior to Voice over IP, Voice over Frame Relay (VoFR) enjoyed brief fame as a means of carrying packetized voice. Supporting VoFR through Adtran equipment is part of the history of Asterisk.
This feature is no longer popular in the community, though, so it may be difficult to find support for it.
This file allows you to create and manage agents for your
call center. If you are using the Queue() application, you may want to configure
agents for the queue. The agents.conf file is used to
configure the AGENT channel driver.
The [general] section in
agents.conf currently contains only two parameters.
The persistentagents parameter tells Asterisk
whether or not to save the status of agents who use the callback feature
of queues in the local Asterisk database. If set to yes, a logged-in remote agent will then remain
logged in across a reboot (unless removed from the database through some
other means). The multiplelogin
parameter tells Asterisk whether or not multiple agents can log in from
the same extension.
The following parameters, which are specified in the [agents] section, are used to define agents and
the way the system interacts with them. The settings apply to all agents,
unless otherwise specified in the individual agent definitions:
-
maxlogintries The maximum number of times an agent may attempt to log in. Defaults to 3.
-
autologoff Accepts an argument (in seconds) defining how long an agent channel should ring for before the agent is deemed unavailable and logged off.
-
autologoffunavail Define
autologoffunavailto have agents automatically logged out when theDial()application returns aCHANUNAVAILstatus while trying to dial that agent. Default is “no”.-
ackcall Accepts the arguments
yesandno. If set toyes, requires a callback agent to acknowledge log in by pressing the#key after logging in. This works in conjunction with theAgentCallbackLogin()application.-
endcall If set to
yes, allows an agent to hang up a call by pressing the*key. Defaults toyes. Set this tonoto have Asterisk do nothing when the agent presses the*key.-
wrapuptime You can configure this parameter to allow agents a few seconds of downtime after completing a call before the queue presents them with another call. This setting is measured in milliseconds.
-
musiconhold =>class Accepts a music-on-hold class as its argument. This setting applies to all agents.
-
agentgoodbye Defines the default goodbye sound for agents.
-
updatecdr Accepts the arguments
yesandno. Used to define whether the source channel in the CDRs should be set toagent/agent_idto determine which agent generated the calls.-
group Defines the groups to which an agent belongs, specified with integers. Specify that an agent belongs to multiple groups by separating the integers with commas.
-
recordagentcalls Accepts the arguments
yesandno. Defines whether or not agent calls should be recorded.-
recordformat Defines the format to record files in. The argument specified should be
wav,gsm, orwav49. The default recording format iswav.-
urlprefix Accepts a string as its argument. The string can be formed as a URL and is appended to the start of the text to be added to the name of the recording.
-
savecallsin Accepts a filesystem path as its argument. Allows you to override the default path of /var/spool/asterisk/monitor/ with one of your choosing.
-
custom_beep Accepts a filename as its argument. Can be used to define a custom notification tone to signal to an always-connected agent that there is an incoming call.
The final parameter is used to define agents. Just like in the
zapata.conf file, configuration parameters are
inherited from above the agent =>
definition. Agents are defined with the following format:
agent =>agent_id,agent_password,name
For example, we can define agent Happy Tempura with the agent ID 1000 and password 1234, as follows.
agent => 1000,1234,Happy Tempura
Be aware that an agents.conf file is a complement to the queue configuration process. The most critical configuration file for your queues is queues.conf. You can configure a very basic queue without agents.conf.
Warning
The AlarmReceiver()
application is not approved by Underwriter’s Laboratory (UL) and should
not be used as the primary or sole means of receiving alarm messages or
events. This application is not guaranteed to be reliable, so don’t
depend on it unless you have extensively tested it. Use of this
application without extensive testing may place your life and/or
property at risk.
The alarmreceiver.conf file is used by the
AlarmReceiver() application, which
allows Asterisk to accept alarms using the SIA (Ademco) Contact ID
protocol. When a call is received from an alarm panel, it should be
directed to a context that calls the AlarmReceiver() application. In turn, AlarmReceiver() will read the
alarmreceiver.conf configuration file and perform the
configured actions as required. All parameters are specified under the
[general] heading.
The sample configuration file will contain the current settings for this application and is very well documented.
The alsa.conf file is used to configure Asterisk to use the Advanced Linux Sound Architecture (ALSA) to provide access to a sound card, if desired. You can use this file to configure the CONSOLE channel, which is most commonly used to create an overhead paging system (although, as with any other channel, there are all kinds of creative ways this can be used). Keep in mind that the usefulness of the ALSA channel by itself is limited due to its lack of a user interface.[165]
This is the configuration for the answering matching detection
application in Asterisk, called AMD().
It is used to adjust the different parameters for detecting an answering
machine based on items such as initial silence, greeting length, silence
after the greeting, and so forth.
The asterisk.conf file defines the
locations for the configuration files, the spool directory, and the
modules, as well as a location to write logfiles to. The default settings
are recommended unless you understand the implications of changing them.
The asterisk.conf file is generated automatically
when you run the make samples command,
based on information it collects about your system. It will contain a
[directories] section such as the
following:
[directories] astetcdir => /etc/asterisk astmoddir => /usr/lib/asterisk/modules astvarlibdir => /var/lib/asterisk astdatadir => /var/lib/asterisk astagidir => /var/lib/asterisk/agi-bin astspooldir => /var/spool/asterisk astrundir => /var/run astlogdir => /var/log/asterisk
Additionally, you can specify an [options] section, which will allow you to
define startup options (command-line switches) in the configuration file.
The following example shows the available options and the command-line
switches that they effectively enforce:
[options]
;Under "options" you can enter configuration options
;that you also can set with command line options
verbose = 0 ; Verbosity level for logging (-v)
debug = 3 ; Debug: "No" or value (1-4)
nofork=yes | no ; Background execution disabled (-f)
alwaysfork=yes | no ; Always background, even with -v or -d (-F)
console= yes | no ; Console mode (-c)
highpriority = yes | no ; Execute with high priority (-p)
initcrypto = yes | no ; Initialize crypto at startup (-i)
nocolor = yes | no ; Disable ANSI colors (-n)
dumpcore = yes | no ; Dump core on failure (-g)
quiet = yes | no ; Run quietly (-q)
timestamp = yes | no ; Force timestamping in CLI verbose output (-T)
runuser = asterisk ; User to run asterisk as (-U) NOTE: will require changes to
; directory and device permissions
rungroup = asterisk ; Group to run asterisk as (-G)
internal_timing = yes | no ; Enable internal timing support (-I)
; These options have no command line equivalent
cache_record_files = yes | no ; Cache record() files in another directory until
; completion
record_cache_dir = <dir>
transcode_via_sln = yes | no ; Build transcode paths via SLINEAR
transmit_silence_during_record = yes | no ; send SLINEAR silence while channel is
; being recorded
maxload = 1.0 ; The maximum load average we accept calls for
maxcalls = 255 ; The maximum number of concurrent calls you want
; to allow
execincludes = yes | no ; Allow #exec entries in configuration files
dontwarn = yes | no ; Don't over-inform the Asterisk sysadm, he's a guru
systemname = <a_string> ; System name. Used to prefix CDR uniqueid and to
; fill ${SYSTEMNAME}
languageprefix = yes | no ; Should language code be last component of sound file
; name or first?
; When off, sound files are searched as
; <path>/<lang>/<file>
; When on, sound files are search as <lang>/<path>/<file>
; (only affects relative paths for sound files)The cdr.conf file is used to enable
call detail record logging to a flat file or a database. Storing call
records is useful for all sorts of purposes including billing, fraud
prevention, QoS evaluations, and more. The cdr.conf
file contains some general parameters that are not specific to any
particular database, but rather indicate how Asterisk should handle the
passing of information to the database. All options are under the [general] heading of the
cdr.conf file:
-
enable Accepts the arguments
yesandno. Specifies whether or not to use CDR logging. If set tono, this will override any CDR module explicitly loaded. The default isyes.-
batch Accepts the arguments
yesandno. Allows Asterisk to write data to a buffer instead of writing to the database at the end of every call, to reduce load on the system.-
size Sets the maximum number of CDRs to accumulate in the buffer before posting to the backend CDR storage systems. This setting only takes effect if the
batchsetting is set toyes. This setting defaults to 100 records.-
time Accepts an integer (in seconds) as its argument. Sets the number of seconds before Asterisk flushes the buffer and writes the CDRs to the database, regardless of the number of records in the buffer (as defined by
size). The default is 300 seconds (5 minutes).-
scheduleronly Accepts the arguments
yesandno. If you are generating a massive volume of CDRs on a system that is pushing them to a remote database, settingscheduleronlytoyesmay be of benefit. Since the scheduler cannot start a new task until the current one is finished, slow CDR writes may adversely affect other processes needing the scheduler. This setting will instruct Asterisk to handle CDR writes in a new thread, essentially assigning a dedicated scheduler to this function. In normal operation, this would yield very little benefit.-
safeshutdown Accepts the arguments
yesandno. Settingsafeshutdowntoyeswill prevent Asterisk from shutting down completely until the buffer is flushed and all information is written to the database. If this parameter is set tonoand you shut down Asterisk with information still residing in the buffers, that information will likely be lost.-
endbeforehexten Normally, CDR records are not closed out until after all extensions are finished executing. By enabling this option, the CDR will be ended before executing the
hextension so that CDR values such asendandbillsecmay be retrieved inside of this extension. Defaults tono.
The rest of cdr.conf contains
setup for several of the backend CDR engines. See the sample cdr.conf for more information.
The cdr_manager.conf file simply
contains a [general] heading and a
single option, enabled, which you can
use to specify whether or not the Asterisk Manager API generates CDR
events. If you want CDR events to be generated, you will need the
following lines in your cdr_manager.conf file:
[general] enabled=yes
The Manager API will then output CDR events containing the following fields:
Event: Cdr AccountCode: Source: Destination: DestinationContext: CallerID: Channel: DestinationChannel: LastApplication: LastData: StartTime: AnswerTime: EndTime: Duration: BillableSeconds: Disposition: AMAFlags: UniqueID: UserField:
Asterisk can store CDR data in a local or remote database via the ODBC interface. The cdr_odbc.conf file contains the information Asterisk needs to connect to the database. The cdr_odbc.so module will attempt to load the cdr_odbc.conf file, and if information is found for connecting to a database, the CDR data will be recorded there.
Asterisk can store CDR data in a PostgreSQL database via the cdr_pgsql.so module. When the module is loaded the necessary information will be read from the cdr_pgsql.conf file, and Asterisk will connect to the PostgreSQL database to write and store CDR data.
Asterisk can also store CDR data to a FreeTDS database (including MS SQL) with the use of the cdr_tds.so module. The configuration file cdr_tds.conf is read once the module is loaded. Upon a successful connection, CDR data will be written to the database.
Most codecs do not have any configurable parameters; they are what they are, and that’s all they are.
Some codecs, however, are capable of behaving in different ways. This primarily means that they can be optimized for a particular goal, such as cutting down on latency, making best use of a network, or perhaps delivering high quality audio.
The codecs.conf file is fairly new in Asterisk, and as of this writing it allows configuration of Speex parameters only. The settings are self-explanatory, as long as you are familiar with the Speex protocol (see http://www.speex.org).
codecs.conf also allows you to configure Packet
Loss Concealment (PLC). You need to define a [plc] section and indicate genericplc => true. This will cause Asterisk
to attempt to interpolate any packets that are missed. (Enabling this
functionality will incur a small performance penalty.)
This file is used to configure whether Asterisk should perform DNS lookups on a regular basis, and how often those lookups should be performed.
The DUNDi protocol is used to dynamically look up the VoIP address of a phone number on a network, and to connect to that address. Unlike the ENUM standard, DUNDi has no central authority. The dundi.conf file contains DUNDi extensions used to control what is advertised; it also contains the peers to whom you will submit lookup requests and from whom you will accept lookup requests. The DUNDi protocol was explored in Chapter 14, Potpourri.
The Electronic Numbering (ENUM) system is used in conjunction with the Internet’s DNS system to map E.164 ITU standard (ordinary telephone) numbers to email addresses, web sites, VoIP addresses, and the like. An ENUM number is created in DNS by reversing the phone number, separating each digit with a period, and appending e164.arpa (the primary DNS zone). If you want Asterisk to perform ENUM lookups, configure the domain(s) in which to perform the lookups within the enum.conf file. In addition to the official e164.arpa domain, you can have Asterisk perform lookups in the publicly accessible e164.org domain.
Asterisk can write configuration data to and load configuration data from a database using the external configuration engine (also known as realtime). This enables you to map external configuration files (static mappings) to a database, allowing the information to be retrieved from the database. It also allows you to map special runtime entries that permit the dynamic creation and loading of objects, entities, peers, and so on without a reload. These mappings are assigned and configured in the extconfig.conf file, which is used by both res_odbc and realtime.
At the center of every good universe is a dialplan. The extensions.conf file is the means by which you tell Asterisk how you want calls to be handled. The dialplan contains a list of instructions that, unlike traditional telephony systems, is entirely customizable. The dialplan is so important that rather than defining it in this appendix, we have dedicated all of Chapters 5 and 6, as well as Appendix B, Application Reference, to this topic. Go forth, read, and enjoy!
This file is the equivalent of extensions.conf, only it’s for dialplans
written in the AEL language. When Asterisk loads the dialplan, it reads
the AEL dialplan from extensions.ael
and merges it with the dialplan from extensions.conf.
features.conf, the file formally known as parking.conf, contains configuration information related to call parking and call transfers. Call parking configuration options include:
The extension to dial to park calls (
parkext =>)The extension range to park calls in (
parkpos =>)Which context to park calls in (
context =>)How long a call can remain parked for before ringing the extension that parked it (
parkingtime =>)The sound file played to the parked caller when the call is removed from parking (
courtesytone =>)ADSI parking announcements (
asdipark=yes|no)
In addition to the call parking options, in this file you can configure the button mappings for blind transfers, attended transfers, one-touch recording, disconnections, and the pickup extension (which allows you to answer a remotely ringing extension).
The Festival text-to-speech engine allows Asterisk to read text files to the end user with a computer-generated voice. Festival is covered in Chapter 14, Potpourri.
The term findme/follow me is intended to give the impression that a
PBX system has the intelligence to locate a user wherever they may be,
such that their calls will find them and follow them. The followme.conf file is used to configure
theFollowMe() dialplan application.
The func_odbc dialplan function was one of the
most anticipated capabilities to have been added to Asterisk 1.4. This
function provides a simple mechanism with which to connect to ODBC
databases through the dialplan. The SQL queries are defined in this
configuration file, and a dialplan function is automatically
created.
This configuration file is used to specify the parameters for connectivity with Google Talk.
Asterisk has a very simple HTTP daemon built into it, which is used by the Asterisk GUI and AJAM. This functionality is discussed in Chapter 11, The Asterisk GUI Framework.
Similar to sip.conf, the iax.conf file is where you configure options related to the IAX protocol. Your end devices and service providers are also configured here. The iax.conf file is covered in detail in Appendix A, VoIP Channels.
This file is used by Asterisk to allow the system to provision and upgrade the firmware on an IAXy device.
The indications.conf file is used to tell Asterisk how to generate the various telephone sounds common in different parts of the world; a dial tone in England sounds very different from a dial tone in Canada, but your Asterisk system will be pleased to make the sounds you want to hear. This file consists of a list of sounds a telephone system might need to produce (dial tone, busy signals, and so forth), followed by the frequencies used to generate those sounds.
By default (and without an indications.conf
file), Asterisk will use the tones common in North America. You can change
the default country for your system by specifying the two-letter country
code in the [general] section.
Supported country codes are listed in the
indications.conf.sample file located in
/usr/src/asterisk/configs. If you have the required
information, your country can easily be added. Here’s what the
configuration for North America looks like:
[general] country=us ; [us] description = United States / North America ringcadance = 2000,4000 dial = 350+440 busy = 480+620/500,0/500 ring = 440+480/2000,0/4000 congestion = 480+620/250,0/250 callwaiting = 440/300,0/10000 dialrecall = !350+440/100,!0/100,!350+440/100,!0/100,!350+440/100,!0/100,350+440 record = 1400/500,0/15000 info = !950/330,!1400/330,!1800/330,0
The jabber.conf file specifies the information needed to allow Asterisk to interact with an XMPP (Jabber) server.
The logger.conf file specifies the type
and verbosity of messages logged to the various logfiles in the
/var/log/asterisk/ directory. It has two sections,
[general] and [logfile].
Settings under the [general]
section are used to customize the output of the logs (and can safely be
left blank, as the defaults serve most people very well). However, if
you love to customize such things, read on.
You can define exactly how you want your timestamps to look
through the use of the dateformat
parameter:
dateformat=%F %T
The Linux manpage for strftime(3) lists all of the ways you can do
this.
If you want to append your system’s hostname to the names of the
logfiles, set appendhostname=yes.
This can be useful if you have a lot of systems delivering logfiles to
you.
If for some reason you do not want to log events from your queues,
you can set queue_log=no.
If generic events do not interest you, instruct Asterisk to omit
them from the logfiles by setting event_log=no.
The [logfiles] section defines
the types of information you wish to log. There are multiple ranks for
the various bits of information that will be logged, and it can be
desirable to separate log entries into different files. The general
format for lines in the [logfiles]
section is filename => levels, where
filename is the name of the file to save the
logged information to and levels are the
types of information you wish to save.
Tip
Using console for the
filename is a special exception that allows
you to control the type of information sent to the Asterisk
console.
A sample [logfiles] section
might look like this:
[logfiles] console => notice,warning,error messages => notice,warning,error
You can specify logging of the following types of information:
-
debug Enabling debugging gives far more detailed output about what is happening in the system. For example, with debugging enabled, you can see what DTMF tones the users entered while accessing their voicemail boxes. Debugging information should be logged only when you are actually debugging something, as it will create massive logfiles very rapidly.
-
verbose When you connect to the Asterisk console and set a verbosity of
3or higher, you’ll see output on the console showing what Asterisk is doing. You can save this output to a logfile by adding a line such asverbose_log => verboseto your logger.conf file. Note that a high amount of verbosity can quickly eat up hard drive space.-
notice A notice is used to inform you of minor changes to the system, such as when a peer changes state. It is normal to see these types of messages, and the events they indicate generally have no adverse effects on the server.
-
warning A warning happens when Asterisk attempts to do something and is unsuccessful. These types of errors are usually not fatal, but they should be investigated, especially if a lot of them are seen.
-
error Errors are often related to Out of Memory errors. They generally indicate serious problems that may lead to Asterisk to crash or freeze.
The Asterisk Manager Interface is an API that external programs can use to communicate with and control Asterisk, much as you would do from the Asterisk console.
Warning
The Manager gives programs the ability to run commands and request
information from the Asterisk server. However, it is not very secure;
its authentication mechanism defaults to using plain-text passwords, and
all connected terminals default to receiving all events. The Asterisk
Manager should be used only on a trusted local area network, or locally
on the box. The permit and deny constructs allow you to restrict access
to certain extensions or subnets.
Many of the available graphical interfaces to Asterisk—such as the Flash Operator Panel—use the Manager to pull data and determine the status of applications. The manager.conf file defines the way programs authenticate with the Manager.
The Manager commands (which you can list by typing show
manager commands at the Asterisk console) have varying degrees
of privilege. You can control the read and write permissions for these
commands with the use of the read and
write options in the
manager.conf file.
Here’s a sample manager.conf file:
[general] enabled = no port = 5038 bindaddr = 0.0.0.0 [oreilly] secret = notvery deny=0.0.0.0/0.0.0.0 permit= 192.168.1.0/255.255.255.0 read = system,call,log,verbose,command,agent,user,config write = system,call,log,verbose,command,agent,user,config
For more information on the Asterisk Manager Interface, see Chapter 10, Asterisk Manager Interface (AMI) and Adhearsion.
MeetMe is one of the more remarkable applications in Asterisk. It allows you to set up predefined audio conference rooms. This rather simple concept has proven to be extremely expensive to implement in every other PBX, but what seems like a big deal to them is simple to Asterisk. Whether by using a dedicated server, or through the use of a service, Asterisk now delivers this functionality as a standard application.
MeetMe conferences can be created either dynamically, with the
d flag in the Dial() application, or statically in the
meetme.conf file. The format for creating conference
rooms is as follows:
conf =>conference_number[,pin][,administrator_pin]
All conferences must be defined under the [rooms] section header.
[rooms] conf => 4569 conf => 5060,54377017 conf => 3389,4242,1337 conf => 333,,2424
The Media Gateway Control Protocol (MGCP) has only primitive support in Asterisk. This is likely due to the fact that SIP has stolen the limelight from every other VoIP protocol (except IAX, of course). Because of this, you should attempt to use Asterisk’s MCGP channel in a production environment only if you are prepared to perform extensive testing, are willing to pay to have features and patches implemented within your time frames, and have in-house expertise with the protocol.
Having said that, we are not prepared to pronounce MGCP dead. SIP is not yet the panacea it has been touted as, and MGCP has proven itself to be very useful in carrier backbone environments. Many believe MGCP will fill a niche or void that has not yet been discovered, and we remain interested in it.
The modem.conf file is used by Asterisk to communicate with ISDN-BRI interfaces through the ISDN4Linux driver. Since ISDN4Linux lacks many core ISDN features, it is not generally used. For BRI, the most popular add-on seems to be chan_capi, available from http://www.junghanns.net.
The musiconhold.conf file is used to configure different classes of music and their locations for use in music-on-hold applications. Asterisk can play hold music in any native file formats. Asterisk can also makes use of a certain version of mpg123 to play MP3 files, but this is discouraged. You can specify arguments for a class, allowing you to use an external application to stream music either locally or over a network.
The Open Settlement Protocol (OSP) is officially documented in ETSI TS 101 321, a European Telecommunication Standards Institute (ETSI) document that came out of the work of the TIPHON working group. As far as we can tell, OSP is another attempt to apply old-style telecom thinking to disruptive technologies.
The oss.conf file is used to configure Asterisk to use the Open Sound System (OSS) driver to allow communications with the sound card via the CONSOLE channel. Note that ALSA is now the preferred interface for the CONSOLE channel.
The phone.conf file is used to configure a Quicknet PhoneJACK card. The PhoneJACK card seems to provide something like an FXS interface, in that you can plug an analog telephone into it and pass calls through Asterisk.
The privacy.conf file is used to
control the maximum number of tries a user has to enter his 10-digit
telephone number in the PrivacyManager() application. The PrivacyManager()
application determines if a Caller ID is set for the incoming call. The
user enters his 10-digit number within the number of tries configured in
privacy.conf, the application sets the
PRIVACYMGRSTATUS channel variable to either
SUCCESS or FAILED. If the Caller ID
is set, the application does nothing.
Note
The PrivacyManager() application can also
accept the arguments in the dialplan. This allows the value to remain in
memory, instead of an I/O operation to the disk to read the
configuration file, which you would only worry about with high usage of
this application (many calls per second).
Asterisk provides basic call center functionality via its queueing system, but those who are using it in more mission-critical environments often report that their solutions required customization. You can do this customization in the queues.conf file.
The [general] section of
queues.conf contains settings that will apply to all
queues. If the persistentmembers
parameter is set to yes, a member that
is added to the system via the AddQueueMember() application or through the
Asterisk Manager Interface will be stored in the AstDB, and therefore
retained across a restart.
The autofill parameter allows
Asterisk to be more efficient in the way it distributes calls to queue
members, especially if there are multiple callers in the queue and
multiple queue members available to receive the call. It is recommended
you set autofill to yes.
Another general parameter of queues.conf is MonitorType. If set to MixMonitor, it will mix the inbound and outbound
audio streams. If set to Monitor, it
will revert to the older method of recording the inbound and outbound
audio in separate files.
Next you can define one or more queues by placing its name inside of
square brackets ([]). Within each
queue, the following parameters are available:
-
musiconhold This parameter allows you to configure which music-on-hold class (configured in musiconhold.conf) to use for the queue.
-
announce When a call is presented to a member of the queue, the prompt specified by
announcewill be played to that agent before the caller is connected. This can be useful for agents who are logged in to more than one queue. You can specify either the full path to the file, or a path relative to /var/lib/asterisk/sounds/.-
strategy Asterisk can use six strategies to distribute calls to agents:
-
ringall The queue rings every available agent and connects the call to whichever agent answers first (this is the default).
roundrobin(deprecated)The queue cycles through the agents until it finds one who is available to take the call.
roundrobindoes not take into account the workload of the agents. Also, becauseroundrobinalways starts with the first agent in the queue, this strategy is suitable only in an environment where you want your higher-ranked agents to handle all calls unless they are busy, in which case the lower-ranked agents may get a call.-
leastrecent The call is presented to the agent who has not been presented a call for the longest period of time.
-
fewestcalls The call is presented to the agent who has received the least amount of calls. This strategy does not take into account the actual agent workloads; it considers only the number of calls they have taken (for example, an agent who has had 3 calls that each lasted for 10 minutes will be preferred over an agent who has had 5 calls each lasting 2 minutes).
-
random As its name suggests, the random strategy chooses an agent at random. In a small call center, this strategy may prove to be the most fair.
-
rrmemory The queue cycles through the list of queue members, keeping track of which member last received a call. The next time a call needs to be distributed, Asterisk will continue from this point in the list of queue members. (This strategy is known as round-robin memory). This ensures that call presentation cycles through the agents as fairly as possible.
-
-
servicelevel In a call center, the service level represents the maximum amount of time a caller should ideally have to wait before being presented to an agent. For example, if
servicelevelis set to 60 and the service level percentage is 80 percent, that means 80 percent of the calls that came into the queue were presented to an agent in less than 60 seconds.-
context If a context is assigned to a queue, the caller will be able to press a single digit to exit to the corresponding extension within the configured context, if it exists. This action takes the caller out of the queue, which means that she will lose her place in line—be aware of this when you use this feature.
-
timeout The
timeoutvalue defines the maximum amount of time (in seconds) to let an agent’s phone ring before deeming the agent unavailable and placing the call back into the queue.-
retry When a timeout occurs, the
retryvalue specifies how many seconds to wait before presenting the call again to an available agent.-
weight The
weightparameter assigns a rank to the queue. If calls are waiting in multiple queues, those queues with the highestweightvalues will be presented to agents first. When you are designing your queues, be aware that this strategy can prevent a call in a lower-weighted queue from ever being answered. Always ensure that calls in lower-weighted queues eventually get promoted to higher-weighted queues to ensure that they don’t have to hold forever.-
maxlen maxlenis the maximum number of calls that can be added to the queue before the call goes to the next priority of the current extension.-
announce-frequency The
announce-frequencyvalue (defined in seconds) determines how often to announce to the caller his place in the queue and estimated hold time.-
announce-holdtime There are three possible values for this parameter:
yes,no, andonce. Theannounce-holdtimeparameter determines whether or not to include the estimated hold time within the position announcement. If set toonce, it will be played to the caller only once.-
monitor-format This parameter accepts three possible values:
wav,gsm, andwav49. By enabling this option, you are telling Asterisk that you wish to record all completed calls in the queue in the format specified. If this option is not specified, no calls will be recorded.-
monitor-join The
Monitor()application in Asterisk normally records either end of the conversation in a separate file. Settingmonitor-jointoyesinstructs Asterisk to merge the files at the end of the call. This should be set only if theMonitorTypeparameter is set toMonitor.-
joinempty This parameter accepts three values:
yes,no, andstrict. It allows you to determine whether callers can be added to a queue based on the status of the members of the queue. Thestrictoption will not allow callers to join the queue if all members are unavailable.-
leavewhenempty This parameter determines whether you want your holding callers to be removed from the queue when the conditions preventing a caller from joining exist (i.e., when all of your agents log out and go home).
-
eventwhencalled Set
eventwhencalledtoyesif you wish to have queue events presented on the Manager Interface.-
eventmemberstatusoff Setting this parameter to
nowill generate extra information pertaining to each queue member.-
reportholdtime If you set this parameter to
yes, the amount of time the caller held before being connected will be announced to the queue member answering the call.-
memberdelay This parameter defines whether a delay will be inserted between the time when the queue identifies a free agent and the time when the call is connected to that agent.
-
member => member_name Members of a queue can be either channel types or agents. Any agents you list here must be defined in the agents.conf file.
The purpose of the res_odbc.so module is to store configuration file information in a database and retrieve that information from the database. The res_odbc.conf file specifies how to access the table within the database. The extconfig.conf file is used to determine how to connect to the database.
The res_snmp.conf file is used
to configure SNMP support in Asterisk. There are two options in the
[general]. The subagent option specifies whether
res_snmp should run as a subagent or a full SNMP
agent. Asterisk defaults to running as a subagent. The enabled option specifies whether SNMP support in
Asterisk is enabled. This defaults to no, so you’ll need to change this if you want
SNMP support.
The rpt.conf file is used to configure Jim Dixon’s newest project, Jim’s Radio Repeater Application (app_rpt), allows Asterisk to communicate using VoIP via radio repeater technology. This allows people to efficiently provide large-area coverage of wireless networking and routing information to the amateur radio public through their local high-speed Internet connections.
The rtp.conf file controls the Real-time Transport Protocol (RTP) ports that Asterisk uses to generate and receive RTP traffic. The RTP protocol is used by SIP, H.323, MGCP, and possibly other protocols to carry media between endpoints.
The default rtp.conf file uses the RTP port range of 10,000 through 20,000. However, this is far more ports than you’re likely to need, and many network administrators may not be comfortable opening up such a large range in their firewalls. You can limit the RTP port range by changing the upper and lower bound limits within the rtp.conf file.
For every bidirectional SIP call between two endpoints, five ports are generally used: port 5060 for SIP signaling, one port for the data stream and one port for the Real-Time Control Protocol (RTCP) in one direction, and an additional two ports for the data stream and RTCP in the opposite direction.
UDP datagrams contain a 16-bit field for a Cyclic Redundancy Check (CRC), which is used to verify the integrity of the datagram header and its data. It uses polynomial division to create the 16-bit checksum from the 64-bit header. This value is then placed into the 16-bit CRC field of the datagram, which the remote end can then use to verify the integrity of the received datagram.
Setting rtpchecksums=no requests
that the OS not do UDP checksum creating/checking for the sockets used by
RTP. If you add this option to the sample rtp.conf
file, it will look like this:
[general] rtpstart=10000 rtpend=20000 rtpchecksums=no
The say.conf file is used to
configure spoken language grammar rules for a number of applications, such
as SayNumber(). If you’re looking to
use Asterisk in a language that isn’t currently supported, you can script
support through the configuation options in this file.
The sip.conf file defines all the SIP protocol options for Asterisk. The authentication for endpoints, such as SIP phones and service providers, is also configured in this file. Asterisk uses the sip.conf file to determine which calls you are willing to accept and where those calls should go in relation to your dialplan. Many SIP-related options are configured in sip.conf, which was covered in depth in Appendix A, VoIP Channels.
Asterisk has the ability to remotely notify a SIP phone to
recheck its configuration files or reboot by sending it a specially
formatted, manufacturer-specific NOTIFY
message (defined in sip_notify.conf). Because each of
these messages is manufacturer-specific, support varies from phone to
phone.
If you wish to connect to phones using Cisco’s proprietary Skinny Client Control Protocol (SCCP), you can use the skinny.conf file to define the parameters and channels that will use it. However, since the SCCP protocol is proprietary, you may find that support in Asterisk for this protocol is less than perfect but steadily improving over time.
Even though Asterisk is a modern PBX, many people still want it to
behave like an old key system with shared lines. Asterisk can emulate a
key system by configuring shared lines in sla.conf.
This file configures the Station Message Desk Interface. SMDI is a very useful addition to Asterisk, as it will allow it to act as a voicemail system for legacy PBXes that support the SMDI protocol.
This file is used for the configuration of Asterisk’s support for UDPTL packets. UDPTL packets are one of the transports used by T.38 faxing over IP connections.
With the advent of the Asterisk GUI, the Asterisk developers found
it would be helpful to create a configuration file where user accounts can
be specified, instead of having different pieces spread across a myriad of
files (such as extensions.conf,
sip.conf, and voicemail.conf. This file is also updated by
the Asterisk GUI when new users are added to the system or when user
settings are modified.
The voicemail.conf file controls the
Asterisk voicemail system (called Comedian Mail). It consists of three
main sections. The first, called [general], sets the general system-wide settings
for the voicemail system. The second, called [zonemessages], allows you to configure
different voicemail zones, which are a collection of time and time zone
settings. The third and final section is where you create one or more
groups of voicemail boxes, each containing the mailbox definitions. For
more information on adding voicemail capabilities to your dialplan, see
Chapter 6, More Dialplan Concepts.
The [general] section of
voicemail.conf contains a plethora of options that
affect the entire voicemail system:
-
format Lists the codecs that should be used to save voicemail messages. Codecs should be separated with the pipe character (
|). The first format specified is the format used when attaching a voicemail message to an email. Defaults towav49|gsm|wav. The reason that the voicemail might be saved in several different formats is to minimize the amount of transcoding that Asterisk does when the voicemail is played back.-
serveremail Provides the email address from which voicemail notifications should be sent.
-
attach Specifies whether or not Asterisk should attach the voicemail sound file to the voicemail notification email.
-
maxmsg Sets the maximum number of messages that may be kept in any voicemail folder.
-
maxmessage Sets the maximum length of a voicemail message, in seconds.
-
minmessage Sets the minimum length of a voicemail message, in seconds.
-
maxgreet Sets the maximum length of voicemail greetings, in seconds.
-
skipms Specifies how many milliseconds to skip forward/back when the user skips forward or backward during message playback.
-
maxsilence Indicates how many seconds of silence to allow before ending the recording.
-
silencethreshold Sets the silence threshold (what we consider “silence”—the lower the threshold is, the more sensitive it is).
-
maxlogins Sets the maximum allowed number of failed login attempts.
-
userscontext Specifies which voicemail context the mailboxes defined in
users.confshould be a part of. This defaults to thedefaultvoicemail context.-
externnotify Supplies the full path and filename of an external program to be executed when a voicemail is left or delivered, or when a mailbox is checked. It can also be set to
smdito use SMDI for external notification. If it issmdi, thesmdiportshould be set to a valid port as specified insmdi.conf.-
smdiport Specifies the communications port used by SMDI. This should correspond to a valid port as specified in
smdi.conf. This is used when theexternnotifysetting is set tosmdi.-
externpass Supplies the full path and filename of an external program to be executed whenever a voicemail password is changed.
-
directoryintro If set, overrides the default introduction to the dial-by-name directory.
-
charset Defines the character set for voicemail messages.
-
adsifdn Specifies the ADSI feature descriptor number to download to.
-
adsisec Sets the ADSI security lock code.
-
adsiver Indicates the ADSI voicemail application version number.
-
pbxskip Causes Asterisk not to add the string
[PBX]:to the beginning of the subject line of a voicemail notification email.fromstring:Changes the
From:string of voicemail notification email messages.-
usedirectory Permits a mailbox owner to select entries from the dial-by-name directory for forwarding and/or composing new voicemail messages.
-
odbcstorage If support for ODBC voicemail storage has been compiled into Asterisk, this option allows you to specify which ODBC connection to use. ODBC connections are defined in
res_odbc.conf.-
odbctable This option is used in conjunction with the
odbcstorageoption. This option specifies which database table to use for voicemail messages.-
emailsubject Specifies the email subject of voicemail notification email messages.
-
pagerfromstring Changes the
From:string of voicemail notification pager messages.-
emailbody Supplies the email body of voicemail notification email messages.
-
emaildateformat Specifies the format of the date and time for outbound email notifications. For more information on the format, see the
strftime(3)manpage.-
mailcmd Supplies the full path and filename of the program Asterisk should use to send notification emails. This option is useful if you want to override the default email program.
-
nextaftercmd Skips to the next message after the user hits 7 or 9 to delete or save the current message. This can be set only globally at this time, not on a per-mailbox basis.
As voicemail users may be located in different geographical
locations, Asterisk provides a way to configure the time zone and the
way the time is announced for different callers. Each unique combination
is known as a voicemail zone. You configure your
voicemail zones in the [zonemessages]
section of voicemail.conf. Later, you can assign
your voicemail boxes to use the settings for one of these zones.
Each voicemail zone definition consists of a line with the following syntax:
zonename=timezone|time_format
The zonename is an arbitrary name used
to identify the zone. The timezone argument
is the name of a system time zone, as found in
/usr/share/zoneinfo. The
time_format argument specifies how times
should be announced by the voicemail system. The
time_format argument is made up of the
following elements:
-
'filename' The filename of a sound file to play (single quotes around the filename are required)
-
${VAR} Variable substitution
-
Aora The day of the week (Saturday, Sunday, etc.)
-
Borborh The name of the month (January, February, etc.)
doreThe numeric day of the month (first, second... thirty-first)
-
Y The year
-
Iorl The hour, in 12-hour format
-
H The hour, in 24-hour format—single-digit hours are preceded by “oh”
-
k The hour, in 24-hour format—single-digit hours are not preceded by “oh”
-
M The minute
-
Porp A.M. or .P.M.
-
Q “today”, “yesterday,” or ABdY (note: not standard strftime value)
-
q “” (for today), “yesterday”, weekday, or ABdY (note: not standard strftime value)
-
R 24-hour time, including minutes
For example, the following example sets up two different voicemail zones, one for the Central time zone in 12-hour format, and a second in the Mountain time zone, in 24-hour format:
[zonemessages] central=America/Chicago|'vm-received' Q 'digits/at' IMp mountain24=America/Denver|'vm-received' q 'digits/at' H 'digits/hundred' M 'hours'
Now that the system-wide settings and voicemail zones have been set, you can define your voicemail contexts and individual mailboxes.
Voicemail contexts are used to separate out different groups of voicemail users. For example, if you are using Asterisk to host voicemail for more than one company, you should place each company’s mailboxes in different voicemail contexts, to keep them separate. You might also use voicemail contexts to create per-department dial-by-name directories.
To define a new voicemail context, simply put the context name inside of square brackets, like this:
[default]
Inside a voicemail context, each mailbox definition takes the following syntax:
mailbox=password,name[,pager_email[,options]]]
The mailbox argument is the mailbox
number.
The password argument is the numeric
code the mailbox owner must enter to access his voicemail. If the
password is preceded by a minus sign (-), the password may not be changed by the
mailbox owner.
Tip
If the password is set to d,
then this line is assumed to provide an alternate name that can be
used for this mailbox in the dial-by-name directory. In the following
example, people can reach extension 123 by searching for either Robert or Bob, along with a popular misspelling of his
last name:
123 => 4444,Robert Schauerhamer 123 => d,Bob Schauerhamer 123 => d,Robert Showerhammer
The email and
pager_email arguments are email addresses
where voicemail notifications will be sent. These may be left blank if
you don’t want to send voicemail notifications via email. The message
sent to the pager_email address is usually
shorter and suitable for sending to a cell phone (via an email to SMS
gateway) or to an alpha-numeric pager.
The options argument is a
pipe-separated list of voicemail options that may be specified for the
mailbox. (These options may also be set globally by placing them in the
[general]
section.) Valid voicemail options include:
-
tz Sets the voicemail zone from the
[zonemessages]section earlier. This option is irrelevant ifenvelopeis set tono.-
attach Attaches the voicemail to the notification email (but not to the pager email). May be set to either
yesorno.-
attachfmt Specifies the format of the voicemail message that should be attached to the message sent to the notification email. Ordinarily, Asterisk uses the first format specified in the
formatparameter listed in[general](covered earlier), but this may also be changed on a per-mailbox basis. This option may be set only on a per-mailbox basis.This option is often used if Windows users want wav49 attachments but Linux users want their attachments in gsm format.
-
saycid Says the Caller ID information before the message.
-
cidinternalcontexts Sets the internal context for name playback instead of extension digits when saying the Caller ID information.
-
sayduration Turns on/off the duration information before the message. Defaults to
on.-
saydurationm Specifies the minimum duration to say when
saydurationison. Default is two minutes.-
dialout Specifies the context to dial out from (by choosing option 4 from the advanced menu). If not specified, dialing out from the voicemail system will not be permitted.
-
sendvoicemail Specifies the context to send voicemail from (by choosing option 5 from the advanced menu). If not specified, sending messages from within the voicemail system will not be permitted.
-
searchcontexts By default, Asterisk searches only the
defaultcontext if no context is specified. To have Asterisk search all contexts, set this option toyes.-
callback Specifies the context to call back from. If not specified, calling the sender back from within the voicemail system will not be permitted.
-
review Allows senders to review/re-record their messages before saving them. Defaults to
off.-
operator Allows senders to hit
0before, after, or while leaving a voicemail message to reach an operator. Defaults tooff.-
envelope Turns on/off envelope playback before message playback. Defaults to
on. This does not affect option 3,3 from the advanced options menu.-
delete Deletes voicemails from the server after notification is sent. This option may be set only on a per-mailbox basis; it is intended for use with users who wish to receive their voicemail messages only by email.
-
volgain If your voicemail attachments to email are too quiet, you can set this option to increase the gain on the message before it is attached to the email notification.
Note
This option only works if the
soxapplication has been installed on your Asterisk system.-
forcename Forces new users to record their names. A new user is determined by the password being the same as the mailbox number. Defaults to
no.-
forcegreetings Forces new users to record greetings. A new user is determined by the password being the same as the mailbox number. Defaults to
no.-
hidefromdir Hides the mailbox from the dial-by-name directory. Defaults to
no.-
tempgreetwarn Warns users that their temporary greeting is still enabled.
You can specify multiple options by separating them with the pipe character, as shown in the definitions for mailboxes 102 and 103 below.
Here are some sample mailbox definitions:
[default] ; regular mailbox with email notification 101 => 4242,Example Mailbox,somebody@asteriskdocs.org ; more advanced mailbox with email and pager notification and a couple of ; special options 102 => 9855,Another User,another@asteriskdocs.org,pager@asteriskdocs.org, attach=no|tz=central ; a mailbox with no email notification and lots of extra options 103 => 6522,John Q. Public,,,tz=central|attach=yes|saycid=yes|dialout=fromvm| callback=fromvm|review=yes
This file is used to configure Voicetronix cards with
Asterisk. See the sample vpb.conf for
more information.
The zapata.conf file is used to define the relationship between Asterisk and the Zaptel driver. Because zapata.conf is specific to Asterisk, it is located with the other Asterisk configuration files in /etc/asterisk/. As with zaptel.conf, the zapata.conf file contains a multitude of choices reflecting the multitude of hardware it supports, and we won’t try to list all of the options here. In this book we’ve covered only the analog interfaces to the Zaptel driver, as described in Chapter 3, Installing Asterisk.
The zaptel.conf file is not located with the other Asterisk .conf files; the Zaptel driver is available to any application that can make use of it, so it makes more sense to store it in a non-Asterisk-specific directory (/etc/). zaptel.conf is parsed by the ztcfg program to configure the TDM hardware elements in your system. You configure three main elements in the zaptel.conf file:
A way of identifying the interfaces on the card within the dialplan
The type of signaling the interface requires
The tone language associated with a particular interface, as found in zonedata.c
Warning
Be very careful not to plug your FXS module into a telephone line. The voltage associated with the phone line, especially during an incoming call, will be much too high for the module to handle and may permanently damage it, rendering it useless!
Within the zaptel.conf file, we define the type
of signaling that the channel is going to use. We also define which
channels to load. The options in the configuration file are the
information that will be used to configure the channels with the ztcfg command.
The actual parameters available in the zaptel.conf file are quite extensive, as a wide variety of PSTN interfaces make use of the Zaptel telephony engine. Also, as this technology is rapidly evolving, anything we write now may not be accurate by the time you read it. Consequently, we won’t try to list all of the options here.
In this book, we have focused on the Zaptel analog interfaces as provided by the Digium TDM400P card (see Chapter 3, Installing Asterisk).
[164] With the advent of the new menuselect system, this best practice may no longer be necessary if you are building only the modules you need in the first place
[165] Yes, we are aware that the user interface to the channel interface is the Asterisk CLI; however, this is not usable as a telephone and therefore does not meet the criteria of an interface from the perspective of a telephone user.
Table of Contents
- AGENT
- ARRAY
- BASE64_DECODE
- BASE64_ENCODE
- BLACKLIST
- CALLERID
- CDR
- CHANNEL
- CHECK_MD5
- CHECKSIPDOMAIN
- CURL
- CUT
- DB
- DB_DELETE
- DB_EXISTS
- DUNDILOOKUP
- ENUMLOOKUP
- ENV
- EVAL
- EXISTS
- FIELDQTY
- FILTER
- GLOBAL
- GROUP
- GROUP_COUNT
- GROUP_LIST
- GROUP_MATCH_COUNT
- IAXPEER
- IF
- IFTIME
- ISNULL
- KEYPADHASH
- LANGUAGE
- LEN
- MATH
- MD5
- MUSICCLASS
- QUEUE_MEMBER_COUNT
- QUEUE_MEMBER_LIST
- QUEUE_WAITING_COUNT
- QUEUEAGENTCOUNT
- QUOTE
- RAND
- REALTIME
- REGEX
- SET
- SHA1
- SIP_HEADER
- SIPCHANINFO
- SIPPEER
- SORT
- SPEECH
- SPEECH_ENGINE
- SPEECH_GRAMMAR
- SPEECH_SCORE
- SPEECH_TEXT
- SPRINTF
- STAT
- STRFTIME
- STRPTIME
- TIMEOUT
- TXTCIDNAME
- URIDECODE
- URIENCODE
- VMCOUNT
Dialplan functions are very powerful, and once you begin using them, you will wonder how you got along without them. Functions are used in the dialplan in a similar manner to variables. If it helps, you can think of them as intelligent variables (or for those of you from the database world, variables with triggers). When you invoke them, they perform a specific action, and their result becomes a part of the command in which you have included the function (in exactly the same way as a variable would).
Name
AGENT — Returns information about an agent
This function allows you to retrieve information pertaining to agents and may only be read, not set.
The valid items to retrieve are:
-
status(default) The status of the agent (
LOGGEDIN|LOGGEDOUT)-
password The password of the agent
-
name The name of the agent
-
mohclass Music-on-hold class
-
exten The callback extension for the Agent (
AgentCallbackLogin)-
channel The name of the active channel for the Agent (
AgentLogin)
Name
ARRAY — Allows one to define several variables at one time
The comma-separated list, which the function equals, will be interpreted as a set of values to which the comma-separated list of variable names in the argument should be set. This function may only be set, not read.
; Set var1 to 1 and var2 to 2. exten => 123,1,Set(ARRAY(var1,var2)=1\,2)
Tip
Remember to either backslash your commas in
extensions.conf or quote the entire argument,
since Set() can take multiple
arguments itself.
Name
BLACKLIST — Checks if the Caller ID is on the blacklist
Synopsis
Name
CALLERID — Gets or sets Caller ID data on the channel
CALLERID() parses the
Caller ID string within the current channel and returns all or part, as
specified by datatype. The allowable
datatypes are all, name, num,
ani, dnid, or rdnis. Optionally, an alternative Caller ID
may be specified if you wish to parse that string instead of the Caller
ID set on the channel.
This function may be both read and set.
Name
CDR — Gets or sets CDR information for this call (which will be written to the CDR log)
Here is a list of all the available CDR field names:
-
clid Read-only. Use the
CALLERID(all)function to set this value.-
lastapp Read-only. Denotes the last application run.
-
lastdata Read-only. Denotes the arguments to the last application run.
-
src Read-only. Use the
CALLERID(ani)function to set this value.-
dst Read-only. Corresponds to the final extension in the dialplan.
-
dcontext Read-only. Corresponds to the final context in the dialplan.
-
channel Read-only. The name of the channel on which the call originated.
-
dstchannel Read-only. The name of the channel on which the call terminated.
-
disposition Read-only. Maximum reached state of the channel. If the
uoption is specified, this value will be returned as an integer, instead of a string:1=NOANSWER,2=BUSY,3=FAILED,4=ANSWERED.-
amaflags Read/write. Billing flags. If the
uoption is specified, this value will be returned as an integer, instead of a string:1=OMIT,2=BILLING,3=DOCUMENTATION.-
accountcode Read/write. Billing account (19 char maximum).
-
userfield Read/write. User-defined field.
-
start Read-only. Time when the call started. If the
uoption is specified, this value will be returned as an integer (seconds since the epoch) instead of a formatted date/time string.-
answer Read-only. Time when the call was answered (may be blank if the call is not yet answered). If the
uoption is specified, this value will be returned as an integer (seconds since the epoch) instead of a formatted date/time string.-
end Read-only. Time when the call was completed (may be blank if the call is not yet complete). If the
uoption is specified, this value will be returned as an integer (seconds since the epoch) instead of a formatted date/time string.-
duration Read-only. The difference between start and end, in seconds. May be 0, if the call is not yet complete.
-
billsec Read-only. The difference between answer and end, in seconds. May be 0, if the call is not yet complete.
-
uniqueid Read-only. A string that will be unique per-call within this Asterisk instance.
The following options may be specified:
-
l All results will be retrieved from the last Call Detail Record for the call, in the case of using multiple CDRs via ForkCDR().
-
r Custom CDR variables will be retrieved from the last Call Detail Record, but the standard fields will be retrieved from the first.
-
u The unparsed value will be returned. See the fieldname list above for entries that are affected by this flag.
You may also supply a fieldname not on
the above list, and create your own variable, whose value can be changed
with this function, and this variable will be stored in the CDR.
Name
CHANNEL — Gets or sets various channel parameters
Standard items (provided by all channel technologies) are:
audioreadformatRead-only. Format currently being read.
audionativeformatRead-only. Format used natively for audio.
videonativeformatRead-only. Format used natively for video.
audiowriteformatRead-only. Format currently being written.
callgroupRead/write. Callgroups for call pickup.
channeltypeRead-only. Technology used for channel.
languageRead/write. Language used for sounds played and recorded.
musicclassRead/write. Class used (from musiconhold.conf) for hold music.
rxgainRead/write. Receive gain (in dB) on channel drivers that support it.
txgainRead/write. Transmit gain (in dB) on channel drivers that support it.
tonezoneRead/write. Regional zone for indications played.
stateRead-only. Current channel state.
transfercapabilityRead/write. What can be transferred on an ISDN circuit. Current valid values are:
SPEECHSpeech (default, voice calls)
DIGITALUnrestricted digital information (data calls)
RESTRICTED_DIGITALRestricted digital information
3K1AUDIO3.1 kHz Audio (fax calls)
DIGITAL_W_TONESUnrestricted digital information with tones/announcements
VIDEOVideo
Additional items may be available from the channel driver providing the channel; see its documentation for details. Any item requested that is not available on the current channel will return an empty string.
Name
CHECK_MD5 — Validate an MD5 digest
Name
CURL — Returns the data resulting from a GET or POST to a URI
Name
CUT — Cuts a string based on a given delimiter
CUT() works in a
similar manner to the cut(1) Unix
command-line tool, and is, in fact, designed based upon that
tool.
In the dialplan, you may specify character offsets to select a
substring of a variable based purely on the uniform length of characters
(namely 1). CUT() is designed to help
you work with data that may have multiple, variable-length sections,
divided by a common delimiter.
The most common case is the name of a channel, which is composed
of two parts, a base name and a unique identifier (e.g.,
SIP/tom-abcd1234 or
SIP/bert-1a2b3c4d). CUT() may be used to trim the unique
identifier, no matter how long the base name may be:
; Trim the unique identifier from the current channel name
exten => 123,1,Set(chan=${CUT(CHANNEL,-,1)})
varname is the name of the variable
that will be operated on. Note that CUT() operates on the
name of a variable, rather than upon the
value of a variable. CUT() is somewhat unique in this
regard.
char-delim is the character that will
serve as the delimiter ('-' is the default)
range-spec allows you to define which
fields are returned. The range-spec can be
specified as a range with - (e.g.,
1-3) or a group of ranges and field
numbers by separating each with &
(e.g., 1&3-4). Note that if
multiple field numbers are specified, the resulting value will have its
fields separated by the same delimiter.
Tip
range-spec uses a 1-based offset.
That is, the first field is field 1 (as opposed to a 0-based offset,
where the first field would be 0).
Name
DB — Read or write to AstDB
Name
EVAL — Evaluates stored variables
EVAL() is one of the
most powerful dialplan functions. It permits one to store variable
expressions in a location other than extensions.conf, such as a database, yet
evaluate them in the dialplan, as if they were included there all along.
You can bet that EVAL() is a
cornerstone in making a dialplan truly dynamic.
; We might store something like "SIP/${DB(ext2chan/123)}" in the
; database entry for extension/123, which tells us to look up yet
; another database entry.
exten => _XXX,1,Set(dialline=${DB(extension/${EXTEN})})
exten => _XXX,n,Dial(${EVAL(${dialline})}); Real world example (taken from production code)
exten => _1NXXNXXXXXX,n(generic),Set(provider=${DB(rt2provider/${route})}-nanp)
exten => _1NXXNXXXXXX,n(provider),Dial(${EVAL(${DB(provider/${provider})})})
exten => _1NXXNXXXXXX,n,Goto(nextroute) Name
FILTER — Strips string of illegal characters
Name
GROUP — Associates the channel into a set group
Name
GROUP_COUNT — Counts the number of channels in the specified group.
Name
IAXPEER — Obtains IAX channel information
If peername is specified, valid items are:
-
ip The IP address of this peer. If
itemis not specified, the IP address will be given.-
status The peer’s status (if
qualify=yes).-
mailbox The peer’s configured mailbox.
-
context The peer’s configured context.
-
expire The epoch time of the next registration expiration for this peer.
-
dynamic Does this peer register with Asterisk? (yes/no)
-
callerid_name The Caller ID name configured on this peer.
-
callerid_num The Caller ID number configured on this peer.
-
codecs The peer’s configured codecs.
-
codec[x] Preferred codec index number
x(beginning with zero).
Name
IF — Conditional value selection
Name
IFTIME — Compares the current system time to a time specification
Name
KEYPADHASH — Converts letters into numbers
Hashes the letters in string
into the equivalent keypad numbers.
; Calculate the hashes of the authors' last names. So, the
; corresponding values would be 623736, 76484, and 82663443536.
exten => 123,1,Set(lastname1=${KEYPADHASH(Madsen)})
exten => 123,n,Set(lastname2=${KEYPADHASH(Smith)})
exten => 123,n,Set(lastname3=${KEYPADHASH(VanMeggelen)})
Name
MUSICCLASS — Access a channel’s music-on-hold setting
Name
RAND — Random number
Chooses a random number within a range.
RAND() randomly picks an
integer between min and
max, inclusive, and returns that integer. If
min is not specified, it defaults to 0. If max is not
specified, it defaults to the C constant INT_MAX, which is 2,147,483,647 on 32-bit
platforms. Note that INT_MAX is quite
a bit larger on 64-bit platforms.
Name
SET — Sets a variable
Name
SIPCHANINFO — Retrieves info on a SIP channel
Gets the specified SIP parameter from the current channel.
Valid items are:
-
peerip The IP address of this SIP peer
-
recvip The source IP address of this SIP peer
-
from The SIP URI from the From: header
-
uri The SIP URI from the Contact: header
-
useragent The name of the SIP user agent
-
peername The name of the SIP peer
-
t38passthrough 1 if T38 is offered or enabled in this channel, otherwise 0
Name
SIPPEER — Retrieves info about a SIP peer
Valid items are:
-
ip The IP address of this peer. If
itemis not specified, the IP address will be given.-
mailbox This peer’s configured mailbox.
-
context The peer’s configured context.
-
expire The epoch time of the next registration expiration.
-
dynamic Does this device register with Asterisk? (yes/no)
-
callerid_name The Caller ID name configured on this peer.
-
callerid_number The Caller ID number configured on this peer.
-
status This peer’s status (if
qualify=yes).-
regexten This peer’s registration extension, if configured.
-
limit This peer’s call limit.
-
curcalls Current number of calls. Only available if call-limit is set on this peer.
-
language Default language for this peer.
-
accountcode Account code for this peer.
-
useragent The name of the SIP user agent.
-
codecs The configured codecs for this peer.
-
codec[x] Preferred codec index number
x(beginning with zero).
Name
SPRINTF — Formats a string
Formats a variable or set of variables according to a format string.
The most common case for the use of SPRINTF is to zero-pad a number to a certain length:
; Returns 00123
exten => 123,1,Set(padfive=${SPRINTF(%05d,${EXTEN})}) Most of the format options listed in the manpage for sprintf(3) are also implemented in this
dialplan function.
Name
STAT — Evaluates filesystem attributes
Does a check on the specified file.
flag may be one of the following
options:
-
e Returns
1if the file exists;0otherwise-
s Returns the size of the file, in bytes
-
f Returns
1if the path referenced is a regular file (and not a directory, symlink, socket, or device) or0otherwise-
d Returns
1if the path referenced is a directory (and not a regular file, symlink, socket, or device) or0otherwise-
M Returns the epoch time when the file contents were last modified
-
C Returns the epoch time when the file inode was last modified
-
m Returns the permissions mode of the file (as an octal number)
Name
STRFTIME — Formats the date and time
Returns the current date/time in a specified format.
STRFTIME passes the
epoch and format
arguments directly to the underlying strftime(3) C library call, so check out that
manpage for more information. The timezone
parameter should be the name of a directory/file in /usr/share/zoneinfo (e.g., America/Chicago or America/New_York).
Name
STRPTIME — Converts a string into a date and time
Returns the epoch of the arbitrary date/time string structured as described in the format.
The purpose of this function is to take a formatted date/time and convert it back into seconds since the epoch (January 1st, 1970, at midnight GMT), so that you may do calculations with it, or simply convert it into some other date/time format.
STRPTIME passes the string and
format directly to the underlying C library call strptime(3), so check out that manpage for
more information. The timezone parameter
should be the name of a directory/file in /usr/share/zoneinfo (e.g., America/Chicago or America/New_York).
Name
TIMEOUT — Accesses channel timeout values
Gets or sets timeouts on the channel.
The timeouts that can be manipulated are:
-
absolute The absolute maximum amount of time permitted for a call. A setting of
0disables the timeout.-
digit The maximum amount of time permitted between digits when the user is typing in an extension. When this timeout expires, after the user has started to type in an extension, the extension will be considered complete, and will be interpreted. Note that if an extension typed in is valid, it will not have to timeout to be tested, so typically at the expiry of this timeout, the extension will be considered invalid (and thus control will be passed to the
iextension, or if it doesn’t exist the call will be terminated). The default timeout is five seconds.-
response The maximum amount of time permitted after falling through a series of priorities for a channel in which the user may begin typing an extension. If the user does not type an extension in this amount of time, control will pass to the
textension if it exists, and if not the call will be terminated. The default timeout is 10 seconds.
Table of Contents
- AbsoluteTimeout
- AgentCallbackLogin
- AgentLogoff
- Agents
- ChangeMonitor
- Command
- DBGet
- DBPut
- Events
- ExtensionState
- GetConfig
- GetVar
- Hangup
- IAXNetstats
- IAXPeers
- ListCommands
- Logoff
- MailboxCount
- MailboxStatus
- MeetmeMute
- MeetMeUnmute
- Monitor
- Originate
- Park
- ParkedCalls
- PauseMonitor
- Ping
- PlayDTMF
- QueueAdd
- QueuePause
- QueueRemove
- QueueStatus
- Queues
- Redirect
- SIPpeers
- SIPShowPeer
- SetCDRUserField
- SetVar
- Status
- StopMonitor
- UnpauseMonitor
- UpdateConfig
- UserEvent
- WaitEvent
- ZapDNDoff
- ZapDNDon
- ZapDialOffhook
- ZapHangup
- ZapRestart
- ZapShowChannels
- ZapTransfer
The following is a list of actions you can perform using the Manager Interface, or AMI. See Chapter 14, Potpourri for more information on the AMI.
Name
AbsoluteTimeout — Sets the sAbsoluteTimeout on a channel
Name
AgentCallbackLogin — Sets an agent as logged in to the queue system in callback mode
Logs the specified agent in to the Asterisk queue system in callback mode. When a call is distributed to this agent, it will ring the specified extension.
Parameters
-
Agent [required] Agent ID of the agent to log in to the system, as specified in agents.conf.
-
Exten [required] Extension to use for callback.
-
Context [optional] Context to use for callback.
-
AckCall [optional] Set to
trueto require an acknowledgement (the agent pressing the#key) to accept the call when agent is called back.-
WrapupTime [optional] The minimum amount of time after disconnecting before the agent will receive a new call.
-
ActionID [optional] An identifier which can be used to identify the response to this action.
Name
AgentLogoff — Sets an agent as no longer logged in
Name
Agents — Lists agents and their status
Example
Action: Agents
ActionID: mylistofagents
Response: Success
Message: Agents will follow
ActionID: mylistofagents
Event: Agents
Agent: 1001
Name: Jared Smith
Status: AGENT_IDLE
LoggedInChan: 201@Lab
LoggedInTime: 1173237646
TalkingTo: n/a
ActionID: mylistofagents
Event: Agents
Agent: 1002
Name: Leif Madsen
Status: AGENT_LOGGEDOFF
LoggedInChan: n/a
LoggedInTime: 0
TalkingTo: n/a
ActionID: mylistofagents
Event: Agents
Agent: 1003
Name: Jim VanMeggelen
Status: AGENT_LOGGEDOFF
LoggedInChan: n/a
LoggedInTime: 0
TalkingTo: n/a
ActionID: mylistofagents
Event: AgentsComplete
ActionID: mylistofagents
Name
ChangeMonitor — Changes monitoring filename of a channel
The ChangeMonitor action may be used to
change the file started by a previous Monitor action. The following parameters
may be used to control this.
Name
Command — Executes an Asterisk CLI command
Name
DBGet — Gets AstDB entry
Name
DBPut — Puts DB entry
Name
Events — Controls event flow
Name
ExtensionState — Checks extension status
This command reports the extension state for the given extension. If the extension has a hint, this will report the status of the device connected to the extension.
Parameters
-
Exten [required] The name of the extension to check.
-
Context [required] The name of the context that contains the extension.
-
ActionId [optional] An action identifier that can be used to identify this manager transaction.
Name
GetConfig — Retrieves configuration
Name
GetVar — Retrieves the value of a variable
Name
Hangup — Hangs up channel
Name
IAXPeers — Lists IAX peers
Example
Action: IAXPeers
Name/Username Host Mask Port Status
jared/jared 192.168.0.71 (S) 255.255.255.255 4569 UNREACHABLE
jaredsmith 192.168.0.72 (S) 255.255.255.255 4569 OK (43 ms)
arrivaltel/8017 172.20.95.2 (S) 255.255.255.255 4569 Unmonitored
sokol/jsmith 172.17.122.217 (S) 255.255.255.255 4569 OK (48 ms)
demo/asterisk 216.207.245.47 (S) 255.255.255.255 4569 Unmonitored
5 iax2 peers [2 online, 1 offline, 2 unmonitored]
Name
ListCommands — Lists the manager commands
Example
Action: ListCommands
Response: Success
AbsoluteTimeout: Set Absolute Timeout (Priv: call,all)
AgentCallbackLogin: Sets an agent as logged in by callback (Priv: agent,all)
AgentLogoff: Sets an agent as no longer logged in (Priv: agent,all)
. . .
ZapTransfer: Transfer Zap Channel (Priv: <none>)
Name
MailboxStatus — Checks mailbox status
Name
MeetmeMute — Mutes a MeetMe user
Parameters
-
Meetme [required] The MeetMe conference bridge number.
-
Usernum [required] The user number in the specified bridge.
-
ActionID [optional] A unique identifier to help you identify responses to this command.
Example
Action: MeetmeMute
Meetme: 104
Usernum: 1
ActionID: 5432154321
Response: Success
ActionID: 5432154321
Message: User muted
Event: MeetmeMute
Privilege: call,all
Channel: SIP/linksys2-10211dc0
Uniqueid: 1174008176.3
Meetme: 104
Usernum: 1
Status: on
Notes
To find the Usernum number for
a particular caller, watch the Asterisk Manager Interface when a new
member joins a conference bridge. When it happens, you’ll see an event
like this:
Event: MeetmeJoin Privilege: call,all Channel: SIP/linksys2-10211dc0 Uniqueid: 1174008176.3 Meetme: 104 Usernum: 1
Name
MeetMeUnmute — Unmutes a MeetMe user
Name
Monitor — Monitors a channel
Parameters
-
Channel [required] Specifes the channel to be recorded.
-
File [optional] The name of the file in which to record the channel. The path defaults to the Asterisk monitor spool directory, which is usually /var/spool/asterisk/monitor. If no filename is specified, the filename will be the name of the channel, with slashes replaced with dashes.
-
Format [optional] The audio format in which to record the channel. Defaults to
wav.-
Mix [optional] A Boolean flag specifying whether or not Asterisk should mix the inbound and outbound audio from the channel in to a single file.
-
ActionID [optional] An identifier that can be used to identify the response to this action.
Name
Originate — Originates call
Generates an outbound call from Asterisk, and connect the channel to a context/extension/priority combination or dialplan application.
Parameters
-
Channel [required] Channel name to call. Once the called channel has answered, the control of the call will be passed to the specified
Exten/Context/PriorityorApplication.-
Exten [optional] Extension to use (requires
ContextandPriority).-
Context [optional] Context to use (requires
ExtenandPriority).-
Priority [optional] Priority to use (requires
ExtenandContext).-
Application [optional] Application to use.
-
Data [optional] Data to pass as parameters to the application (requires
Application).-
Timeout [optional] How long to wait for call to be answered (in ms).
-
CallerID [optional] Caller ID to be set on the outgoing channel.
-
Variable [optional] Channel variable to set. Multiple variable headers are allowed.
-
Account [optional] Account code.
-
Async [optional] Set to
truefor asynchronous origination. Asynchronous origination allows you to originate one or more calls without waiting for an immediate response.-
ActionID [optional] An identifier that can be used to identify the response to this action.
Name
Park — Parks a channel
Parameters
-
Channel [required] Channel name to park.
-
Channel2 [required] Channel to announce park info to (and return the call to if the parking times out).
-
Timeout [optional] Number of milliseconds to wait before callback.
-
ActionID [optional] An identifier which can be used to identify the response to this action.
Name
ParkedCalls — Lists parked calls
Example
Action: ParkedCalls
ActionID: 0982350175
Response: Success
ActionID: 0982350175
Message: Parked calls will follow
Event: ParkedCall
Exten: 701
Channel: SIP/linksys2-101f98a8
From: SIP/linksys2-101f98a8
Timeout: 26
CallerID: linksys2
CallerIDName: linksys2
ActionID: 0982350175
Event: ParkedCallsComplete
ActionID: 0982350175
Name
PauseMonitor — Pauses the recording of a channel
Name
Ping — Keeps connection alive
Name
PlayDTMF — Plays DTMF on a channel
Name
QueueAdd — Adds a member to the specified queue
Parameters
-
Queue [required] The name of the queue.
-
Interface [required] The name of the member to add to the queue. This will be a technology and resource, such as
SIP/JaneorLocal/203@lab/n. Agents (as defined in agents.conf) can also be added by using theAgent/1234syntax.-
MemberName [optional] This is a human-readable alias for the interface, and will appear in the queue statistics and queue logs.
-
Penalty [optional] A numerical penalty to apply to this queue member. Asterisk will distribute calls to members with higher penalties only after attempting to distribute the call to all members with a lower penalty.
-
Paused [optional] Whether or not the member should be initially paused.
-
ActionID [optional] An action identifier that you can use to identify the response to this manager transaction.
Example
Action: QueueAdd
Queue: myqueue
Interface: SIP/testphone
MemberName: Jared Smith
Penalty: 2
Paused: no
ActionID: 4242424242
Response: Success
ActionID: 4242424242
Message: Added interface to queue
Event: QueueMemberAdded
Privilege: agent,all
Queue: myqueue
Location: SIP/testphone
MemberName: Jared Smith
Membership: dynamic
Penalty: 2
CallsTaken: 0
LastCall: 0
Status: 1
Paused: 0
Name
QueuePause — Pauses or unpauses a member in a call queue
Parameters
-
Interface [required] The name of the interface to pause or unpause.
-
Paused [required] Whether or not the interface should be paused. Set to
trueto pause the member, orfalseto unpause the member.-
Queue [optional] The name of the queue in which to pause or unpause this member. If not specified, the member will be paused or unpaused in all the queues it is a member of.
-
ActionID [optional] An identifier that can be used to identify the response to this action.
Example
Action: QueuePause
Interface: SIP/testphone
Paused: true
Queue: myqueue
Response: Success
Message: Interface paused successfully
Event: QueueMemberPaused
Privilege: agent,all
Queue: myqueue
Location: SIP/testphone
MemberName: Jared Smith
Paused: 1
Action: QueuePause
Interface: SIP/testphone
Paused: false
Response: Success
Message: Interface unpaused successfully
Event: QueueMemberPaused
Privilege: agent,all
Queue: myqueue
Location: SIP/testphone
MemberName: Jared Smith
Paused: 0
Name
QueueRemove — Removes interface from queue
Name
QueueStatus — Checks queue status
Parameters
-
Queue [optional] If specified, limits the response to the status of the specified queue.
-
Member [optional] An action identifier that you can use to identify the response to this manager transaction.
-
ActionID [optional] An identifier that can be used to identify the response to this action.
Example
Action: QueueStatus
Queue: inbound-queue
ActionID: 11223344556677889900
Response: Success
ActionID: 11223344556677889900
Message: Queue status will follow
Event: QueueParams
Queue: inbound-queue
Max: 0
Calls: 1
Holdtime: 99
Completed: 540
Abandoned: 51
ServiceLevel: 60
ServicelevelPerf: 50.4
Weight: 0
ActionID: 11223344556677889900
Event: QueueMember
Queue: inbound-queue
Location: Local/4020@agents/n
Membership: dynamic
Penalty: 2
CallsTaken: 25
LastCall: 1175563440
Status: 2
Paused: 0
ActionID: 11223344556677889900
Event: QueueEntry
Queue: inbound-queue
Position: 1
Channel: Zap/25-1
CallerID: 8012317154
CallerIDName: JOHN Q PUBLIC
Wait: 377
ActionID: 11223344556677889900
Event: QueueStatusComplete
ActionID: 11223344556677889900
Name
Queues — Shows basic queue information
Name
Redirect — Redirects (transfers) a channel
Parameters
-
Channel [required] Channel to redirect.
-
ExtraChannel [optional] Channel identifier of the second call leg to transfer.
-
ActionID [optional] An identifier that can be used to identify the response to this action.
-
Exten [required] Extension in the dialplan to transfer to.
-
Context [required] Context to transfer to.
-
Priority [required] Priority to transfer to.
Name
SIPpeers — Lists all SIP peers
Parameters
-
ActionID [optional] An action identifier that you can use to identify the response to this manager transaction.
Example
Action: SIPPeers
ActionID: 555444333222111
Response: Success
ActionID: 555444333222111
Message: Peer status list will follow
Event: PeerEntry
ActionID: 555444333222111
Channeltype: SIP
ObjectName: labrat
ChanObjectType: peer
IPaddress: 10.0.0.75
IPport: 5060
Dynamic: no
Natsupport: no
VideoSupport: no
ACL: no
Status: OK (318 ms)
RealtimeDevice: no
Event: PeerEntry
ActionID: 555444333222111
Channeltype: SIP
ObjectName: guineapig
ChanObjectType: peer
IPaddress: 172.18.227.72
IPport: 5060
Dynamic: no
Natsupport: no
VideoSupport: no
ACL: no
Status: Unmonitored
RealtimeDevice: no
Event: PeerEntry
ActionID: 555444333222111
Channeltype: SIP
ObjectName: another
ChanObjectType: peer
IPaddress: 172.18.227.73
IPport: 5060
Dynamic: yes
Natsupport: no
VideoSupport: no
ACL: no
Status: Unmonitored
RealtimeDevice: no
Event: PeerlistComplete
ListItems: 7
ActionID: 555444333222111
Name
SIPShowPeer — Shows information about a SIP peer
Parameters
-
Peer [required] The name of the SIP peer.
-
ActionID [optional] An action identifier that you can use to identify the response to this manager transaction.
Example
Action: SIPShowPeer
Peer: linksys2
ActionID: 9988776655
Response: Success
ActionID: 9988776655
Channeltype: SIP
ObjectName: linksys2
ChanObjectType: peer
SecretExist: Y
MD5SecretExist: N
Context: lab
Language:
AMAflags: Unknown
CID-CallingPres: Presentation Allowed, Not Screened
Callgroup:
Pickupgroup:
VoiceMailbox:
TransferMode: open
LastMsgsSent: -1
Call-limit: 0
MaxCallBR: 384 kbps
Dynamic: Y
Callerid: "Linksys #2" <555>
RegExpire: 2516 seconds
SIP-AuthInsecure: no
SIP-NatSupport: RFC3581
ACL: N
SIP-CanReinvite: Y
SIP-PromiscRedir: N
SIP-UserPhone: N
SIP-VideoSupport: N
SIP-DTMFmode: rfc2833
SIPLastMsg: 0
ToHost:
Address-IP: 192.168.5.71
Address-Port: 5061
Default-addr-IP: 0.0.0.0
Default-addr-port: 5056
Default-Username: linksys2
RegExtension: 6100
Codecs: 0x4 (ulaw)
CodecOrder: ulaw
Status: Unmonitored
SIP-Useragent: Linksys/SPA962-5.1.5
Reg-Contact : sip:linksys2@192.168.5.71:5061
Name
SetCDRUserField — Sets the CDR UserField
Name
SetVar — Sets channel variable
Name
Status — Lists channel status
Parameters
-
Channel [optional] Limits the status output to the specified channel.
-
ActionID [optional] An action identifier that you can use to identify the response to this manager transaction.
Example
Action: Status
Channel: SIP/test-10225140
ActionID: 101010101010101
Response: Success
ActionID: 101010101010101
Message: Channel status will follow
Event: Status
Privilege: Call
Channel: SIP/test-10225140
CallerID: "Bob Jones" <501>
CallerIDNum: 501
CallerIDName: "Bob Jones"
Account:
State: Up
Context: lab
Extension: 201
Priority: 1
Seconds: 865
Link: Local/200@lab-4d13,1
Uniqueid: 1177550165.0
ActionID: 101010101010101
Event: StatusComplete
ActionID: 101010101010101
Name
StopMonitor — Stops the recording of a channel
Name
UnpauseMonitor — Unpauses monitoring
Name
UpdateConfig — Updates a config file
Parameters
-
SrcFilename [required] The filename of the configuration file from which to read the current information.
-
DstFilename [required] The filename of the configuration file to be written.
-
Reload [optional] Specifies whether or not a reload should take place after the configuration update, or the name of a specific module that should be reloaded.
-
Action-XXXXXX [required] An action to take. Can be one of
NewCat,RenameCat,DelCat,Update,Delete, orAppend.-
Cat-XXXXXX [required] The name of the category to operate on.
-
Var-XXXXXX [optional] The name of the variable to operate on.
-
Value-XXXXXX [optional] The value of the variable to operate on.
-
Match-XXXXXX [optional] If set, an extra parameter that must be matched on the line.
-
ActionID [optional] An identifier that can be used to identify the response to this action.
Example
Action: UpdateConfig
SrcFilename: sip.conf
DstFilename: test.conf
Action-000000: update
Cat-000000: linksys
Var-000000: mailbox
Value-000000: 101@lab
Response: Success
Notes
Note that the first set of parameters should be numbered
000000, the second 000001, and so
on. This allows you to update many different configuration values at the
same time. It should also be noted that the Asterisk GUI uses this its
primary mechanism for updating the configuration of Asterisk.
Name
UserEvent — Sends an arbitrary event
Parameters
-
UserEvent [required] The name of the arbitrary event to send.
-
Header [optional] The name and value of an arbitrary parameter to your event. You may add as many additional headers (along with their values) to your event.
-
ActionID [optional] An identifier which can be used to identify the response to this action.
Name
WaitEvent — Waits for an event to occur
After calling this action, Asterisk will send you a
Success response as soon as another
event is queued by the Asterisk Manager Interface. Once
WaitEvent has been called on an HTTP manager session,
events will be generated and queued.
Name
ZapDNDoff — Sets a Zap channel’s do not disturb status to off
Name
ZapDNDon — Sets a Zap channel’s do not disturb status to on
Name
ZapDialOffhook — Dials over Zap channel while off-hook
Name
ZapHangup — Hangs up Zap channel
Name
ZapShowChannels — Shows status Zapata channels
Parameters
-
ActionID [optional] An action identifier that can be used to identify the response from Asterisk.
Example
Action: ZapShowChannels
ActionID: 9999999999
Response: Success
ActionID: 9999999999
Message: Zapata channel status will follow
Event: ZapShowChannels
Channel: 1
Signalling: FXO Kewlstart
Context: incoming
DND: Disabled
Alarm: No Alarm
ActionID: 9999999999
Event: ZapShowChannels
Channel: 4
Signalling: FXS Kewlstart
Context: incoming
DND: Disabled
Alarm: No Alarm
ActionID: 9999999999
Event: ZapShowChannelsComplete
ActionID: 9999999999
This appendix contains the examples from the hot-desking feature in the the section called “Getting Funky with func_odbc: Hot-Desking”” section in Chapter 12, Relational Database Integration. It may be useful to follow along with this example in Chapter 12, Relational Database Integration as it can be useful to see where the code is going while reading along with the explanation.
Name
Hot-Desking (extensions.conf) — Dialplan code
Synopsis
; Hot Desking Feature
[hotdesk]
; Hot Desk Login
exten => _11XX,1,NoOp()
exten => _11XX,n,Set(E=${EXTEN})
exten => _11XX,n,Verbose(1|Hot Desk Extension ${E} is changing status)
exten => _11XX,n,Verbose(1|Checking current status of extension ${E})
exten => _11XX,n,Set(${E}_STATUS=${HOTDESK_INFO(status,${E})})
exten => _11XX,n,Set(${E}_PIN=${HOTDESK_INFO(pin,${E})})
exten => _11XX,n,GotoIf($[${ISNULL(${${E}_STATUS})}]?invalid_user)
exten => _11XX,n,GotoIf($[${${E}_STATUS} = 1]?logout,1:login,1)
exten => login,1,NoOp()
exten => login,n,Set(PIN_TRIES=0)
exten => login,n,Set(MAX_PIN_TRIES=3)
exten => login,n(get_pin),NoOp()
exten => login,n,Set(PIN_TRIES=$[${PIN_TRIES} + 1])
exten => login,n,Read(PIN_ENTERED|enter-password|${LEN(${${E}_PIN})})
exten => login,n,GotoIf($[${PIN_ENTERED} = ${${E}_PIN}]?valid_login,1)
exten => login,n,Playback(invalid-pin,1)
exten => login,n,GotoIf($[${PIN_TRIES} <= ${MAX_PIN_TRIES}]?get_pin:login_fail,1)
exten => valid_login,1,NoOp()
exten => valid_login,n,Set(LOCATION=${CUT(CHANNEL,/,2)})
exten => valid_login,n,Set(LOCATION=${CUT(LOCATION,-,1)})
exten => valid_login,n,Set(ARRAY(USERS_LOGGED_IN)=${HOTDESK_CHECK_PHONE_LOGINS
(${LOCATION})})
exten => valid_login,n,GotoIf($[${USERS_LOGGED_IN} > 0]?logout_login,1)
exten => valid_login,n(set_login_status),NoOp()
exten => valid_login,n,Set(HOTDESK_STATUS(${E})=1\,${LOCATION})
exten => valid_login,n,GotoIf($[${ODBCROWS} < 1]?error,1)
exten => valid_login,n,Playback(agent-loginok)
exten => valid_login,n,Hangup()
exten => logout_login,1,NoOp()
exten => logout_login,n,Set(ROW_COUNTER=0)
exten => logout_login,n,While($[${ROW_COUNTER} < ${USERS_LOGGED_IN}])
exten => logout_login,n,Set(WHO=${HOTDESK_LOGGED_IN_USER(${LOCATION},${ROW_COUNTER})})
exten => logout_login,n,Set(HOTDESK_STATUS(${WHO})=0)
exten => logout_login,n,Set(ROW_COUNTER=$[${ROW_COUNTER} + 1])
exten => logout_login,n,EndWhile()
exten => logout_login,n,Goto(valid_login,set_login_status)
exten => logout,1,NoOp()
exten => logout,n,Set(HOTDESK_STATUS(${E})=0)
exten => logout,n,GotoIf($[${ODBCROWS} < 1]?error,1)
exten => logout,n,Playback(silence/1&agent-loggedoff)
exten => logout,n,Hangup()
exten => login_fail,1,NoOp()
exten => login_fail,n,Playback(silence/1&login-fail)
exten => login_fail,n,Hangup()
exten => error,1,NoOp()
exten => error,n,Playback(silence/1&connection-failed)
exten => error,n,Hangup()
exten => invalid_user,1,NoOp()
exten => invalid_user,n,Verbose(1|Hot Desk extension ${E} does not exist)
exten => invalid_user,n,Playback(silence/2&invalid)
exten => invalid_user,n,Hangup()
include => hotdesk_outbound
[hotdesk_outbound]
exten => _X.,1,NoOp()
exten => _X.,n,Set(LOCATION=${CUT(CHANNEL,/,2)})
exten => _X.,n,Set(LOCATION=${CUT(LOCATION,-,1)})
exten => _X.,n,Set(WHO=${HOTDESK_PHONE_STATUS(${LOCATION})})
exten => _X.,n,GotoIf($[${ISNULL(${WHO})}]?no_outgoing,1)
exten => _X.,n,Set(${WHO}_CID_NAME=${HOTDESK_INFO(cid_name,${WHO})})
exten => _X.,n,Set(${WHO}_CID_NUMBER=${HOTDESK_INFO(cid_number,${WHO})})
exten => _X.,n,Set(${WHO}_CONTEXT=${HOTDESK_INFO(context,${WHO})})
exten => _X.,n,Goto(${${WHO}_CONTEXT},${EXTEN},1)
[international]
exten => _011.,1,NoOp()
exten => _011.,n,Set(E=${EXTEN})
exten => _011.,n,Goto(outgoing,call,1)
exten => i,1,NoOp()
exten => i,n,Playback(silence/2&sorry-cant-let-you-do-that2)
exten => i,n,Hangup()
include => longdistance
[longdistance]
exten => _1NXXNXXXXXX,1,NoOp()
exten => _1NXXNXXXXXX,n,Set(E=${EXTEN})
exten => _1NXXNXXXXXX,n,Goto(outgoing,call,1)
exten => _NXXNXXXXXX,1,Goto(1${EXTEN},1)
exten => i,1,NoOp()
exten => i,n,Playback(silence/2&sorry-cant-let-you-do-that2)
exten => i,n,Hangup()
include => local
[local]
exten => _416NXXXXXX,1,NoOp()
exten => _416NXXXXXX,n,Set(E=${EXTEN})
exten => _416NXXXXXX,n,Goto(outgoing,call,1)
exten => i,1,NoOp()
exten => i,n,Playback(silence/2&sorry-cant-let-you-do-that2)
exten => i,n,Hangup()
[outgoing]
exten => call,1,NoOp()
exten => call,n,Set(CALLERID(name)=${${WHO}_CID_NAME})
exten => call,n,Set(CALLERID(number)=${${WHO}_CID_NUMBER})
exten => call,n,Dial(SIP/service_provider/${E})
exten => call,n,Playback(silence/2&pls-try-call-later)
exten => call,n,Hangup()
[hotdesk_phones]
exten => _11XX,1,NoOp()
exten => _11XX,n,Set(E=${EXTEN})
exten => _11XX,n,Set(LOCATION=${HOTDESK_LOCATION(${E})})
exten => _11XX,n,GotoIf($[${ISNULL(${LOCATION})}]?voicemail,1)
exten => _11XX,n,Dial(SIP/${LOCATION},30)
exten => _11XX,n,Goto(voicemail,1)
exten => voicemail,1,NoOp()
exten => voicemail,n,Voicemail(${E}@hotdesk,u)
exten => voicemail,n,Hangup()See Also
Hot-Desking (sip.conf), Hot-Desking
(func_odbc.conf), Chapter 5, Dialplan Basics, Chapter 6, More Dialplan Concepts, Read(), CUT,
While(), ISNULL, VoiceMail(),
CALLERID, Dial(), GotoIf()
Name
Hot-Desking (func_odbc.conf) — Custom dialplan functions
Synopsis
[INFO]
prefix=HOTDESK
dsn=asterisk
read=SELECT ${ARG1} FROM ast_hotdesk WHERE extension = '${ARG2}'
[STATUS]
prefix=HOTDESK
dsn=asterisk
write=UPDATE ast_hotdesk SET status = '${VAL1}', location = '${VAL2}' WHERE extension
= '${ARG1}'
[CHECK_PHONE_LOGINS]
prefix=HOTDESK
dsn=asterisk
read=SELECT COUNT(status) FROM ast_hotdesk WHERE status = '1' AND location = '${ARG1}'
[LOGGED_IN_USER]
prefix=HOTDESK
dsn=asterisk
read=SELECT extension FROM ast_hotdesk WHERE status = '1' AND location = '${ARG1}'
ORDER BY id LIMIT '1' OFFSET '${ARG2}'
[PHONE_STATUS]
prefix=HOTDESK
dsn=asterisk
read=SELECT extension FROM ast_hotdesk WHERE location = '${ARG1}' AND status = '1'Name
Hot-Desking (sip.conf) — Two sample phone configurations and sample service provider configuration
Synopsis
; HOT DESK USERS [desk_1] type=friend host=dynamic secret=my_special_secret context=hotdesk qualify=yes [desk_2] type=friend host=dynamic secret=my_special_secret context=hotdesk qualify=yes ; END HOT DESK USERS
See Also
Hot-Desking (extensions.conf), Hot-Desking (func_odbc.conf), Chapter 4, Initial Configuration of Asterisk
Symbols
- ! (bang), matching characters with, Pattern-matching syntax
- != operator, Operators
- $ (dollar sign), using expressions, Basic Expressions
- % (remainder of sign), Operators
- & (ampersand)
- and boolean operator, Operators
- dialing multiple channels, Using the Dial() Application
- ' (single quotes)
- using the makerequest function, Adding a new tab to the GUI
- * (asterisk), What Do I Really Need?
- GotoIfTime( ) function), Time-Based Conditional Branching with GotoIfTime()
- multiplication sign, Operators
- * (wildcard), What Do I Really Need?
- *** termcap support not found, configure: error: *** termcap support not found
- + (plus sign), Operators
- , (commas), using Set( ), Getting Funky with func_odbc: Hot-Desking
- - (minus sign), Operators
- . (period), matching characters with, Pattern-matching syntax
- / (forward slash)
- integer division sign, Operators
- using Dial( ), Using the Dial() Application
- 7960 (Cisco) telephone, Cisco 7960 Telephone-Cisco 7960 Telephone
- : (regular expression operator), Operators
- < (less than) operator, Operators
- <= operator, Operators
- = (equal sign) comparison operator, Operators
- => (extensions), Extensions
- > (greater than) comparison operator, Operators
- >= operator, Operators
- [ ] (square brackets), IAX
- contexts and, Contexts
- DUNDi peers, defining, Defining DUNDi peers
- editing the iax.conf file, Configure the Softphone
- Manager interface and, The Manager Interface
- \ (backslash), using Set( ), Getting Funky with func_odbc: Hot-Desking
- ^ (caret), in regular expressions, Operators
- _ (underscores), using pattern-matching, Pattern-matching syntax
- { } (curly braces)
- functions and, Syntax
- variables and, Using Variables
- | (pipe), IAX
- as a separator, Applications
- boolean operator, Operators
- mailboxes, creating, Creating Mailboxes
- Set( ) application and, Getting Funky with func_odbc: Hot-Desking
- μlaw, Logarithmic companding
A
- AADK (Asterisk Appliance Developers Kit, Why a GUI for Asterisk?
- AbsoluteTimeout (AMI action),
- AC (alternating current), Ringer
- accountcode
- CSV value, Call Detail Recording
- parameter (IAX), General IAX Settings
- SIP parameter, SIP Channel Definitions
- ActiveRecord, Database integration
- adaptors (telephony), Telephony Adaptors
- AddQueueMember( ) application,
- Adhearsion, Asterisk Development with Adhearsion-More Information
- code, distributing and reusing, Distributing and reusing code
- dialplans and, A New Approach to Dialplans
- installing, Installing Adhearsion-Installing Adhearsion from RubyGems
- Micromenus, using, Integrate with Your Desk Phone Using Micromenus
- adsi parameter (IAX), General IAX Settings
- adsi.conf file, adsi.conf
- ADSIProg( ) application,
- adtranvofr.conf file, adtranvofr.conf
- AGENT dialplan function,
- AgentCallbackLogin( ) application, ,
- AgentLogin( ) application,
- AgentLogoff( ) application,
- AgentMonitorOutgoing( ) application,
- Agents (AMI action),
- agents.conf file, agents.conf
- AGI (Asterisk Gateway Interface), The Asterisk Gateway Interface (AGI)-Conclusion
- communication, The Standard Pattern of AGI Communication
- debugging, Debugging in AGI-Using Asterisk’s agi debug Command
- agi debug command, Using Asterisk’s agi debug Command
- AGI( ) application, Calling an AGI Script from the Dialplan,
- agi-bin/ directory, /var/lib/asterisk
- AJAM (Asynchronous JavaScript and Asterisk Manager), Why a GUI for Asterisk?, Ajax, AJAM, and Asterisk-The Prototype framework
- Ajax (Asynchronous JavaScript and XML), Why a GUI for Asterisk?, Architecture of the Asterisk GUI, Ajax, AJAM, and Asterisk-The Prototype framework
- form (HTML) processing, Form processing in an Ajax application
- AlarmReceiver( ) application,
- alarmreceiver.conf file, alarmreceiver.conf
- Algebraic-Code-Excited Linear Prediction (CS-ACELP), G.729A
- aliasing, Aliasing
- allow parameter
- allowexternalinvites SIP parameter, General SIP Parameters
- allowguest SIP parameter, General SIP Parameters
- allowoverlap SIP parameter, General SIP Parameters
- allowsubscribe SIP parameter, General SIP Parameters
- allowtransfers SIP parameter, General SIP Parameters
- alsa.conf file, alsa.conf
- alternate installations of AsteriskNOW, Alternate Installations
- alwaysauthreject SIP parameter, General SIP Parameters
- AMA (Automatic Message Accounting), General IAX Settings
- amaflags CSV value, Call Detail Recording, General IAX Settings
- amaflags SIP parameter, SIP Channel Definitions
- AMD CPUs, Choosing a Processor
- AMD( ) application,
- AMI (Asterisk Manager Interface), The Manager Interface-More Information, Architecture of the Asterisk GUI
- HTTP, commands over, Issuing Manager Commands over HTTP
- ampersand (&)
- and boolean operator, Operators
- dialing multiple channels, Using the Dial() Application
- analog interfaces, What Do I Really Need?
- cards, Analog interface cards
- analog telephones, Analog telephones
- FXS channels, configuring, Configuring an FXS Channel for an Analog Telephone
- analog telephony, Analog Telephony-Tip and Ring
- Analog Terminal Adaptors (ATAs), Telephony Adaptors, Linksys SPA-942
- analog waveforms, Digitally encoding an analog waveform
- digitizing, Performance Issues
- analog-to-digital (A/D) converters, Aliasing
- and (&) boolean operator, Operators
- ANSWER (AGI),
- answer CSV value, Call Detail Recording
- Answer( ) application, Applications, The Answer(), Playback(), and Hangup() Applications,
- Festival, using, Calling Festival from the Dialplan
- AppendCDRUserField( ) application,
- applications, Extensions, Applications
- dialplan, Dialplan Syntax
- ARA (Asterisk Realtime Architecture), Preparing a System for Asterisk, Using Realtime-Dynamic Realtime
- arguments
- applications, Applications
- macros, using, Using Arguments in Macros
- Makefiles, Alternative make Arguments
- ${ARG n} variable, Calling Macros from the Dialplan
- ARRAY( ) function, Getting Funky with func_odbc: Hot-Desking,
- AstDB (Asterisk database, Using the Asterisk Database (AstDB)-Using the AstDB in the Dialplan
- Asterisk
- Appliance Developers Kit (AADK), Why a GUI for Asterisk?
- Documentation Project, The Asterisk Documentation Project
- Gateway Interface (AGI), The Asterisk Gateway Interface (AGI)-Conclusion
- GUI project, Why a GUI for Asterisk?
- Guru, Configuring an IAX Softphone
- Manager Interface (AMI), The Manager Interface-More Information, Architecture of the Asterisk GUI, Asterisk Manager Interface
- HTTP, commands over, Issuing Manager Commands over HTTP
- Realtime Architecture (ARA), Preparing a System for Asterisk, Using Realtime-Dynamic Realtime
- User Groups (AUGs), Asterisk User Groups
- Web Voicemail, make webvmail
- Wiki, The Asterisk Wiki
- asterisk (*)
- GotoIfTime( ) function, Time-Based Conditional Branching with GotoIfTime()
- multiplication sign, Operators
- wildcard, What Do I Really Need?
- Asterisk GUI, What Is AsteriskNOW?
- #asterisk IRC channel, The IRC Channels
- Asterisk-Biz mailing list, The Asterisk Mailing Lists
- Asterisk-BSD mailing list, The Asterisk Mailing Lists
- #asterisk-dev IRC channel, The IRC Channels
- Asterisk-Dev mailing list, The Asterisk Mailing Lists
- asterisk-sounds package, What Packages Do I Need?
- Asterisk-Users mailing list, The Asterisk Mailing Lists
- asterisk.conf file, Static Realtime, asterisk.conf
- AsteriskNOW (Ruby), Installing Ruby/RubyGems on AsteriskNOW
- AsteriskNOW software, AsteriskNOW™-For More Information
- Astlinux, Small systems
- Astricon, Standard Installation
- Asynchronous JavaScript and Asterisk Manager (AJAM), Why a GUI for Asterisk?, Ajax, AJAM, and Asterisk-The Prototype framework
- Asynchronous JavaScript and XML (see Ajax)
- ATAs (Analog Terminal Adaptors), Telephony Adaptors, Linksys SPA-942
- attach options, creating mailboxes, Creating Mailboxes
- AUGs (Asterisk User Groups), Asterisk User Groups
- Authenticate( ) application,
- auto-attendants, The Background(), WaitExten(), and Goto() Applications
- autobug parameter (IAX), General IAX Settings
- autoconf, Menuselect
- autodomain SIP parameter, General SIP Parameters
- autokill parameter (IAX), General IAX Settings
- Automatic Message Accounting (AMA), General IAX Settings
- Automatic Partitioning screen, Extended procedure
B
- Back-To-Back User Agent (B2BUA), Configuring SIP Telephones
- Background( ) application, Working with Interface Configuration Files, The Background(), WaitExten(), and Goto() Applications, Customizing System Prompts,
- BackgroundDetect( ) application,
- backslash (\), using Set( ), Getting Funky with func_odbc: Hot-Desking
- bandwidth parameter (IAX), General IAX Settings
- bang (!), matching characters with, Pattern-matching syntax
- BASE64_DECODE dialplan function,
- BASE64_ENCODE dialplan function,
- bash shell, compiling Asterisk source code, Extracting the Source Code
- Basic Rate Interface (BRI), Other types of PSTN interfaces, ISDN telephones, ISDN-BRI/BRA
- bidirectional communication (full duplex), FXO and FXS Channels
- billsec CSV value, Call Detail Recording
- binaries (Asterisk), Using Precompiled Binaries
- bindaddr SIP parameter, General SIP Parameters
- bindport SIP parameter, General SIP Parameters
- bison, Linux Package Requirements
- BLACKLIST dialplan function,
- bland line feed (\n), Debugging from the Operating System
- BLOB (Binary Large Object), storing voicemails, ODBC Voicemail
- Boehnlein, Greg, Small systems
- Boolean operators, Operators
- Boot server host name, DHCP server
- bootROM (Polycom sets), The bootROM
- Branch, Obtaining the Source Code
- BRI (Basic Rate Interface), Other types of PSTN interfaces, ISDN telephones, ISDN-BRI/BRA
- buggymwi SIP parameter, General SIP Parameters
- business systems, Preparing a System for Asterisk
- Busy( ) application,
C
- -c (console) switch, Console Commands
- -c flag (Asterisk console), Connecting to the Console
- C programming language, Distributing and reusing code
- C++ preprocessors, configure: error: C++ preprocessor "/lib/cpp" fails sanity check
- C7960 (Cisco) telephone, Cisco 7960 Telephone-Cisco 7960 Telephone
- Call Detail Records (CDR), Storing Call Detail Records
- information, storing, Call Detail Recording
- call files, Call Files
- call parking, Call Parking
- CALLER ID dialplan function,
- callerid parameter (IAX), Channel-specific parameters
- callerid SIP parameter, SIP Channel Definitions
- callevents SIP parameter, General SIP Parameters
- callgroup SIP parameter, SIP Channel Definitions
- callingpres SIP parameter, SIP Channel Definitions
- canreinvite SIP parameter, SIP Channel Definitions
- caret (^), in regular expressions, Operators
- CAS (Channel Associated Signaling, Channel Associated Signaling (CAS)
- category module, Static Realtime
- Cathedral and the Bazaar (Raymond), The Promise of Open Source Telephony
- cat_metric module, Static Realtime
- CDR (Call Detail Records), Storing Call Detail Records
- information, storing, Call Detail Recording
- CDR dialplan function,
- cdr.conf file, Static Realtime, cdr.conf
- cdr_manager.conf file, cdr_manager.conf
- cdr_odbc.conf file, cdr_odbc.conf
- cdr_pgsql.conf file, cdr_pgsql.conf
- cdr_tds.conf file, cdr_tds.conf
- CentOS directory, Installing Asterisk
- central office (CO), Ringer
- central processing unit (CPU), Performance Issues
- CEPT (European Conference of Postal and Telecommunications Administrations), T-carrier circuits
- cfgbasic.html file, Customization of the GUI
- CHALLENGE action, Issuing Manager Commands over HTTP
- ChangeMonitor( ) application, ,
- ChanIsAvail( ) application,
- channel =>, defining channels and, Zapata Hardware Configuration
- channel CSV value, Call Detail Recording
- CHANNEL dialplan function,
- CHANNEL STATUS (AGI),
- ChannelRedirect( ) application,
- channels, Initial Configuration of Asterisk
- banks, Channel banks
- variables, Channel variables
- ChanSpy( ) application,
- chan_h323.so, H.323
- chan_sip.so module, SIP
- chan_zap, Compiling Zaptel
- checkmwi SIP parameter, General SIP Parameters
- CHECKSIPDOMAIN dialplan function,
- CHECK_MD5 dialplan function,
- Christensen, Clayton M., Linksys SPA-942
- circuit types (digital circuit-switched), Circuit Types
- circuit-switched network, Analog telephones
- circuits (electrical), Electrical Circuits, Analog telephones
- Cisco 7960 telephone, Cisco 7960 Telephone-Cisco 7960 Telephone
- Cisco Call Manager PBX, Skinny/SCCP
- Cisco VoIP equipment, Skinny/SCCP
- Citel, Proprietary digital telephones
- clean (make), The Zapata Telephony Drivers
- CLI (command-line interface), Loading Asterisk and Zaptel Quickly
- clid CSV value, Call Detail Recording
- clients, Configuring SIP Telephones
- codecpriority parameter (IAX), General IAX Settings
- codecs (COder/DECoder), Performance Issues, Codecs-MP3
- codecs.conf file, codecs.conf
- Colp, Joshua, Preparing a System for Asterisk
- columns (database)
- ActiveRecord databases, Database integration
- PostgreSQL, defining for in static realtime, Static Realtime
- comma separated values (CSV), Call Detail Recording
- Command (AMI action),
- command-line interface (CLI), Loading Asterisk and Zaptel Quickly
- commands (applications), Extensions, Applications
- commas (,), using Set( ), Getting Funky with func_odbc: Hot-Desking
- commented module, Static Realtime
- communications terminals, Communications Terminals
- community (Asterisk), The Asterisk Community
- compactheaders SIP parameter, General SIP Parameters
- companding, Logarithmic companding
- compiling
- Asterisk, Compiling Asterisk-Using Precompiled Binaries
- bash and, Extracting the Source Code
- Linux package requirements and, Linux Package Requirements
- issues with, Common Compiling Issues-Depmod errors during compilation
- libpri, Compiling libpri
- Zapter, Compiling Zaptel
- computer power supplies, Computer power supplies
- conditional branching, Conditional Branching-Time-Based Conditional Branching with GotoIfTime()
- config (make), The Zapata Telephony Drivers, make config, Loading Asterisk and Zaptel Quickly
- configuration files, Working with Interface Configuration Files
- Asterisk GUI and, Reading a configuration file
- dialplan, Dialplan Syntax
- Polycom sets, The Polycom configuration files
- using templates and, Using Templates in Your Configuration Files
- configuration of Asterisk, Initial Configuration of Asterisk-Conclusion
- configure: error: *** termcap support not found, configure: error: *** termcap support not found
- Congestion( ) application,
- console (Asterisk), Connecting to the Console
- console commands, starting Asterisk without scripts, Console Commands
- context setting (features.conf file), Call Parking
- context SIP parameter, SIP Channel Definitions
- contexts, Dialplan Syntax
- contiguous connections (circuits), Analog telephones
- ContinueWhile( ) application,
- contrib/ directory, configuring Festival, Getting Festival Set Up and Ready for Asterisk
- ControlPlayback( ) application,
- cookies, LOGIN
- cords (waveforms), Logarithmic companding
- Core sounds package, What Packages Do I Need?
- CounterPath X-Lite Softphone, CounterPath’s X-Lite Softphone-CounterPath’s X-Lite Softphone
- Courier-IMAP, Storing Voicemail in an IMAP Server
- cpp, configure: error: no acceptable C compiler found in $PATH
- CPUs (central processing unit), Performance Issues
- crackers, Asterisk: The Hacker’s PBX
- Creative Commons licensed music, Music on Hold
- CRM (Customer Relationship Management), The Manager Interface
- cross-platform softphones, Configuring an IAX Softphone
- Crossing the Chasm (Moore, Geoffrey), The Business Case
- CS-ACELP (Algebraic-Code-Excited Linear Prediction), G.729A
- CSV (comma separated values), Call Detail Recording
- CURL dialplan function,
- curly braces ({ })
- functions and, Syntax
- variables and, Using Variables
- Customer Relationship Management (CRM), The Manager Interface
- CUT dialplan function,
D
- DATABASE DEL (AGI),
- DATABASE DELTREE (AGI),
- DATABASE GET (AGI),
- DATABASE PUT (AGI),
- databases, Using the Asterisk Database (AstDB)-Using the AstDB in the Dialplan
- Adhearsion, Database integration-Database integration
- func_odbc function, Getting Funky with func_odbc: Hot-Desking-Getting Funky with func_odbc: Hot-Desking
- installing, Installing the Database-Installing the Database
- relational integration, Introduction-Conclusion
- DateTime( ) application,
- days_of_month argument (GotoIfTime( ) function), Time-Based Conditional Branching with GotoIfTime()
- days_of_week argument (GotoIfTime( ) function), Time-Based Conditional Branching with GotoIfTime()
- DB dialplan function,
- DBdel( ) application,
- DBdeltree( ) application,
- DBGet (AMI action),
- DBget( ) application, Storing Data in the AstDB
- DBPut (AMI action),
- DBput( ) application, Storing Data in the AstDB
- DB_DELETE dialplan function,
- DB_EXISTS dialplan function,
- DC (direct current) voltage, Ringer
- dcontext CSV value, Call Detail Recording
- DeadAGI( ) application, Calling an AGI Script from the Dialplan,
- debugging, Debugging
- decoder (codec), Performance Issues
- defaultexpiry SIP parameter, General SIP Parameters
- defaultip parameter
- delayreject parameter (IAX), General IAX Settings
- Denial of Service (DoS), Security considerations
- deny parameter, Connecting to a SIP Service Provider
- deny SIP parameter, SIP Channel Definitions
- depmod errors, Depmod errors during compilation
- dev directory, Systems Running udevd
- devfs, Systems Running udevd
- DHCP servers, DHCP server
- Polycom IP 430, DHCP server
- DHTML, Ajax, AJAM, and Asterisk
- dial pad, Dial pad
- Dial( ) application, Using the Dial() Application, Call Parking, IAX Channel Definitions,
- dial-by-name directories, creating, Creating a Dial-by-Name Directory
- dialplan, Configuring the Dialplan, Dialplan Basics-Conclusion
- Adhearsion, developing with, A New Approach to Dialplans
- AGI scripts, Calling an AGI Script from the Dialplan
- building an interactive, Building an Interactive Dialplan-Includes
- concepts, More Dialplan Concepts-Conclusion
- configuring, Dialplan Configuration, Dialplan Configuration
- connecting two Asterisk boxes, Configuring the Dialplan
- for testing, Configuring the Dialplan for Testing
- Festival, Calling Festival from the Dialplan
- functions, Dialplan Functions
- macros, calling from, Calling Macros from the Dialplan
- reload command, Working with Interface Configuration Files
- scripting logic, Performance Issues
- setting up, Setting Up the Dialplan for Some Test Calls
- syntax, Dialplan Syntax-Applications
- voicemail, adding to, Adding Voicemail to the Dialplan
- DIALSTATUS variable, Using the Dial() Application
- Dictate( ) application,
- dictate/ directory, /var/spool/asterisk/
- DID (Direct Inward Dialing), Connecting to an IAX Service Provider
- DiffServ (differentiated service), Differentiated Service
- digital
- circuit-switched networks, The Digital Circuit-Switched Telephone Network-Signaling System 7
- circuits, What Do I Really Need?
- interface cards, Digital interface cards
- signaling protocols, Digital Signaling Protocols-Signaling System 7
- telephones, Proprietary digital telephones
- telephony, Digital Telephony-Aliasing
- circuit-switched networks, The Digital Circuit-Switched Telephone Network
- Digital Signal Processing (DSP), The Zapata Telephony Project, Performance Issues
- digital-to-analog (D/A) converters, Digitally encoding an analog waveform
- Digium, The Asterisk Community, Analog interface cards
- X100P card, FXO and FXS Channels
- Digium TDM11B, Initial Configuration of Asterisk
- direct current (DC) voltage, Ringer
- Direct Inward Dialing (DID), Connecting to an IAX Service Provider
- directories, used by Asterisk, Directories Used by Asterisk-/var/log/asterisk/cdr-csv
- Directory( ) application, Creating a Dial-by-Name Directory,
- directrtpsetup SIP parameter, General SIP Parameters
- DISA( ) application,
- disallow parameter (IAX), General IAX Settings
- disallow SIP parameter, SIP Channel Definitions
- disposition CSV value, Call Detail Recording
- distclean (make), make distclean
- Distributed Universal Number Discovery (see DUNDi)
- division sign (/), Operators
- Dixon, Jim, The Zapata Telephony Project
- DNS (Domain Name System), ENUM
- dnsmgr.conf file, dnsmgr.conf
- doc/ subdirectory, Contexts
- dollar signs ($), using expressions, Basic Expressions
- DOM, Ajax, AJAM, and Asterisk
- Domain Name System (DNS), ENUM
- domain SIP parameter, General SIP Parameters
- DoS (Denial of Service) attacks, Security considerations
- Dovecot IMAP servers, Storing Voicemail in an IMAP Server
- downloading configurations (Polycom phones), Protocol to use for downloading
- doxygen system, make progdocs
- DPDISCOVER query, General configuration
- DS-0, The humble DS-0―the foundation of it all
- DSP (Digital Signal Processing), The Zapata Telephony Project, Performance Issues
- dst CSV value, Call Detail Recording
- dstchannel CSV value, Call Detail Recording
- \dt (describe tables) command, Storing Call Detail Records
- DTMF (Dual-Tone Multi Frequency), Dial pad
- dtmfmode SIP parameter, SIP Channel Definitions
- Dual-Tone Multi Frequency (DTMF), Dial pad
- DumpChan( ) application,
- dumphistory SIP parameter, General SIP Parameters
- DUNDi (Distributed Universal Number Discovery), Linux Package Requirements, DUNDi-Configuring the dialplan
- DUNDi protocol, Preparing a System for Asterisk
- dundi.conf file, Configuring Asterisk for Use with DUNDi, dundi.conf
- peers, defining, Defining DUNDi peers
- DUNDILOOKUP dialplan function,
- duration CSV value, Call Detail Recording
- dust and electronics, Dust
- dynamic realtime, Using Realtime
E
- E&M (Ear & Mouth or recEive & transMit) signaling, Channel Associated Signaling (CAS)
- E.164, E.164
- E1 (CEPT-1), T-carrier circuits
- E1 cards, Digital interface cards, What Do I Really Need?
- e164.org, e164.org
- EAGI( ) application, Calling an AGI Script from the Dialplan,
- Ear & Mouth (E&M), Channel Associated Signaling (CAS)
- echo, Preparing a System for Asterisk, Echo
- echo cancellation, Performance Issues, Echo Cancellation
- Echo( ) application, Setting Up the Dialplan for Some Test Calls, Dialplan Configuration,
- /ect/asterisk/ directory, /etc/asterisk/
- electrical
- circuits, Electrical Circuits
- supplies, Environment
- elements (GUI), GUI elements
- email, notifying of voicemail, Voicemail
- encryption, Encryption
- end CSV value, Call Detail Recording
- EndWhile( ) application,
- Enebo, Thomas, Using Java
- ENUM, ENUM
- enum.conf file, enum.conf
- ENUMLOOKUP dialplan function,
- ENV dialplan function, Environment variables,
- environment variables, Environment variables
- environments, Preparing a System for Asterisk, Environment
- equal sign (=) comparison operator, Operators
- equipment conditions, The Equipment Room
- errors, compiling, configure: error: *** termcap support not found
- /etc/ directory, Zaptel Hardware Configuration
- /etc/asterisk directory, Using Realtime
- dialplan syntax, Dialplan Syntax
- European Conference of Postal and Telecommunications Administrations (CEPT), T-carrier circuits
- EVAL dialplan function,
- Events (AMI action),
- EXEC (AGI),
- Exec( ) application,
- ExecIf( ) application,
- EXISTS dialplan function,
- ExitWhile( ) application,
- Express Installation (AsteriskNOW), Installation
- expressions, Basic Expressions
- extconfig.conf file, Static Realtime, extconfig.conf
- ${EXTEN} channel variable, Using the ${EXTEN} channel variable
- extensions, Extensions
- dialplan, Dialplan Syntax
- extensions.ael file, extensions.ael
- extensions.conf file, Working with Interface Configuration Files, Dialplan Syntax, Database integration, extensions.conf
- [hotdesk] context and, Getting Funky with func_odbc: Hot-Desking
- mapping contexts, creating, Creating mapping contexts
- voicemail, storing and, Testing ODBC Voicemail
- ExtensionState (AMI action),
- ExtenSpy( ) application,
- ExternalIVR( ) application,
- externhost SIP parameter, General SIP Parameters
- externip SIP parameter, General SIP Parameters
- externrefresh SIP parameter, General SIP Parameters
- extracting Asterisk source code, Obtaining Asterisk Source Code
- Extras sound package, What Packages Do I Need?
F
- families (database groupings), Using the Asterisk Database (AstDB)
- family key values (AstDB), Storing Data in the AstDB
- FastAGI( ) application, Calling an AGI Script from the Dialplan,
- features.conf file, Call Parking, features.conf
- Festival, Festival-Calling Festival from the Dialplan, Festival
- Festival( ) application, Getting Festival Set Up and Ready for Asterisk,
- festival.conf file, festival.conf
- festival.scm file, Getting Festival Set Up and Ready for Asterisk
- fflush function (PHP), Creating AGI Scripts in PHP
- fgets function (PHP), Creating AGI Scripts in PHP
- FIELDQTY dialplan function,
- file handles, Fundamentals of AGI Communication
- filename module, Static Realtime
- FILTER dialplan function,
- Firefox browser, What You Will Need, Ajax, AJAM, and Asterisk
- firewalls, configuring, Connecting to a SIP Service Provider, Connecting Two Asterisk Boxes Together via IAX
- connecting two Asterisk boxes together, Connecting Two Asterisk Boxes Together via SIP
- firmware/ directory, /var/lib/asterisk
- flags (console), Connecting to the Console
- flash events, Hook switch (or switch hook)
- Flash Operator Panel (FOP), The Flash Operator Panel
- Flash( ) application,
- floating point unit (FPU), Performance Issues
- processors, choosing, Choosing a Processor
- FollowMe( ) application,
- FOP (Flash Operator Panel), The Flash Operator Panel
- forcejitterbuffer parameter (IAX), General IAX Settings
- Foreign eXchange Office (see FXO)
- Foreign eXchange Station (see FXS)
- ForkCDR( ) application,
- forms (HTML), Form processing in a traditional web application
- forward slash (/), using Dial( ), Using the Dial() Application
- FPU (floating point unit), Performance Issues
- processors, choosing, Choosing a Processor
- FreeBSD, The Asterisk Mailing Lists
- friend type, Friends
- fromdomain SIP parameter, SIP Channel Definitions
- fromuser parameter, Connecting to a SIP Service Provider
- fromuser SIP parameter, SIP Channel Definitions
- FTP servers, FTP server
- configuring Polycom set with, FTP
- full duplex (bidirectional communication), FXO and FXS Channels
- functions (dialplan), Dialplan Functions
- func_odbc function, Getting Funky with func_odbc: Hot-Desking-Getting Funky with func_odbc: Hot-Desking, An Example of func_odbc-See Also
- func_odbc.conf file, Getting Funky with func_odbc: Hot-Desking
- FXO (Foreign eXchange Office), Analog interface cards, Initial Configuration of Asterisk
- channels, FXO and FXS Channels
- ports, Analog interface cards
- PSTN connections, configuring for, Configuring an FXO Channel for a PSTN Connection-Dialing In
- FXS (Foreign eXchange Station), Initial Configuration of Asterisk
- channels, FXO and FXS Channels
- configuring for analog telephones, Configuring an FXS Channel for an Analog Telephone
- ports, Analog interface cards
- fxsks, Zaptel Hardware Configuration
G
- -g (core dumb) switch, Console Commands
- g parameter (makerequest function), Adding a new tab to the GUI
- G.711 codec, Performance Issues, G.711
- G.726 codec, G.726
- G.729 codec, Performance Issues, What Packages Do I Need?
- G.729A codec, G.729A
- g726nonstandard SIP parameter, General SIP Parameters
- GCC compiler, Linux Package Requirements, Standard Installation
- gcc-c++ package, configure: error: C++ preprocessor "/lib/cpp" fails sanity check
- General Peering Agreement (GPA), The General Peering Agreement
- [general] section, Configuring the Device Itself, The Manager Interface, IAX
- Asterisk GUI, setting up, Setting up httpd.conf and manager.conf
- dundi.conf file and, General configuration
- Gentoo, Using Precompiled Binaries
- GET DATA (AGI),
- GET DATA command, Writing AGI Scripts in Python
- GET FULL VARIABLE (AGI),
- GET OPTION (AGI),
- GET VARIABLE (AGI),
- GetConfig (AMI action),
- GETCONFIG command, Reading a configuration file
- GetCPEID( ) application,
- getekeepers, H.323 and NAT
- getElementById( ) method, Form processing in an Ajax application
- GetVar (AMI action),
- glibc-devel, configure: error: no acceptable C compiler found in $PATH
- glibc-headers, configure: error: no acceptable C compiler found in $PATH
- glibc-kernheaders, configure: error: no acceptable C compiler found in $PATH
- GLOBAL dialplan function,
- global variables, Global variables
- GLOBAL( ) function, Global variables
- GNU make, Linux Package Requirements
- Gosub( ) application,
- GosubIf( ) application,
- Goto( ) application, The Background(), WaitExten(), and Goto() Applications,
- GotoIf( ) application, The GotoIf() Application,
- GotoIfTime( ) application,
- GotoIfTime( ) function, Time-Based Conditional Branching with GotoIfTime()-Time-Based Conditional Branching with GotoIfTime()
- GPA (General Peering Agreement), The General Peering Agreement
- Grandstream, Other types of PSTN interfaces
- graphical user interfaces (see GUI)
- greater than (>) comparison operator, Operators
- ground starts (gs), Zaptel Hardware Configuration
- grounding, Grounding
- GROUP dialplan function,
- GROUP_COUNT dialplan function,
- GROUP_LIST dialplan function,
- GROUP_MATCH_COUNT dialplan function,
- gs (ground starts), Zaptel Hardware Configuration
- GSM, Performance Issues
- GSM codec, What Packages Do I Need?, GSM, Customizing System Prompts
- GUI (Asterisk), What Is AsteriskNOW?, Accessing the GUI, The Asterisk GUI Framework-For More Information
- architecture of, Architecture of the Asterisk GUI
- customization of, Customization of the GUI-Exposing configuration settings in the GUI
- developing, Developing for the Asterisk GUI-For More Information
- installing, Installing the Asterisk GUI-Setting up httpd.conf and manager.conf
- Guy, Ed, Writing AGI Scripts in Python
H
- H.323, H.323
- hackers, Asterisk: The Hacker’s PBX
- half duplex communication, FXO and FXS Channels
- handsets, Handset
- HANGUP (AGI),
- Hangup (AMI action),
- Hangup( ) application, Applications,
- hardware
- server, Server Hardware Selection-Redundant power supplies
- telephony, Telephony Hardware-Echo Cancellation
- HasNewVoicemail( ) application,
- HasVoicemail( ) application,
- Hello World! example, Our First Dialplan
- high option (bandwidth parameter), General IAX Settings
- hobby systems, Preparing a System for Asterisk
- grounding and, Grounding
- hook switches, Hook switch (or switch hook)
- host SIP parameter, SIP Channel Definitions
- hostnames, installing AsteriskNOW, Extended procedure
- hot-desking feature, Getting Funky with func_odbc: Hot-Desking-Getting Funky with func_odbc: Hot-Desking
- HOTDESK_CHECK_PHONE_LOGINS( ) function, Getting Funky with func_odbc: Hot-Desking
- HOTDESK_INFO( ) function, Getting Funky with func_odbc: Hot-Desking
- HOTDESK_STATUS( ) function, Getting Funky with func_odbc: Hot-Desking
- HTML, Ajax, AJAM, and Asterisk
- HTTP protocol, using Polycom phones and, Protocol to use for downloading
- httpd.conf file, setting up, Setting up httpd.conf and manager.conf
- humidity and electronics, Humidity
- hybrid transformers, Hybrid (or network)
I
- IAX (Inter-Asterisk eXchange), Configuring an IAX Softphone-Configuring the Dialplan for Testing, IAX (The “Inter-Asterisk eXchange” Protocol), IAX-Channel-specific parameters
- connecting two Asterisk boxes, Connecting Two Asterisk Boxes Together via IAX-Configuring the Dialplan
- iax.conf file, Working with Interface Configuration Files, Configuring Our Asterisk Boxes, Users and Peers and Friends—Oh My!, iax.conf
- channel configuration, configuring, Configuring the Channel Configuration File (iax.conf)
- dundi user, creating, Defining DUNDi peers
- iax/ subdirectory or firmware/, /var/lib/asterisk
- IAX2 protocol, Configuring an IAX Softphone-Configuring the Dialplan for Testing
- IAX2Provision( ) application,
- iaxmaxthreads parameter (IAX), General IAX Settings
- IAXNetstats (AMI action),
- IAXPEER dialplan function,
- IAXPeers (AMI action),
- iaxprov.conf file, iaxprov.conf
- iaxthreads parameter (IAX), General IAX Settings
- ICES( ) application,
- IETF (Internet Engineering Task Force), Configuring an IAX Softphone, IAX (The “Inter-Asterisk eXchange” Protocol), History
- H.323, H.323 and NAT
- IF dialplan function,
- IFTIME dialplan function,
- ignoreregexpire SIP parameter, General SIP Parameters
- iLBC (Internet Low Bitrate Codec), iLBC
- image/ directory, /var/lib/asterisk
- IMAP servers, storing voicemails, Storing Voicemail in an IMAP Server
- ImportVar( ) application,
- includes, Includes
- [incoming] context, The s Extension, Zapateller()
- incominglimit SIP parameter, SIP Channel Definitions
- [incoming_osaka] context, Configuring Our Asterisk Boxes
- indications.conf file, indications.conf
- initialization script options, Loading Asterisk and Zaptel Quickly
- inkeys parameter (IAX), Channel-specific parameters
- Innovator's Dilemma, Linksys SPA-942
- insecure SIP parameter, SIP Channel Definitions
- installation, Installing Asterisk-Conclusion
- integer division sign (/), Operators
- Integrated Services Digital Network (see ISDN)
- Intel CPUs, Choosing a Processor
- Inter-Asterisk eXchange (see IAX)
- Interactive Voice Response (IVR), Low-barrier IVR
- interface configuration files, Working with Interface Configuration Files
- internal calls, Adding a Context for Internal Calls-Adding a Context for Internal Calls
- [internal] context, Adding Voicemail to the Dialplan
- International Telecommunication Union (ITU), H.323, Closed Thinking
- Internet Engineering Task Force (see IETF)
- Internet Explorer, Form processing in an Ajax application
- Internet Low Bitrate Codec (iLBC), iLBC
- Internet Telephony Service Provider (ITSP), Connecting to a SIP Service Provider
- connecting to, Connecting to an IAX Service Provider
- interrupt request (IRQ) latency, Performance Issues
- invalid entries, handling, Handling Invalid Entries and Timeouts
- INVITE requests, sending DoS attacks and, Security considerations
- IP 430 (Polycom), Polycom’s IP 430-Gotchas
- IP addresses, CounterPath’s X-Lite Softphone, Connecting to a SIP Service Provider
- IP telephones, IP telephones
- ${IPADDR} variable, Creating mapping contexts
- IRC (Internet Relay Chat) channels, The IRC Channels
- IRQ (interrupt request) latency, Performance Issues
- ISDN (Integrated Services Digital Network), ISDN
- telephones, ISDN telephones
- ISNULL dialplan function,
- ISO file (AsteriskNOW), Extended procedure
- ITSP (Internet Telephony Service Provider), Connecting to a SIP Service Provider
- connecting to, Connecting to an IAX Service Provider
- ITU (International Telecommunication Union), H.323, Closed Thinking
- IVR (Interactive Voice Response), Low-barrier IVR
J
- Jabber (XMPP), Asterisk and Jabber (XMPP)
- Java programming language, Using Java
- JavaScript, Why a GUI for Asterisk?, Architecture of the Asterisk GUI, Ajax, AJAM, and Asterisk
- jbenable SIP parameter, General SIP Parameters
- jbforce SIP parameter, General SIP Parameters
- jbimpl SIP parameter, General SIP Parameters
- jblog SIP parameter, General SIP Parameters
- jbmaxsize SIP parameter, General SIP Parameters
- jbresyncthreshold SIP parameter, General SIP Parameters
- jitter buffer parameter (IAX), General IAX Settings
- JRuby, Using Java
K
- Kernel Development Headers, Linux Package Requirements
- kernel optimizations, Performance Issues
- kewlstarts (ks), Zaptel Hardware Configuration
- key pairs, Defining DUNDi peers
- Key Telephone Systems (KTS), Proprietary digital telephones
- KEYPADHASH dialplan function,
- keys (database groupings), Using the Asterisk Database (AstDB)
- keys/ directory, /var/lib/asterisk
- ks (kewlstarts), Zaptel Hardware Configuration
- KTS (Key Telephone Systems), Proprietary digital telephones
L
- label argument (GotoIfTime( ) function), Time-Based Conditional Branching with GotoIfTime()
- labels (priority), Priority labels
- LANGUAGE dialplan function,
- language parameter (IAX), General IAX Settings
- language SIP parameter, SIP Channel Definitions
- laptops, Preparing a System for Asterisk
- large object types (PostgreSQL), creating, Creating the Large Object Type
- large systems, choosing processors for, Large systems
- lastapp CSV value, Call Detail Recording
- lastdata CSV value, Call Detail Recording
- latency (IRQ), Performance Issues
- LEN dialplan function,
- LEN( ) application, Examples of Dialplan Functions
- less than (<) operator, Operators
- libnewt, Linux Package Requirements
- ztcfg and zttool, using, Using ztcfg and zttool
- libpri (PRI) libraries, What Packages Do I Need?
- compiling, Compiling libpri
- loading, Loading libpri Without Script
- libstdc++-devel, configure: error: C++ preprocessor "/lib/cpp" fails sanity check
- libtermcap-devel, Linux Package Requirements
- libtool package, Linux Package Requirements
- licenses for music, Music on Hold
- limit option, Configuring res_odbc for Access to Our Database
- limitonpeers SIP parameter, General SIP Parameters
- Linksys SPA-942, Linksys SPA-942-Registering your phone to Asterisk
- Linksys WRT54G routers, Preparing a System for Asterisk
- Linux, Linux Considerations
- distribution, Performance Issues
- installing Asterisk and, Installing Asterisk
- Ruby/RubyGems, installing on, Installing Ruby/RubyGems on Linux
- Linux Firewalls (Suehring/Ziegler), Connecting to a SIP Service Provider, Connecting Two Asterisk Boxes Together via SIP, Connecting Two Asterisk Boxes Together via IAX
- linux-2.4 symbolic link, Compiling Zaptel
- ListCommands (AMI action),
- LiveCD, Alternate Installations
- loadzone, Zaptel Hardware Configuration
- localAjaxinit function, Adding a new tab to the GUI
- localnet SIP parameter, General SIP Parameters
- Log( ) application,
- logarithmic companding, Logarithmic companding
- logger.conf file, Static Realtime, logger.conf
- logic ground, Power Conditioning and Uninterruptible Power Supplies
- LOGIN action, Issuing Manager Commands over HTTP
- login extension, Getting Funky with func_odbc: Hot-Desking
- Logoff (AMI action),
- logrotate utility, Managing Logs
- logs, managing, Managing Logs
- LookupBlacklist( ) application,
- LookupCIDName( ) application,
- loop starts (ls), Zaptel Hardware Configuration
- low option (bandwidth parameter), General IAX Settings
- low volume, Digital Telephony
- lo_list command, Testing ODBC Voicemail
- ls (loop starts), Zaptel Hardware Configuration
- lsmod command, Loading Zaptel
M
- MAC (Media Access Control), General configuration
- Mac OS X, installing Ruby/RubyGems, Installing Ruby/RubyGems on Mac OS X
- Macro( ) application, Calling Macros from the Dialplan,
- MacroExclusive( ) application,
- MacroExit( ) application,
- MacroIf( ) application,
- macros, Macros-Using Arguments in Macros
- arguments, using, Using Arguments in Macros
- ${MACRO_CONTEXT} variable, Calling Macros from the Dialplan
- ${MACRO_EXTEN} variable, Calling Macros from the Dialplan
- ${MACRO_PRIORITY} variable, Calling Macros from the Dialplan
- Madsen, Leif, The Asterisk Documentation Project
- mailbox parameter
- MailboxCount (AMI action),
- mailboxdetail parameter (IAX), General IAX Settings
- mailboxes, creating, Creating Mailboxes
- MailboxExists( ) application,
- MailboxStatus (AMI action),
- mailing lists (Asterisk), The Asterisk Mailing Lists
- make clean, The Zapata Telephony Drivers, make clean
- make config, The Zapata Telephony Drivers, make config, Loading Asterisk and Zaptel Quickly
- make distclean, make distclean
- make progdocs, make progdocs
- make program, Standard Installation
- make samples command, installing Asterisk, Standard Installation
- make update, make update
- make webvmail, make webvmail
- Makefiles, Menuselect
- arguments, Alternative make Arguments
- makerequest function, Adding a new tab to the GUI
- Manager interface
- commands, Connecting to the Manager Interface
- Manager Interface (Asterisk), The Manager Interface-More Information, Architecture of the Asterisk GUI, Asterisk Manager Interface
- HTTP, commands over, Issuing Manager Commands over HTTP
- manager.conf file, The Manager Interface, Static Realtime, manager.conf
- Asterisk GUI, setting up, Setting up httpd.conf and manager.conf
- master config files, The master config file for each phone
- Master.csv, /var/log/asterisk/cdr-csv
- matchexterniplocally SIP parameter, General SIP Parameters
- MATH dialplan function,
- maxcallbitrate SIP parameter, SIP Channel Definitions
- maxexpiry SIP parameter, General SIP Parameters
- maxjitterbuffer parameter (IAX), General IAX Settings
- maxjitterinterps parameter (IAX), General IAX Settings
- maxregexpire parameter (IAX), General IAX Settings
- MD5 dialplan function,
- MD5 hashing, Security considerations
- md5secret SIP parameter, SIP Channel Definitions
- media, Configuring SIP Telephones
- Media Access Control (MAC), General configuration
- Media Gateway Control Protocol (MGCP), MGCP
- medium option (bandwidth parameter), General IAX Settings
- medium systems, choosing processors for, Medium systems
- MeetMe( ) application, Conferencing with MeetMe(),
- meetme.conf file, Conferencing with MeetMe(), meetme.conf
- meetme/ directory, /var/spool/asterisk/
- MeetMeAdmin( ) application,
- MeetMeCount( ) application, Conferencing with MeetMe(),
- MeetmeMute (AMI action),
- MeetMeUnmute (AMI action),
- menuselect, Menuselect, Installing Additional Prompts
- message waiting indication (MWI), Voicemail, Channel-specific parameters
- metrics, Static Realtime
- MGCP (Media Gateway Control Protocol), MGCP
- mgcp.conf file, mgcp.conf
- Micromenus, integrating desk phones with, Integrate with Your Desk Phone Using Micromenus
- Microsoft
- DHCP environments, DHCP server
- NetMeeting client, H.323
- Ruby/RubyGems, installing, Ruby/RubyGems on Windows
- Milliwatt( ) application,
- minexpiry SIP parameter, General SIP Parameters
- minregexpire parameter (IAX), General IAX Settings
- minus sign (-), Operators
- MixMonitor( ) application,
- modem.conf file, modem.conf
- modems, Choosing a Motherboard
- modprobe, Zaptel Hardware Configuration
- modules.conf file, /usr/lib/asterisk/modules/, Static Realtime, modules.conf
- mohinterpret parameter (IAX), General IAX Settings
- mohinterpret SIP parameter, SIP Channel Definitions
- mohmp3/ directory, /var/lib/asterisk
- mohsuggest parameter (IAX), General IAX Settings
- mohsuggest SIP parameter, SIP Channel Definitions
- Molex connectors, Determining the FXO and FXS Ports on Your TDM400P
- Monitor (AMI action),
- Monitor( ) application,
- monitor/ directory, /var/spool/asterisk/
- months argument (GotoIfTime( ) function), Time-Based Conditional Branching with GotoIfTime()
- Moore, Geffrey, The Business Case
- MorseCode( ) application,
- motherboard, choosing, Choosing a Motherboard-Choosing a Motherboard
- Mozilla (see Firefox browser)
- MP3 (Moving Picture Experts Group Audio Layer 3) codec, MP3
- MP3Player( ) application,
- MP3s, Music on Hold
- MPLS (Multiprotocol Label Switching), MPLS
- multiplication sign (*), Operators
- Multiprotocol Label Switching (MPLS), MPLS
- Music on Hold, Music on Hold-Music on Hold
- MUSICCLASS dialplan function,
- musicclass SIP parameter, SIP Channel Definitions
- MusicOnHold( ) application,
- musiconhold.conf file, Static Realtime, musiconhold.conf
- MWI (message waiting indication), Voicemail, Channel-specific parameters
- MySQL, Using the Asterisk Database (AstDB), The Asterisk Gateway Interface (AGI), Introduction
- CDRs, storing, Call Detail Recording
N
- /n (blank line feed), Debugging from the Operating System
- -n flag, Defining DUNDi peers
- N, matching characters with, Pattern-matching syntax
- names (functions), Syntax
- NANP (North America Number Plan), Pattern-matching examples
- NAT (Network Address Translation), Protocols for VoIP, SIP and NAT
- nat SIP parameter, SIP Channel Definitions
- NATed firewalls, History
- NBScat( ) application,
- ncursers, Linux Package Requirements
- NetMeeting client (Microsoft), H.323
- Network Address Translation (NAT), Protocols for VoIP, SIP and NAT
- Network Configuration screen, Extended procedure
- Network Interface Card (NIC), Choosing a Motherboard
- network transformers, Hybrid (or network)
- newt-devel package, Linux Package Requirements
- NIC (Network Interface Card), Choosing a Motherboard
- NoCDR( ) application,
- nochecksums parameter (IAX), General IAX Settings
- non-root users, Running Asterisk As a Non-root User-Running Asterisk As a Non-root User
- nonces, Security considerations
- NoOP (AGI),
- NoOp( ) application,
- Nortel, A Telephony Revolution
- North America Number Plan (NANP), Pattern-matching examples
- notifyhold SIP parameter, General SIP Parameters
- notifymimetype SIP parameter, General SIP Parameters
- notifyringing SIP parameter, General SIP Parameters
- ${NUMBER} variable, Creating mapping contexts
- Nutter, Charles, Using Java
- Nyquist's theorem, Nyquist’s Theorem
O
- ob_implicit_flush(false) command, Creating AGI Scripts in PHP
- ODBC connector, Introduction
- installing and configuring, Installing and Configuring ODBC-Configuring res_odbc for Access to Our Database
- voicemail, ODBC Voicemail-Testing ODBC Voicemail, Storing Voicemail in an ODBC Database
- ogg-Vorbis format, Music on Hold
- OHCI USB controller chip, The ztdummy Driver, Unresolved symbol link when loading ztdummy
- open architecture, Open Architecture
- Open Settlement Protocol (OSP), osp.conf
- OpenH323 Gatekeeper, H.323 and NAT
- OpenSER (SIP Express Router), Configuring SIP Telephones
- OpenSSL, Linux Package Requirements
- OpenWRT, Small systems
- operating systems, debugging AGI scripts from, Debugging from the Operating System
- operator option, creating mailboxes, Creating Mailboxes
- operators, Operators
- Originate (AMI action),
- OS79XX.TXT file, Cisco 7960 Telephone
- [Osaka] definition, Configuring Our Asterisk Boxes
- OSP (Open Settlement Protocol), osp.conf
- osp.conf file, osp.conf
- oss.conf file, oss.conf
- outbound dialing, Enabling Outbound Dialing
- outgoing/ directory, /var/spool/asterisk/
- outkey parameter (IAX), Channel-specific parameters
P
- packet-based transmissions, The Need for VoIP Protocols
- packet-switched networks, Packet-Switched Networks
- packetization, The Need for VoIP Protocols
- Page( ) application,
- Park (AMI action),
- Park( ) application,
- ParkAndAnnounce( ) application,
- ParkedCall( ) application,
- ParkedCalls (AMI action),
- parkext setting (features.conf file), Call Parking
- parkingtime setting (features.conf file), Call Parking
- parkpos setting (features.conf file), Call Parking
- parser generators, Linux Package Requirements
- password-protected voicemail boxes, Voicemail
- pattern matching, Pattern Matching-Using the ${EXTEN} channel variable
- PauseMonitor (AMI action),
- PauseMonitor( ) application,
- PauseQueueMember( ) application,
- PBX (Private Branch eXchange), A Telephony Revolution, Proprietary digital telephones
- AsteriskNOW and, AsteriskNOW™
- legacy migration, Legacy PBX migration gateway
- shortcoming of, Massive Change Requires Flexible Technology
- pbx_dundi.so module, Defining DUNDi peers
- PCI-Express, Choosing a Motherboard
- PCI-X, Choosing a Motherboard
- PCM (Pulse-Code Modulation), Pulse-Code Modulation
- pedantic SIP parameter, General SIP Parameters
- peer connections, Peers
- peer type, Connecting to a SIP Service Provider
- peers (DUNDi), Defining DUNDi peers
- Pentium 100s, Preparing a System for Asterisk
- performance issues of hardware, Performance Issues-Performance Issues
- performance requirements, Preparing a System for Asterisk
- period, matching characters with, Pattern-matching syntax
- Perl, writing AGI scripts in, Writing AGI Scripts in Perl-The Perl AGI Library
- permit parameter, Connecting to a SIP Service Provider
- permit SIP parameter, SIP Channel Definitions
- permit statements, Connecting to a SIP Service Provider
- PGcluster, ODBC Voicemail
- phone trees, The Background(), WaitExten(), and Goto() Applications
- phone.conf file, phone.conf
- phones
- types of, Types of Phones-Communications Terminals
- PHP, creating AGI scripts in, Creating AGI Scripts in PHP-The PHP AGI Library
- PHPAGI project, The PHP AGI Library
- Pickup( ) application,
- pickupgroup SIP parameter, SIP Channel Definitions
- Pika Technologies, Analog interface cards
- Ping (AMI action),
- pipe (|), IAX
- as a separator, Applications
- boolean operator, Operators
- mailboxes, creating, Creating Mailboxes
- Set( ) application and, Getting Funky with func_odbc: Hot-Desking
- play( ) method, Adhearsion dialplan writing
- Playback( ) application, Preparing a System for Asterisk, The Answer(), Playback(), and Hangup() Applications, Customizing System Prompts,
- PlayDTMF (AMI action),
- Player image, Alternate Installations
- Playtones( ) application,
- plus sign (+), Operators
- Polycom, Essential Server Components
- IP 430, Polycom’s IP 430-Gotchas
- pooling option, Configuring res_odbc for Access to Our Database
- port SIP parameter, SIP Channel Definitions
- ports (FXO/FXS), configuring, FXO and FXS Channels
- PostgreSQL, Using the Asterisk Database (AstDB), The Asterisk Gateway Interface (AGI), Introduction
- CDRs, Storing Call Detail Records
- CDRs, storing, Call Detail Recording
- installing, Installing the Database-Installing the Database
- static realtime, defining tables, Static Realtime
- voicemail, storing, ODBC Voicemail
- power conditioned UPS, Power Conditioning and Uninterruptible Power Supplies
- power supply requirements, Power Supply Requirements
- pre-connect option, Configuring res_odbc for Access to Our Database
- precompiled binaries (Asterisk), Using Precompiled Binaries
- preload directive, Static Realtime
- PRI (Primary Rate Interface), ISDN telephones
- PRI libraries (libpri), What Packages Do I Need?
- compiling, Compiling libpri
- loading, Loading libpri Without Script
- Primary Rate Interface (PRI), ISDN telephones, ISDN-PRI/PRA
- priorities, Extensions-Priority labels
- privacy.conf file, privacy.conf
- PrivacyManager( ) application,
- Private Branch eXchange (see PBX)
- processors, choosing, Choosing a Processor-Large systems
- progdocs (make), make progdocs
- Progress( ) application,
- progressinband SIP parameter, SIP Channel Definitions
- promiscredir SIP parameter, SIP Channel Definitions
- prompt, installing, Installing Additional Prompts
- proprietary digital telephones, Proprietary digital telephones
- proprietary protocols, Proprietary Protocols
- Prototype framework, The Prototype framework
- PSTN (Public Switch Telephone Network), The Zapata Telephony Project, Performance Issues, Analog Telephony
- connecting to, Connecting to the PSTN-Other types of PSTN interfaces
- motherboard, choosing, Choosing a Motherboard
- public domain music, Music on Hold
- Public Switch Telephone Network (see PSTN)
- Pulse-Code Modulation (PCM), Pulse-Code Modulation-Aliasing
- Python, writing AGI scripts in, Writing AGI Scripts in Python-The Python AGI Library
Q
- -q option (PHP), Creating AGI Scripts in PHP
- QoS (Quality of Service), Quality of Service-Best Effort
- qualify parameter (IAX), Channel-specific parameters
- qualify SIP parameter, SIP Channel Definitions
- qualifyfreqnotok parameter (IAX), Channel-specific parameters
- qualifyfreqok parameter (IAX), Channel-specific parameters
- qualifysmoothing parameter (IAX), Channel-specific parameters
- quantization, Digitally encoding an analog waveform
- queries (SQL), Getting Funky with func_odbc: Hot-Desking
- Queue( ) application,
- QueueAdd (AMI action),
- QUEUEAGENTCOUNT dialplan function,
- QueueLog( ) application,
- QueuePause (AMI action),
- QueueRemove (AMI action),
- Queues (AMI action),
- queues.conf file, queues.conf
- QueueStatus (AMI action),
- QUEUE_MEMBER_COUNT dialplan function,
- QUEUE_MEMBER_LIST dialplan function,
- QUEUE_WAITING_COUNT dialplan function,
- QUOTE dialplan function,
R
- -r (remote) switch, Console Commands
- -r flag (Asterisk console), Connecting to the Console
- RAND dialplan function,
- Random( ) application,
- Raymond, Eric S., The Promise of Open Source Telephony
- Read( ) application,
- ReadFile( ) application,
- README.festival file, Getting Festival Set Up and Ready for Asterisk
- Real-Time Transport Protocol), Configuring SIP Telephones
- realm SIP parameter, General SIP Parameters
- RealTime application,
- Realtime Architecture (ARA), Preparing a System for Asterisk, Using Realtime-Dynamic Realtime
- dynamic, Dynamic Realtime
- REALTIME dialplan function,
- RealTimeUpdate( ) application,
- recEive & transMit signaling, Channel Associated Signaling (CAS)
- RECEIVE CHAR (AGI),
- RECORD FILE (AGI),
- RECORD FILE command, Writing AGI Scripts in Perl
- Record( ) application, Writing AGI Scripts in Perl,
- recordhistory SIP parameter, General SIP Parameters
- recording sound, Customizing System Prompts
- Redirect (AMI action),
- REDIRECT action, Transferring a call
- redundant power supplies, Redundant power supplies
- references, Basic Expressions
- regcontext parameter
- REGEX dialplan function,
- regexten parameter
- register => (register switch), Registering to Other Servers with register Statements
- register statements, register Statements
- registerattempts SIP parameter, General SIP Parameters
- registertimeout SIP parameter, General SIP Parameters
- regular expression (:), Operators
- relational database integration, Introduction-Conclusion
- relaxdtmf SIP parameter, General SIP Parameters
- releases of Asterisk source code, Obtaining Asterisk Source Code
- reload service <option>, Loading Asterisk and Zaptel Quickly
- remainder of sign (%), Operators
- remove module (rmmod) command, Zaptel Hardware Configuration
- RemoveQueueMember( ) application,
- REN (Ringer Equivalence Number), Ringer
- Reservation Protocol (RSVP), RSVP
- ResetCDR( ) application,
- restart service <option>, Loading Asterisk and Zaptel Quickly
- resyncthreshold parameter (IAX), General IAX Settings
- res_crypto.so module, Defining DUNDi peers
- res_odbc.conf file, Configuring res_odbc for Access to Our Database, Configuring voicemail.conf for ODBC Storage, res_odbc.conf
- RetryDial( ) application,
- Return( ) application,
- review option, creating mailboxes, Creating Mailboxes
- RFC 3261, Configuring SIP Telephones
- Rhino analog cards, Analog interface cards
- Ringer Equivalence Number (REN), Ringer
- ringers, Parts of an Analog Telephone
- Ringing( ) application,
- rmmod (remove module) command, Zaptel Hardware Configuration
- root users, Running Asterisk As a Non-root User-Running Asterisk As a Non-root User
- rows (database), Static Realtime
- rpt.conf file, rpt.conf
- RSA key exchange, Security considerations
- RSVP (Reservation Protocol), RSVP
- rtautoclear parameter
- rtcachefriends parameter (IAX), General IAX Settings
- rtcachefriends SIP parameter, General SIP Parameters
- rtignoreregexpire parameter (IAX), General IAX Settings
- rtp.conf file, Connecting Two Asterisk Boxes Together via SIP, Static Realtime, rtp.conf
- RTP; RFC 3550 (Real-Time Transport Protocol), Configuring SIP Telephones
- rtpholdtimeout SIP parameter, SIP Channel Definitions
- rtpkeepalive SIP parameter, SIP Channel Definitions
- rtptimeout SIP parameter, SIP Channel Definitions
- rtsavesysname SIP parameter, General SIP Parameters
- rtupdate parameter (IAX), General IAX Settings
- rtupdate SIP parameter, General SIP Parameters
- Ruby, Installing Ruby/RubyGems on AsteriskNOW
S
- s (start) extension, The s Extension
- sampling, Digitally encoding an analog waveform
- frequency, Nyquist’s Theorem
- Sangoma, Analog interface cards, Digital interface cards
- SAY ALPHA (AGI),
- SAY DATE (AGI),
- SAY DATETIME (AGI),
- SAY DIGITS (AGI),
- SAY NUMBER (AGI),
- SAY NUMBER command, Creating AGI Scripts in PHP
- SAY PHONETIC (AGI),
- SAY TIME (AGI),
- SayAlpha( ) application,
- saycid option, creating mailboxes, Creating Mailboxes
- SayDigits( ) application, Using the ${EXTEN} channel variable,
- SayNumber( ) application, Basic Expressions,
- SayPhonetic( ) application,
- SayUnixTime( ) application,
- SCCP (Skinny Client Control Protocol), Cisco 7960 Telephone, Skinny/SCCP
- scripts
- AGI, The Asterisk Gateway Interface (AGI)-Conclusion
- Perl, writing in, Writing AGI Scripts in Perl-The Perl AGI Library
- PHP, writing in, Creating AGI Scripts in PHP
- Python, writing in, Writing AGI Scripts in Python-The Python AGI Library
- loading with, Loading Asterisk and Zaptel Quickly
- loading without, Loading Zaptel Modules Without Scripts
- SCTP (Stream Control Transmission Protocol), Stream Control Transmission Protocol
- secret SIP parameter, SIP Channel Definitions
- ${SECRET} variable, Creating mapping contexts
- Secure RTP, Encrypting Audio with Secure RTP
- security (servers), Security
- security (VoIP), VoIP Security-Physical security
- SELECT statement, Storing Call Detail Records
- SEND IMAGE (AGI),
- SEND IMAGE command, Writing AGI Scripts in Perl
- SEND TEXT (AGI),
- SEND TEXT command, Writing AGI Scripts in Perl
- sendani parameter (IAX), Channel-specific parameters
- SendDTMF( ) application,
- SendImage( ) application,
- sendrpid SIP parameter, General SIP Parameters
- SendText( ) application,
- SendURL( ) application,
- serverremail option, creating mailboxes, Creating Mailboxes
- servers
- class motherboards, Choosing a Motherboard
- components, Essential Server Components
- electrical circuits, Electrical Circuits
- Festival, Starting the Festival Server
- hardware selection for, Server Hardware Selection-Redundant power supplies
- service providers, connecting to, Connecting to a SIP Service Provider
- SET AUTOHANGUP (AGI),
- SET CALLERID (AGI),
- SET CONTEXT (AGI),
- SET dialplan function,
- SET EXTENSION (AGI),
- SET MUSIC ON (AGI),
- SET PRIORITY (AGI),
- SET VARIABLE (AGI),
- Set( ) application, Basic Expressions, Examples of Dialplan Functions,
- arguments and, Getting Funky with func_odbc: Hot-Desking
- AstDB database, storing data and, Storing Data in the AstDB
- set-specific config files, The set-specific config file
- SetAMAFlags( ) application,
- SetCallerID( ) application,
- SetCallerPres( ) application,
- SetCDRUserField (AMI action),
- SetCDRUserField( ) application,
- SetGlobalVar( ) application,
- SetMusicOnHold( ) application,
- SetTransferCapability( ) application,
- SetVar (AMI action),
- setvar SIP parameter, SIP Channel Definitions
- SHA1 dialplan function,
- sidetones, Hybrid (or network)
- Signaling System 7 (SS7), Signaling System 7
- SIMPLE protocol, Asterisk and Jabber (XMPP)
- sine waves, Digitally encoding an analog waveform
- single quotes ('), using the makerequest function, Adding a new tab to the GUI
- SIP (Session Initiation Protocol), Proprietary digital telephones, Initial Configuration of Asterisk, SIP-SIP and NAT, SIP-SIP Channel Definitions
- configuring, Configuring SIP Telephones-Configuring the Dialplan for Testing
- connecting two Asterisk boxes, Connecting Two Asterisk Boxes Together via SIP-Configuring the Dialplan
- service providers, connecting to, Connecting to a SIP Service Provider-Connecting to a SIP Service Provider
- SIP Express Router (OpenSER), Configuring SIP Telephones
- SIP RFC, Configuring the Device Itself
- SIP trapezoid, History
- sip.cfg file, The sip.cfg file
- sip.conf file, Working with Interface Configuration Files, Defining the SIP device in Asterisk, Users and Peers and Friends—Oh My!, Getting Funky with func_odbc: Hot-Desking, sip.conf
- connecting two Asterisk boxes together, Configuring Our Asterisk Boxes
- SIPAddHeader( ) application,
- SIPCHANINFO dialplan function,
- sipdebug SIP parameter, General SIP Parameters
- SIPDefault.cnf file, Cisco 7960 Telephone
- SIPDtmfMode( ) application,
- SIPp applications, Preparing a System for Asterisk
- SIPPEER dialplan function,
- SIPpeers (AMI action),
- SIPShowPeer (AMI action),
- Sipura Technologies, Other types of PSTN interfaces, Linksys SPA-942
- SIP_HEADER dialplan function,
- sip_notify.conf file, sip_notify.conf
- Skinny Client Control Protocol (SCCP), Cisco 7960 Telephone, Skinny/SCCP
- skinny.conf file, skinny.conf
- SLAStation( ) application,
- SLATrunk( ) application,
- small systems, choosing processors for, Small systems
- Smith, Allison, Customizing System Prompts
- Smith, Jared, The Asterisk Documentation Project
- SMP (Kernel Devleopment Headers), Linux Package Requirements
- Soekris systems, Preparing a System for Asterisk
- SoftHangup( ) application,
- softphones, Softphones, Setting Up the Dialplan for Some Test Calls, Configuring the Device Itself, Configure the Softphone
- SOHO (small office/home office) system, Preparing a System for Asterisk
- SONET (Synchronous Optical Network), SONET and OC circuits
- SORT dialplan function,
- sound cards, What Do I Really Need?
- sound recording, Customizing System Prompts
- sounds/ directory, /var/lib/asterisk
- source code (Asterisk), Obtaining the Source Code-Extracting the Source Code
- SoX (Sound eXchange) utility, Music on Hold
- SPA-942 (Linksys), Linksys SPA-942-Registering your phone to Asterisk
- Spam over Internet Telephony (SPIT), Spam over Internet Telephony (SPIT)
- speak( ) method, Adhearsion dialplan writing
- SPEECH dialplan function,
- speech processing, Speech Processing
- SPEECH_ENGINE dialplan function,
- SPEECH_GRAMMAR dialplan function,
- SPEECH_SCORE dialplan function,
- SPEECH_TEXT dialplan function,
- Speex codec, Speex
- Spencer, Mark, The Asterisk Community, Mark Spencer Talks About the GUI
- SPIT (Spam over Internet Telephony), Spam over Internet Telephony (SPIT)
- SPRINTF dialplan function,
- SQLite, Call Detail Recording
- square brackets ([ ]), IAX
- contexts and, Contexts
- DUNDi peers, defining, Defining DUNDi peers
- editing the iax.conf file, Configure the Softphone
- Manager interface and, The Manager Interface
- src CSV value, Call Detail Recording
- srvlookup SIP parameter, General SIP Parameters
- SS7 (Signaling System 7), Signaling System 7
- StackPop( ) application,
- start CSV value, Call Detail Recording
- start service <option>, Loading Asterisk and Zaptel Quickly
- StartMusicOnHold( ) application,
- STAT dialplan function,
- static, Preparing a System for Asterisk, Digital Telephony
- static realtime, Using Realtime-Static Realtime
- stations, Communications Terminals
- Status (AMI action),
- status service asterisk <option>, Loading Asterisk and Zaptel Quickly
- STDERR (standard error), Fundamentals of AGI Communication, Creating AGI Scripts in PHP
- STDIN (standard input), Fundamentals of AGI Communication, Creating AGI Scripts in PHP
- STDOUT (standard output), Fundamentals of AGI Communication, Creating AGI Scripts in PHP
- stop service <option>, Loading Asterisk and Zaptel Quickly
- StopMixMonitor( ) application,
- StopMonitor (AMI action),
- StopMonitor( ) application,
- StopMusicOnHold( ) application,
- StopPlaytones( ) application,
- Stream Control Transmission Protocol (SCTP), Stream Control Transmission Protocol
- STREAM FILE (AGI),
- STREAM FILE command, Writing AGI Scripts in Perl, Creating AGI Scripts in PHP
- STRFTIME dialplan function,
- STRPTIME dialplan function,
- su (super-user), Running Asterisk As a Non-root User
- subscribecontext SIP parameter, General SIP Parameters
- Subversion (SVN), Obtaining the Source Code
- Asterisk GUI, installing files, Installing the Asterisk GUI
- AsteriskNOW, downloading, GUI elements
- Suehring, Steve, Connecting to a SIP Service Provider, Connecting Two Asterisk Boxes Together via SIP, Connecting Two Asterisk Boxes Together via IAX
- SVN (Subversion), Obtaining the Source Code
- Asterisk GUI, installing files, Installing the Asterisk GUI
- AsteriskNOW, downloading, GUI elements
- switch hooks, Hook switch (or switch hook)
- Synchronous Optical Network (SONNET), SONET and OC circuits
- syntax (dialplan), Dialplan Syntax-Applications
- pattern-matching, Pattern-matching syntax
- system prompts, customizing, Customizing System Prompts
- System( ) application,
- system/ directory, /var/spool/asterisk/
- systems, preparing for Asterisk, Preparing a System for Asterisk-Conclusion
- environments, Environment-Security
- motherboards, choosing, Choosing a Motherboard-Choosing a Motherboard
- processors, choosing for, Choosing a Processor-Large systems
T
- T-carrier circuits, T-carrier circuits
- T1 cards, Digital interface cards, What Do I Really Need?
- ztcfg and zttool, using, Using ztcfg and zttool
- T1 digital circuits, T-carrier circuits
- t1min SIP parameter, General SIP Parameters
- t38pt_udpt1 SIP parameter, General SIP Parameters
- Tab completion, Extracting the Source Code
- tables (database)
- ActiveRecord database, Database integration
- PostgreSQL, defining for in static realtime, Static Realtime
- TCP (Transmission Control Protocol), Transmission Control Protocol
- TDD MODE (AGI),
- TDM (Time Division Multiplexing), Connecting to the PSTN, Compiling libpri, Using the GUI
- TDM11B (Digium), Initial Configuration of Asterisk
- TDM2400P card, Analog interface cards
- TDM400P cards, Analog interface cards, FATAL: Module wctdm/fxs/fxo not found
- determining FXO/FXS ports on, Determining the FXO and FXS Ports on Your TDM400P
- TDM800P card, Analog interface cards
- telco (telephone company), FXO and FXS Channels
- Telecommunication Standardization Bureau (TSB), Closed Thinking
- telecommunications, A Telephony Revolution
- telephone lines, What Do I Really Need?
- telephones
- FXS channels, configuring for, Configuring an FXS Channel for an Analog Telephone
- SIP configuration for, Basic SIP Telephone Configuration in Asterisk
- types of, Types of Phones-Communications Terminals
- telephony, Understanding Telephony-Conclusion
- adaptors, Telephony Adaptors
- analog, Analog Telephony-Tip and Ring
- future of, Asterisk: The Future of Telephony-Proper integration of communications technologies
- gateway, Telephony Adaptors
- hardware, Telephony Hardware-Echo Cancellation
- temperature and electronics, Temperature
- templates, using in configuration files, Using Templates in Your Configuration Files-Enabling Verbosity and Debugging
- terminals, Communications Terminals
- text-to-speech engines, Festival
- text2wave utility, Calling Festival from the Dialplan
- TFTP servers, FTP server, Protocol to use for downloading
- Cisco 7960 telephones and, Cisco 7960 Telephone
- Thompson, James, The Asterisk Wiki
- Time Division Multiplexing (TDM), Connecting to the PSTN, Compiling libpri, Using the GUI
- Time To Live (ttl) field, General configuration
- Time Zone screen, Extended procedure
- time-based conditional branching, Time-Based Conditional Branching with GotoIfTime()-Time-Based Conditional Branching with GotoIfTime()
- TIMEOUT dialplan function,
- TIMEOUT( ) function, Examples of Dialplan Functions
- timeouts, handling, Handling Invalid Entries and Timeouts
- times argument (GotoIfTime( ) function), Time-Based Conditional Branching with GotoIfTime()
- tip and ring, Tip and Ring
- TLS (Transport Layer Security), Security considerations
- tmp/ directory, /var/spool/asterisk/
- TOS (Type of Service), General IAX Settings
- tos_audio SIP parameter, General SIP Parameters
- tos_sip SIP parameter, General SIP Parameters
- tos_video SIP parameter, General SIP Parameters
- transcoding, Performance Issues
- transfer parameter (IAX), Channel-specific parameters
- Transfer( ) application,
- Transmission Control Protocol (TCP), Transmission Control Protocol
- Transport Layer Security (TLS), Security considerations
- trapezoid (SIP), History
- trixbox, Massive Change Requires Flexible Technology
- Trunk, Obtaining the Source Code
- trunk parameter (IAX), General IAX Settings
- trunkfreq parameter (IAX), General IAX Settings
- [trunkgroups], Zapata Hardware Configuration
- trunking, Connecting Two Asterisk Boxes Together via IAX, IAX Channel Definitions
- trunktimestamps parameter (IAX), General IAX Settings
- trustrpid SIP parameter, General SIP Parameters
- TryExec( ) application,
- TrySystem( ) application,
- TSB (Telecommunication Standardization Bureau), Closed Thinking
- ttl (Time To Live), General configuration
- TXTCIDNAME dialplan function,
- Type of Service (TOS), General IAX Settings
- tz option, creating mailboxes, Creating Mailboxes
U
- -u option (Python), Writing AGI Scripts in Python
- u parameter (makerequest function), Adding a new tab to the GUI
- udev daemon, Systems Running udevd
- UDP (User Datagram Protocol), User Datagram Protocol
- underscores (_), using pattern-matching, Pattern-matching syntax
- Unified Messaging, Storing Voicemail in an IMAP Server
- uninterruptible power supplies, Power Conditioning and Uninterruptible Power Supplies
- UNISTIM, UNISTIM
- unixODB package, Linux Package Requirements
- unixODBC, Call Detail Recording
- unixODBC-devel package, Linux Package Requirements, Installing and Configuring ODBC
- unnumbered priorities, Unnumbered priorities
- UnpauseMonitor (AMI action),
- UnpauseMonitor( ) application,
- UnpauseQueueMember( ) application,
- update (make), make update
- UpdateConfig (AMI action),
- UPDATECONFIG action, Updating configuration files using UPDATECONFIG
- URIDECODE dialplan function,
- URIENCODE dialplan function,
- usb-uhci module, The ztdummy Driver
- unresolved symbol links and, Unresolved symbol link when loading ztdummy
- use strict (Perl), Writing AGI Scripts in Perl
- user connections, Users
- User Datagram Protocol (UDP), User Datagram Protocol
- user type, Connecting to a SIP Service Provider
- useragent SIP parameter, General SIP Parameters
- usereqphone SIP parameter, General SIP Parameters
- UserEvent (AMI action),
- UserEvent( ) application,
- userfield CSV value, Call Detail Recording
- username SIP parameter, SIP Channel Definitions
- users.conf file, Reading a configuration file
- /usr/bin/ directory, Writing AGI Scripts in Perl
- /usr/lib/asterisk/modules/ directory, /usr/lib/asterisk/modules/
V
- -v (verbosity) switch, Console Commands
- valid_login extension, Getting Funky with func_odbc: Hot-Desking
- values (functions), Syntax
- /var/lib/asterisk directory, /var/lib/asterisk
- /var/log/asterisk/ directory, /var/log/asterisk/
- /var/log/asterisk/cdr-csv directory, /var/log/asterisk/cdr-csv
- /var/run/ directory, /var/run/
- /var/spool/asterisk/ directory, /var/spool/asterisk/
- variables, Using Variables-Adding variables to our dialplan, Expressions and Variable Manipulation-Operators
- var_metric module, Static Realtime
- var_name module, Static Realtime
- var_val module, Static Realtime
- VERBOSE (AGI),
- Verbose( ) application,
- verbosity, enabling, Enabling Verbosity and Debugging
- Very Secure FTP Daemon (see VSFTPD)
- video, Video
- videosupport SIP parameter, General SIP Parameters
- Virtual Private Network (VPN), Security considerations
- VMAuthenticate( ) application,
- VMCOUNT dialplan function,
- vmexten SIP parameter, General SIP Parameters
- voice menus, creating, The Background(), WaitExten(), and Goto() Applications
- Voice over IP (see VoIP)
- Voice over IP (VoIP)
- Asterisk Wiki and, The Asterisk Wiki
- voicemail, Voicemail-Creating a Dial-by-Name Directory
- accessing, Accessing Voicemail
- dial-by-name directories, Creating a Dial-by-Name Directory
- storage methods, Alternative Voicemail Storage Methods-Storing Voicemail in an ODBC Database
- storing in databases, ODBC Voicemail-Testing ODBC Voicemail
- VoiceMail( ) application, Adding Voicemail to the Dialplan,
- voicemail.conf file, Voicemail, Configuring voicemail.conf for ODBC Storage, voicemail.conf
- voicemail/ directory, /var/spool/asterisk/
- VoiceMailMain( ) application,
- Voicetronix analog cards, Analog interface cards
- VoIP (Voice over IP), VoIP: Bridging the Gap Between Traditional and Network Telephony
- echo cancellation and, Echo Cancellation
- protocols for, Protocols for VoIP-Conclusion
- security, VoIP Security-Physical security
- spam, VoIP spam
- voltage, Grounding
- vpb.conf file, vpb.conf
- VPN (Virtual Private Network), Security considerations
- VSFTPD (Very Secure FTP Daemon), FTP server
- Polycom phones, configuring, FTP
- vsftpd config file, FTP server, FTP
W
- WAIT FOR DIGIT (AGI),
- WAIT FOR DIGIT command, Writing AGI Scripts in Perl
- Wait( ), Preparing a System for Asterisk
- Wait( ) application,
- WaitEvent (AMI action),
- WaitExten( ) application, Working with Interface Configuration Files, The Background(), WaitExten(), and Goto() Applications,
- WaitForRing( ) application,
- WaitForSilence( ) application,
- WaitMusicOnHold( ) application,
- Wallack, June, Customizing System Prompts
- waveforms (analog), Digitally encoding an analog waveform
- wcfxo driver, FATAL: Module wctdm/fxs/fxo not found
- wctdm driver, FATAL: Module wctdm/fxs/fxo not found
- web applications, Integrating with a Web Application
- webvmail (make), make webvmail
- wget program, Obtaining Asterisk Source Code
- While( ) application,
- whitespace in AGI scripts, Creating AGI Scripts in PHP
- Wi-Fi, Wi-Fi
- Wi-MAX, Wi-MAX
- Windows (see Microsoft)
- wireless, Wireless
- wizards, setting up GUIs, Using the GUI
- WRAP boards, Preparing a System for Asterisk
X
- -x (execute) switch, Console Commands
- X, matching characters with, Pattern-matching syntax
- X-Lite softphone (ConuterPath), CounterPath’s X-Lite Softphone-CounterPath’s X-Lite Softphone
- X100P (Digium) card, FXO and FXS Channels
- X101P (Digium) card, FXO and FXS Channels
- Xen universal guest domain image, Alternate Installations
- XML, AJAM and JavaScript
- XMLHttp ActiveX object, Ajax, AJAM, and Asterisk
- XMLHttpRequest, Ajax, AJAM, and Asterisk
- XMLHttpRequest object, Form processing in an Ajax application
- XMPP (Jabber), Asterisk and Jabber (XMPP)
Y
- -y switch (yum application), Linux Package Requirements
- yacc, Linux Package Requirements
- yum application, Linux Package Requirements
Z
- Z, matching characters with, Pattern-matching syntax
- Zapata, The Zapata Telephony Project
- hardware configuration for, Zapata Hardware Configuration, Zapata Hardware Configuration
- telephony drivers, What Packages Do I Need?, The Zapata Telephony Drivers
- Zapata Telephony Project
- Tormenta T1 card and, Digital interface cards
- Zapata, Emiliano, The Zapata Telephony Project
- zapata.conf, Zapata Hardware Configuration
- zapata.conf file, Working with Interface Configuration Files, Zapata Hardware Configuration, zapata.conf
- Zapateller( ) application, Zapateller(),
- ZapBarge( ) application,
- ZapDialOffhook (AMI action),
- ZapDNDoff (AMI action),
- ZapDNDon (AMI action),
- ZapHangup (AMI action),
- ZapRAS( ) application,
- ZapRestart (AMI action),
- ZapScan( ) application,
- ZapShowChannels (AMI action),
- Zaptel
- cards, Choosing a Motherboard
- compiling, Compiling Zaptel-Using ztcfg and zttool
- hardware configuration
- FXO channels and, Zaptel Hardware Configuration
- FXS channels and, Zaptel Hardware Configuration
- loading, Loading Asterisk and Zaptel Quickly, Loading Zaptel
- without scripts, Loading Zaptel Modules Without Scripts-Loading ztdummy
- zaptel.conf file, Working with Interface Configuration Files, Zaptel Hardware Configuration, zaptel.conf
- ZapTransfer (AMI action),
- zconfig.h configuration file, Managing Echo on Zaptel Channels
- Ziegler, Robert, Connecting to a SIP Service Provider, Connecting Two Asterisk Boxes Together via SIP, Connecting Two Asterisk Boxes Together via IAX
- zlib-devel package, Linux Package Requirements
- zonedata.c file, Zaptel Hardware Configuration
- [zonemessages] section (voicemail.conf file), Creating Mailboxes
- ztcfg program, Using ztcfg and zttool
- ztdummy driver, Connecting Exclusively to a Packet-Based Telephone Network, What Packages Do I Need?, Compiling Zaptel, Loading ztdummy
- scripts, loading without, Loading Zaptel Modules Without Scripts
- unresolved symbol links when loading, Unresolved symbol link when loading ztdummy
- zttool program, Linux Package Requirements, Using ztcfg and zttool, Zaptel Hardware Configuration
Colophon
The animals on the cover of Asterisk: The Future of Telephony are starfish. Starfish are classified as Asteroidea. They are a group of echinoderms, spiny-skinned invertebrates found only in the sea. Most starfish have fivefold symmetry (arms or rays in multiples of five), though some species can have four or nine arms. But all starfish are radially symmetrical: they have arms or rays branching out from a central body disc. There are over 1,500 species of starfish.
Starfish live on the floor of the sea and in tidal pools, clinging to rocks and moving (slowly) using a water-based vascular system to manipulate their hundreds of tiny, tube-like legs, called podia. A small bulb or ampulla at the top of the tube contracts, expelling water and expanding the starfish’s leg. The ampulla relaxes, and the leg retracts. Starfish use muscles to bend their legs, but it is the flow of water pressure that keeps the feet moving. At the tip of each leg, starfish have suction cups that allow them to pry open clam, oyster, or mussel shells. Many starfish can push their stomachs out through their mouths in order to digest their prey in its shell. Starfish are carnivores; they eat coral, fish, and snails, as well as bivalves.
Starfish can flex and rearrange their arms to fit into small places as they move over the ocean floor. At the end of each arm, they have eyespots, primitive sensors that detect light and help the starfish determine direction. Starfish also have the ability to regenerate a missing limb. Some species can even regrow a complete, new starfish from a severed arm.
The cover image is from the Dover Pictorial Archive. The cover font is Adobe ITC Garamond. The text font is Linotype Birka; the heading font is Adobe Myriad Condensed; and the code font is LucasFont’s TheSans Mono Condense.