The Simple Network Management Protocol (SNMP) is a
standardized protocol for network management. It is very commonly used and
implemented across many applications and network devices. Platforms such
as OpenNMS,[173] an open source network management platform, use SNMP (among
other things). Asterisk supports SNMP through the res_snmp module. This section discusses the
installation and configuration of res_snmp, as well as how it can be utilized by a
platform like OpenNMS.
By default, Asterisk will not compile the SNMP development module, since a dependency needs to be satisfied first.
In CentOS, you simply need to install the net-snmp-devel package:
$ sudo yum install net-snmp-develSee the upcoming section the section called “Recompiling Asterisk with the res_snmp module” for a description of how to recompile Asterisk with SNMP support.
Under Ubuntu, the following package needs to be installed:
$ sudo apt-get install snmp libsnmp-dev snmpdTip
Both the snmp and snmpd packages need to be installed
explicitly on Ubuntu, as they are not dependencies of the SNMP
development libraries, like they are on CentOS. The snmp package installs SNMP tools like
snmpwalk that we’ll need, and the snmpd package installs the SNMP
daemon.
See the next section for a description of how to recompile Asterisk with SNMP support.
Once you’ve satisfied the dependencies for SNMP, you can recompile Asterisk with SNMP support:
$cd ~/src/asterisk-complete/asterisk/1.8/$./configure$make menuselect# verify that res_snmp is selected under Resource Modules $sudo make install
You then need to copy the sample config
file over to the /etc/asterisk
folder:
$ sudo cp ~/src/asterisk-complete/asterisk/1.8/configs/res_snmp.conf.sample \
/etc/asterisk/res_snmp.conf
We’ll talk about configuring this file for use with OpenNMS in the next section.
The OpenNMS project provides an open-source network management platform that has Asterisk support built right in. There are a few steps that must be taken to enable this support, though. In this section we’ll take you through what you need to do to get your Asterisk server talking to OpenNMS.
The OpenNMS wiki has detailed instructions for installing OpenNMS, which you can find at http://opennms.org/wiki/Installation:Yum.
Warning
OpenNMS should normally not be installed on your Asterisk server. You will want to designate a separate machine as your OpenNMS server.
Since the OpenNMS wiki provides all the required instructions, we’ll leave it to the experts to lead you through the first part of the installation. Once you’ve installed OpenNMS, come back here and we’ll take you through how to configure it to work with Asterisk.
The instructions for installing OpenNMS on the wiki use SNMPv2c, which is not a secure method of abstracting data from the SNMP protocol. Since we want to build a secure system, our instructions will show you how to enable SNMPv3 support.[174]
However, because SNMPv3 can be a bit of an unwieldy beast, and because you may not wish to enable SNMPv3 for some reason (e.g., if your version of SNMP was not compiled with OpenSSL support), we will provide instructions for configuring the SNMP daemon for both SNMPv2c and SNMPv3.
It tends to be easier to configure the system for SNMPv2c first and then update it to SNMPv3, as the steps to get SNMPv3 set up properly are more complex.
In the /etc/asterisk/res_snmp.conf file that
you’ve copied over from your source directory, there are two lines you
must uncomment:
[general]
;subagent=yes
;enabled=yes
Modify the res_snmp.conf file so both the SNMP client
and the subagent are enabled:
[general]
subagent=yes
enabled=yes
After modifying this file, you will need to reload
the res_snmp.so module in order
for the changes to take effect:
*CLI> module unload res_snmp.so
Unloaded res_snmp.so
 Unloading [Sub]Agent Module
  == Terminating SubAgent
*CLI> module load res_snmp.so
Loaded res_snmp.so
  == Parsing '/etc/asterisk/res_snmp.conf':   == Found
 Loading [Sub]Agent Module
 Loaded res_snmp.so => (SNMP [Sub]Agent for Asterisk)
  == Starting SubAgent
Now you can modify the /etc/snmp/snmpd.conf file for SNMP on the
host machine. Rename the current example configuration file and create
a new snmpd.conf file:
$cd /etc/snmp$sudo mv snmpd.conf snmpd.sample
The
first thing to do is to add the permissions control to the file. We
suggest you read the /etc/snmpd/snmp.sample file that you just
renamed to get a better idea of how the permissions are being set up.
Then, add the following to your snmpd.conf file:
$ sudo cat > snmpd.conf

com2sec notConfigUser  default       public

group   notConfigGroup v1           notConfigUser
group   notConfigGroup v2c           notConfigUser

view all    included  .1
view system included  .iso.org.dod.internet.mgmt.mib-2.system

access  notConfigGroup ""      any       noauth    exact  all    none none

syslocation Caledon, ON
syscontact Leif Madsen lmadsen@shifteight.org

Ctrl+D
Tip
The syslocation and syscontact lines are not necessary, but
they can make it easier to identify a particular server if you’re
monitoring several nodes.
Now we need to enable the AgentX subagent support so information about our Asterisk system can be found:
$ sudo cat >> snmpd.conf

master agentx
agentXSocket /var/agentx/master
agentXPerms 0660 0775 nobody root

sysObjectID .1.3.6.1.4.1.22736.1

Ctrl+D
By adding the master agentx line and the agentX options, we’ve enabled Asterisk to
communicate with the SNMP daemon. The agentXPerms option is stating that Asterisk
is running as root. If your
Asterisk system is running in a different group, change root to the group that Asterisk is running
as.
Just below the AgentX configuration, we
added the sysObjectID option. The
purpose of adding the sysObjectID
string is so OpenNMS will know that this host system is running
Asterisk, allowing it to dynamically grab additional graphing
information.
Once you’ve performed these configuration steps, you need to restart the SNMP daemon:
$sudo /etc/init.d/snmpd restart
To verify that the information can be polled correctly, utilize the snmpwalk application:
$ snmpwalk -On -v2c -c public 127.0.0.1 .1.3.6.1.4.1.22736You should get several lines of information flowing across your screen if your configuration is correct, much like the following:
.1.3.6.1.4.1.22736.1.5.4.1.4.3 = INTEGER: 2
.1.3.6.1.4.1.22736.1.5.4.1.4.4 = INTEGER: 2
.1.3.6.1.4.1.22736.1.5.4.1.4.5 = INTEGER: 1
.1.3.6.1.4.1.22736.1.5.4.1.4.6 = INTEGER: 1
.1.3.6.1.4.1.22736.1.5.4.1.5.1 = INTEGER: 1
...etc
At this point your host system should be ready for OpenNMS to connect and gather the information it needs. Proceed by adding a node to the system and filling in the appropriate information. After a period of time, OpenNMS will poll the host system and have access to the Asterisk statistics. You should be able to click on Resource Graphs after selecting the node you created and see a selection of graphs available, such as SIP, DAHDI, Local, etc.
Enabling SNMPv3 allows you to securely connect and transmit data from the SNMP daemon to the SNMP client. This may not be necessary in a local environment, especially if the client and the daemon are running on the same machine. However, when traversing public networks it is important to secure this data.
First, you need to stop the SNMP daemon, using the init script or the service command:
$ sudo /etc/init.d/snmpd stopAfter stopping the daemon, you need to
add the initial user to the /var/net-snmp/snmpd.conf file. This file is
dynamic in nature and should only be modified when the SNMP daemon has
been stopped.
You need to create a bootstrap user
that you will be able to use to create the administration user in the
next step. Add the following line to the /var/net-snmp/snmpd.conf file:
createUser initial MD5 setup_passphrase DES
Note
We’re modifying the snmpd.conf file we created in the section called “Editing /etc/snmp/snmpd.conf to work with your OpenNMS
server”.
After adding it, save the file and
exit. Next, you need to add permissions to the /etc/snmp/snmpd.conf file. Add the
following line to give the initial user read/write permissions:
rwuser initial
After making these modifications, you can restart the SNMP daemon:
$ sudo /etc/init.d/snmpd startStarting snmpd: [ OK ]
Tip
If you don’t see the [ OK ] part after Starting snmpd:, you have likely made a
mistake somewhere. Stop the daemon and try again.
Using your initial user, you now need to
create a user for OpenNMS to connect to. You’ll do this with
the snmpusm[175] application. Execute the following command, which will
clone the opennmsUser user from
the initial user. We configured
the password setup_passphrase for
the authentication and privacy settings when we added the initial user to the /var/net-snmp/snmpd.conf file:
$sudo snmpusm -v3 -u initial -n "" -l authPriv \ -a MD5 -A setup_passphrase \ -x DES -X setup_passphrase \ localhost create opennmsUser initial
User successfully created.
Now
change the passphrase for the opennmsUser with the following
command:
$sudo snmpusm -v 3 -u initial -n "" -l authPriv \ -a MD5 -A setup_passphrase \ -x DES -X setup_passphrase \ -Ca -Cx localhost passwd setup_passphrase \0p3nNMSv3opennmsUser
SNMPv3 Key(s) successfully changed.
Warning
The password we’ve assigned to the opennmsUser, 0p3nNMSv3, is intended solely as an
example, and should definitely not be used. Change it to something
else that is secure.
You can now test to make sure you’re getting results from your user by utilizing the snmpwalk application:
$sudo snmpwalk -v 3 -u opennmsUser -n "" -l authPriv \ -a MD5 -A 0p3nNMSv3 \ -x DES -X 0p3nNMSv3 \ localhost ifTable
IF-MIB::ifIndex.1 = INTEGER: 1
IF-MIB::ifIndex.2 = INTEGER: 2
IF-MIB::ifIndex.3 = INTEGER: 3
IF-MIB::ifDescr.1 = STRING: lo
IF-MIB::ifDescr.2 = STRING: eth0
IF-MIB::ifDescr.3 = STRING: sit0
Now that you have data being returned, lock down the /etc/snmp/snmpd.conf file to make sure only
the opennmsUser can read data from
the SNMP daemon.
The file will look quite similar to the
one in the previous section, for configuring SNMPv2c. We’ve commented
out the lines you no longer need with the hash symbol (#) and added new group and access lines to control access to the SNMP
daemon:
com2sec notConfigUser  default       public

#group   notConfigGroup v1            notConfigUser
#group   notConfigGroup v2c           notConfigUser
group   notConfigGroup usm           opennmsUser

#view    systemview    included   .1.3.6.1.2.1.1
#view    systemview    included   .1.3.6.1.2.1.25.1.1
view    all           included   .1

#access  notConfigGroup ""      any       noauth    exact  all    none none
access  notConfigGroup ""       usm       priv      exact  all    none none


syslocation Caledon, ON
syscontact Leif Madsen lmadsen@shifteight.org


#rwuser initial

master agentx
agentXSocket /var/agentx/master
agentXPerms 0660 0775 nobody root

sysObjectID .1.3.6.1.4.1.22736.1
Note
You’ll also notice we’ve commented
out the rwuser initial line as
we no longer need to permit full read/write access to the SNMP
daemon. Permitting read/write access to the initial user is only necessary when
making changes using the snmpusm
application.
On the group line, we’ve
configured the system to use usm
(the User-based Security Model) and permitted the opennmsUser to connect. We control how it
can connect with the access line,
where we’ve enabled access via the notConfigGroup using usm and the priv model, which makes sure we connect
using both authentication and privacy settings. These in turn make
sure that we authenticate securely and transmit data encrypted.
After modifying the /etc/snmp/snmpd.conf file, restart the SNMP
daemon one last time:
$sudo /etc/init.d/snmpd restart
Then verify that you can still access data via snmpwalk:
$sudo snmpwalk -v 3 -u opennmsUser -n "" -l authPriv \ -a MD5 -A 0p3nNMSv3 \ -x DES -X 0p3nNMSv3 \ localhost ifTable
and that Asterisk is still able to connect via AgentX with snmpwalk:
$sudo snmpwalk -v 3 -u opennmsUser -n "" -l authPriv \ -a MD5 -A 0p3nNMSv3 \ -x DES -X 0p3nNMSv3 \ localhost .1.3.6.1.4.1.22736
If all goes well, you should get lots of lines back, including:
SNMPv2-SMI::enterprises.22736.1.5.4.1.2.1 = STRING: "SIP"
SNMPv2-SMI::enterprises.22736.1.5.4.1.2.2 = STRING: "IAX2"
SNMPv2-SMI::enterprises.22736.1.5.4.1.2.3 = STRING: "Bridge"
SNMPv2-SMI::enterprises.22736.1.5.4.1.2.4 = STRING: "MulticastRTP"
SNMPv2-SMI::enterprises.22736.1.5.4.1.2.5 = STRING: "DAHDI"
SNMPv2-SMI::enterprises.22736.1.5.4.1.2.6 = STRING: "Local"
SNMPv2-SMI::enterprises.22736.1.5.4.1.3.1 = STRING: "Session Initiation Protocol(SIP)"
SNMPv2-SMI::enterprises.22736.1.5.4.1.3.2 = STRING: "Inter Asterisk eXchange Driver"
SNMPv2-SMI::enterprises.22736.1.5.4.1.3.3 = STRING: "Bridge Interaction Channel"
SNMPv2-SMI::enterprises.22736.1.5.4.1.3.4 = STRING: "Multicast RTP Paging Channel"
SNMPv2-SMI::enterprises.22736.1.5.4.1.3.5 = STRING: "DAHDI Telephony Driver"
SNMPv2-SMI::enterprises.22736.1.5.4.1.3.6 = STRING: "Local Proxy Channel Driver"
If
you don’t get data returned right away, it could be because the
Asterisk res_snmp.so module has
not reconnected to the SNMP daemon. You can force this either by
restarting Asterisk, or by unloading and reloading the res_snmp.so module from the Asterisk
CLI.
Once you’ve installed
OpenNMS and configured Asterisk with the res_snmp module, you can use OpenNMS to monitor your
Asterisk server. You can
configure what statistics are monitored, as well as what notifications
you would like to receive based on those statistics. Exploring the
capabilities of OpenNMS is left as an exercise for the reader. However,
we have included a few graphs to demonstrate some of the basic
information you can collect from an Asterisk server. These graphs come
from an Asterisk server that is
not very heavily loaded, but they still give a good indication of what
you might see.
Figure 24.1, “Graph of active Asterisk channels” contains a graph of how many channels were active in Asterisk at different times.
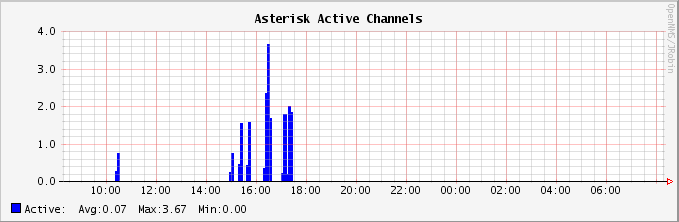
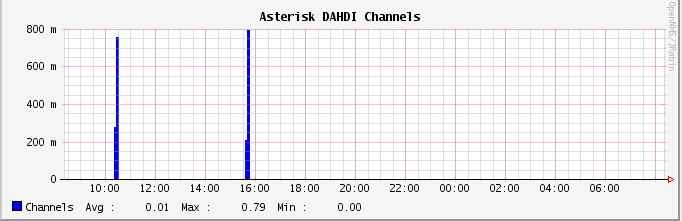
Figure 24.2, “Graph of active DAHDI channels” shows a graph of active channels of a specific type. In this case, we’re looking at how many DAHDI channels are active on the system. Monitoring DAHDI channels is particularly interesting, since DAHDI channels are generally mapped to physical resources, and a predefined number of channels are available. It would be very useful to monitor DAHDI channel utilization and get notified when usage passes a particular threshold, as this might be a signal that additional capacity needs to be added.
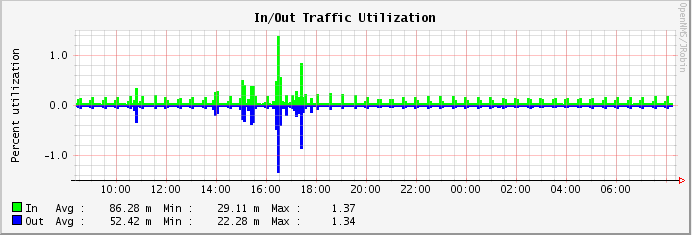
Finally, Figure 24.3, “Graph of traffic on a network interface” shows network interface utilization. As you can see, there were spikes in the traffic flowing into and out of the system when SIP calls were in progress.
[173] OpenNMS is certainly not the only platform that could be used
with the res_snmp module. However,
we chose to discuss it here for a number of reasons. First, OpenNMS is
a very good network management platform that has Asterisk-specific
integration. Second, it’s open source and 100% free. Lastly, Jeff
Gehlbach of OpenNMS has contributed to the development of Asterisk,
most notably making significant improvements to the SNMP support. He
was also nice enough to help us get all of this stuff working so that
we could document it.
[174] Additionally, you can find a blog post on enabling SNMPv3 for OpenNMS at http://www.opennms.org/wiki/SNMPv3_protocol_configuration.
[175] USM means User-based Security Model.