Now that we’ve got Asterisk installed, we can get our system up and running. The purpose here is to get Asterisk loaded up and ready to go, as it isn’t doing anything useful yet. These are the steps that all system administrators will need to start out with when installing a new system. If the commands that need to be run differ on CentOS and Ubuntu, you will see a table with rows labeled for each distribution; otherwise, you will see a single command that should be run regardless of which Linux distribution you have chosen.
Note
This section applies only to CentOS users, so if you’re using Ubuntu, you can skip to the next section.
In CentOS, the Security-Enhanced Linux (SELinux) system is enabled by default, and it often gets in the way of Asterisk. Sometimes the issues are quite subtle, and at least one of the authors has spent a good number of hours debugging issues in Asterisk that turned out to be resolved by disabling SELinux. There are many articles on the Internet that describe the correct configuration of SELinux, but we’re going to disable it for the sake of simplicity.
Note
While disabling SELinux is not the ideal situation, the configuration of SELinux is beyond the scope of this book, and frankly, we just don’t have enough experience with it to configure it correctly.
To temporarily switch off SELinux, perhaps in order to verify whether an issue you’re having is being caused by SELinux, run the following command as root:
$ sudo echo 0 > /selinux/enforceYou can reenable SELinux by doing the same thing, but replacing the 0 with a 1:
$ sudo echo 1 > /selinux/enforceTo disable SELinux permanently, modify
the /etc/selinux/config file:
$cd /etc/selinux/$sudo vim config
Change the SELINUX option from
enforcing to disabled.
Note
Alternatively, you can change the value
of enforcing to permissive,
which simply logs the errors instead of enforcing the policy.
When you’re done modifying the configuration file, you’ll have the following:
# This file controls the state of SELinux on the system.
# SELINUX= can take one of these three values:
#       enforcing - SELinux security policy is enforced.
#       permissive - SELinux prints warnings instead of enforcing.
#       disabled - SELinux is fully disabled.
SELINUX=disabled
# SELINUXTYPE= type of policy in use. Possible values are:
#       targeted - Only targeted network daemons are protected.
#       strict - Full SELinux protection.
SELINUXTYPE=targeted

# SETLOCALDEFS= Check local definition changes
SETLOCALDEFS=0
Since you can’t disable SELinux without rebooting, you’ll need to do that now:
$ sudo rebootIn order to get Asterisk up and running cleanly, we need to create some configuration files. We could potentially install the sample files that come with Asterisk (by executing the make samples command in our Asterisk source) and then modify those files to suit our needs, but the make samples command installs many sample files, most of them for modules that you will never use. We want to limit which modules we are loading, and we also believe that it’s easier to understand Asterisk configuration if you build your config files from scratch, so we’re going to create our own minimal set of configuration files.[34]
The first thing we need to do (assuming
it does not already exist) is create the
/etc/asterisk/ directory where our configuration
files will live:
$sudo mkdir /etc/asterisk/$sudo chown asteriskpbx:asteriskpbx /etc/asterisk/
Warning
Running make samples on a system that already has configuration files will overwrite the existing files.
We’re now going to step through all the files that are required to get a simple Asterisk system up and running.
The first file needed is
indications.conf, a file that contains
information about how to detect different telephony tones for
different countries. There is a perfectly good sample file that we can
use in the Asterisk source, so let’s copy it into our
/etc/asterisk/ directory:
$ cp ~/src/asterisk-complete/asterisk/1.8/configs/indications.conf.sample \
/etc/asterisk/indications.conf
Because we’re running Asterisk as
non-root, we need to tell Asterisk which user to run as. This is done
with the asterisk.conf file. We can copy a sample
version of it from the Asterisk source to
/etc/asterisk:
$ cp ~/src/asterisk-complete/asterisk/1.8/configs/asterisk.conf.sample \
/etc/asterisk/asterisk.conf
The asterisk.conf
file contains many options that we won’t go over here (they are
covered in the section called “asterisk.conf”), but
we do need to make an adjustment. Near the end of the
[options] section, there are two options we need to
enable: runuser and
rungroup.
Open the
asterisk.conf file with an editor such as
nano or vim: Uncomment the
runuser and rungroup lines, and
modify them so that they each contain
asteriskpbx as the assigned value. Open the
/etc/asterisk/asterisk.conf file with vim:
$ vim /etc/asterisk/asterisk.confThen modify the file by uncommenting the two lines starting with
runuser and rungroup and
modifying the value to
asteriskpbx
runuser=asteriskpbx
rungroup=asteriskpbx
We now have all the configuration files required to start a very minimal version of Asterisk.[36] Give it a shot by starting Asterisk up in the foreground:
$ /usr/sbin/asterisk -cvvvTip
We are specifying the full path to
the asterisk binary, but if you modify your
PATH system variable to include the
/usr/sbin/ directory you don’t need to specify
the full path. See the section called “Adding a system user” for
information about modifying the $PATH environment
variable.
Asterisk will start successfully without any errors or warnings (although it does warn you that some files are missing), and present to you the Asterisk command-line interface (CLI). At this point there are no modules, minimal core functionality, and no channel modules with which to communicate, but Asterisk is up and running.
Executing the module show command at the Asterisk CLI shows that there are no external modules loaded:
*CLI> module showModule Description Use Count 0 modules loaded
We’ve done this simply to demonstrate that Asterisk can be run in a very minimal state, and doesn’t require the dozens of modules that a default install will enable. Let’s stop Asterisk with the core stop now CLI command:
*CLI> core stop nowSo, we’ve managed to get Asterisk running, but it’s not
able to do anything useful for us yet. To tell Asterisk what modules
we expect it to load, we’ll need a modules.conf
file.
Create the file
modules.conf in your
/etc/asterisk/ directory with the following
command (replace the >> with > if you instead want to
overwrite an existing file):
$ cat >> /etc/asterisk/modules.confType (or paste) the following lines, and press Ctrl+D on a new line when you’re finished:
          ; The modules.conf file, used to define which modules Asterisk should load (or
; not load).
;
[modules]
autoload=yes
The autoload=yes
line will tell Asterisk to automatically load all modules located in
the /usr/lib/asterisk/modules/ directory. If you
wanted to, you could leave the file like this, and Asterisk would
simply load any modules it found in the modules
folder.
With your new
modules.conf file in place, starting Asterisk
will cause a whole slew of modules to be loaded. You can verify this
by starting Asterisk and running the module show
command:
$asterisk -c*CLI>module show
Module                         Description                              Use Count
res_speech.so                  Generic Speech Recognition API           0
res_monitor.so                 Call Monitoring Resource                 0
...
func_math.so                   Mathematical dialplan function           0
171 modules loaded
We now have many modules loaded, and
many additional dialplan applications and functions at our disposal.
We don’t need all these resources loaded, though, so let’s filter out
some of the more obscure modules that we don’t need at the moment.
Modify your modules.conf file to contain the
following noload lines, which will tell Asterisk to
skip loading the identified modules:
; Resource modules
noload => res_speech.so
noload => res_phoneprov.so
noload => res_ael_share.so
noload => res_clialiases.so
noload => res_adsi.so

; PBX modules
noload => pbx_ael.so
noload => pbx_dundi.so

; Channel modules
noload => chan_oss.so
noload => chan_mgcp.so
noload => chan_skinny.so
noload => chan_phone.so
noload => chan_agent.so
noload => chan_unistim.so
noload => chan_alsa.so

; Application modules
noload => app_nbscat.so
noload => app_amd.so
noload => app_minivm.so
noload => app_zapateller.so
noload => app_ices.so
noload => app_sendtext.so
noload => app_speech_utils.so
noload => app_mp3.so
noload => app_flash.so
noload => app_getcpeid.so
noload => app_setcallerid.so
noload => app_adsiprog.so
noload => app_forkcdr.so
noload => app_sms.so
noload => app_morsecode.so
noload => app_followme.so
noload => app_url.so
noload => app_alarmreceiver.so
noload => app_disa.so
noload => app_dahdiras.so
noload => app_senddtmf.so
noload => app_sayunixtime.so
noload => app_test.so
noload => app_externalivr.so
noload => app_image.so
noload => app_dictate.so
noload => app_festival.so
There are, of course, other modules
that you could remove, and others that you may find extremely useful,
so feel free to tweak this file as you wish. Ideally, you should be
loading only the modules that you need for the system you are running.
The examples in this book assume that your
modules.conf file looks like our example
here.
Additional information about the
modules.conf file can be found in the section
the section called “modules.conf”.
The musiconhold.conf file defines
the classes for music on hold in your Asterisk system. By defining
different classes, you can specify different hold music to be used in
various situations, such as different announcements to be played while
holding in a queue, or different hold music if you have multiple PBXs
hosted on the same system. For now, we’ll just create a default music
on hold class so that we have at a minimum some hold music when
placing callers on hold:
$cd /etc/asterisk/$cat >> musiconhold.conf
; musiconhold.conf
[default]
mode=files
directory=moh

Ctrl+D
We’ve created a
musiconhold.conf file and defined our
[default] hold music class. We’re also assuming you
installed the hold music from the menuselect
system; by default there is at least one music on hold package
installed, so unless you disabled it, you should have music in at
least one format.
Additional information about
musiconhold.conf can be found in the section
the section called “musiconhold.conf”.
menuselect is a text-based menu system in Asterisk used to configure which modules to compile and install. The modules are what give Asterisk its power and functionality. New modules are constantly being created.
In the installation sections, we conveniently skipped over using the menuselect system in order to keep the instructions simple and straightforward. However, it is important enough that we have given menuselect its own section.
In addition to specifying which modules to install, menuselect also allows you to set flags that can aid in debugging issues (see Chapter 2, Asterisk Architecture), set optimization flags, choose different sound prompt files and formats, and do various other nifty things.
We would need a whole chapter in order to fully explore menuselect, and for the most part you won’t need to make many changes to it. However, the following example will give you an idea of how menuselect works, and is recommend for any installation.
By default Asterisk only installs the core sound prompt files, and
only in GSM format. Also, the three OpSound music on hold files
available for download are only selected in .wav
format.[37]
We’re going to want extra sound prompts installed instead of just the default core sound prompts, and in a better-sounding format than GSM. We can do this with the menuselect system by running make menuselect in the Asterisk source directory. Before exploring that, though, let’s talk about the different menuselect interfaces.
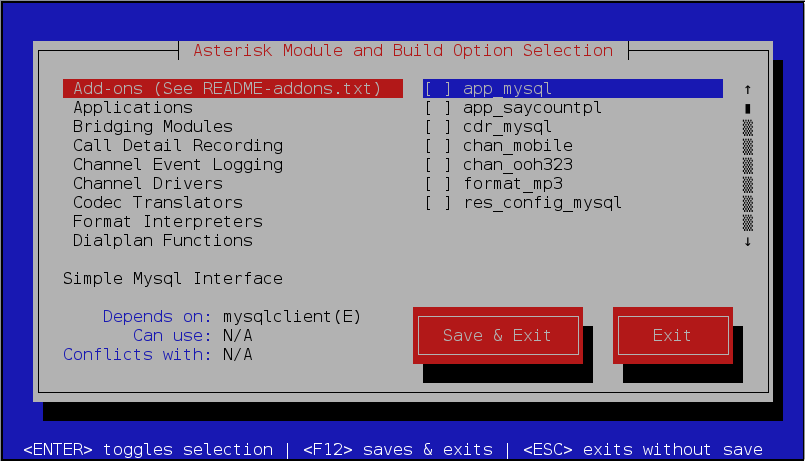
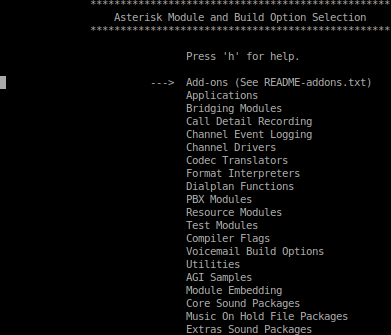
There are two interfaces available for
menuselect: curses and newt. If the
libnewt libraries are installed, you will get the
blue and red interface shown in Figure 3.1, “menuselect using the newt interface”.
Otherwise, by default menuselect will use the
curses (black and white) interface shown in Figure 3.2, “menuselect using the curses interface”.
Tip
The minimum screen size for the curses interface is 80x27, which means it may not load if you’re using the default terminal size for a simple distribution installation. This is not a problem when you’re using SSH to reach the server remotely, as typically your terminal can be resized, but if you’re working at the terminal directly you may need to have screen buffers installed to enable a higher resolution, which is not recommended for a system running Asterisk. The solution is to use the newt-based menuselect system.
Run the following commands to start menuselect:
$cd ~/src/asterisk-complete/asterisk/1.8.$<your version>/make menuselect
You will be presented with a screen such as that in Figure 3.1, “menuselect using the newt interface” or Figure 3.2, “menuselect using the curses interface”. You can use the arrow keys on your keyboard to move up and down. The right arrow key will take you into a submenu, and the left arrow key will take you back. You can use the space bar or Enter key to select and deselect modules. Pressing the q key will quit without saving, while the x key will save your selections and then quit.
Once you’ve started
menuselect, scroll down to Core Sound
Packages and press the right arrow key (or
Enter) to open the menu. You will be presented with a
list of available options. These options represent the core sound
files in various languages and formats. By default, the only set of
files selected is CORE-SOUNDS-EN-GSM, which is the
English-language Core Sounds package in GSM format.
Select
CORE-SOUNDS-EN-WAV and
CORE-SOUNDS-EN-ULAW (or ALAW if
you’re outside of North America or Japan[39]), and any other sound files that may be applicable in
your network.
Note
The reason we have multiple formats for the same files is that Asterisk can play back the appropriate format depending on which codec is negotiated by an endpoint. This can lower the CPU load on a system significantly.
After selecting the appropriate sound
files, press the left arrow key to go back to the
main menu. Then scroll down two lines to the Extra Sound
Packages menu and press the right arrow key
(or Enter). You will notice that by default there are
no packages selected. As with the core sound files, select the
appropriate language and format to be installed. A good option is
probably to install the English sound files in the
WAV, ULAW, and
ALAW formats.
Once you’ve completed selecting the sound files, press the x key to save and exit menuselect. You then need to install your new prompts by downloading them from the Asterisk downloads site. This is done simply by running make install again:
$sudo make install$sudo chown -R asteriskpbx:asteriskpbx /var/lib/asterisk/sounds/
The files will be downloaded,
extracted, and installed into the appropriate location (/var/lib/asterisk/sounds/<language>/
by default). Your Asterisk server will need to have a working Internet
connection in order to retrieve the files.
Administrators often build tools when performing installations on several machines, and Asterisk is no exception. If you need to install Asterisk onto several machines, you may wish to build a set of scripts to help automate this process. The menuselect system contains command-line options that you can use to enable or disable the modules that are built and installed by Asterisk.
If you are starting with a fresh checkout of Asterisk, you must first execute the configure script in order to determine what dependencies are installed on the system. Then you need to build the menuselect application and run the make menuselect-tree command to build the initial tree structure:
$cd ~/src/asterisk-complete/asterisk/1.8.$<your version>/./configure$cd menuselect$make menuselect$cd ..$make menuselect-treeGenerating input for menuselect ...
For details about the options available, run menuselect/menuselect --help from the top level of your Asterisk source directory. You will be returned output like the following:
Usage: menuselect/menuselect [--enable <option>] [--disable <option>]
   [--enable-category <category>] [--enable-all]
   [--disable-category <category>] [--disable-all] [...]
   [<config-file> [...]]
Usage: menuselect/menuselect { --check-deps | --list-options
   | --list-category <category> | --category-list | --help }
   [<config-file> [...]]
The options displayed can then be used to control which modules are installed via the menuselect application. For example, if you wanted to disable all modules and install a base system (which wouldn’t be of much use) you could use the command:
$ menuselect/menuselect --disable-all menuselect.makeoptsIf
you then look at the menuselect.makeopts file,
you will see a large amount of text that displays all the modules and
categories that have been disabled. Let’s say you now want to enable
the SIP channel and the Dial() application.
Enabling those modules can be done with the following command, but
before doing that look at the current
menuselect.makeopts (after disabling all the
modules) and locate app_dial in the
MENUSELECT_APPS category and
chan_sip in the
MENUSELECT_CHANNELS category. After executing the
following command, look at the
menuselect.makeopts file again, and you will see
that those modules are no longer listed:
$ menuselect/menuselect --disable-all --enable chan_sip \
--enable app_dial menuselect.makeopts
Tip
The modules listed in the
menuselect.makeopts file are those that will not be built—modules that
are not listed will be built when the make
application is executed.
You can then build the
menuselect.makeopts file in any way you want by
utilizing the other commands, which will allow you to build custom
installation scripts for your system using any scripting language you
prefer.
[34] If your /etc/asterisk/ folder has files
in it already, move those files to another directory, or delete them
if you are sure you don’t need what is there.
[35] /usr/src/asterisk-complete/asterisk/asterisk-1.8.<your
version>/
[36] So minimal, in fact, that it’s completely useless at this point. But we digress.
[37] A good way to put the final touches on your new system is to install some appropriate sound files to be used as music on hold. There are only three songs installed by default, and callers will quickly tire of listening to the same three songs over and over again. We’ll discuss this more in the section called “musiconhold.conf”.
[38] Which we will cover in Chapter 16, Relational Database Integration, along with many other cool things.
[39] If you want to understand all about mu-law and A-law, you can read the section the section called “Logarithmic companding”. All you need to know here is that outside of North America and Japan, A-law is used.