In this section we’ll cover how to create the
sip.conf and iax.conf
configuration files in the /etc/asterisk/ directory,
which are used for defining the parameters by which SIP and IAX2 devices
can communicate with your system.
Note
Asterisk allows devices using many different protocols to speak to it (and therefore to each other). However, the SIP and IAX2 protocols are the most popular and mature VoIP modules, so we will focus our attention on them. For your first Asterisk build, you might be best off not bothering with the other protocols (such as Skinny/SCCP, Unistim, H.323, and MGCP), and getting comfortable working with SIP and IAX2 first. The configuration for the other protocols is similar, and the sample configuration files are full of information and examples, so once you have the basics down, other protocols should be fairly easy to work with.
The channel configuration
files, such as sip.conf and
iax.conf, contain the configuration for the channel
driver, such as chan_iax2.so or
chan_sip.so, along with the information and
credentials required for a telephony device to contact and interact with
Asterisk.
Common information about the channel
driver is contained at the top of the configuration file, in the
[general] section. All section names are encased in
square brackets, including device names. Anything that follows a section
name (or device definition, which for our purposes is essentially the same
thing) is applied to that section. The [general]
section can also contain information to define defaults for device
configurations, which are overridden in the section for each device, or in
a template. Asterisk also comes with defaults that are hardcoded, so while
some settings are mandatory, many other settings can be ignored as long as
you are happy with the defaults.
Tip
Asterisk will check for parameters in the following order:
This means that just because you didn’t specify a setting for a particular parameter doesn’t mean your device isn’t going to have a setting for that parameter. If you are not sure, set the parameter explicitly in the section of the configuration file that deals with that specific channel, or in the relevant template.
While we haven’t discussed Asterisk dialplans yet, it is
useful to be able to visualize the relationship between the channel
configuration files (sip.conf,
iax.conf) and the dialplan
(extensions.conf). The dialplan is the heart of an
Asterisk system: it controls how call logic is applied to any connection
from any channel, such as what happens when a device dials extension
101 or an incoming call from an external provider is
routed. Both the relevant channel configuration file and the
extensions.conf file play a role in most calls routed through the system.
Figure 5.1, “Relationship of sip.conf to extensions.conf” provides a graphical
representation of the relationship between the
sip.conf and extensions.conf
files.
When a call comes into Asterisk, the
identity of the incoming call is matched in the channel configuration
file for the protocol in use (e.g., sip.conf). The
channel configuration file also handles authentication and defines where
that channel will enter the dialplan.
Once Asterisk has determined how to
handle the channel, it will pass call control to the correct context in
the dialplan. The context parameter in the channel
configuration file tells the channel where it will enter the dialplan
(which contains all the information about how to handle and route the
call).
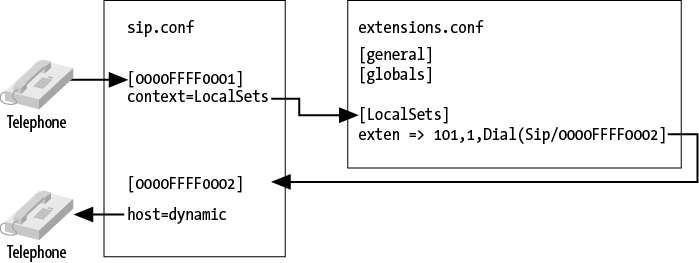
Conversely, if the dialplan has been
programmed to dial another device when the request for extension number
101 is being processed, a request to dial telephony
device 0000FFFF0002 will use the channel
configuration file to determine how to pass the call back out of the
dialplan to the telephone on the network (including such details as
authentication, codec, and so forth).
A key point to remember is that the channel configuration files control not only how calls enter the system, but also how they leave the system. So, for example, if one set calls another set, the channel configuration file is used not only to pass the call through to the dialplan, but also to direct the call from the dialplan to the destination.
The SIP[47] channel module is arguably the most mature and
feature-rich of all the channel modules in Asterisk. This is due to the
enormous popularity of the SIP protocol, which has taken over the
VoIP/telecom industry and been implemented in thousands of devices and
PBXs. If you look through the sip.conf.sample file
in the ./configs subdirectory of your Asterisk
source you will notice a wealth of options available. Fortunately, the
default options are normally all you need, and therefore you can create
a very simple configuration file that will allow most standard SIP
telephones to connect with Asterisk.
The first thing you need to do is
create a configuration file in your /etc/asterisk
directory called sip.conf.
Paste or type the following information into the file:
[general]
context=unauthenticated         ; default context for incoming calls
allowguest=no                   ; disable unauthenticated calls
srvlookup=yes                   ; enabled DNS SRV record lookup on outbound calls
udpbindaddr=0.0.0.0             ; listen for UDP requests on all interfaces
tcpenable=no                    ; disable TCP support

[office-phone](!)   ; create a template for our devices
type=friend         ; the channel driver will match on username first, IP second
context=LocalSets   ; this is where calls from the device will enter the dialplan
host=dynamic        ; the device will register with asterisk
nat=yes             ; assume device is behind NAT
                    ; *** NAT stands for Network Address Translation, which allows
                    ; multiple internal devices to share an external IP address.
secret=s3CuR#p@s5   ; a secure password for this device -- DON'T USE THIS PASSWORD!
dtmfmode=auto       ; accept touch-tones from the devices, negotiated automatically
disallow=all        ; reset which voice codecs this device will accept or offer
allow=ulaw          ; which audio codecs to accept from, and request to, the device
allow=alaw          ; in the order we prefer

; define a device name and use the office-phone template
[0000FFFF0001](office-phone)

; define another device name using the same template
[0000FFFF0002](office-phone)
Open the sip.conf
file you’ve just created, and we’ll go over each item.
We’ve created four sections, the first
one being the [general] section. This is a standard
section that appears at the top of the configuration file for all
channel modules, and must always be named in this way. The
[general] section contains general configuration
options for how that protocol relates to your system, and can be used to
define default parameters as well.
For example, we’ve defined the default
context as unauthenticated, to ensure
that we have explicitly declared where unauthenticated guest calls will
enter the dialplan (rather than leaving that to chance). We’ve named it
unauthenticated to make it obvious that calls
processed in this context are not trusted, and thus should not be able
to do things such as make outbound calls to the PSTN (which could
potentially cost money, or represent identity theft). You should be
aware that we could have used any name we wanted, and also that there
needs to be an identically named context in
extensions.conf to define the call flow for
unauthenticated calls.
The next option is
allowguest, which we’ve disabled as we don’t want to accept any
unauthenticated calls at this time. Keep in mind that for some channels
you may actually want to accept unauthenticated calls. A common use for
allowing unauthenticated calls is for companies that allow dialing by
uniform resource identifiers (URIs), like email addresses. If we wanted to allow customers to
call us from their phones without having to authenticate, we could
enable guest calls and handle them in the
unauthenticated context defined by the previous
option.
Note
You may be wondering why you might
ever want to allow unauthenticated calls. The reason is that if you publish your SIP URI on your
business cards (e.g., sip:leif.madsen@shifteight.org),
calls to that URI will fail if your unauthenticated context simply
hangs up. What you want instead is for your unauthenticated context to
put incoming calls into a controlled environment. You may wish to
allow the calls, but you won’t necessarily trust them.[48]
The
srvlookup option is used to enable Asterisk to perform a lookup via
a DNS SRV record, which is typically used for outbound connections to
service providers. We’ll talk more about Asterisk and DNS in Chapter 12, Internet Call Routing.
The
udpbindaddr[49]option takes the value of an IP address or
0.0.0.0 to tell Asterisk which network interface it
should listen to for requests carried by the UDP network transport
protocol (which is the protocol that actually carries the voice
channels). By defining 0.0.0.0, we’re instructing the
channel driver to listen on all available interfaces. Alternatively, we
could limit VoIP connections for this protocol to a single interface by
defining the IP address of a specific network interface on our
system.
Warning
Currently in Asterisk the
udpbindaddr and
tcpbindaddr options are an all-or-one proposition. In other words,
if you have three NICs in your system, you can’t restrict VoIP traffic
to two of them: it’s either one only, or all of them.
The
tcpenable option allows us to accept requests via the TCP network
transport protocol. For now we’ve disabled it, as the UDP method is
currently more mature (and more popular) and we’re attempting to
eliminate as many barriers as possible. Having said that, feel free to
test TCP support once you’re comfortable configuring your devices.
Note
There are also
tlsenable and
tlsbindaddr options for enabling SIP over TLS (encrypted SIP).
We’ll cover the configuration of SIP with TLS in Chapter 7, Outside Connectivity.
The next section we’ve defined is a
template we have chosen to name [office-phone](!).
We’ve created it as a template so that we can use the values within it
for all of our devices.
Tip
Following the section name with
(!) tells Asterisk to treat this section as a template. By
doing this we eliminate the need to repetitively add and change
configuration options for every device we choose to define. Templates
are extremely useful and are available in all of Asterisk’s
configuration files. If you want to change something for an individual
device that was previously defined in the template for that device,
you can do that under the section header, and it will override what
was defined by the template. It is not necessary to use templates, but
they are extremely handy, and we use them extensively.
In the
[office-phone] template we’ve defined several options required
for authentication and control of calls to and from devices that use
that template. The first option we’ve configured is the
type, which we’ve set to friend.
This tells the channel driver to attempt to match on name first, and
then IP address.
When a request from a telephone is
received and authenticated by Asterisk, the requested extension number
is handled by the dialplan in the context defined in
the device configuration; in our case, the context named
LocalSets.
The host option is used when we need to send a request to the
telephone (such as when we want to call someone). Asterisk needs to know
where the device is on the network. By defining the value as
dynamic, we let Asterisk know that the telephone will
tell us where it is on the network instead of having its location
defined statically. If we wanted to define the address statically, we
could replace dynamic with an IP address such as
192.168.128.30.
The nat option is used to tell Asterisk to enable some tricks to
make phone calls work when a SIP phone may be located behind a NAT. This
is important because the SIP protocol includes IP addresses in messages.
If a phone is on a private network, it may end up placing private
addresses in SIP messages, which are often not useful.
The password for the device is defined
by the secret parameter. While this is not strictly required, you
should note that it is quite common for unsavory folks to run phishing
scripts that look for exposed VoIP accounts with insecure passwords and
simple device names (such as a device name of 100
with a password of 1234). By utilizing an uncommon
device name such as a MAC address, and a password that is a little
harder to guess, we can significantly lower the risk to our system
should we need to expose it to the outside world.
Tip
You can generate a secure password using one of several password generators available on the Internet and on your operating system. Here is a simple script that you can run at your console to generate one:
          $
          dd if=/dev/random count=1 bs=8 2>/dev/null | base64 | sed -e 's/=*$//'
Warning
Do not use the password we have defined in the example. This book will be available online and can be downloaded by anyone, and that particular password is almost certain to become one of the first passwords added to the list employed by VoIP phishing scripts in brute-force password attacks. If your SIP ports are exposed to the Internet and you use simple passwords, rest assured that you will eventually be defrauded.
The
dtmfmode option is used to define which DTMF (touch-tone) format
Asterisk should expect to be sent by the telephone. The four options
are: info, inband,
rfc2833, and auto. The
info value means to use the SIP INFO method,
inband is for inband audio tones, and
rfc2833 is for the out-of-band method defined by that
RFC. Using auto allows Asterisk to automatically
determine which DTMF mode to use (it prefers rfc2833
if available).
The last two options,
disallow and allow (sip.conf), are used to
control which audio codecs are accepted from and offered to the
telephone. By defining disallow=all first, we’re
telling Asterisk to reset any previously defined codec definitions in
the [general] section (or the internal defaults);
then we explicitly declare which codecs we’ll accept (and the order we
prefer). In our example we’ve enabled both ulaw and
alaw, with ulaw most preferred (if
you are outside of Canada or the US, you’ll likely want to declare
alaw first).
Now that we’re finished with our
template, we can define our device names and, utilizing the
office-phone template, greatly simplify the amount of
details required under each device section. The device name is defined
in the square brackets, and the template to be applied is defined in the
parentheses following the device name. We can add additional options to
the device name by specifying them below the device name:
[0000FFFF0003](office-phone) ; template must be on same line and no space between
secret=@N0th3rP4S5
allow=gsm
As far as the SIP module in Asterisk can tell, it will end up reading this in as if it was a section defined like this, which is a configuration section with all of the options specified from the template first:
[0000FFFF0003]

;
; These options came from the template section.
;
type=friend
context=LocalSets
host=dynamic
nat=yes
secret=s3CuR#p@s5
dtmfmode=auto
disallow=all
allow=ulaw
allow=alaw

;
; These options came from the specific section.
;
secret=@N0th3rP4S5 ; Overrides the secret from the template
allow=gsm          ; Adds gsm to the list of allowed codecs
Note that if you specify an option that was also specified in the
template, the module will see that option twice. For most options, it
will override the value in the template, but for some, such as
type, allow, and
disallow, it will not.
IAX2 stands for the Inter-Asterisk eXchange protocol, version 2. It was originally developed to connect Asterisk systems together across different physical networks, and especially those behind firewalls and NAT devices. IAX2 was designed to limit the number of ports required to carry VoIP calls across a firewall, and to easily traverse networks that employed NAT devices (which historically have been problematic for the SIP protocol). As Asterisk has developed over the years, the IAX2 protocol has matured. It was standardized in an IETF RFC in 2009,[50] but IAX2 has not become popular with hardware vendors, possibly due to the relative recency of the RFC, and certainly due to the fact that SIP is far and away the most recognized VoIP protocol in terms of mind-share (i.e., nontechnical folks have probably heard of SIP). IAX2, however, has advantages that make it a protocol worth discussing.
One of the primary advantages of IAX is single-port firewall penetration. All traffic, including signaling and audio data, is transferred over a single UDP port (4569), which can greatly simplify securing the VoIP network.[51]
Another advantage is IAX2 trunking, which encapsulates packets for several voice frames into the same datagram using a single IAX2 header. The benefit of this is a reduction in the amount of overhead required to send many simultaneous calls between two endpoints. The amount of bandwidth saved with IAX2 trunking when sending just a couple of calls between locations is pretty insignificant, but when you start scaling to the size of dozens or hundreds of calls, the savings can be substantial.
For now, we’re only interested in the
minimal configuration required to get our IAX2 endpoints talking to each
other, so let’s explore what we need to configure in
iax.conf to do so.
First, we need to create our
iax.conf file in the
/etc/asterisk configuration directory and add the
following configuration information to the file:
[general]
autokill=yes   ; don't stall for a long time if other endpoint doesn't respond
srvlookup=yes  ; enable DNS SRV lookups for outbound calls

[office-phone](!)    ; template for IAX-based office phones
type=friend          ; Asterisk will allow calls to and from this phone
host=dynamic         ; inform Asterisk that the phone will tell us where
                     ;   it is on the network
secret=my5UP3rp@s5!  ; a secure password -- which means DON'T USE THIS ONE!
context=LocalSets    ; the context where incoming requests will enter the dialplan
disallow=all         ; reset the available voice codecs
allow=ulaw           ; prefer the ulaw codec
allow=alaw           ; but also allow the alaw codec

[0000FFFF0004](office-phone) ; define our first phone with the office-phone template

[0000FFFF0005](office-phone) ; define another phone with our office-phone template
Let’s go over the options we added to
this file, starting first with the [general] section.
This is where we define our default configuration, our global options,
and our general channel driver setup. There are many options we can
define here, and we encourage you to check out the
iax.conf.sample file in the
configs directory of your Asterisk source,[52] but since we’re looking for a straightforward
configuration, we’re going to allow many of the default options to be
applied.
One option we have added is
autokill, which is used to instruct the
chan_iax2.so channel driver not to wait around too
long on stalled connections. Also,
srvlookup has been enabled to allow DNS SRV lookups for outgoing
calls.
The next section we’ve defined is named
[office-phone](!), which is a template that contains
the options we’ll apply to our IAX phones and the authentication
information required for communication between the phones and
Asterisk.
Tip
As mentioned in the preceding
section, following the section name with (!) tells
Asterisk to treat this section as a template. Templates are useful, so
use them(!).
The first option we’ve configured in
our template is the type. We’ve defined the
type to be friend, which informs
Asterisk that we plan on placing calls to the phone and that we expect
to receive requests (calls) from the phone.
Note
The other two types are
user and peer. In IAX2, a
friend is a combination of both a
user and a peer, which is common
for telephones because we expect to send calls to them, and to receive
requests for placing calls from them. We could alternatively define
two separate sections with the same name with types of
user and peer, and then define
only the required information for each of those types; or if we only
ever expected to send calls to or place calls using a section (such as
in the case of an inbound- or outbound-only service provider), we
would define it as only either a user or a
peer. However, in the vast majority of cases, just
utilizing the type of friend is
the most logical choice.
Note the difference between the
meaning of the type option in
iax.conf versus sip.conf
(see the sidebar SIP Configuration Matching and the type Option). In
iax.conf, the meaning is much simpler: it only
has to do with the direction of the phone calls.
Following the type
option, we’ve set host to dynamic,
which means the phone will register with us to identify where it exists
on the network (so that we know where to send its calls). Alternatively,
we could statically define an IP address such as
192.168.128.50 where all calls will be sent to and
accepted from. This will only work if the device will always have the
same IP address.
The next option is
secret, which defines the password.
Warning
You should make sure you are
implementing a secure password here, especially if you plan on opening
your system up to the outside world at all. Do not use something
stupid such as 1234, or you’ll regret it. No,
seriously. We’re not kidding. Not even in the lab.
The number of successful attacks on VoIP-enabled telephone systems (not just Asterisk) is on the rise, and will continue to get worse. Commonly, successful intrusions are due to weak passwords. If you get in the habit of using strong passwords now, you’ll have that much more protection in the future.
Tip
You can generate a complex password using a password generator like those available on the Internet and on your operating system. Here is a simple script that you can run at the Linux shell prompt to generate a string that’ll be suitable as a password:
$ddif=/dev/random count=1 bs=8 2>/dev/null | base64 | sed -e 's/=*$//'
Warning
Do not use the password we have defined in the example. You can be sure that shortly after this book is published, that will be one of the first passwords a brute-force bot will try to use on your system.
The
context option defines the context at which this channel will
enter the dialplan. When a call is placed by a telephone and the request
is received by Asterisk, it is handled by the logic defined in the
context configured here within the dialplan
(extensions.conf).
Following that are the
disallow and allow options. These define the codecs that will be allowed for
this channel (in order of preference). The directive
disallow=all resets any default codecs that may have
been permitted in the [general] section (or as part
of the channel defaults). Then, we define the specific codecs we wish to
permit with allow.
Note
If we wanted to use specific codecs for one of our devices, we could define that codec within the device configuration section for that channel simply by adding it below the device section header:
[0004F2FF0006](office-phone)
disallow=all ; Clear previous codec settings.
allow=gsm    ; Allow only gsm.
Our examples so far have been based on hypothetical device
names. To create actual channels based on whatever you have in your
environment, you will want to change the device names in your
sip.conf and iax.conf files to
something that makes more sense.
For example, if you have a Polycom IP
430 set with a MAC address of 0004f2119698, you’ll
want to define a device identifier in sip.conf for
that device:
[0004f2119698](office-phone)
If you have an IAX softphone on your PC that you wish to use, your
iax.conf file may want something like this:
[001b63a28ccc](office-phone) ; you could have a comment like Leif's Laptop
Remember that you can name your devices anything you want. Asterisk doesn’t care, but for ease of management, make sure you choose a naming convention that is logical, scalable, and sustainable.
[47] The SIP RFC is a long read, but about the first 25 pages are a good introduction. Check it out at http://www.ietf.org/rfc/rfc3261.txt.
[48] The whole concept of security and trust on a VoIP network is something that can become quite complex. Spammers are already hard at work figuring out this technology, and you need to be aware of the concepts. We’ll cover this in more depth later in the book, such as in Chapter 7, Outside Connectivity and Chapter 26, Security.
[49] The complement to this option is
tcpbindaddr, used for listening for requests
carried via the TCP network transport protocol.
[51] SIP, which has separate signaling and voice data protocols and
ports, requires port 5060 for signaling, and at least two RTP ports
for every active call for voice. By default, Asterisk uses ports
5060 for SIP and 10,000 through 20,000 for RTP, although that can be
tuned with the rtp.conf file.
[52] We also encourage you to read the section called “sip.conf” in this chapter, as it contains many concepts that apply equally to other Asterisk configuration files.